
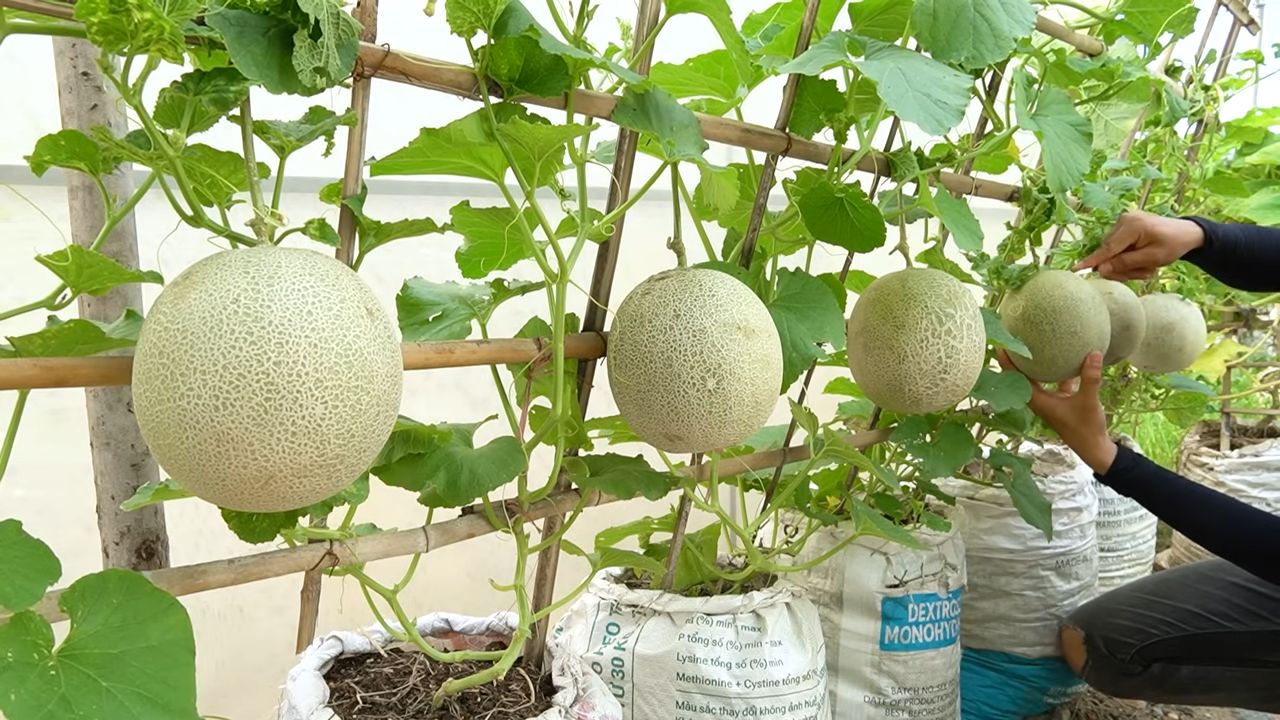
Growing cantaloupes in bags might sound a little unconventional, but trust me, it’s a game-changer for home gardeners like us! Forget sprawling vines taking over your precious garden space. We’re about to unlock a secret to juicy, delicious cantaloupes, even if you’re short on room or dealing with less-than-ideal soil.
For centuries, gardeners have sought innovative ways to cultivate their favorite fruits and vegetables. While traditional in-ground planting has its merits, the rise of container gardening, including methods like growing cantaloupes in bags, reflects our modern desire for efficiency and control. Think of it as a miniature, personalized melon patch right at your fingertips!
Why should you try this DIY trick? Well, for starters, it’s perfect for apartment dwellers with balconies or anyone with limited garden space. Plus, it allows you to create the ideal growing environment, controlling soil quality, drainage, and even sunlight exposure. No more battling weeds or worrying about poor soil conditions! This method also offers protection from soilborne pests and diseases, leading to healthier, more productive plants. Imagine biting into a perfectly ripe, homegrown cantaloupe, knowing you nurtured it from seed to sweet success – all within the confines of a simple bag. Let’s dive in and discover how to make this happen!
Growing Cantaloupes in Bags: A Sweet Success Story!
Hey there, fellow gardening enthusiasts! I’m so excited to share my experience growing cantaloupes in bags. Yes, you read that right! Forget sprawling vines taking over your garden; we’re going vertical (sort of) and contained. This method is perfect if you’re short on space, have poor soil, or just want to try something a little different. Trust me, the juicy, homegrown cantaloupe you’ll get is worth the effort!
Why Grow Cantaloupes in Bags?
Before we dive into the how-to, let’s talk about why this method rocks:
* Space Saver: Cantaloupes are notorious for their sprawling vines. Growing them in bags keeps them contained and manageable, ideal for balconies, patios, or small gardens.
* Soil Control: You get to choose the perfect soil mix for your cantaloupes, ensuring they get the nutrients they need. No more battling with poor native soil!
* Pest and Disease Management: Bags can help isolate your plants, making it easier to monitor and control pests and diseases.
* Earlier Harvest: The soil in bags tends to warm up faster than in the ground, giving your cantaloupes a head start.
* Portability: Need to move your plants to chase the sun or protect them from frost? No problem! Just pick up the bag and move it.
Choosing the Right Bag and Soil
Okay, let’s get started! The first step is selecting the right bag and preparing the soil. This is crucial for success, so pay attention!
* Bag Size: You’ll need a large bag, at least 15-20 gallons in size. I’ve had great success with heavy-duty grow bags made from fabric. They allow for good drainage and aeration. You can also use large plastic containers, but make sure they have drainage holes.
* Bag Material: Fabric grow bags are my preference because they “air prune” the roots, preventing them from becoming root-bound. Plastic containers are cheaper but require careful monitoring of watering.
* Soil Mix: Cantaloupes are heavy feeders, so they need a rich, well-draining soil mix. I like to use a combination of:
* Compost (40%): Provides essential nutrients and improves soil structure.
* Peat Moss or Coco Coir (30%): Helps retain moisture and provides aeration.
* Perlite or Vermiculite (20%): Improves drainage and aeration.
* Slow-Release Fertilizer (10%): Provides a steady supply of nutrients throughout the growing season. I use a balanced fertilizer like 10-10-10 or an organic fertilizer specifically formulated for vegetables.
Step-by-Step Guide to Growing Cantaloupes in Bags
Alright, let’s get our hands dirty! Here’s a detailed guide to growing cantaloupes in bags:
1. Prepare the Bag:
* If you’re using a fabric grow bag, simply unfold it and place it in a sunny location.
* If you’re using a plastic container, drill several drainage holes in the bottom.
2. Fill the Bag with Soil:
* Mix your soil components thoroughly in a large container or on a tarp.
* Fill the bag with the soil mix, leaving about 4-6 inches of space at the top.
3. Starting Seeds or Transplanting Seedlings:
* Starting from Seeds:
* Sow 2-3 cantaloupe seeds directly into the bag, about 1 inch deep.
* Water gently to moisten the soil.
* Keep the soil consistently moist but not waterlogged.
* Once the seedlings emerge (usually in 7-10 days), thin them to one strong plant per bag.
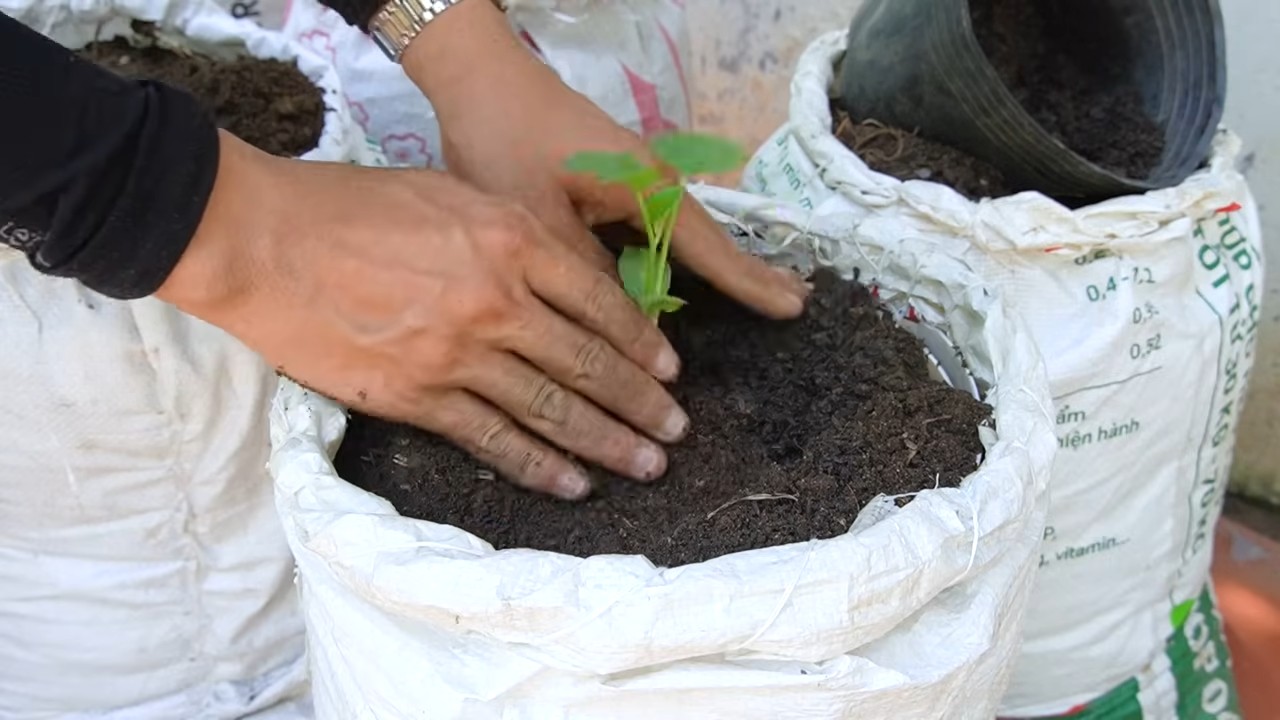
* Transplanting Seedlings:
* If you’re using seedlings, gently remove them from their containers.
* Dig a hole in the center of the bag, large enough to accommodate the root ball.
* Place the seedling in the hole and backfill with soil.
* Water thoroughly.
4. Watering:
* Cantaloupes need consistent moisture, especially during fruit development.
* Water deeply whenever the top inch of soil feels dry to the touch.
* Avoid overhead watering, as this can promote fungal diseases. Water at the base of the plant.
* In hot weather, you may need to water daily.
5. Fertilizing:
* Even with slow-release fertilizer, cantaloupes benefit from supplemental feeding.
* Once the plants start to flower, begin feeding them with a liquid fertilizer high in phosphorus and potassium. This will promote fruit development.
* I like to use a diluted solution of fish emulsion or seaweed extract every 2-3 weeks.
6. Support:
* As the cantaloupe vines grow, they’ll need support. You can use a trellis, stakes, or even a tomato cage.
* Train the vines to grow up the support structure.
* If you’re growing a variety with large fruits, you may need to provide additional support for the developing cantaloupes. You can use slings made from pantyhose or netting to support the fruits and prevent them from breaking off the vine.
7. Pollination:
* Cantaloupes need to be pollinated to produce fruit. Bees are the primary pollinators, but if you don’t have many bees in your area, you may need to hand-pollinate.
* To hand-pollinate, use a small paintbrush to transfer pollen from the male flowers (which have long, thin stems) to the female flowers (which have a small fruit developing at the base).
* The best time to hand-pollinate is in the morning, when the flowers are open.
8. Pruning:
* Pruning can help improve air circulation and promote fruit development.
* Remove any yellowing or diseased leaves.
* You can also prune the vines to encourage the plant to focus its energy on producing fewer, larger fruits.
9. Pest and Disease Control:
* Keep an eye out for common cantaloupe pests, such as aphids, squash bugs, and cucumber beetles.
* You can control these pests with insecticidal soap, neem oil, or by hand-picking them off the plants.
* Cantaloupes are also susceptible to fungal diseases, such as powdery mildew and downy mildew.
* To prevent these diseases, provide good air circulation, avoid overhead watering, and apply a fungicide if necessary.
10. Harvesting:
* Knowing when to harvest cantaloupes can be tricky. Here are a few signs that your cantaloupe is ripe:
* The skin turns from green to tan or yellow.
* The stem starts to crack where it attaches to the fruit.
* The cantaloupe has a sweet aroma.
* The tendril closest to the fruit dries up and turns brown.
* To harvest, gently twist the cantaloupe off the vine. If it’s ripe, it should come off easily.
Troubleshooting
Even with the best care, you might encounter some challenges. Here are a few common problems and how to fix them:
* Yellowing Leaves: Could be a sign of overwatering, underwatering, nutrient deficiency, or disease. Check the soil moisture, fertilize if needed, and inspect for pests or diseases.
* Lack of Fruit: Could be due to poor pollination, insufficient sunlight, or nutrient deficiency. Hand-pollinate if necessary, ensure the plant gets at least 6 hours of sunlight per day, and fertilize with a balanced fertilizer.
* Small Fruits: Could be due to insufficient watering, nutrient deficiency, or too many fruits on the vine. Water deeply and regularly, fertilize with a fertilizer high in phosphorus and potassium, and prune the vine to remove some of the fruits.
* Cracked Fruits: Often caused by inconsistent watering. Try to maintain consistent soil moisture.
Choosing the Right Cantaloupe Variety
Not all cantaloupe varieties are created equal, especially when growing in bags. Look for varieties that are compact and produce smaller fruits. Here are a few of my favorites:
* Minnesota Midget: A small, early-maturing variety that’s perfect for containers.
* Sugar Cube: Another compact variety with sweet, flavorful fruits.
* Jenny Lind: A unique variety with a turban-shaped fruit and a delicious flavor.
Extra Tips for Success
* Sunlight is Key: Cantaloupes need at least 6-8 hours of direct sunlight per day. Choose a sunny
Conclusion
So, there you have it! Growing cantaloupes in bags isn’t just a quirky gardening experiment; it’s a game-changer for anyone looking to maximize their yield, combat space constraints, or simply enjoy the satisfaction of nurturing these sweet melons from seed to harvest. We’ve explored the ins and outs of this method, from selecting the right bags and soil to providing the necessary support and care.
But why is this DIY trick a must-try? The answer lies in its versatility and effectiveness. By confining the root system, you encourage more focused growth, leading to larger, juicier cantaloupes. The bags also offer superior drainage, preventing root rot and other common melon ailments. Plus, the portability factor allows you to chase the sun, ensuring your cantaloupes receive the optimal amount of sunlight for sweetness and flavor.
Don’t be afraid to experiment with variations! Try using different types of bags, such as grow bags made from breathable fabric, which can further enhance drainage and aeration. You could also explore different soil mixes, adding compost or other organic matter to boost nutrient levels. Consider companion planting herbs like basil or marigolds around your bags to deter pests naturally. For those in cooler climates, using dark-colored bags can help absorb more heat, extending the growing season.
The beauty of growing cantaloupes in bags is that it’s adaptable to your specific environment and preferences. Whether you’re a seasoned gardener or a complete novice, this method offers a rewarding and accessible way to enjoy homegrown cantaloupes.
We wholeheartedly encourage you to give this DIY trick a try. Imagine biting into a perfectly ripe, sun-kissed cantaloupe that you nurtured from seed, all thanks to the simple yet effective method of growing cantaloupes in bags. It’s an experience that’s both satisfying and delicious.
And once you’ve embarked on your cantaloupe-growing adventure, we’d love to hear about your experience! Share your tips, tricks, and triumphs in the comments below. Let’s create a community of bag-grown cantaloupe enthusiasts and learn from each other’s successes. Happy gardening!
Frequently Asked Questions (FAQ)
What type of bag is best for growing cantaloupes?
The ideal bag for growing cantaloupes should be durable, have good drainage, and be large enough to accommodate the plant’s root system. Grow bags made from breathable fabric are a popular choice because they allow for excellent drainage and aeration, preventing root rot. However, sturdy plastic bags with drainage holes can also work well. Aim for a bag that is at least 15-20 gallons in size to provide ample space for the cantaloupe roots to develop. The material should also be UV resistant to withstand prolonged sun exposure.
How often should I water cantaloupes grown in bags?
Watering frequency depends on several factors, including the weather, the type of bag you’re using, and the stage of growth. Generally, cantaloupes need consistent moisture, especially during fruit development. Check the soil moisture level regularly by sticking your finger about an inch into the soil. If it feels dry, it’s time to water. In hot, sunny weather, you may need to water daily, while in cooler or cloudier conditions, you can water every other day. Avoid overwatering, as this can lead to root rot. Ensure the bag has adequate drainage to prevent water from pooling at the bottom.
What kind of soil should I use for growing cantaloupes in bags?
Cantaloupes thrive in well-draining, nutrient-rich soil. A good soil mix for growing cantaloupes in bags would include a combination of potting mix, compost, and perlite or vermiculite. The potting mix provides a good base, while the compost adds essential nutrients and improves soil structure. Perlite or vermiculite enhances drainage and aeration. You can also add a slow-release fertilizer to provide a steady supply of nutrients throughout the growing season. Avoid using heavy clay soil, as it can retain too much moisture and lead to root problems.
How much sunlight do cantaloupes need when grown in bags?
Cantaloupes require at least 6-8 hours of direct sunlight per day to produce sweet, flavorful fruit. When growing cantaloupes in bags, choose a location that receives ample sunlight throughout the day. If you live in a particularly hot climate, you may need to provide some afternoon shade to prevent the plants from overheating. The portability of bags allows you to move the plants to follow the sun, ensuring they receive the optimal amount of light.
Do I need to support the cantaloupe vines when growing them in bags?
Yes, supporting the cantaloupe vines is crucial, especially as the fruits begin to develop. Cantaloupe vines can become quite heavy, and without support, they can break or become damaged. You can use a trellis, stakes, or a cage to provide support. Train the vines to grow up the support structure, and use soft ties to secure them in place. As the fruits grow larger, you may need to provide additional support to prevent them from weighing down the vines. Consider using slings made from netting or fabric to cradle the developing cantaloupes.
How do I know when my cantaloupe is ripe?
Determining when a cantaloupe is ripe can be tricky, but there are several indicators to look for. First, check the color of the rind. A ripe cantaloupe will have a golden-tan color, rather than a greenish hue. Second, smell the blossom end (the opposite end from the stem). A ripe cantaloupe will have a sweet, musky aroma. Third, check the stem. When a cantaloupe is ripe, the stem will easily slip from the vine with a gentle tug. Finally, the rind should feel slightly soft and springy when pressed gently.
Can I grow more than one cantaloupe plant in a single bag?
While it’s technically possible to grow more than one cantaloupe plant in a single large bag, it’s generally not recommended. Cantaloupe plants require a significant amount of space for their root systems to develop properly. Crowding multiple plants in a single bag can lead to competition for nutrients and water, resulting in smaller, less flavorful fruits. For best results, it’s best to grow one cantaloupe plant per bag.
What are some common pests and diseases that affect cantaloupes grown in bags, and how can I prevent them?
Common pests that affect cantaloupes include aphids, squash bugs, and vine borers. Diseases include powdery mildew, fusarium wilt, and root rot. To prevent these problems, start with healthy, disease-resistant seeds or seedlings. Ensure good air circulation around the plants and avoid overwatering. Regularly inspect the plants for signs of pests or diseases, and take action promptly if you notice any problems. You can use organic pest control methods, such as insecticidal soap or neem oil, to control pests. For diseases, consider using a fungicide or removing infected leaves.
Can I reuse the bags for growing cantaloupes in subsequent seasons?
Whether you can reuse the bags depends on the type of bag and its condition. Grow bags made from durable fabric can often be reused for several seasons, provided they are properly cleaned and sanitized. Plastic bags may also be reusable, but they are more prone to tearing and degradation. Before reusing any bag, thoroughly clean it to remove any soil, debris, or pathogens. You can wash the bag with soap and water, or use a diluted bleach solution to disinfect it. Allow the bag to dry completely before storing it for future use. If the bag is damaged or shows signs of wear and tear, it’s best to replace it with a new one.
Leave a Comment