
Potato bucket gardening: Ever dreamt of harvesting a mountain of potatoes from your own backyard, even if you only have a tiny balcony or patio? I know I have! Forget sprawling fields and back-breaking digging. We’re diving into the wonderful world of container gardening, specifically, the incredibly rewarding technique of growing potatoes in buckets!
Growing potatoes has a rich history, dating back thousands of years to the Andes Mountains in South America. These humble tubers sustained civilizations and eventually spread across the globe, becoming a staple in countless cuisines. Now, you can participate in this legacy, even without acres of land.
Why should you try potato bucket gardening? Well, for starters, it’s incredibly space-efficient. Apartment dwellers and urban gardeners rejoice! Plus, it’s a fantastic way to control soil quality and prevent pests. But the real magic lies in the “harvesting” process. Imagine the thrill of tipping over a bucket and unearthing a treasure trove of freshly grown potatoes – it’s like a mini-excavation project with delicious results! This DIY guide will walk you through every step, from choosing the right bucket to mastering the art of “hilling” for a bumper crop. Get ready to get your hands dirty and experience the joy of homegrown potatoes, no matter where you live!
Potato Bucket Gardening: Grow Your Own Spuds in Small Spaces!
Hey there, fellow gardening enthusiasts! Ever dreamed of harvesting a mountain of potatoes but thought you didn’t have the space? Well, I’m here to tell you that you absolutely can grow potatoes, even if you only have a balcony or a small patio! The secret? Bucket gardening! It’s a fantastic way to maximize your yield in a minimal footprint, and it’s surprisingly easy. I’m going to walk you through everything you need to know to get started.
What You’ll Need
Before we dive into the nitty-gritty, let’s gather our supplies. This is what I’ve found works best for me:
* Buckets: 5-gallon buckets are ideal. You can often find them for free or cheap at bakeries, restaurants, or even construction sites. Make sure they’re clean and food-grade if possible.
* Potatoes: Seed potatoes are the best option. You can buy them from a garden center or online. Alternatively, you can use potatoes from the grocery store that have started to sprout (eyes). Just make sure they’re organic to avoid any sprout inhibitors.
* Potting Mix: A good quality potting mix is crucial. Avoid using garden soil, as it can compact in the bucket and hinder drainage. I like to use a mix of compost, peat moss (or coco coir), and perlite.
* Drill: For drainage holes.
* Water: Essential for keeping your potatoes happy and hydrated.
* Fertilizer: A balanced, slow-release fertilizer will provide your potatoes with the nutrients they need.
* Optional: Straw or mulch to help retain moisture and suppress weeds.
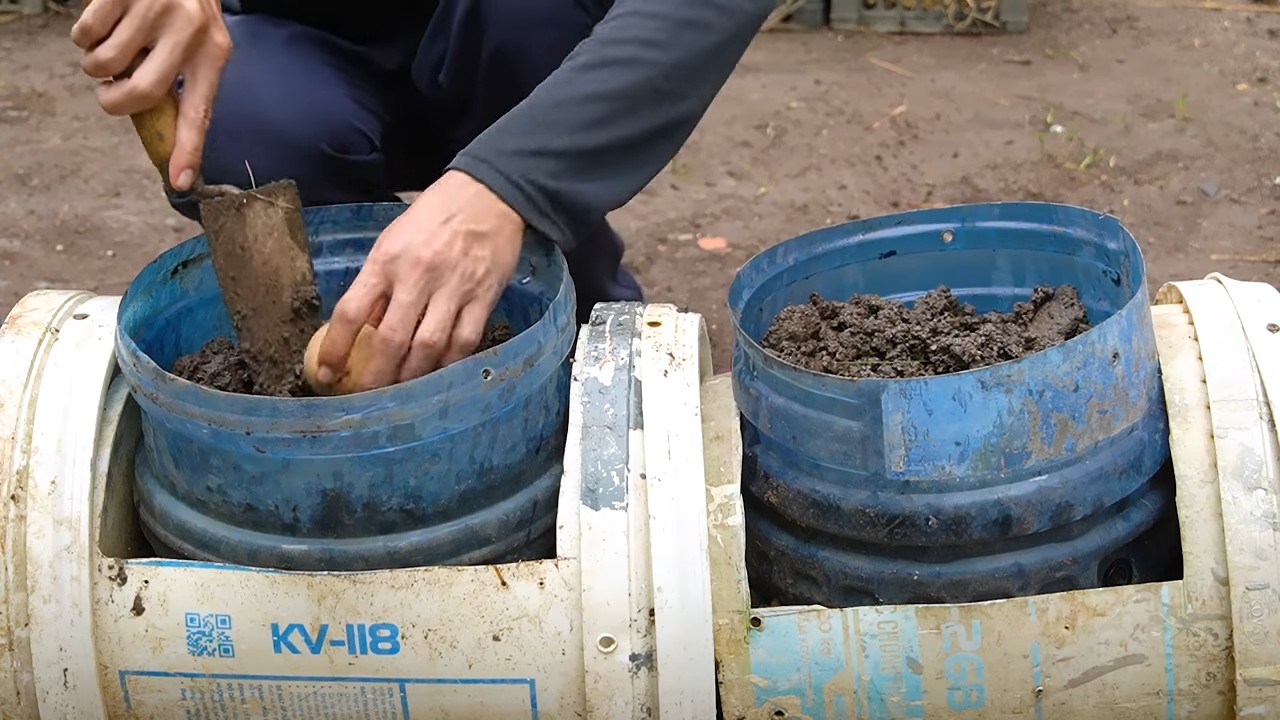
Preparing Your Buckets
This is a crucial step to ensure your potatoes have a healthy growing environment.
1. Drill Drainage Holes: This is super important! Potatoes don’t like sitting in soggy soil. Drill about 4-6 drainage holes in the bottom of each bucket. I usually go for a 1/2 inch drill bit.
2. Clean the Buckets: Give your buckets a good scrub with soap and water to remove any dirt or residue.
3. Optional: Add a Layer of Gravel: Some people like to add a layer of gravel at the bottom of the bucket to improve drainage. I personally don’t find it necessary if you have good drainage holes and use a well-draining potting mix, but it’s an option if you’re concerned about waterlogging.
Planting Your Seed Potatoes
Now for the fun part! Getting those potatoes in the ground (or, in this case, the bucket!).
1. Prepare Your Seed Potatoes: If you’re using seed potatoes, you can cut them into smaller pieces, making sure each piece has at least one or two “eyes” (those little sprouts). Let the cut pieces sit for a day or two to callous over. This helps prevent them from rotting in the soil. If you’re using sprouted potatoes from the grocery store, you can plant them whole or cut them into pieces as well.
2. Add Soil to the Bucket: Fill the bucket with about 4-6 inches of potting mix.
3. Plant the Potatoes: Place the seed potato pieces on top of the soil, with the eyes facing up. Space them evenly if you’re planting multiple pieces in one bucket. I usually plant about 3-4 pieces in a 5-gallon bucket.
4. Cover with Soil: Cover the potatoes with another 4-6 inches of potting mix.
5. Water Thoroughly: Give the soil a good watering until it’s evenly moist.
The “Hilling” Process: The Secret to More Potatoes!
This is where the magic happens! Hilling is the process of adding more soil to the bucket as the potato plants grow. This encourages the plant to produce more potatoes along the stem.
1. Wait for Sprouts: After a week or two, you should start to see sprouts emerging from the soil.
2. Add More Soil: Once the sprouts are about 6-8 inches tall, add more potting mix to the bucket, burying the stems up to the bottom set of leaves. Leave the top leaves exposed.
3. Repeat the Process: Continue adding soil every few weeks as the plants grow, until the bucket is almost full. This encourages the plant to produce potatoes all along the buried stem.
4. Water Regularly: Keep the soil consistently moist, but not waterlogged. Water deeply whenever the top inch of soil feels dry.
Caring for Your Potato Plants
Now that your potatoes are planted and hilling is underway, here’s how to keep them happy and healthy:
* Sunlight: Potatoes need at least 6-8 hours of sunlight per day. Place your buckets in a sunny location.
* Watering: As I mentioned before, water regularly, especially during hot weather. Check the soil moisture frequently and water when the top inch feels dry.
* Fertilizing: Feed your potato plants with a balanced, slow-release fertilizer every few weeks. Follow the instructions on the fertilizer package. You can also use a liquid fertilizer diluted in water.
* Pest Control: Keep an eye out for pests like aphids, potato beetles, and flea beetles. You can control them with insecticidal soap or neem oil. I prefer organic methods whenever possible.
* Weed Control: Keep the buckets free of weeds. Weeds can compete with your potato plants for nutrients and water.
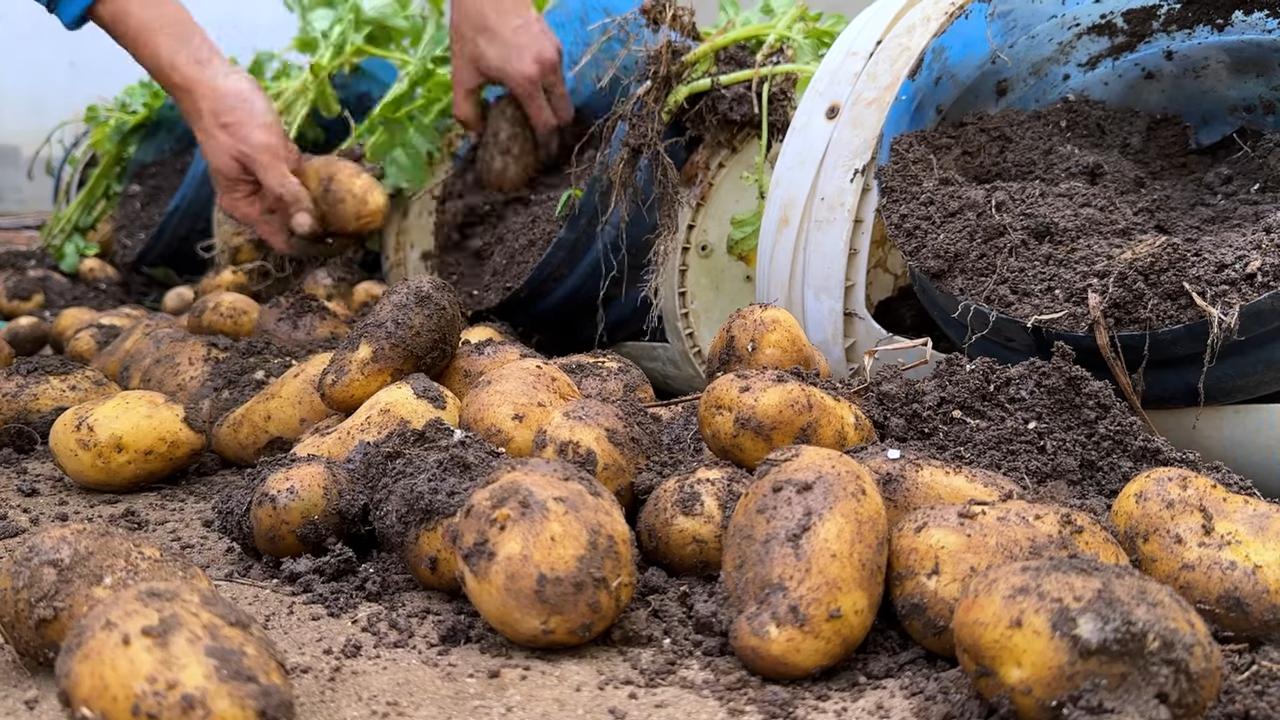
Harvesting Your Potatoes
The moment you’ve been waiting for! Harvesting your homegrown potatoes is incredibly rewarding.
1. When to Harvest: You can harvest “new potatoes” (small, tender potatoes) about 7-8 weeks after planting. These are delicious boiled or roasted. For larger, mature potatoes, wait until the plants start to flower and the foliage begins to die back. This usually takes about 10-12 weeks.
2. How to Harvest: The easiest way to harvest is to simply dump the bucket out onto a tarp or into a wheelbarrow. Gently sift through the soil to find your potatoes. Be careful not to damage them.
3. Curing Your Potatoes: If you’re harvesting mature potatoes, you’ll want to cure them before storing them. This helps them develop a thicker skin and prevents them from rotting. To cure your potatoes, spread them out in a cool, dark, and well-ventilated place for about a week.
4. Storing Your Potatoes: Store your cured potatoes in a cool, dark, and dry place. A root cellar is ideal, but a basement or garage will also work. Avoid storing them in the refrigerator, as this can cause them to turn sweet.
Troubleshooting
Even with the best planning, things can sometimes go wrong. Here are a few common problems and how to fix them:
* Yellowing Leaves: This can be a sign of overwatering, underwatering, or nutrient deficiency. Check the soil moisture and adjust your watering accordingly. Fertilize your plants if they’re lacking nutrients.
* Potato Beetles: These pesky beetles can quickly defoliate your potato plants. Handpick them off the plants or use insecticidal soap or neem oil.
* Potato Blight: This fungal disease can cause brown spots on the leaves and stems. Prevent blight by providing good air circulation and avoiding overhead watering. If blight does occur, remove the affected leaves and spray the plants with a fungicide.
* Not Enough Potatoes: If you’re not getting as many potatoes as you expected, it could be due to a number of factors, such as poor soil, insufficient sunlight, or inadequate hilling. Make sure you’re using a good quality potting mix, providing plenty of sunlight, and hilling your plants regularly.
Tips and Tricks for Success
Here are a few extra tips to help you get the most out of your potato bucket garden:
* Choose the Right Potato Variety: Some potato varieties are better suited for container gardening than others. Look for varieties that are compact and early-maturing.
* Use a Dark-Colored Bucket: Dark-colored buckets absorb more heat, which can help warm the soil and promote faster growth.
* Rotate Your Crops: Avoid planting potatoes in the same bucket year after year. This can help prevent soilborne diseases.
* Don’t Overwater: Overwatering is a common mistake that can lead to root rot. Make sure your buckets have good drainage and water only when the top inch of soil feels dry.
* Have Fun! Gardening should be enjoyable. Don’t be afraid to experiment and try new things.
So there you have it! Everything you need to know to grow your own potatoes in buckets. It’s a fun, rewarding, and space-saving way to enjoy fresh, homegrown potatoes. Happy gardening!
Conclusion
So, there you have it! Potato bucket gardening isn’t just a gardening trend; it’s a game-changer for anyone looking to grow their own fresh, delicious potatoes, regardless of space constraints or gardening experience. We’ve walked you through the simple steps, highlighted the benefits, and hopefully, inspired you to ditch the store-bought spuds and embrace the satisfaction of harvesting your own.
Why is this DIY trick a must-try? Because it offers an unparalleled combination of convenience, control, and yield. Imagine having a constant supply of freshly dug potatoes, bursting with flavor and free from harmful chemicals, right at your fingertips. No more lugging heavy bags from the grocery store or wondering about the origins of your produce. Potato bucket gardening puts you in charge, allowing you to nurture your plants from seed to table.
But the beauty of this method lies in its adaptability. Feel free to experiment with different potato varieties to discover your favorites. Russets, Yukon Golds, fingerlings – the possibilities are endless! You can also adjust the size of your bucket to suit your space and desired yield. Consider adding companion plants like marigolds or basil to deter pests and enhance the flavor of your potatoes.
For those seeking an extra challenge, try using organic fertilizers or creating your own compost tea to nourish your plants. You can even explore different watering techniques, such as drip irrigation, to conserve water and ensure consistent moisture. The key is to have fun and learn from your experiences.
Potato bucket gardening is more than just a way to grow potatoes; it’s an opportunity to connect with nature, learn new skills, and enjoy the fruits (or rather, vegetables) of your labor. It’s a rewarding experience that will leave you feeling empowered and proud of your accomplishments.
We understand that trying something new can be daunting, but we assure you that potato bucket gardening is surprisingly easy and accessible. With a little bit of effort and attention, you’ll be amazed at the abundance you can harvest from a single bucket.
So, what are you waiting for? Grab a bucket, some seed potatoes, and get ready to embark on your potato-growing adventure! We’re confident that you’ll be thrilled with the results.
Don’t forget to share your experiences with us! We’d love to hear about your successes, challenges, and any tips or tricks you discover along the way. Post photos of your potato buckets, share your harvest stories, and let’s create a community of passionate potato gardeners. Together, we can inspire others to embrace the joy of growing their own food and experience the magic of potato bucket gardening. Let us know what kind of soil you used, what challenges you faced, and how you overcame them. Your insights could be invaluable to other aspiring gardeners.
Ready to Grow?
We encourage you to take the plunge and experience the satisfaction of growing your own potatoes. It’s a simple, rewarding, and sustainable way to enjoy fresh, delicious produce. Happy gardening!
Frequently Asked Questions (FAQ)
What kind of bucket should I use for potato bucket gardening?
The ideal bucket size is around 5-10 gallons. Make sure it’s made of food-grade plastic to avoid any harmful chemicals leaching into your potatoes. You can also use a large trash can, but ensure it’s clean and has drainage holes. Dark-colored buckets tend to absorb more heat, which can be beneficial in cooler climates, but might overheat the soil in hotter regions. Consider using a lighter-colored bucket or painting a dark bucket white to reflect sunlight.
How many seed potatoes can I plant in one bucket?
Generally, you can plant 2-3 seed potatoes in a 5-10 gallon bucket. If you’re using a larger container, you can increase the number accordingly, but be sure to space them out adequately to allow for proper growth. Overcrowding can lead to smaller potatoes and reduced yields. Cut larger seed potatoes into pieces, ensuring each piece has at least 2-3 “eyes” or sprouts. Let the cut pieces callous over for a day or two before planting to prevent rotting.
What type of soil is best for potato bucket gardening?
Potatoes thrive in well-draining, slightly acidic soil with a pH between 6.0 and 6.8. A mix of potting soil, compost, and perlite or vermiculite is ideal. The potting soil provides nutrients, the compost adds organic matter, and the perlite or vermiculite improves drainage. Avoid using heavy clay soil, as it can become waterlogged and inhibit potato growth. You can also purchase a pre-mixed potato growing mix from your local garden center.
How often should I water my potato bucket?
Water your potato bucket regularly, especially during hot and dry weather. The soil should be consistently moist but not waterlogged. Check the moisture level by sticking your finger into the soil – if it feels dry an inch or two below the surface, it’s time to water. Avoid overwatering, as this can lead to root rot. Drip irrigation or a soaker hose can be helpful for providing consistent moisture.
How much sunlight do potato buckets need?
Potatoes need at least 6-8 hours of direct sunlight per day to thrive. Choose a location that receives plenty of sunlight throughout the day. If you live in a particularly hot climate, some afternoon shade can be beneficial to prevent the soil from overheating. If you don’t have a sunny spot, you can use grow lights to supplement the sunlight.
When is the best time to harvest my potatoes?
You can harvest “new potatoes” (small, tender potatoes) about 2-3 weeks after the plants flower. For larger, mature potatoes, wait until the foliage starts to turn yellow and die back. This usually takes about 80-100 days from planting. To harvest, simply tip the bucket over and carefully dig through the soil to find the potatoes.
What are some common pests and diseases that affect potato plants?
Common pests include aphids, potato beetles, and flea beetles. Diseases include early blight, late blight, and potato scab. Regularly inspect your plants for signs of pests or diseases and take action promptly. Organic pest control methods, such as insecticidal soap or neem oil, can be effective. Ensure good air circulation around your plants to prevent fungal diseases.
Can I reuse the soil from my potato bucket?
Yes, you can reuse the soil from your potato bucket, but it’s important to amend it with fresh compost and nutrients before planting again. Potatoes are heavy feeders, so the soil will likely be depleted of nutrients after one growing season. You can also sterilize the soil by baking it in the oven or solarizing it to kill any potential pathogens.
What are some variations I can try with potato bucket gardening?
You can try growing different varieties of potatoes, such as russets, Yukon Golds, fingerlings, or red potatoes. You can also experiment with different soil mixes, fertilizers, and watering techniques. Consider adding companion plants, such as marigolds, basil, or nasturtiums, to deter pests and attract beneficial insects. You can also try growing potatoes in other types of containers, such as grow bags or raised beds.
How do I store my harvested potatoes?
Store your harvested potatoes in a cool, dark, and dry place. A root cellar is ideal, but a basement or garage can also work. Avoid storing potatoes in the refrigerator, as this can cause them to develop a sweet taste. Properly stored potatoes can last for several months.

Leave a Comment