
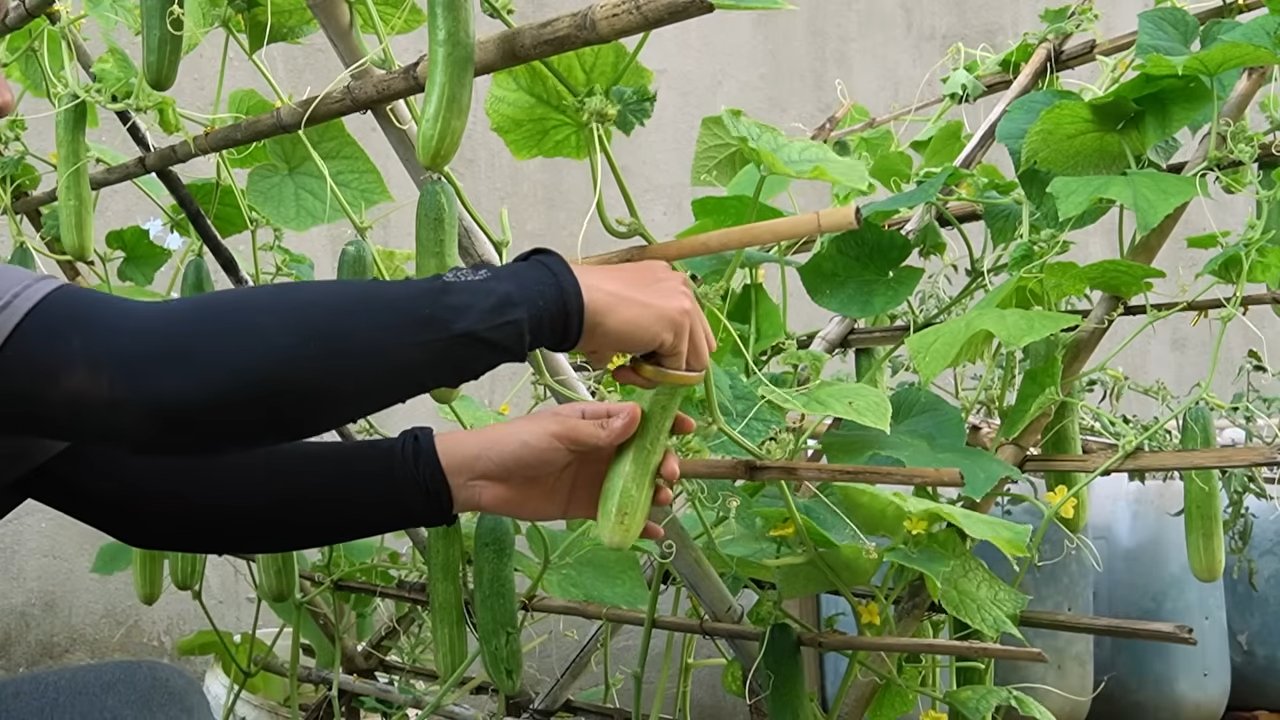
Cucumber Growth Booster: Unlock the secrets to a bountiful harvest right in your backyard! Have you ever dreamed of plucking crisp, juicy cucumbers straight from your own garden, but felt like your plants just weren’t thriving? You’re not alone! Many home gardeners struggle to achieve the cucumber yields they desire, often facing challenges like stunted growth, yellowing leaves, or a lack of fruit production.
For centuries, cucumbers have been a staple in diets around the world, with evidence of cultivation dating back over 3,000 years. From ancient civilizations using them for medicinal purposes to modern-day chefs incorporating them into refreshing salads and pickles, the cucumber’s versatility is undeniable. But growing these delightful veggies can sometimes feel like a mystery.
That’s where this DIY cucumber growth booster comes in! I’m going to share a simple, yet incredibly effective, trick that will give your cucumber plants the boost they need to flourish. This isn’t just another gardening fad; it’s a practical solution based on understanding your plant’s nutritional needs. With this easy-to-make concoction, you can say goodbye to disappointing harvests and hello to an abundance of delicious, homegrown cucumbers. Get ready to transform your garden and impress your friends with your cucumber-growing prowess! Let’s dive into creating your very own cucumber growth booster!
DIY Cucumber Growth Booster: Supercharge Your Harvest!
Hey fellow gardeners! Are you dreaming of overflowing baskets of crisp, juicy cucumbers? I know I am! Sometimes, despite our best efforts, our cucumber plants just need a little extra *oomph* to really thrive. That’s where this amazing DIY growth booster comes in. I’ve been using this recipe for years, and it’s consistently given me bigger, healthier, and more abundant cucumber harvests. It’s all-natural, super affordable, and incredibly easy to make. Let’s get started!
What Makes This Booster So Effective?
This growth booster is a powerhouse of nutrients that cucumbers crave. It combines the benefits of:
* Epsom Salts: Provides magnesium, essential for chlorophyll production (that’s what makes plants green and helps them photosynthesize!) and nutrient uptake. Magnesium deficiency can lead to yellowing leaves and stunted growth.
* Baking Soda: Helps to increase the pH level of the soil slightly, creating a more alkaline environment that cucumbers love. It also acts as a mild fungicide, protecting against common cucumber diseases.
* Ammonia (Optional): Provides a readily available source of nitrogen, a crucial nutrient for leafy growth and overall plant vigor. I use household ammonia, but you can also use diluted urine (yes, really! It’s a fantastic natural fertilizer!).
* Water: Acts as the carrier for all these wonderful nutrients, delivering them directly to the roots of your cucumber plants.
Ingredients You’ll Need
* 1 gallon of water (non-chlorinated is best, so let tap water sit out for 24 hours)
* 1 tablespoon of Epsom salts
* 1 teaspoon of baking soda
* 1/2 teaspoon of household ammonia (optional, but highly recommended!)
* A watering can or garden sprayer
Step-by-Step Instructions
Okay, let’s dive into the nitty-gritty! This is so simple, you’ll be amazed.
1. Gather Your Supplies: Make sure you have all your ingredients and your watering can or sprayer ready to go. Having everything within reach will make the process much smoother.
2. Prepare the Water: Fill your gallon container with water. If you’re using tap water, let it sit out for at least 24 hours to allow the chlorine to dissipate. Chlorine can harm beneficial soil microbes.
3. Add the Epsom Salts: Measure out 1 tablespoon of Epsom salts and add it to the water. Stir well until the Epsom salts are completely dissolved. You don’t want any undissolved crystals sitting at the bottom of your watering can.
4. Incorporate the Baking Soda: Measure out 1 teaspoon of baking soda and add it to the water. Stir again until the baking soda is fully dissolved. You might see a little fizzing – that’s perfectly normal!
5. Add the Ammonia (Optional): If you’re using ammonia, measure out 1/2 teaspoon and carefully add it to the water. Stir gently to combine. Remember, ammonia is potent, so don’t overdo it! If you are using urine, dilute it with 10 parts water to 1 part urine.
6. Mix Thoroughly: Give the entire mixture a good stir to ensure all the ingredients are evenly distributed. This is important for consistent results.
7. Transfer to Watering Can or Sprayer: Pour the solution into your watering can or garden sprayer. If you’re using a sprayer, make sure it’s clean and free of any residue from previous chemicals.
Applying the Growth Booster
Now for the fun part – feeding your cucumber plants! Here’s how I do it:
1. Water the Base of the Plants: Gently water the soil around the base of each cucumber plant with the growth booster solution. Avoid getting the solution on the leaves, as it can sometimes cause leaf burn, especially in direct sunlight.
2. Don’t Overwater: You want to moisten the soil, not saturate it. Overwatering can lead to root rot and other problems.
3. Frequency: I typically apply this growth booster every two weeks during the growing season. If your plants seem to be struggling, you can increase the frequency to once a week, but be careful not to overdo it.
4. Timing: The best time to apply the growth booster is in the early morning or late evening, when the sun isn’t as intense. This will help prevent leaf burn.
Tips and Tricks for Maximum Results
Here are a few extra tips to help you get the most out of this DIY cucumber growth booster:
* Soil Testing: Before you start using any fertilizer, it’s always a good idea to test your soil. This will give you a better understanding of its nutrient content and pH level, allowing you to tailor your fertilization program to your specific needs. You can purchase a soil testing kit at most garden centers or online.
* Companion Planting: Consider planting companion plants alongside your cucumbers. Marigolds, for example, repel nematodes and other pests, while dill attracts beneficial insects that prey on cucumber pests.
* Proper Watering: Cucumbers need consistent moisture to thrive. Water deeply and regularly, especially during hot, dry weather. Mulching around the plants can help to retain moisture in the soil.
* Sunlight: Cucumbers need at least 6-8 hours of sunlight per day. Make sure you plant them in a location that receives plenty of sunshine.
* Support: Provide your cucumber plants with a trellis or other support structure. This will help to keep the fruits off the ground, preventing rot and making them easier to harvest.
* Observation: Pay close attention to your cucumber plants. Look for signs of nutrient deficiencies, pests, or diseases. The sooner you identify and address these problems, the better your chances of a successful harvest. Yellowing leaves, stunted growth, and distorted fruits are all signs that something might be wrong.
* Adjust the Recipe: Feel free to adjust the recipe slightly based on your specific needs and observations. If your plants seem to be responding well, you can stick with the original recipe. If they seem to need a little extra boost, you can increase the amount of Epsom salts or ammonia slightly. However, be careful not to overdo it, as too much fertilizer can be harmful.
* Organic Matter: Amend your soil with plenty of organic matter, such as compost or well-rotted manure. This will improve drainage, aeration, and nutrient retention.
* Crop Rotation: Practice crop rotation to prevent the buildup of soilborne diseases and pests. Avoid planting cucumbers in the same location year after year.
* Harvest Regularly: Harvest your cucumbers regularly, as this will encourage the plants to produce more fruits. Overripe cucumbers can become bitter and seedy.
Troubleshooting
Even with the best care, you might encounter some problems with your cucumber plants. Here are a few common issues and how to address them:
* Yellowing Leaves: This can be a sign of magnesium deficiency, nitrogen deficiency, or overwatering. Try applying the growth booster more frequently, ensuring proper drainage, and testing your soil.
* Stunted Growth: This can be caused by a lack of nutrients, poor soil, or pests. Amend your soil with organic matter, fertilize regularly, and inspect your plants for pests.
* Powdery Mildew: This is a common fungal disease that can affect cucumbers. Improve air circulation around your plants, avoid overhead watering, and apply a fungicide if necessary.
* Cucumber Beetles: These pests can damage leaves and transmit diseases. Handpick them off your plants, use row covers, or apply an insecticide if necessary.
* Blossom End Rot: This is caused by a calcium deficiency. Ensure consistent watering and amend your soil with calcium-rich amendments, such as bone meal.
Why This is Better Than Store-Bought Fertilizers
While store-bought fertilizers can be effective, I prefer this DIY approach for several reasons:
* Cost-Effective: The ingredients are incredibly cheap and readily available. You’ll save a ton of money compared to buying commercial fertilizers.
* All-Natural: You know exactly what’s going into your plants. No harsh chemicals or synthetic ingredients.
* Environmentally Friendly: You’re reducing your reliance on commercially produced fertilizers, which can have a negative impact on the environment.
* Customizable: You can adjust the recipe to suit the specific needs of your plants.
Final Thoughts
I hope you found this DIY cucumber growth booster recipe helpful! Give it a try, and I’m confident you’ll see a noticeable difference in your cucumber harvest. Remember to be patient, observant, and adjust your approach as needed. Happy gardening! And get ready to enjoy those delicious, homegrown cucumbers!
Conclusion
So, there you have it! This simple, yet incredibly effective, DIY cucumber growth booster is more than just a gardening hack; it’s a game-changer for anyone looking to maximize their cucumber harvest. We’ve walked you through the easy steps, explained the science behind why it works, and hopefully, inspired you to ditch those expensive, store-bought fertilizers filled with questionable ingredients.
Why is this a must-try? Because it’s cost-effective, environmentally friendly, and, most importantly, it delivers results. Imagine biting into crisp, juicy cucumbers grown right in your own backyard, knowing you nurtured them with a natural solution. The satisfaction is unparalleled. This isn’t just about growing cucumbers; it’s about connecting with nature and understanding the power of simple, sustainable practices.
But the beauty of this DIY cucumber growth booster lies in its adaptability. Feel free to experiment! For instance, if you’re looking for an extra boost of potassium, consider adding banana peels to your compost tea. They’re a fantastic source of this essential nutrient, which promotes strong root development and abundant flowering. Alternatively, if your soil is particularly alkaline, a small amount of coffee grounds can help lower the pH, creating a more favorable environment for your cucumber plants. Remember to always test your soil pH before making significant adjustments.
Another variation involves incorporating Epsom salts into your feeding schedule. Epsom salts are rich in magnesium sulfate, which can help correct magnesium deficiencies in cucumber plants, leading to healthier foliage and improved fruit production. A tablespoon of Epsom salts dissolved in a gallon of water, applied every two weeks, can work wonders.
Don’t be afraid to tweak the recipe to suit your specific needs and preferences. The key is to observe your plants closely and adjust accordingly. Are the leaves looking pale? Perhaps they need a bit more nitrogen. Are the fruits developing slowly? Potassium might be the answer. Gardening is a journey of learning and experimentation, so embrace the process and have fun with it!
We are confident that this DIY cucumber growth booster will transform your cucumber-growing experience. It’s a simple, sustainable, and effective way to nourish your plants and reap the rewards of a bountiful harvest.
Now, it’s your turn! We wholeheartedly encourage you to give this DIY trick a try. We’re eager to hear about your experiences. Did you notice a significant increase in cucumber production? Did you experiment with any variations? Share your stories, tips, and photos in the comments below. Let’s create a community of cucumber enthusiasts who are passionate about growing healthy, delicious food in a sustainable way. Your insights could inspire others to embark on their own gardening adventures. Let’s grow together!
Frequently Asked Questions (FAQ)
What exactly is a cucumber growth booster, and why do I need one?
A cucumber growth booster is a natural fertilizer designed to provide your cucumber plants with the essential nutrients they need to thrive. While cucumbers can grow without it, a growth booster significantly enhances their growth rate, fruit production, and overall health. It addresses common nutrient deficiencies that can hinder cucumber development, leading to smaller yields and less flavorful fruits. This DIY version is a cost-effective and environmentally friendly alternative to commercial fertilizers, allowing you to control exactly what goes into your garden.
What are the main ingredients in this DIY cucumber growth booster, and why are they important?
The core ingredients typically include compost tea, diluted fish emulsion, and bone meal. Compost tea is a powerhouse of beneficial microbes and nutrients that improve soil health and nutrient availability. Fish emulsion provides a readily available source of nitrogen, crucial for leafy growth and overall plant vigor. Bone meal is rich in phosphorus, which promotes strong root development, flowering, and fruit set. These ingredients work synergistically to provide a balanced nutrient profile that supports all stages of cucumber growth.
How often should I apply this DIY cucumber growth booster to my plants?
The frequency of application depends on several factors, including the age of your plants, the quality of your soil, and the weather conditions. As a general guideline, apply the growth booster every two to three weeks during the active growing season. Younger plants may benefit from more frequent applications at a diluted concentration. Monitor your plants closely for signs of nutrient deficiencies, such as yellowing leaves or stunted growth, and adjust the frequency accordingly. Avoid over-fertilizing, as this can lead to nutrient imbalances and other problems.
Can I use this growth booster on other plants besides cucumbers?
Yes, this DIY growth booster can be beneficial for other fruiting vegetables, such as tomatoes, peppers, and zucchini. However, it’s important to consider the specific nutrient requirements of each plant. For example, tomatoes may require a higher phosphorus content than cucumbers. You can adjust the recipe by adding more bone meal or other phosphorus-rich amendments to suit the needs of different plants. Always research the specific nutrient requirements of each plant before applying any fertilizer.
What if I don’t have access to all the ingredients listed in the recipe? Are there any substitutions I can make?
Absolutely! Gardening is all about adaptability. If you don’t have fish emulsion, you can substitute it with seaweed extract or diluted urine (yes, really! It’s a great source of nitrogen). If bone meal is unavailable, rock phosphate or wood ash can provide a similar phosphorus boost. For compost tea, you can use worm castings tea as an alternative. The key is to understand the primary nutrients each ingredient provides and find suitable replacements that offer similar benefits.
My cucumber plants are already producing fruit. Is it too late to start using this growth booster?
No, it’s never too late to give your plants a boost! Even if your cucumber plants are already producing fruit, applying this DIY growth booster can still improve the size, flavor, and overall quality of your harvest. It can also help your plants stay healthy and productive throughout the growing season. Just be mindful of the application frequency and concentration, and avoid over-fertilizing.
How do I store the leftover cucumber growth booster?
Store any leftover growth booster in a cool, dark place in a tightly sealed container. It’s best to use it within a week or two, as the beneficial microbes in compost tea can degrade over time. Avoid storing it in direct sunlight or at high temperatures, as this can accelerate the decomposition process. If you notice any foul odors or signs of spoilage, discard the mixture.
I’m new to gardening. Is this DIY cucumber growth booster easy to make and use?
Yes! This recipe is designed to be simple and straightforward, even for beginners. The steps are easy to follow, and the ingredients are readily available. Don’t be intimidated by the idea of making your own fertilizer. It’s a rewarding experience that will deepen your connection with your garden and empower you to grow healthy, delicious food. Plus, there are tons of online resources and gardening communities that can provide support and guidance along the way.
Can this growth booster help with common cucumber plant problems like powdery mildew or pests?
While this growth booster primarily focuses on providing nutrients, healthy plants are naturally more resistant to pests and diseases. By ensuring your cucumber plants are well-nourished, you’re strengthening their immune systems and making them less susceptible to problems like powdery mildew. Additionally, the beneficial microbes in compost tea can help suppress soilborne pathogens. However, if you’re dealing with a severe infestation or disease outbreak, you may need to take additional measures, such as applying organic pesticides or fungicides.
What are the potential risks of using too much of this DIY cucumber growth booster?
Over-fertilizing can lead to several problems, including nutrient burn (characterized by brown, crispy leaf edges), salt buildup in the soil, and imbalances in nutrient availability. Excess nitrogen can promote excessive leafy growth at the expense of fruit production. It’s always better to err on the side of caution and start with a diluted concentration, gradually increasing it as needed. Monitor your plants closely for any signs of over-fertilization and adjust your application accordingly. Remember, healthy plants are the result of a balanced approach to gardening, not just excessive fertilization.

Leave a Comment