
Strawberry harvest small space can feel like a distant dream when you’re staring at a tiny balcony or a postage-stamp-sized backyard. But guess what? It doesn’t have to be! I’m here to tell you that a bountiful strawberry harvest, even in the most limited of spaces, is absolutely achievable with a few clever tricks and a dash of DIY magic.
For centuries, strawberries have been cherished not only for their delicious flavor but also for their vibrant color and symbolism. From ancient Roman gardens to medieval monastery plots, these little red gems have held a special place in our hearts and on our tables. Now, it’s your turn to cultivate your own piece of strawberry history, no matter how small your garden may be.
Let’s face it, store-bought strawberries often lack the intense flavor and sweetness of homegrown ones. Plus, there’s something incredibly satisfying about picking your own fresh berries, knowing exactly where they came from and how they were grown. This DIY guide is packed with simple, effective techniques to maximize your strawberry harvest small space potential. We’ll explore vertical gardening solutions, container gardening secrets, and even some clever hacks to protect your precious berries from pests and diseases. Get ready to transform your limited space into a strawberry paradise!
DIY Vertical Strawberry Tower for Small Spaces
Hey there, fellow gardening enthusiasts! If you’re anything like me, you’re always looking for ways to maximize your growing space, especially when it comes to delicious strawberries. And if you’re short on yard space, don’t despair! I’m going to walk you through building your very own vertical strawberry tower. It’s a fun, relatively inexpensive project, and the payoff 鈥?fresh, juicy strawberries right outside your door 鈥?is totally worth it.
Materials You’ll Need
Before we dive in, let’s gather our supplies. This is what I used, but feel free to adapt it based on what you have available or can easily find:
* PVC Pipe: One large diameter PVC pipe (approximately 6-8 inches in diameter and 5-6 feet long). This will be the main structure of your tower.
* Smaller PVC Pipe: One smaller diameter PVC pipe (approximately 1-2 inches in diameter and the same length as the larger pipe). This will be used for watering.
* Drill: With various sized drill bits.
* Measuring Tape: For accurate measurements.
* Marker or Pen: For marking drilling locations.
* Soil: High-quality potting mix specifically formulated for containers. I recommend a mix that drains well but also retains moisture.
* Strawberries: Strawberry plants! Choose everbearing varieties for a continuous harvest throughout the season. I usually get around 15-20 plants for a tower this size.
* Landscape Fabric or Burlap: To line the inside of the larger PVC pipe and prevent soil from washing out.
* Zip Ties or Twine: To secure the landscape fabric.
* Gravel or Small Rocks: For drainage at the bottom of the tower.
* PVC Pipe Cement (Optional): If you want to permanently seal the bottom of the large PVC pipe.
* Safety Glasses: Always protect your eyes!
* Gloves: To keep your hands clean and protected.
* Saw or PVC Pipe Cutter: To cut the PVC pipes to the desired length (if needed).
* End Cap for Small PVC Pipe: To prevent soil from entering the watering pipe.
Planning and Preparation
Before we start cutting and drilling, let’s plan out the placement of our strawberry plants. This will help us determine where to drill the holes in the large PVC pipe.
* Spacing: I usually space my strawberry plants about 8-10 inches apart vertically and stagger them around the pipe. This allows for good air circulation and sunlight exposure.
* Marking: Use your measuring tape and marker to mark the locations of the holes on the large PVC pipe. Make sure to space them evenly and stagger them.
* Hole Size: The size of the holes will depend on the size of your strawberry plants. You want them to be large enough for the roots to grow through, but not so large that the soil will fall out. I usually use a drill bit that’s about 2-3 inches in diameter.
Building the Strawberry Tower
Okay, let’s get our hands dirty! Here’s the step-by-step guide to building your vertical strawberry tower:
1. Cutting the PVC Pipes (If Necessary): If your PVC pipes are too long, use a saw or PVC pipe cutter to cut them to the desired length. I usually aim for a height of around 5-6 feet.
2. Drilling the Holes: Put on your safety glasses! Now, carefully drill the holes at the marked locations on the large PVC pipe. Take your time and make sure the holes are clean and even.
3. Preparing the Watering Pipe: This is where the smaller PVC pipe comes in. We need to drill small holes along the length of this pipe to allow water to seep out and irrigate the soil. I usually drill holes about every 4-6 inches, using a smaller drill bit (around 1/4 inch). Make sure to drill holes all around the circumference of the pipe.
4. Lining the Large PVC Pipe: This step is crucial to prevent soil from washing out of the holes. Cut the landscape fabric or burlap to a size that will line the inside of the large PVC pipe. Secure the fabric to the inside of the pipe using zip ties or twine. Make sure the fabric covers all the holes.
5. Adding Drainage: Pour a layer of gravel or small rocks into the bottom of the large PVC pipe. This will help with drainage and prevent the soil from becoming waterlogged.
6. Inserting the Watering Pipe: Carefully insert the smaller PVC pipe into the center of the large PVC pipe. Make sure it’s positioned so that the holes are facing outwards.
7. Adding Soil: Now, slowly start filling the large PVC pipe with your high-quality potting mix. As you fill it, gently pack the soil around the watering pipe.
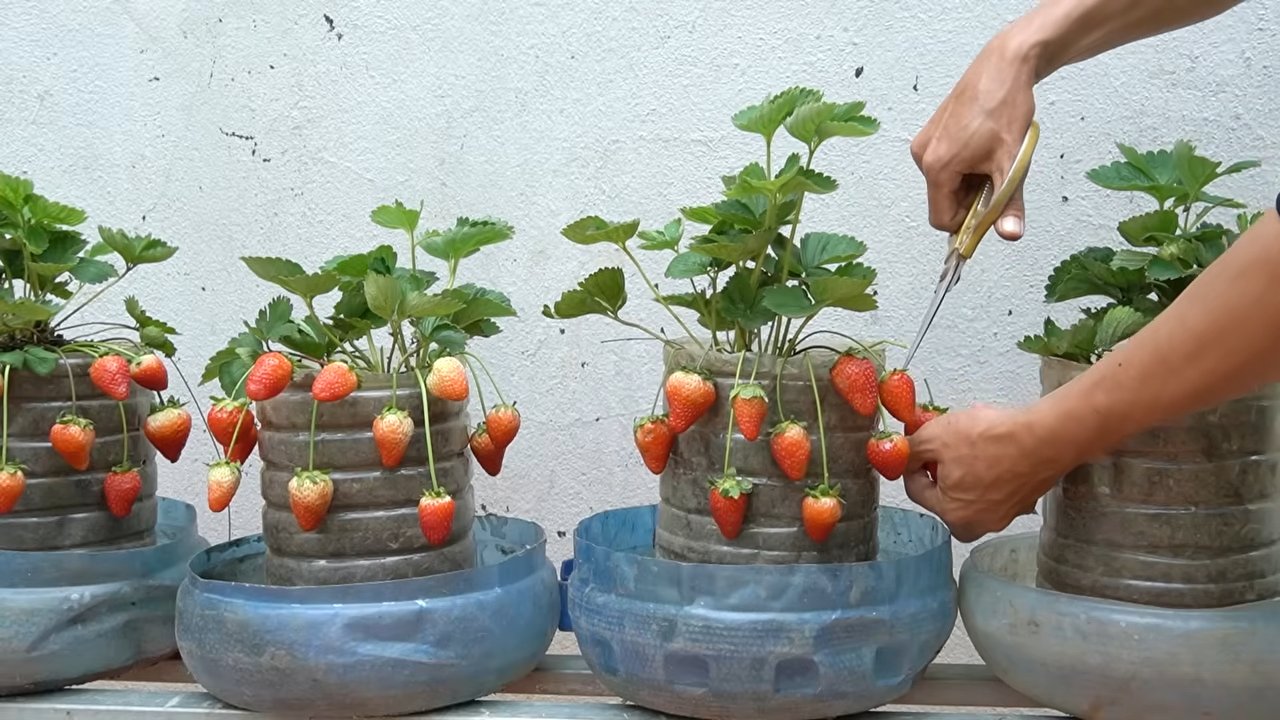
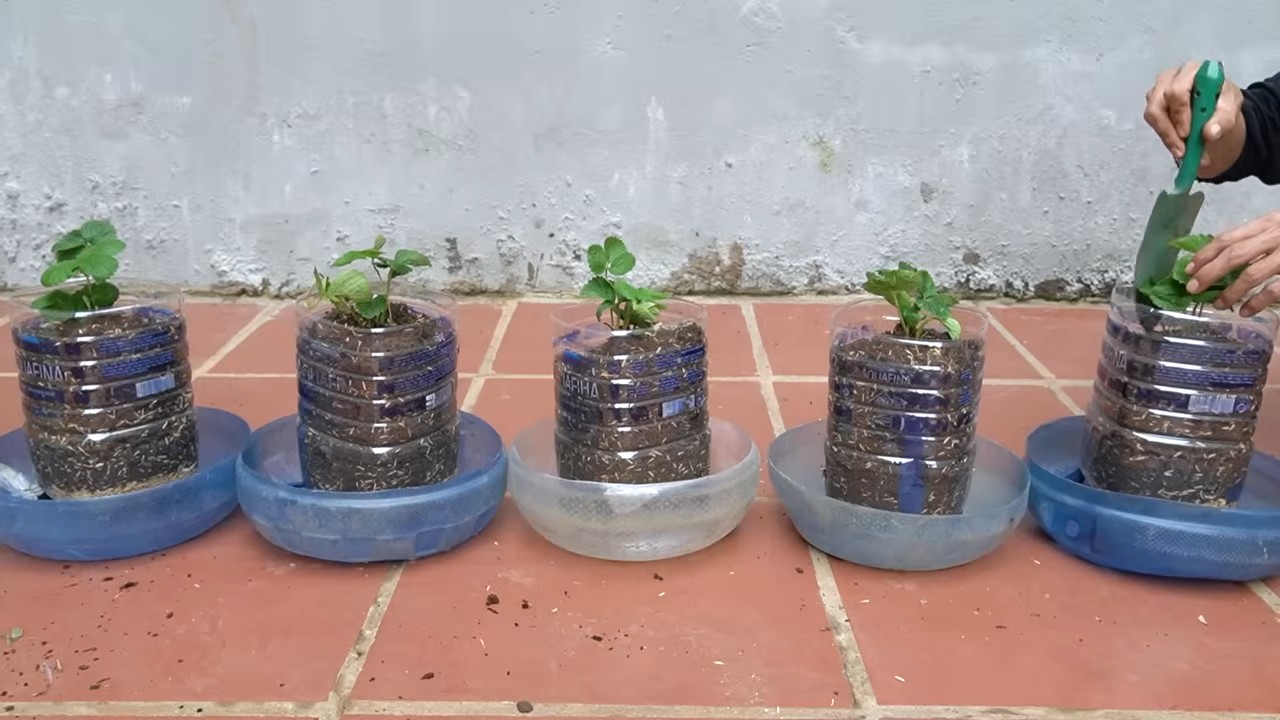
8. Planting the Strawberries: This is the fun part! Carefully remove your strawberry plants from their containers and gently loosen the roots. Insert the roots through the holes in the large PVC pipe and into the soil. Make sure the crown of the plant (where the stems meet the roots) is above the soil level.
9. Continue Filling and Planting: Continue filling the large PVC pipe with soil and planting the strawberry plants until you reach the top.
10. Capping the Watering Pipe: Place the end cap on the top of the smaller PVC pipe to prevent soil from entering.
11. Watering: Water your newly planted strawberry tower thoroughly. Pour water into the smaller PVC pipe until it starts to seep out of the holes. This will ensure that the soil is evenly moistened.
12. Placement: Choose a sunny location for your strawberry tower. Strawberries need at least 6-8 hours of sunlight per day to thrive.
Maintaining Your Strawberry Tower
Now that your strawberry tower is built, it’s important to maintain it properly to ensure a bountiful harvest.
* Watering: Water your strawberry tower regularly, especially during hot, dry weather. Check the soil moisture by sticking your finger into the soil. If it feels dry, it’s time to water. I usually water mine every day or two, depending on the weather.
* Fertilizing: Feed your strawberry plants with a balanced fertilizer every few weeks. Follow the instructions on the fertilizer package.
* Pruning: Remove any dead or yellowing leaves from your strawberry plants. This will help to prevent disease and promote healthy growth.
* Pest Control: Keep an eye out for pests, such as aphids and slugs. If you find any pests, treat them with an appropriate insecticide or organic pest control method.
* Harvesting: Harvest your strawberries when they are fully ripe and red. Gently twist the berries off the plant.
Troubleshooting
Even with the best planning, sometimes things don’t go exactly as expected. Here are a few common problems you might encounter and how to fix them:
* Soil Drying Out Too Quickly: If your soil is drying out too quickly, you can try adding some water-retaining crystals to the potting mix. You can also try mulching around the base of the plants to help retain moisture.
* Plants Not Growing: If your strawberry plants aren’t growing, it could be due to a lack of sunlight, nutrients, or water. Make sure they’re getting enough sunlight, fertilize them regularly, and water them thoroughly.
* Pests: As mentioned earlier, pests can be a problem. Regularly inspect your plants for pests and treat them accordingly.
* Root Rot: Overwatering can lead to root rot. Make sure your soil is well-draining and avoid overwatering.
Alternative Materials and Designs
Don’t feel limited to just PVC pipe! There are plenty of other materials you can use to build a vertical strawberry tower. Here are a few ideas:
* Pallets: Old wooden pallets can be repurposed into a vertical strawberry garden. Simply line the spaces between the slats with landscape fabric and fill them with soil.
* Stacked Pots: Stack different sized pots on top of each other to create a tiered strawberry garden.
* Hanging Baskets: Hang multiple hanging baskets filled with strawberry plants to create a vertical display.
* Fabric Grow Bags: Use fabric grow bags and hang them vertically on a wall or fence.
You can also get creative with the design of your strawberry tower. Try painting the PVC pipe, adding decorative elements, or creating a unique shape. The possibilities are endless!
Enjoying Your Harvest
The best part of building a vertical strawberry tower is, of course, enjoying the delicious strawberries! Freshly picked strawberries are so much more flavorful than store-bought ones. You can eat them fresh, use them in desserts, make jam, or even freeze them for later.
I hope this guide has inspired you to build your own vertical strawberry tower. It’s a fun and rewarding project that will provide you with fresh, delicious strawberries for years to
Conclusion
So, there you have it! Transforming your limited space into a thriving strawberry patch is not only achievable but also incredibly rewarding. This DIY approach to a strawberry harvest small space solution empowers you to enjoy fresh, delicious strawberries right at your fingertips, regardless of your garden’s size. We’ve explored how to maximize vertical space, choose the right container varieties, and provide the optimal growing conditions for a bountiful yield.
But why is this DIY trick a must-try? Beyond the obvious benefit of fresh strawberries, it’s about reclaiming your space and connecting with nature. It’s about the satisfaction of nurturing something from seed (or seedling) to fruit, and the joy of sharing your homegrown bounty with family and friends. It’s also a fantastic way to reduce your carbon footprint by growing your own food locally. Plus, let’s be honest, store-bought strawberries simply can’t compare to the flavor of a sun-ripened, freshly picked berry.
Looking for variations? Consider experimenting with different container types. Hanging baskets add a whimsical touch, while tiered planters create a stunning visual display. You can also explore companion planting to deter pests and improve pollination. Marigolds, basil, and thyme are all excellent choices to plant alongside your strawberries. Another fun variation is to create a strawberry tower using stacked terracotta pots or repurposed materials like pallets. Get creative and personalize your strawberry garden to reflect your own style and preferences!
Don’t be afraid to experiment with different strawberry varieties too. Everbearing varieties will provide a continuous harvest throughout the growing season, while June-bearing varieties offer a larger, concentrated yield. Consider a mix of both to maximize your strawberry enjoyment. And remember, consistent watering and fertilization are key to a successful harvest.
We are confident that with a little effort and these simple tips, you can create a thriving strawberry patch, even in the smallest of spaces. The taste of success, or rather, the taste of your own homegrown strawberries, is well worth the investment.
Now, it’s your turn! We wholeheartedly encourage you to try this DIY trick and experience the joy of a strawberry harvest small space. We’re eager to hear about your successes, challenges, and creative adaptations. Share your photos, tips, and stories in the comments below. Let’s build a community of small-space strawberry growers and inspire others to embrace the joys of homegrown goodness! We can’t wait to see what you create! Happy gardening!
Frequently Asked Questions (FAQ)
What are the best strawberry varieties for small spaces?
Choosing the right strawberry variety is crucial for success in small spaces. Everbearing varieties like ‘Seascape,’ ‘Albion,’ and ‘Tristar’ are excellent choices because they produce fruit throughout the growing season, rather than just in June. This continuous yield is ideal for maximizing your harvest in a limited area. Day-neutral varieties are also a good option, as they are less sensitive to day length and will produce fruit as long as the temperature is suitable. June-bearing varieties, while producing a larger crop all at once, might not be the most efficient use of space if you’re looking for a steady supply of strawberries. Consider the size of the plant as well; some varieties are more compact than others. Researching the specific needs and growth habits of different varieties will help you make the best choice for your particular space and climate.
How much sunlight do strawberries need?
Strawberries are sun-loving plants and require at least 6-8 hours of direct sunlight per day to thrive. Without sufficient sunlight, they will produce fewer flowers and fruits, and the berries that do develop may be smaller and less flavorful. If you’re growing strawberries indoors or in a shaded area, you may need to supplement with grow lights to ensure they receive adequate light. Position your containers in the sunniest spot available, and consider using reflective surfaces, such as white walls or aluminum foil, to bounce sunlight onto the plants. Monitor your plants closely and adjust their position as needed to ensure they are getting enough light.
What type of soil is best for growing strawberries in containers?
The ideal soil for container-grown strawberries is a well-draining, slightly acidic potting mix. Avoid using garden soil, as it can become compacted in containers and doesn’t provide adequate drainage. A good potting mix will retain moisture while allowing excess water to drain away, preventing root rot. You can also amend your potting mix with compost or other organic matter to improve its fertility and drainage. A pH level between 5.5 and 6.5 is ideal for strawberries. You can test the pH of your soil using a soil testing kit and adjust it as needed with lime (to raise the pH) or sulfur (to lower the pH).
How often should I water my strawberry plants?
Watering frequency depends on several factors, including the weather, the type of container you’re using, and the stage of growth of your plants. Generally, you should water your strawberry plants whenever the top inch of soil feels dry to the touch. During hot, dry weather, you may need to water them daily, or even twice a day. Avoid overwatering, as this can lead to root rot. Ensure that your containers have adequate drainage holes to allow excess water to escape. A good rule of thumb is to water deeply and less frequently, rather than shallowly and more often. This encourages the roots to grow deeper and makes the plants more drought-tolerant.
How do I fertilize my strawberry plants?
Strawberries are heavy feeders and benefit from regular fertilization. Use a balanced fertilizer specifically formulated for fruits and vegetables, following the instructions on the label. You can also use organic fertilizers, such as compost tea or fish emulsion. Fertilize your plants every 2-4 weeks during the growing season. Avoid over-fertilizing, as this can lead to excessive vegetative growth at the expense of fruit production. A soil test can help you determine the specific nutrient needs of your plants.
How do I protect my strawberries from pests and diseases?
Strawberries are susceptible to a variety of pests and diseases, including aphids, spider mites, slugs, and fungal diseases. To prevent problems, choose disease-resistant varieties, provide good air circulation, and avoid overwatering. Inspect your plants regularly for signs of pests or diseases and take action promptly. You can use insecticidal soap or neem oil to control aphids and spider mites. Slug bait or copper tape can help deter slugs. For fungal diseases, use a fungicide specifically labeled for strawberries. You can also use row covers to protect your plants from pests and birds.
How do I overwinter my strawberry plants in containers?
In colder climates, strawberry plants in containers need to be protected from freezing temperatures. You can overwinter them in an unheated garage or shed, or you can bury the containers in the ground. Before overwintering, prune back the foliage and remove any dead or diseased leaves. Water the plants sparingly during the winter months, just enough to keep the soil from drying out completely. In the spring, gradually acclimate the plants to outdoor conditions before moving them back to their permanent location.
Can I grow strawberries indoors?
Yes, you can grow strawberries indoors, but it requires providing them with adequate light and warmth. Place your containers near a sunny window or use grow lights to supplement natural light. Maintain a temperature between 60-75掳F (15-24掳C). Pollinate the flowers by hand using a small brush. Indoor-grown strawberries may not produce as many fruits as outdoor-grown plants, but they can still provide a delicious and rewarding harvest.
How do I harvest my strawberries?
Strawberries are ready to harvest when they are fully red and slightly soft to the touch. Gently twist or cut the berry from the plant, leaving a small piece of the stem attached. Harvest your strawberries in the morning, after the dew has dried. Store them in the refrigerator for up to a week. Enjoy your fresh, homegrown strawberries in salads, desserts, or simply eat them straight from the plant!

Leave a Comment