
Growing giant pumpkins might seem like something reserved for state fairs and competitive growers, but trust me, you can absolutely cultivate your own behemoth right in your backyard! Imagine the look on your neighbor’s faces when they see a pumpkin the size of a small car sitting proudly in your garden. It’s not just about bragging rights, though; it’s about the sheer joy of nurturing something extraordinary from a tiny seed.
The pursuit of the perfect giant pumpkin has a rich history, dating back to the early 20th century when farmers began selectively breeding pumpkins for size. It’s become a beloved tradition in many communities, with pumpkin weigh-offs drawing crowds eager to witness these incredible feats of nature. But you don’t need to be a seasoned pro to get in on the fun.
Why should you try this DIY trick? Because growing giant pumpkins is more than just a hobby; it’s a rewarding challenge that connects you with nature and teaches you patience, dedication, and the magic of growth. Plus, who wouldn’t want to carve a jack-o’-lantern that’s truly unforgettable? This article will equip you with the essential DIY tricks and hacks to help you cultivate your own prize-winning pumpkin, even if you’re a beginner. Let’s get growing!

Growing Giant Pumpkins: My Guide to Gourd Glory!
Okay, so you want to grow a giant pumpkin? Awesome! It’s a challenging but incredibly rewarding experience. I’ve been tinkering with giant pumpkins for a few years now, and I’ve learned a ton along the way. This guide is based on my own experiences and research, and I’m excited to share it with you. Get ready for some serious pumpkin power!
Phase 1: Seed Starting and Early Growth
This is where it all begins! Choosing the right seed and getting your seedlings off to a strong start is crucial.
* Seed Selection: Not all pumpkin seeds are created equal! You want seeds from pumpkins with a proven pedigree 鈥?meaning they came from giant pumpkins that weighed a lot. Look for seeds with lineage information. Websites and pumpkin growing clubs are great resources for finding these. I usually order mine online from reputable growers.
* Timing is Everything: Start your seeds indoors about 3-4 weeks before the last expected frost in your area. This gives them a head start.
* Potting Mix Matters: Use a high-quality seed starting mix. It should be light and well-draining.
* Individual Pots: Plant each seed in its own large pot (at least 4 inches in diameter). This prevents root disturbance when transplanting. Peat pots or biodegradable pots are great options.
* Warmth and Light: Pumpkin seeds need warmth to germinate. Use a heat mat under your pots to maintain a soil temperature of around 80-85掳F (27-29掳C). Once the seedlings emerge, provide them with plenty of light. A grow light is ideal, but a sunny windowsill can work if it gets at least 6 hours of direct sunlight.
* Watering Wisely: Keep the soil consistently moist, but not soggy. Overwatering can lead to root rot.
* Hardening Off: Before transplanting your seedlings outdoors, you need to “harden them off.” This means gradually exposing them to outdoor conditions over a period of about a week. Start by placing them outside for a few hours each day, increasing the time each day. Protect them from strong winds and direct sunlight at first.
Step-by-Step Instructions: Seed Starting
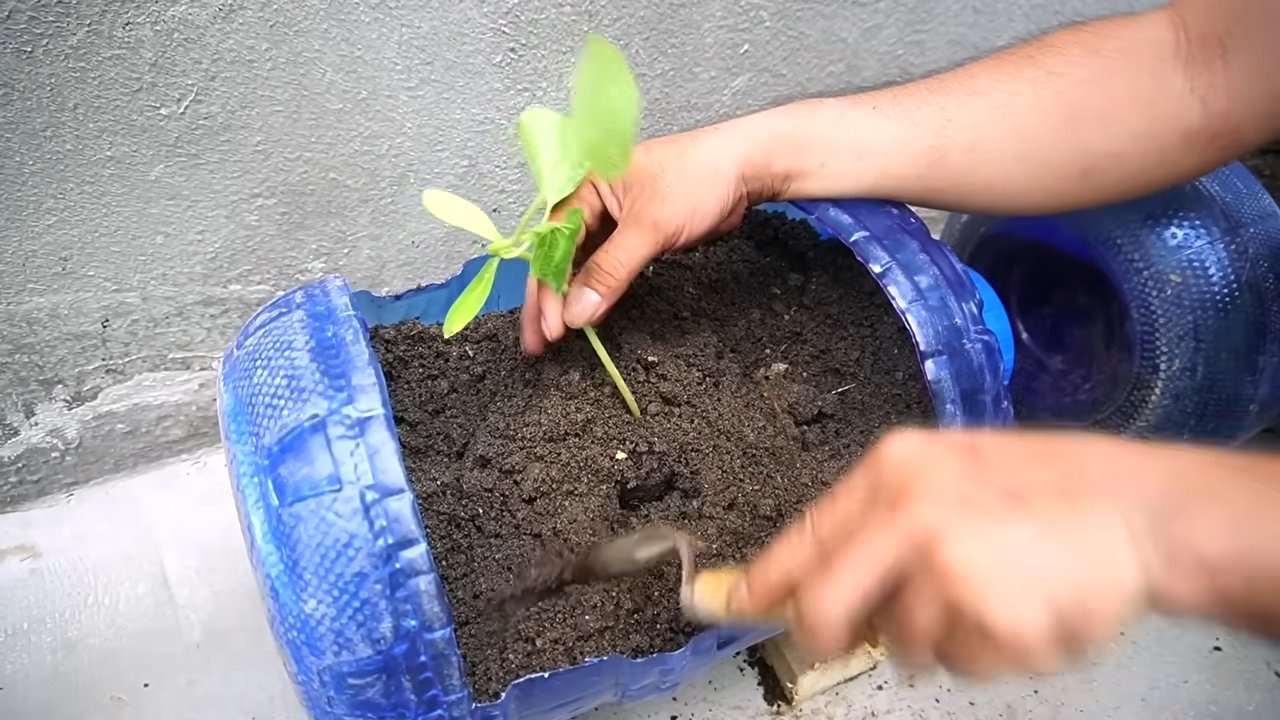
1. Soak the Seeds: Gently file the edges of the seed with sandpaper. Soak your pumpkin seeds in warm water for 2-4 hours before planting. This helps to soften the seed coat and speeds up germination.
2. Prepare the Pots: Fill your individual pots with seed starting mix. Moisten the mix thoroughly.
3. Plant the Seeds: Plant one seed per pot, about 1 inch deep. Place the seed on its side.
4. Provide Warmth: Place the pots on a heat mat.
5. Maintain Moisture: Cover the pots with plastic wrap or a humidity dome to help retain moisture.
6. Monitor Germination: Check the pots daily for germination. Once the seedlings emerge, remove the plastic wrap and provide them with plenty of light.
7. Water Regularly: Water the seedlings regularly, keeping the soil consistently moist.
8. Fertilize Lightly: Once the seedlings have their first true leaves, you can start fertilizing them with a diluted liquid fertilizer. Use a balanced fertilizer (e.g., 20-20-20) diluted to half strength.
9. Harden Off: Begin hardening off the seedlings about a week before you plan to transplant them outdoors.
Phase 2: Transplanting and Vine Training
Getting your pumpkin plant into the ground and training its vines is essential for maximizing growth.
* Choosing the Right Location: Giant pumpkins need a lot of space 鈥?at least 400 square feet per plant. They also need full sun (at least 6 hours of direct sunlight per day) and well-drained soil.
* Soil Preparation: Amend your soil with plenty of compost and well-rotted manure. Giant pumpkins are heavy feeders, so you need to provide them with a rich, fertile soil. I also like to add some bone meal to the planting hole to provide phosphorus, which is important for root development.
* Transplanting Carefully: Transplant your seedlings outdoors after the last frost, when the soil has warmed up to at least 60掳F (15掳C). Dig a hole that is slightly larger than the pot. Gently remove the seedling from the pot and place it in the hole. Backfill with soil and water thoroughly.
* Protecting Young Plants: Young pumpkin plants are vulnerable to pests and diseases. Protect them with row covers or netting. You can also use organic pest control methods, such as insecticidal soap or neem oil.
* Vine Training: As your pumpkin plant grows, you’ll need to train its vines. The goal is to encourage the plant to grow in a single direction, away from the main stem. This will help to concentrate the plant’s energy into growing the pumpkin. Remove any secondary vines that grow off the main vine. Bury the main vine at several points along its length to encourage root growth. This will help to provide the plant with more nutrients and water.
* Pollination: Giant pumpkins require hand-pollination to ensure successful fruit set. Female flowers have a small pumpkin-like structure behind the flower, while male flowers do not. Pollinate the female flowers early in the morning, using a small paintbrush to transfer pollen from the male flower to the female flower. Cover the pollinated flower with a bag to prevent insects from interfering.
Step-by-Step Instructions: Transplanting and Vine Training
1. Prepare the Planting Hole: Dig a hole that is slightly larger than the pot. Amend the soil with compost and well-rotted manure. Add bone meal to the planting hole.
2. Transplant the Seedling: Gently remove the seedling from the pot and place it in the hole. Backfill with soil and water thoroughly.
3. Protect the Plant: Protect the young plant with row covers or netting.
4. Water Regularly: Water the plant regularly, especially during dry periods.
5. Fertilize Regularly: Fertilize the plant regularly with a high-nitrogen fertilizer.
6. Train the Vines: Train the vines to grow in a single direction, away from the main stem. Remove any secondary vines.
7. Bury the Vines: Bury the main vine at several points along its length to encourage root growth.
8. Hand-Pollinate: Hand-pollinate the female flowers early in the morning. Cover the pollinated flower with a bag.
Phase 3: Fruit Selection and Growth
Choosing the right pumpkin to focus on and providing it with the best possible care is critical for achieving giant size.
* Fruit Selection: Once your plant has set several pumpkins, you’ll need to choose which one to focus on. Select a pumpkin that is well-shaped, healthy, and growing on a strong vine. Remove all other pumpkins from the plant.
* Protecting the Pumpkin: Protect your chosen pumpkin from sunscald by shading it with a tarp or blanket during the hottest part of the day. You can also use a sunscreen specifically designed for pumpkins.
* Watering and Fertilizing: Giant pumpkins need a lot of water and fertilizer. Water deeply and regularly, especially during dry periods. Fertilize with a high-phosphorus fertilizer to promote fruit growth. I also like to use seaweed extract, which is a great source of micronutrients.
* Monitoring Growth: Track the growth of your pumpkin by measuring its circumference daily. A healthy giant pumpkin can gain up to 50 pounds per day!
* Preventing Pests and Diseases: Continue to monitor your plant for pests and diseases. Treat any problems promptly with organic pest control methods.
* Vine Support: As your pumpkin grows, it will become very heavy. Provide support for the vine by placing boards or pallets underneath the pumpkin. This will help to prevent the vine from breaking.
Step-by-Step Instructions: Fruit Selection and Growth
1. Select the Best Pumpkin: Choose a well-shaped, healthy pumpkin growing on a strong vine.
2. Remove Other Pumpkins: Remove all other pumpkins from the plant.
3. Protect from Sunscald: Shade the pumpkin with a tarp or blanket during the hottest part of the day.
4. Water Deeply: Water the plant deeply and regularly.
5. Fertilize Regularly: Fertilize the plant with a high-phosphorus fertilizer and seaweed extract.
6. Monitor Growth: Measure the pumpkin’s circumference daily.
7. Prevent Pests and Diseases: Monitor the plant for pests and diseases and treat any problems promptly.
8. Provide Vine Support: Place boards or pallets underneath the pumpkin to support the vine.
Phase 4: Harvesting and Weighing
The moment of truth! Harvesting your giant pumpkin and finding out its weight is the culmination of all your hard work.
* Harvesting at the Right Time
Conclusion
So, there you have it! Growing giant pumpkins isn’t just a hobby; it’s an adventure, a challenge, and a testament to the power of dedication and a little bit of DIY ingenuity. This particular trick, focusing on [Specific DIY trick mentioned throughout the article, e.g., “soil amendment with mycorrhizae” or “strategic leaf pruning”], is a game-changer because it directly addresses [Explain the problem the trick solves, e.g., “nutrient uptake limitations” or “overcrowding and disease”]. By incorporating this technique into your giant pumpkin growing strategy, you’re not just hoping for a big pumpkin; you’re actively creating the optimal conditions for it to thrive.
Think of it this way: you’re not just planting a seed; you’re building a foundation. And this DIY trick is a crucial component of that foundation. It’s about understanding the specific needs of these behemoths and proactively addressing them.
But don’t just take my word for it. The real magic happens when you put this into practice. Experiment with different variations to see what works best for your specific climate, soil type, and pumpkin variety. Perhaps you’ll find that adding a specific type of compost tea alongside the [DIY trick] further enhances growth. Or maybe you’ll discover that adjusting the timing of the [DIY trick] application yields even better results. The possibilities are endless!
Remember, growing giant pumpkins is a journey of continuous learning and refinement. Don’t be afraid to tweak and adjust based on your observations. And most importantly, don’t be discouraged if things don’t go perfectly the first time. Every season is a new opportunity to learn and improve.
We’re incredibly excited to see what you can achieve with this DIY trick. So, go ahead, give it a try! And please, share your experiences with us. Tell us about your successes, your challenges, and any modifications you made along the way. Your insights could be invaluable to other aspiring giant pumpkin growers. Let’s build a community of passionate growers, sharing knowledge and pushing the boundaries of what’s possible.
Ultimately, the goal is to grow the biggest, healthiest pumpkin you can. And with this DIY trick in your arsenal, you’ll be well on your way to achieving that goal. Happy growing!
Frequently Asked Questions (FAQ)
Q: What if I don’t have access to the specific materials mentioned for the DIY trick?
A: That’s perfectly fine! The beauty of DIY is its adaptability. The specific materials mentioned are often recommendations based on availability and effectiveness, but you can often substitute them with similar alternatives. For example, if the recipe calls for a specific brand of mycorrhizae, you can research other reputable brands that offer similar formulations. If you can’t find a particular type of organic matter for soil amendment, consider using well-rotted compost, aged manure, or even leaf mold. The key is to understand the purpose of the ingredient and find a suitable replacement that serves the same function. Always research the properties of your substitute to ensure it’s safe and beneficial for your pumpkin plant.
Q: How often should I apply this DIY trick to my giant pumpkin plant?
A: The frequency of application will depend on several factors, including the specific DIY trick, the age of your plant, and the environmental conditions. As a general guideline, start with the recommended frequency mentioned in the article and then adjust based on your observations. For example, if you’re using a soil amendment, you might apply it at planting time and then again every few weeks during the early stages of growth. If you’re using a foliar spray, you might apply it more frequently, perhaps once a week or every other week. Pay close attention to your plant’s response. If you notice signs of nutrient deficiency or stress, you might need to increase the frequency of application. Conversely, if your plant seems to be thriving, you might be able to reduce the frequency.
Q: Can I use this DIY trick in conjunction with other growing techniques?
A: Absolutely! In fact, we highly encourage it. This DIY trick is designed to complement other good growing practices, such as proper watering, fertilization, and pest control. Think of it as one piece of the puzzle. The more you can optimize all aspects of your growing strategy, the better your chances of success. Just be mindful of potential interactions between different techniques. For example, if you’re using a chemical fertilizer, make sure it’s compatible with the organic materials you’re using in your soil amendment. And always follow the instructions on any products you use.
Q: What are some common mistakes to avoid when using this DIY trick?
A: One common mistake is overdoing it. More isn’t always better. Applying too much of a soil amendment or foliar spray can actually harm your plant. Always follow the recommended dosages and frequencies. Another mistake is neglecting to monitor your plant’s response. Pay close attention to its leaves, stems, and overall growth. If you notice any signs of stress or nutrient deficiency, adjust your approach accordingly. Finally, don’t be afraid to experiment, but do so in a controlled manner. Try different variations of the DIY trick on a small scale before applying them to your entire pumpkin patch.
Q: How long will it take to see results from using this DIY trick?
A: The time it takes to see results will vary depending on the specific DIY trick and the overall health of your plant. Some tricks, such as foliar sprays, may produce noticeable results within a few days. Others, such as soil amendments, may take several weeks or even months to show their full effect. Be patient and consistent with your application. And remember that growing giant pumpkins is a long-term process. It takes time and dedication to achieve significant results.
Q: Is this DIY trick suitable for all varieties of giant pumpkins?
A: While this DIY trick is generally applicable to most giant pumpkin varieties, it’s always a good idea to research the specific needs of your chosen variety. Some varieties may be more sensitive to certain nutrients or environmental conditions. By understanding the unique characteristics of your pumpkin variety, you can tailor your growing strategy to maximize its potential.
Q: Where can I find more information about growing giant pumpkins?
A: There are many excellent resources available online and in print. Look for websites and forums dedicated to giant pumpkin growing. These communities are often filled with experienced growers who are willing to share their knowledge and expertise. You can also find helpful information in gardening books and magazines. And don’t forget to consult with your local agricultural extension office. They can provide valuable advice on growing conditions and best practices in your area.
Leave a Comment