
Cleaning Hacks You Wish You Knew – wouldn’t it be amazing to wave a magic wand and banish grime, dust, and clutter from your home in an instant? While I can’t offer you a spell, I can equip you with a treasure trove of cleaning hacks that will make your life significantly easier and your home sparkle like never before!
For centuries, people have sought clever ways to maintain clean and healthy living spaces. From ancient civilizations using natural remedies to modern innovations in cleaning technology, the quest for a spotless home is a timeless pursuit. These cleaning hacks you wish you knew aren’t just about aesthetics; they’re about creating a healthier, more comfortable environment for you and your loved ones. A clean home reduces allergens, minimizes the spread of germs, and even boosts your mood!
Let’s face it, cleaning can be a chore. But what if I told you that you could cut your cleaning time in half and achieve even better results? That’s precisely what this article is all about. I’m going to share some of the most effective, time-saving, and budget-friendly cleaning hacks that I’ve personally tested and swear by. Get ready to ditch the elbow grease and embrace a smarter, cleaner way of living!
Cleaning Hacks You Wish You Knew
Okay, let’s dive into some seriously game-changing cleaning hacks that I wish I’d known years ago! These aren’t your grandma’s cleaning tips (well, some might be, but with a modern twist!). Get ready to revolutionize your cleaning routine and reclaim your weekends.
Cleaning Your Microwave Like a Pro
Microwaves. We love them, we use them constantly, and we often neglect cleaning them. But fear not, because I’ve got a super easy method that requires minimal effort and maximum results.
What you’ll need:
* 1 cup of water
* 1 tablespoon of white vinegar or lemon juice
* Microwave-safe bowl
* Clean sponge or cloth
Step-by-step instructions:
1. Prepare the cleaning solution: In your microwave-safe bowl, mix the water and vinegar (or lemon juice). The vinegar/lemon juice helps to loosen the grime and deodorize the microwave.
2. Microwave the solution: Place the bowl in the microwave and heat it on high for 5-7 minutes. You want the solution to boil and create steam inside the microwave. This steam is what will loosen all the stuck-on food particles.
3. Let it sit: Once the timer goes off, don’t open the microwave immediately! Let the bowl sit inside for another 3-5 minutes. This allows the steam to continue working its magic.
4. Wipe it clean: Carefully remove the bowl (it will be hot!). Then, using your clean sponge or cloth, wipe down the inside of the microwave. You’ll be amazed at how easily the grime comes off. For stubborn spots, you might need a little extra elbow grease, but overall, it should be a breeze.
5. Clean the turntable: Don’t forget to remove and wash the microwave turntable! You can usually wash it in the sink with soap and water or even put it in the dishwasher.
De-Gunking Your Showerhead for Better Water Pressure
Is your showerhead spraying water in all directions except where you want it? Is the water pressure weak? Chances are, it’s clogged with mineral deposits. Here’s how to fix it:
What you’ll need:
* White vinegar
* Plastic bag (a Ziploc bag works great)
* Rubber band or twist tie
* Old toothbrush or small cleaning brush
* Pin or needle (optional, for extra stubborn clogs)
Step-by-step instructions:
1. Fill the bag with vinegar: Pour enough white vinegar into the plastic bag to completely submerge the showerhead.
2. Attach the bag to the showerhead: Carefully position the bag over the showerhead, making sure the showerhead is fully immersed in the vinegar. Secure the bag tightly with a rubber band or twist tie.
3. Soak overnight: Let the showerhead soak in the vinegar overnight (or for at least several hours). This allows the vinegar to dissolve the mineral deposits.
4. Remove the bag and scrub: Remove the bag and discard the vinegar. Use your old toothbrush or cleaning brush to scrub away any remaining mineral deposits.
5. Rinse and test: Turn on the shower and let the water run for a few minutes to flush out any remaining debris. Check the water pressure and spray pattern. If there are still some clogged holes, use a pin or needle to gently poke them clear.
Cleaning Your Blender Like a Boss
Blenders are fantastic for smoothies, soups, and sauces, but cleaning them can be a pain. This hack makes it incredibly easy.
What you’ll need:
* Warm water
* Dish soap
Step-by-step instructions:
1. Fill the blender halfway: After you’ve finished using your blender, immediately fill it about halfway with warm water.
2. Add dish soap: Add a squirt or two of dish soap to the water.
3. Blend: Secure the lid and blend on high speed for about 30-60 seconds.
4. Rinse: Pour out the soapy water and rinse the blender thoroughly with clean water.
5. Dry: Allow the blender to air dry completely before storing it.
Reviving Dingy White Laundry
White clothes can quickly become dull and dingy. Here’s how to bring them back to life without harsh chemicals.
What you’ll need:
* Baking soda
* Hydrogen peroxide
* Laundry detergent
Step-by-step instructions:
1. Pre-soak (optional but recommended): For heavily soiled items, pre-soak them in a solution of warm water and 1 cup of baking soda for at least 30 minutes.
2. Add ingredients to the washing machine: Add your regular laundry detergent to the washing machine as usual. Then, add 1 cup of baking soda and 1 cup of hydrogen peroxide to the drum of the washing machine.
3. Wash as usual: Wash your white clothes as usual, using the hottest water setting recommended for the fabric.
4. Dry in the sun (if possible): Sunlight is a natural bleaching agent, so drying your white clothes in the sun can help to further brighten them.
Cleaning Your Grout with Baking Soda and Vinegar
Grout can be a magnet for dirt and grime, making your tiles look dull. This simple solution will have your grout sparkling again.
What you’ll need:
* Baking soda
* White vinegar
* Spray bottle
* Old toothbrush or grout brush
* Water
Step-by-step instructions:
1. Sprinkle baking soda: Sprinkle baking soda liberally over the grout you want to clean.
2. Spray with vinegar: Fill a spray bottle with white vinegar and spray it over the baking soda. The mixture will fizz, which is a good sign – it means it’s working!
3. Let it sit: Let the mixture sit for about 10-15 minutes.
4. Scrub: Use an old toothbrush or grout brush to scrub the grout lines.
5. Rinse: Rinse the area thoroughly with water. You may need to wipe it down with a damp cloth to remove any remaining baking soda residue.
Unclogging Drains Naturally
Chemical drain cleaners can be harsh and damaging to your pipes. Here’s a natural and effective way to unclog drains.
What you’ll need:
* Baking soda
* White vinegar
* Hot water
Step-by-step instructions:
1. Pour baking soda down the drain: Pour about 1 cup of baking soda down the clogged drain.
2. Pour vinegar down the drain: Follow the baking soda with 1 cup of white vinegar. The mixture will fizz.
3. Let it sit: Let the mixture sit for about 30 minutes.
4. Flush with hot water: After 30 minutes, flush the drain with a pot of boiling water.
Cleaning Burnt Pots and Pans
Accidentally burnt your favorite pot? Don’t despair! Here’s how to rescue it.
What you’ll need:
* Baking soda
* Water
* Dish soap
* Scrubbing pad or sponge
Step-by-step instructions:
1. Cover the burnt area with baking soda: Sprinkle a generous amount of baking soda over the burnt food residue in the pot or pan.
2. Add water: Add enough water to cover the burnt area.
3. Bring to a boil: Bring the water to a boil on the stovetop.
4. Simmer: Once boiling, reduce the heat and simmer for about 15-30 minutes, stirring occasionally.
5. Let it cool: Remove the pot or pan from the heat and let it cool slightly.
6. Scrub: Use a scrubbing pad or sponge to scrub away the loosened burnt food residue. You may need to add a little dish soap to help with the cleaning.
7. Wash as usual: Wash the pot or pan as usual with soap and water.
Freshening Up Your Mattress
Mattresses can harbor dust mites and odors. Here’s how to freshen yours up.
What you’ll need:
* Baking soda
* Essential oil (optional)
* Vacuum cleaner with upholstery attachment
* Sieve or strainer (optional)
Step-by-step instructions:
1. Strip the bed: Remove all bedding from the mattress.
2. Sprinkle baking soda: Sprinkle a generous layer of baking soda over the entire surface of the mattress. If you want to add a pleasant scent, mix a few drops of your favorite essential oil (like lavender or eucalyptus) with the baking soda before sprinkling.
Conclusion
So, there you have it! This simple yet incredibly effective cleaning hack is a game-changer for anyone looking to streamline their cleaning routine and achieve sparkling results without breaking the bank. We’ve shown you how to transform readily available household items into powerful cleaning agents, saving you time, money, and effort.
Why is this DIY cleaning trick a must-try? Because it’s not just about cleaning; it’s about reclaiming your time and creating a healthier, more sustainable home. Store-bought cleaners often contain harsh chemicals that can be harmful to your family and the environment. This method allows you to control exactly what goes into your cleaning solutions, ensuring a safer and more natural approach. Plus, let’s be honest, there’s a certain satisfaction that comes from creating something yourself and seeing it work wonders.
But the benefits don’t stop there. This cleaning hack is incredibly versatile. Feel free to experiment with different essential oils to customize the scent and add extra cleaning power. For example, a few drops of tea tree oil can boost the antibacterial properties, while lemon oil adds a refreshing citrus aroma. You can also adjust the ratios of ingredients to suit your specific cleaning needs. Got a particularly stubborn stain? Increase the concentration of vinegar or baking soda.
Consider these variations to tailor the cleaning hack to your specific needs:
* **For a heavy-duty degreaser:** Add a tablespoon of borax to the mixture. Borax is a natural mineral that helps to cut through grease and grime.
* **For a gentle all-purpose cleaner:** Dilute the mixture with more water to make it suitable for delicate surfaces like wood or painted walls.
* **For a mold and mildew remover:** Combine equal parts of white vinegar and water in a spray bottle and spray directly onto the affected area. Let it sit for a few minutes before scrubbing and rinsing.
* **For a glass cleaner:** Mix equal parts of white vinegar and water in a spray bottle. Spray onto glass surfaces and wipe clean with a microfiber cloth.
We are confident that once you try this DIY cleaning hack, you’ll wonder how you ever lived without it. It’s a simple, effective, and eco-friendly way to keep your home clean and healthy.
Now, it’s your turn! We encourage you to give this cleaning hack a try and see the amazing results for yourself. Don’t be afraid to experiment with different variations and find what works best for you. And most importantly, we want to hear about your experience! Share your tips, tricks, and before-and-after photos in the comments below. Let’s create a community of DIY cleaning enthusiasts and help each other achieve sparkling homes, one cleaning hack at a time. Your insights could be invaluable to others who are just starting out. Let’s revolutionize the way we clean, one homemade solution at a time. Embrace the power of DIY and discover the joy of a clean, healthy, and happy home.
Frequently Asked Questions (FAQ)
What exactly is this “cleaning hack” you’re referring to?
This article focuses on a simple, effective, and eco-friendly method for creating your own cleaning solutions using common household ingredients. It’s about ditching harsh chemicals and embracing a more natural approach to cleaning your home. The specific ingredients and ratios will vary depending on the particular cleaning task, but the underlying principle remains the same: using readily available items like vinegar, baking soda, and essential oils to create powerful cleaning agents.
Is this DIY cleaning hack safe for all surfaces?
While this cleaning hack is generally safe for most surfaces, it’s always a good idea to test it in an inconspicuous area first, especially on delicate or sensitive materials like wood, painted surfaces, or natural stone. Vinegar, in particular, can be acidic and may damage certain surfaces if used undiluted. Always dilute the cleaning solution with water as needed and avoid using abrasive scrubbers that could scratch the surface. When in doubt, consult the manufacturer’s instructions for the specific surface you’re cleaning.
Can I use different types of vinegar?
White vinegar is generally the preferred choice for cleaning due to its high acidity and lack of color, which minimizes the risk of staining. However, you can also use apple cider vinegar as a substitute, although it may have a slightly weaker cleaning power and a more noticeable scent. Avoid using balsamic vinegar or other colored vinegars, as they could potentially stain surfaces.
How long will the DIY cleaning solution last?
The shelf life of your DIY cleaning solution will depend on the ingredients you use. Solutions containing water are more prone to bacterial growth and should be used within a few weeks. Solutions made with vinegar or alcohol have a longer shelf life due to their antibacterial properties. To maximize the shelf life of your cleaning solution, store it in a clean, airtight container in a cool, dark place. It’s always a good idea to label the container with the date you made the solution so you can keep track of its age.
What essential oils are best to use in this cleaning hack?
The best essential oils to use in your DIY cleaning solution will depend on your personal preferences and the specific cleaning task. Some popular choices include:
* **Lemon:** Known for its refreshing scent and degreasing properties.
* **Tea Tree:** Has antibacterial and antifungal properties, making it ideal for cleaning bathrooms and kitchens.
* **Lavender:** Offers a calming scent and has antiseptic properties.
* **Eucalyptus:** Has a strong, invigorating scent and is effective at disinfecting surfaces.
* **Peppermint:** Provides a refreshing scent and can help to repel insects.
When using essential oils, be sure to use high-quality, pure essential oils and follow the recommended dilution ratios. A few drops are usually sufficient for a standard-sized spray bottle.
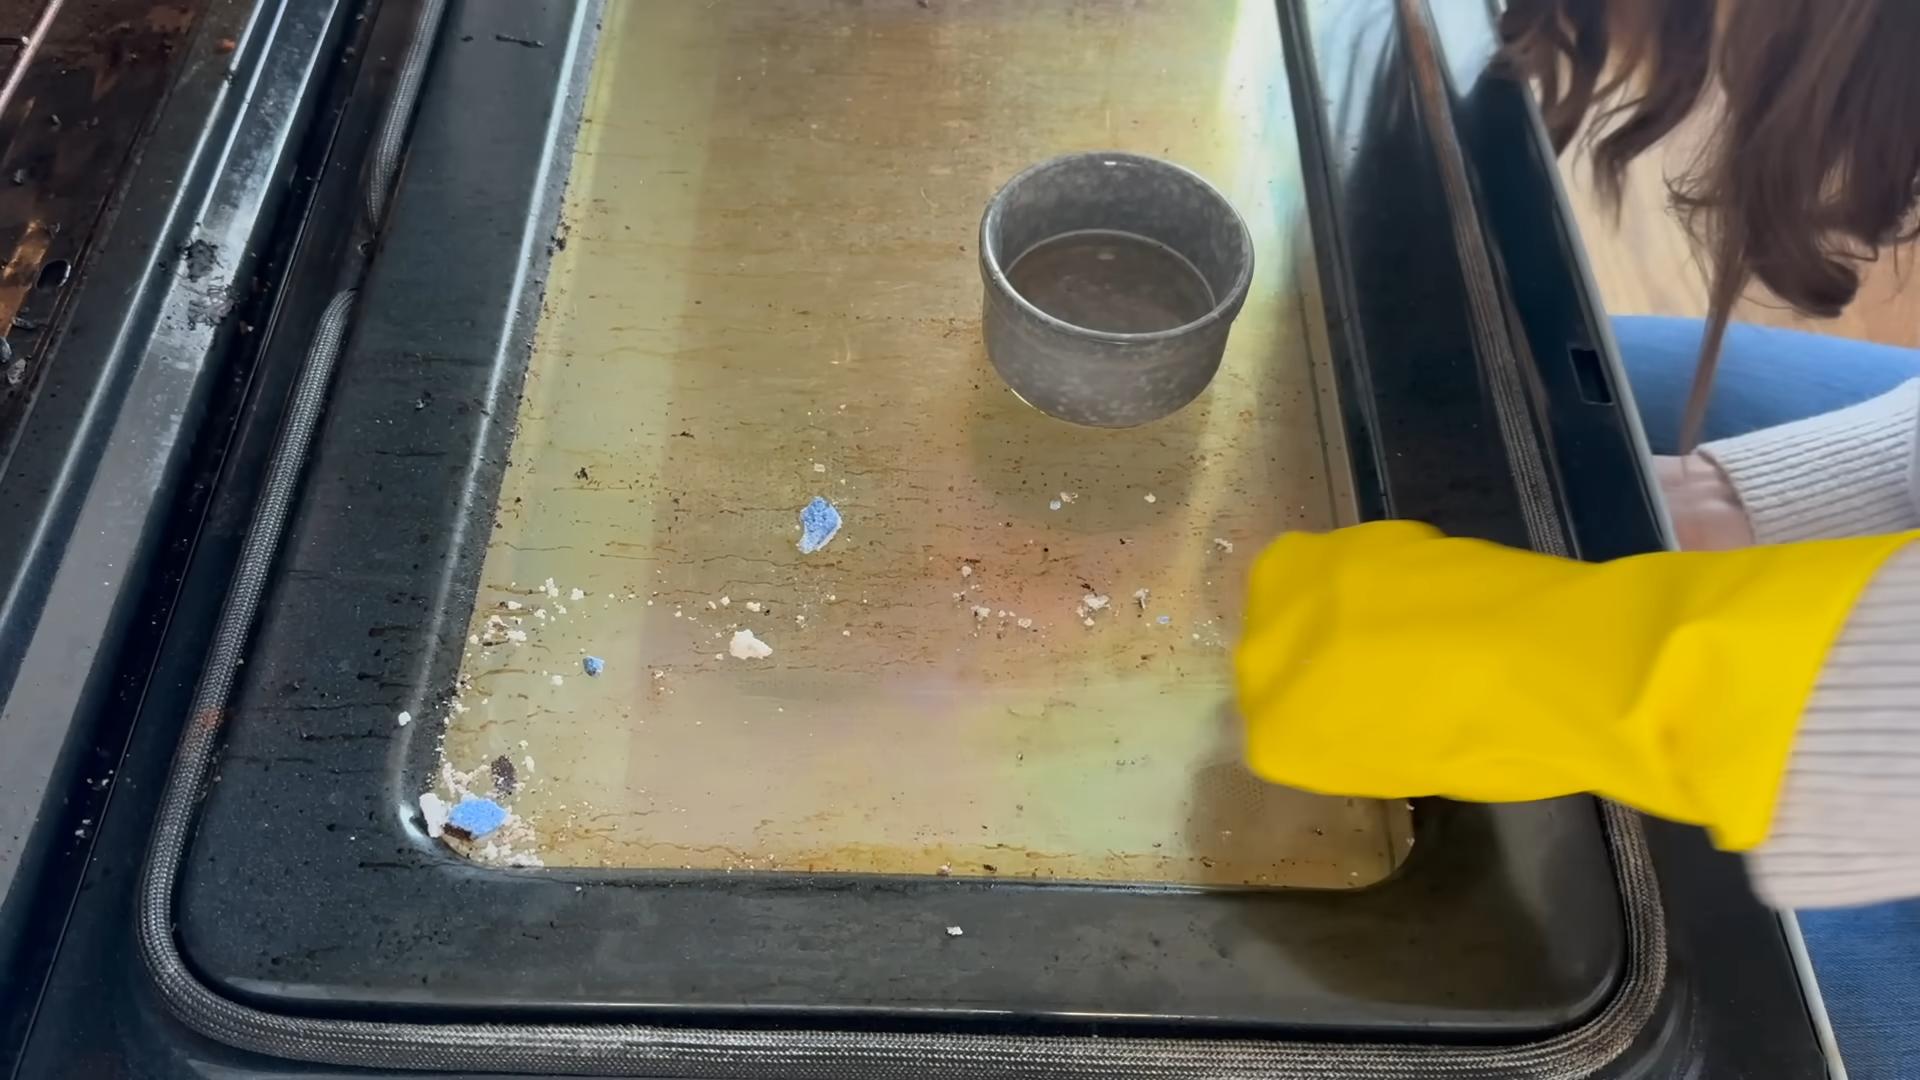
Can I use this cleaning hack to clean my oven?
Yes, you can use this cleaning hack to clean your oven, but it may require a bit more effort than using commercial oven cleaners. A popular method is to make a paste of baking soda and water and spread it all over the inside of your oven. Let it sit overnight, then scrub away the grime with a sponge or cloth. You can also add a bit of vinegar to the baking soda paste for extra cleaning power. Be sure to rinse the oven thoroughly with water after cleaning.
Is this cleaning hack safe for pets and children?
While this cleaning hack is generally safer than using harsh chemicals, it’s still important to take precautions when cleaning around pets and children. Keep cleaning solutions out of reach of children and pets, and avoid spraying them directly onto surfaces that they may come into contact with. If you’re using essential oils, be sure to research their safety for pets, as some essential oils can be toxic to animals. Always ventilate the area well when cleaning and allow surfaces to dry completely before allowing pets or children to come into contact with them.
What if I don’t have all the ingredients listed?
The beauty of this DIY cleaning hack is that it’s flexible and adaptable. If you don’t have all the ingredients listed, you can often substitute them with other common household items. For example, if you don’t have baking soda, you can use borax instead. If you don’t have essential oils, you can simply omit them or use a different scent that you enjoy. The key is to experiment and find what works best for you.
I tried the cleaning hack, but it didn’t work as well as I expected. What could I be doing wrong?
There are several factors that could affect the effectiveness of your DIY cleaning hack. First, make sure you’re using the correct ratios of ingredients. Too much or too little of one ingredient can throw off the balance of the solution. Second, make sure you’re allowing the cleaning solution to sit on the surface for long enough to work its magic. Stubborn stains may require a longer soaking time. Third, make sure you’re using the right type of scrubber or cloth for the surface you’re cleaning. Abrasive scrubbers can damage delicate surfaces, while microfiber cloths are ideal for cleaning glass and other smooth surfaces. Finally, remember that DIY cleaning solutions may not be as powerful as commercial cleaners, so you may need to put in a bit more elbow grease to achieve the desired results.
Leave a Comment