
Oxiclean for grout cleaning: Are you tired of staring at dingy, stained grout lines, wishing they could magically disappear? I know I have been! It’s amazing how quickly grout can go from sparkling white to a breeding ground for grime, making your entire kitchen or bathroom look older than it is. But before you resign yourself to hours of scrubbing with harsh chemicals, let me let you in on a little secret: Oxiclean! This powerful, oxygen-based cleaner isn’t just for laundry; it’s a surprisingly effective and eco-friendlier solution for tackling stubborn grout stains.
Grout cleaning has been a household chore for centuries, evolving from using simple lye solutions to the modern array of cleaning products we see today. But the quest for an easy and effective method remains constant. We all want a clean home without spending hours on our hands and knees, breathing in toxic fumes. That’s where this DIY trick comes in.
This article will guide you through using Oxiclean for grout cleaning, offering a simple, step-by-step approach to restore your grout to its former glory. I’ll share my personal experiences, tips, and tricks to ensure you achieve the best possible results. Say goodbye to stubborn stains and hello to sparkling clean grout with this easy and affordable DIY solution!
DIY Grout Cleaning with OxiClean: A Sparkling Transformation!
Hey there, fellow DIY enthusiasts! Are you tired of staring at dingy, discolored grout lines that seem to mock your cleaning efforts? I know I was! After trying countless cleaners with disappointing results, I stumbled upon a game-changer: OxiClean. Yes, that same OxiClean you use for laundry can work wonders on your grout. And trust me, the results are seriously impressive. I’m going to walk you through exactly how I use OxiClean to get my grout looking practically brand new.
What You’ll Need
Before we dive in, let’s gather our supplies. This is a pretty straightforward project, so the list is short and sweet:
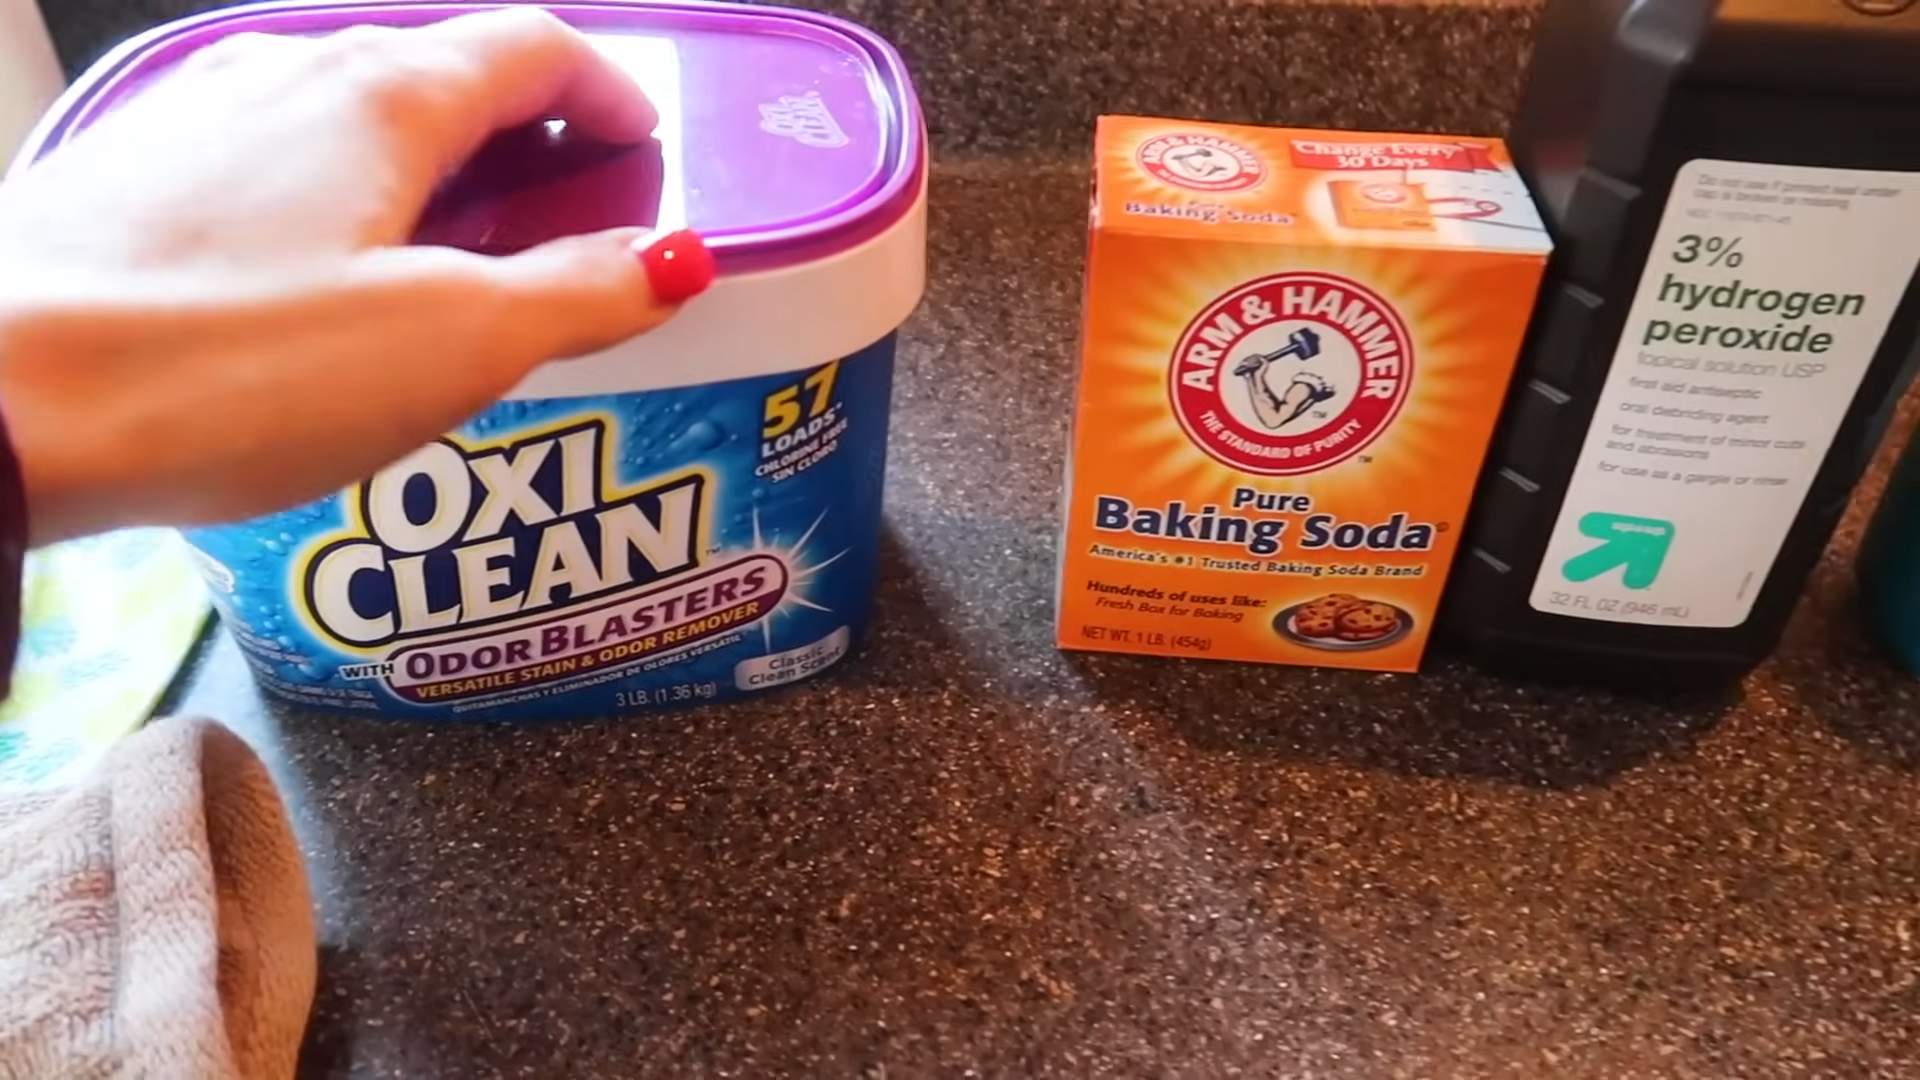
* OxiClean Versatile Stain Remover (the powder form is what I use)
* Warm water
* A small mixing bowl or container
* A stiff-bristled brush (an old toothbrush works great for small areas, or a grout brush for larger spaces)
* Spray bottle (optional, but helpful for applying the solution)
* Clean cloths or paper towels
* Rubber gloves (protect those hands!)
* Eye protection (safety first!)
* A vacuum cleaner or broom (for pre-cleaning)
* A mop (for the final rinse)
Preparing for the Grout Cleaning Adventure
Okay, let’s get started! Before we unleash the power of OxiClean, we need to prep the area. This will make the cleaning process much more effective.
1. Clear the Area: Remove any rugs, furniture, or obstacles that might get in your way. You want to have clear access to all the grout lines.
2. Sweep or Vacuum: Thoroughly sweep or vacuum the floor to remove loose dirt, dust, and debris. This prevents you from just pushing the grime around when you start scrubbing. I find that a vacuum with a brush attachment works best for getting into those grout lines.
3. Ventilate the Room: Open windows and doors to ensure good ventilation. While OxiClean isn’t overly harsh, it’s always a good idea to have fresh air circulating.
Mixing the OxiClean Solution: The Magic Potion
Now for the fun part: creating our cleaning solution! The key here is to get the right consistency – not too watery, not too pasty.
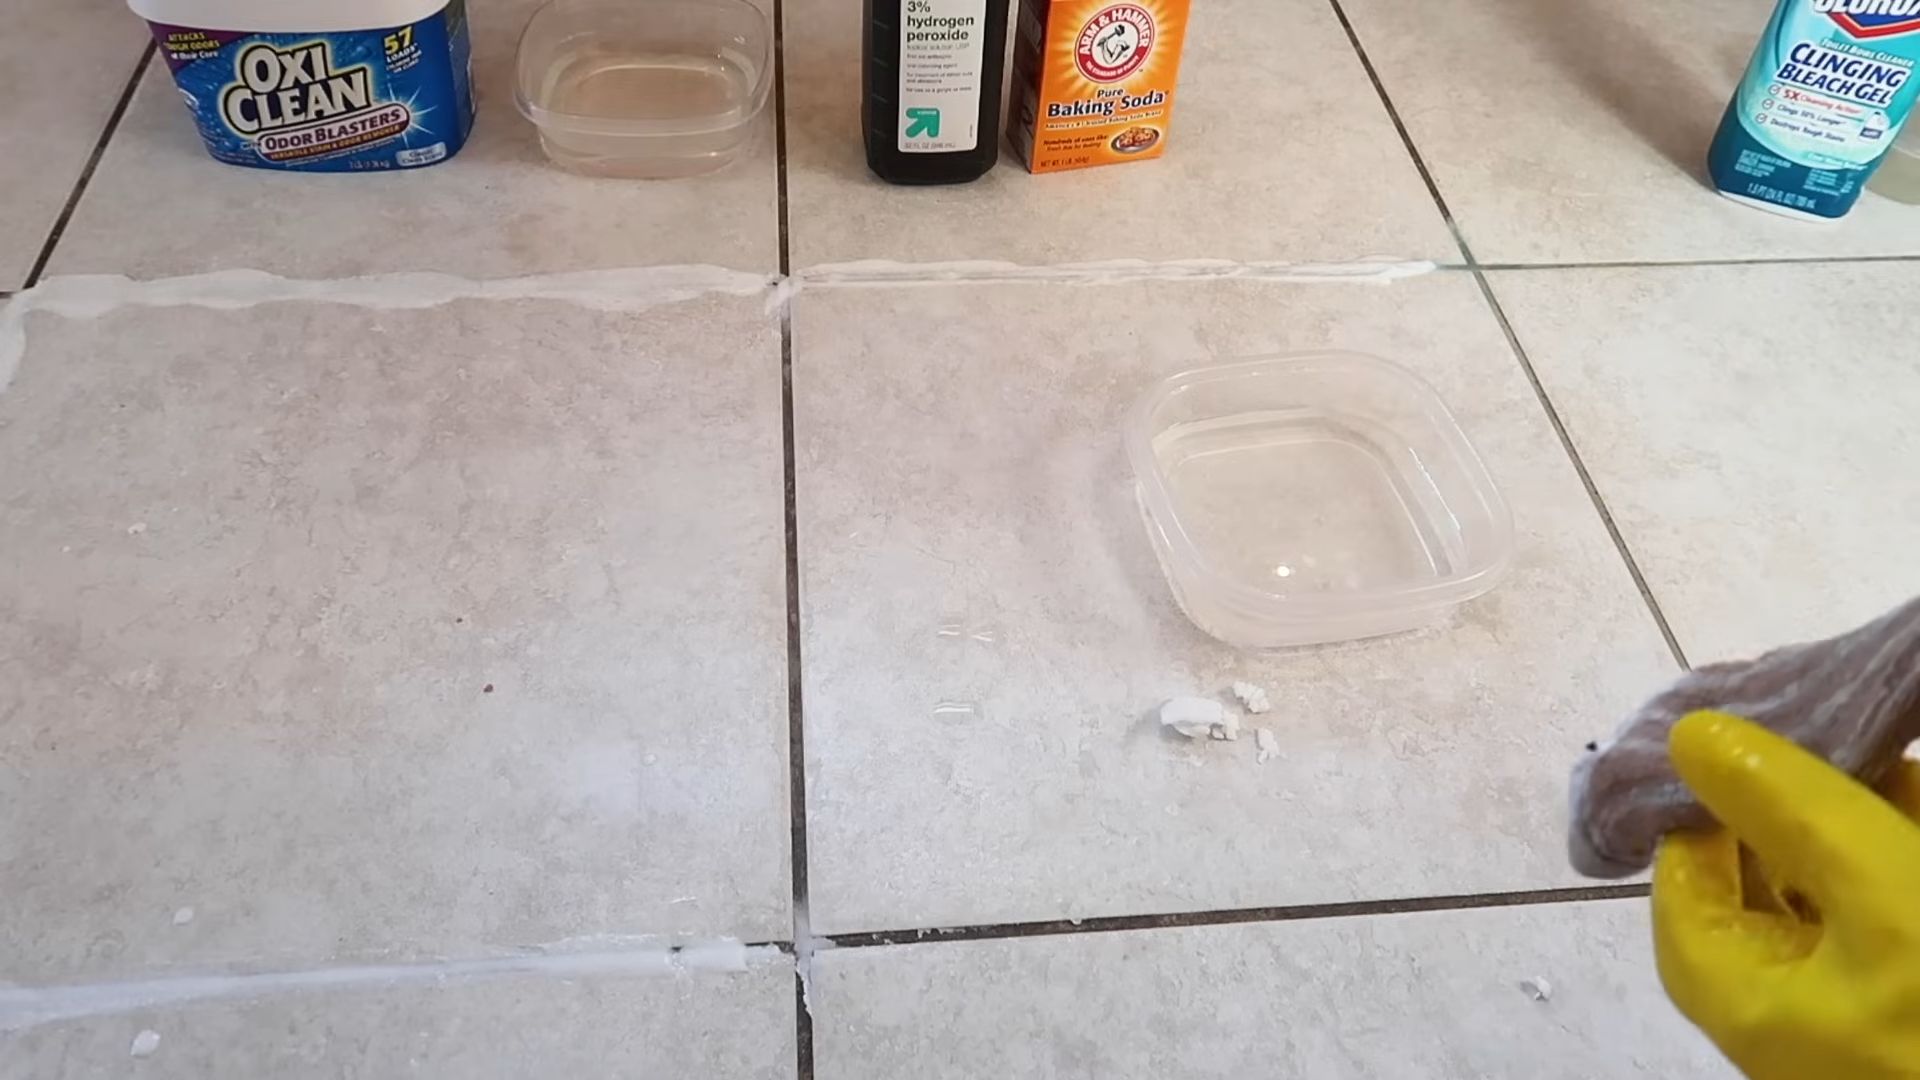
1. Grab Your Bowl: Take your mixing bowl or container and add warm water. I usually start with about 2 cups of warm water.
2. Add the OxiClean: Gradually add OxiClean powder to the warm water, stirring constantly. I typically use about 1/4 cup of OxiClean for every 2 cups of water. You’re aiming for a slightly thick, paste-like consistency. It should be thick enough to cling to the grout lines but still spreadable.
3. Stir Thoroughly: Keep stirring until the OxiClean is completely dissolved. There shouldn’t be any clumps or undissolved powder.
4. Let it Sit (Optional): I sometimes let the solution sit for a few minutes to allow the OxiClean to fully activate. This isn’t strictly necessary, but I think it helps boost its cleaning power.
Applying the OxiClean Solution: Targeting the Grime
Alright, we’ve got our solution, and the area is prepped. Time to get down and dirty (literally!).
1. Apply the Solution: Using your brush or spray bottle, apply the OxiClean solution directly to the grout lines. If you’re using a brush, dip it into the solution and carefully paint the grout lines. If you’re using a spray bottle, spray the solution evenly over the grout.
2. Work in Sections: I recommend working in small sections (about 2-3 square feet at a time) to prevent the solution from drying out.
3. Let it Dwell: This is crucial! Allow the OxiClean solution to dwell on the grout lines for at least 10-15 minutes. This gives the OxiClean time to penetrate the grime and break it down. For heavily soiled grout, you can let it sit for up to 30 minutes, but don’t let it dry completely.
Scrubbing Away the Grime: Elbow Grease Time!
Okay, the OxiClean has done its magic, now it’s our turn to shine!
1. Grab Your Brush: Take your stiff-bristled brush (toothbrush or grout brush) and start scrubbing the grout lines. Use firm, back-and-forth motions to loosen the dirt and grime.
2. Focus on Stubborn Stains: Pay extra attention to areas with stubborn stains or discoloration. You might need to scrub these areas a bit more vigorously.
3. Rinse Your Brush: Periodically rinse your brush in clean water to remove the loosened grime. This will help you scrub more effectively.
4. Don’t Be Afraid to Reapply: If the grout is particularly dirty, you might need to reapply the OxiClean solution and scrub again.
Rinsing and Drying: Revealing the Sparkle
We’re almost there! Now it’s time to rinse away the OxiClean and reveal our sparkling grout.
1. Rinse Thoroughly: Use a clean, damp cloth or sponge to thoroughly rinse the grout lines. Make sure to remove all traces of the OxiClean solution. You might need to rinse several times to ensure everything is clean.
2. Wipe Away Excess Water: Use a clean, dry cloth or paper towels to wipe away any excess water.
3. Mop the Floor: Mop the entire floor with clean water to remove any remaining residue.
4. Dry Completely: Allow the floor to air dry completely. You can speed up the drying process by opening windows or using a fan.
Dealing with Stubborn Stains: When OxiClean Needs a Little Help
Sometimes, even OxiClean needs a little backup. If you have particularly stubborn stains that just won’t budge, here are a few extra tips:
* Baking Soda Paste: Make a paste of baking soda and water and apply it to the stain. Let it sit for a few minutes, then scrub with your brush.
* Vinegar: Vinegar is a natural cleaning powerhouse. Try spraying vinegar on the stain and letting it sit for a few minutes before scrubbing. Be careful when using vinegar on certain types of stone, as it can etch the surface. Always test in an inconspicuous area first.
* Hydrogen Peroxide: Hydrogen peroxide is another great stain remover. Apply it directly to the stain and let it sit for a few minutes before scrubbing.
* Magic Eraser: A Magic Eraser can sometimes work wonders on stubborn stains. Just be gentle, as it can be abrasive.
Maintaining Your Sparkling Grout: Keeping it Clean
Now that you’ve put in all this effort to clean your grout, you’ll want to keep it looking its best. Here are a few tips for maintaining your sparkling grout:
* Regular Cleaning: Sweep or vacuum your floors regularly to prevent dirt and debris from building up in the grout lines.
* Wipe Up Spills Immediately: Don’t let spills sit on your grout for too long. Wipe them up as soon as possible to prevent staining.
* Use a Grout Sealer: Applying a grout sealer can help protect your grout from stains and make it easier to clean. I highly recommend sealing your grout after cleaning it.
* Avoid Harsh Chemicals: Avoid using harsh chemicals or abrasive cleaners on your grout, as they can damage the surface.
* Steam Cleaning: A steam cleaner can be a great way to deep clean your grout without using harsh chemicals.
A Few Extra Tips and Tricks
* Test in an Inconspicuous Area: Before cleaning your entire floor, test the OxiClean solution in an inconspicuous area to make sure it doesn’t damage the grout or tile.
* Protect Your Knees: If you’re cleaning a large area, consider using knee pads to protect your knees.
* Take Breaks: Cleaning grout can be tiring! Take breaks as needed to avoid overexertion.
* Be Patient: Cleaning grout can be a time-consuming process, so be patient and don’t get discouraged if it takes a while.
* Consider the Type of Grout: Different types of grout may react differently to cleaning solutions. Research the type of grout you have and choose a cleaning method that is appropriate. Epoxy grout, for example, is more resistant to staining and may require a different approach.
* Color-Safe Bleach Alternative: OxiClean is a color-safe bleach alternative, but it’s still a good idea to test it on a small, hidden area of colored grout to ensure it doesn’t cause any discoloration.
* Don’t Mix Chemicals: Never mix OxiClean with other cleaning chemicals, especially bleach, as this can create dangerous fumes.
Conclusion
So, there you have it! Unleashing the power of Oxiclean for grout cleaning is a game-changer for anyone battling stubborn stains and discoloration. We’ve walked you through the simple steps, highlighting why this DIY trick is not just effective, but also a cost-efficient and surprisingly eco-conscious alternative to harsh chemical cleaners. Forget spending a fortune on specialized grout cleaning products that often leave behind unpleasant fumes and potentially damage your surfaces. Oxiclean offers a gentler, yet equally potent, solution.
Why is this a must-try? Because it works! You’ll witness firsthand the transformation as dingy, stained grout lines brighten before your eyes, restoring the beauty and hygiene of your tile surfaces. The satisfaction of seeing those stubborn stains lift away is truly rewarding. Plus, you’re likely already familiar with Oxiclean and its versatility, making this a convenient addition to your cleaning arsenal.
But the beauty of this method lies in its adaptability. Feel free to experiment with variations to suit your specific needs and preferences. For instance, if you’re dealing with particularly tough stains, consider letting the Oxiclean paste sit for a longer period – perhaps an hour or even overnight – before scrubbing. You can also adjust the consistency of the paste to your liking, making it thicker for vertical surfaces or thinner for easier application on large areas.
Another variation to consider is adding a few drops of your favorite essential oil to the Oxiclean mixture. This will not only leave your bathroom or kitchen smelling fresh and clean, but also provide aromatherapy benefits while you work. Lavender, tea tree, and eucalyptus are all excellent choices for their antibacterial and antifungal properties.
For those with sensitive skin, we highly recommend wearing gloves during the cleaning process. While Oxiclean is generally considered safe, prolonged contact with the skin can cause irritation. And as always, remember to test the solution on a small, inconspicuous area first to ensure it doesn’t damage or discolor your grout.
Don’t just take our word for it – give this DIY trick a try and experience the magic of Oxiclean for grout cleaning yourself! We’re confident that you’ll be amazed by the results. And once you’ve transformed your grout, we encourage you to share your experience with us. Post before-and-after photos on social media, tag us in your posts, and let us know what variations you tried and how they worked for you. Your feedback will not only inspire others to try this amazing cleaning hack, but also help us refine and improve our recommendations. Let’s create a community of sparkling clean grout enthusiasts!
We believe in the power of simple, effective, and affordable cleaning solutions. And this Oxiclean grout cleaning method embodies all of those qualities. So, ditch the expensive chemicals, embrace the power of Oxiclean, and get ready to say hello to beautifully clean grout!
Frequently Asked Questions (FAQ)
What exactly *is* Oxiclean, and is it safe to use on all types of grout?
Oxiclean is a brand name for a powdered oxygen bleach product. Its active ingredient is sodium percarbonate, which breaks down into sodium carbonate (washing soda) and hydrogen peroxide when mixed with water. This makes it a relatively safe and environmentally friendly cleaning agent compared to chlorine bleach. However, while generally safe, it’s always best to test Oxiclean on a small, hidden area of your grout first, especially if you have colored grout. Some types of colored grout might be susceptible to fading, although this is rare with Oxiclean’s gentle action. If you’re unsure about your grout type, consult with a tile or grout specialist before proceeding.
How much Oxiclean should I use for grout cleaning?
The ideal ratio of Oxiclean to water depends on the severity of the staining and your personal preference. A good starting point is to create a paste-like consistency. This usually translates to about 1/4 cup of Oxiclean powder mixed with 2-3 tablespoons of warm water. Add more water gradually until you achieve a thick, spreadable paste. For lighter stains, you can use a more diluted solution. For tougher stains, you can increase the amount of Oxiclean powder slightly. Remember to always mix the Oxiclean powder with water in a well-ventilated area.
What kind of brush should I use to scrub the grout?
The best type of brush for scrubbing grout is a stiff-bristled brush with a narrow head. A toothbrush is a popular choice for smaller areas and detail work. You can also find specialized grout brushes at most hardware stores or online retailers. Avoid using metal brushes, as they can scratch or damage the tile and grout. When scrubbing, apply firm, even pressure and work in small sections. Rinse the brush frequently to remove any loosened dirt and grime.
How long should I let the Oxiclean mixture sit on the grout before scrubbing?
The amount of time you let the Oxiclean mixture sit on the grout depends on the severity of the stains. For light stains, 15-20 minutes may be sufficient. For more stubborn stains, you can let it sit for up to an hour, or even overnight. If you’re letting it sit for an extended period, be sure to keep the area well-ventilated and check on it periodically to ensure the grout doesn’t dry out completely. If the grout starts to dry out, lightly mist it with water to keep it moist.
Is it necessary to rinse the grout after cleaning with Oxiclean?
Yes, it’s essential to thoroughly rinse the grout after cleaning with Oxiclean. This will remove any residual Oxiclean powder and prevent it from leaving behind a white residue. Use clean water and a sponge or cloth to wipe down the grout lines. You may need to rinse multiple times to ensure all the Oxiclean is removed. After rinsing, dry the grout with a clean towel to prevent water spots.
Can I use Oxiclean on epoxy grout?
While Oxiclean is generally safe for most types of grout, it’s always best to check with the manufacturer of your epoxy grout before using any cleaning product. Some epoxy grouts may be sensitive to certain chemicals, even those found in Oxiclean. If you’re unsure, test the Oxiclean solution on a small, hidden area of the grout first to ensure it doesn’t cause any damage or discoloration.
What if the Oxiclean doesn’t completely remove the stains?
If the Oxiclean doesn’t completely remove the stains on the first try, don’t give up! You can try repeating the process, letting the Oxiclean mixture sit for a longer period, or using a more concentrated solution. For extremely stubborn stains, you may need to resort to a stronger cleaning agent, such as a grout stain remover specifically designed for your type of grout. However, always follow the manufacturer’s instructions carefully and wear appropriate safety gear when using stronger chemicals.
How often should I clean my grout with Oxiclean?
The frequency of grout cleaning depends on several factors, including the amount of foot traffic, the type of grout, and the level of staining. In general, it’s a good idea to clean your grout every few months to prevent stains from building up. However, if you notice stains appearing more frequently, you may need to clean it more often. Regular cleaning with Oxiclean can help keep your grout looking its best and prevent the need for more aggressive cleaning methods in the future.
Can I use Oxiclean in a grout cleaning machine?
While some people have successfully used Oxiclean in grout cleaning machines, it’s important to check the manufacturer’s instructions for your specific machine before doing so. Some machines may not be compatible with powdered cleaning agents, and using Oxiclean could potentially damage the machine. If you decide to use Oxiclean in a grout cleaning machine, be sure to use a diluted solution and rinse thoroughly after cleaning.
Is there anything else I can do to prevent grout from getting stained in the first place?
Yes! Prevention is always better than cure. Sealing your grout after cleaning is a great way to protect it from future stains. Grout sealers create a barrier that prevents liquids and dirt from penetrating the grout, making it easier to clean and maintain. You can also wipe up spills immediately to prevent them from soaking into the grout. Using mats and rugs in high-traffic areas can also help protect your grout from dirt and grime. Regular sweeping and mopping can also help prevent stains from building up.
Leave a Comment