
Container Squash Gardening: Ever dreamed of harvesting plump, juicy squash right from your own patio or balcony? I know I have! There’s something incredibly satisfying about growing your own food, and squash, with its vibrant colors and versatility, is a fantastic choice. But what if you don’t have a sprawling garden? That’s where the magic of container gardening comes in!
For centuries, humans have cultivated squash, with evidence suggesting its domestication dates back thousands of years in the Americas. From the ancient civilizations of Mesoamerica to modern-day kitchens, squash has been a staple food source. Now, you can participate in this rich history, even with limited space.
Many people shy away from growing squash because they believe it requires vast amounts of land. But I’m here to tell you that’s simply not true! With a few clever tricks and DIY hacks, you can successfully grow thriving squash plants in containers. This article will unlock the secrets to container squash gardening, providing you with step-by-step instructions and insider tips to ensure a bountiful harvest. Imagine the delicious squash pies, soups, and roasted vegetables you could create with your homegrown bounty. Let’s get started and transform your small space into a squash-growing paradise!
Container Squash Gardening: A Bountiful Harvest in Small Spaces
Hey there, fellow gardening enthusiasts! Ever dreamt of growing your own squash but thought you didn’t have the space? Well, I’m here to tell you that container squash gardening is totally doable, and it’s a fantastic way to enjoy fresh, homegrown goodness even if you’re short on yard space. I’ve been doing this for years, and I’m excited to share my secrets to a successful container squash harvest.
Choosing the Right Squash Variety
Not all squash varieties are created equal when it comes to container gardening. Some are sprawling behemoths that will quickly outgrow any pot, while others are more compact and well-suited for confined spaces. Here’s what I’ve learned:
* Bush Varieties are Your Best Friend: Look for squash varieties labeled as “bush” or “compact.” These are bred to stay relatively small and manageable, making them perfect for containers.
* Popular Container-Friendly Choices: Some of my personal favorites include:
* Zucchini: ‘Bush Baby’, ‘Spacemiser’, ‘Raven’
* Yellow Squash: ‘Early Crookneck’, ‘Sunburst’
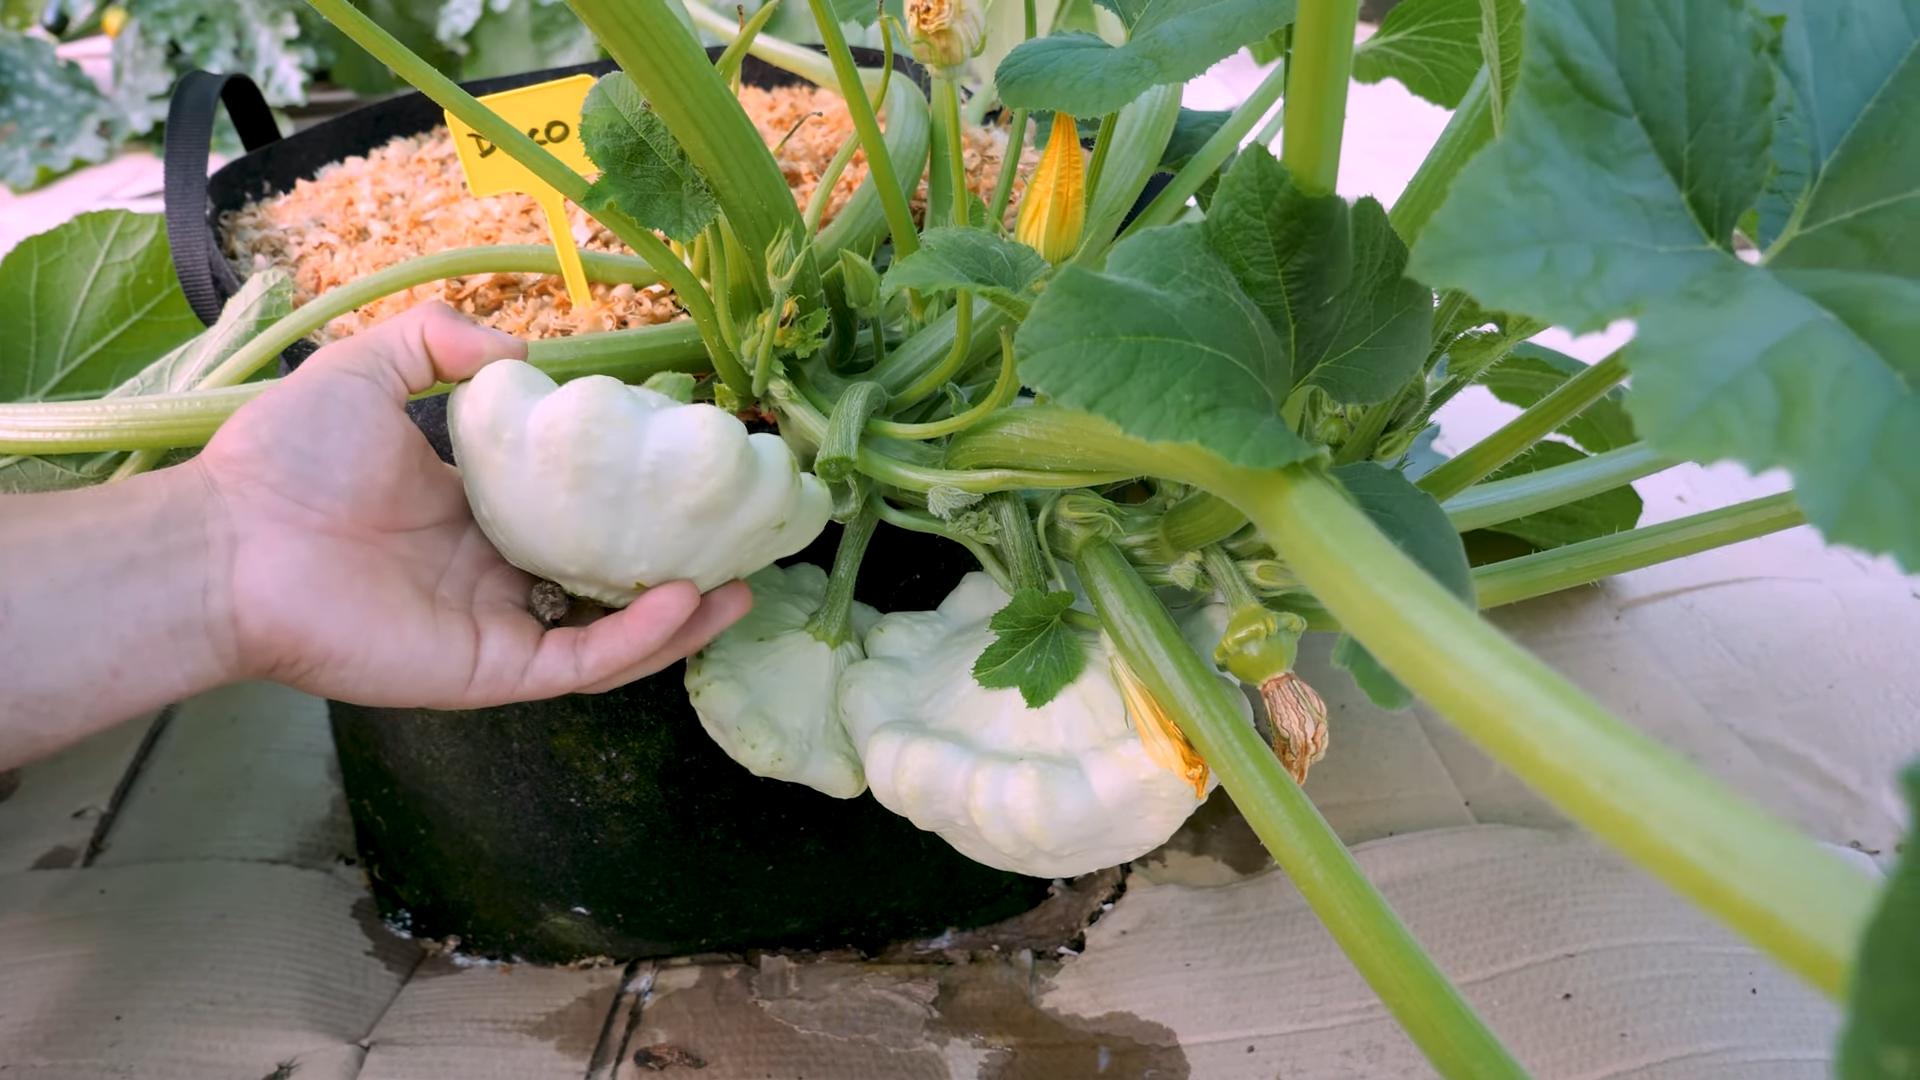
* Patty Pan Squash: ‘Peter Pan’, ‘Scallopini’
* Acorn Squash: ‘Table Bush’, ‘Honey Bear’
* Butternut Squash: ‘Butterbush’
* Avoid Vining Varieties (Unless You’re Prepared): While technically possible, growing vining squash like pumpkins or larger butternut varieties in containers requires a lot more space and support. You’ll need a very large container and a sturdy trellis or support system. If you’re a beginner, I recommend sticking with bush varieties.
Setting Up Your Squash Container Garden
Okay, so you’ve picked your squash variety. Now it’s time to get your container garden ready. This is a crucial step, so pay attention!
* Container Size Matters: Squash plants need room for their roots to grow. A minimum of 20 gallons is recommended for most bush varieties. Larger is always better! I personally prefer using 25-30 gallon containers.
* Drainage is Key: Make sure your container has plenty of drainage holes. Squash plants don’t like sitting in soggy soil. If your container doesn’t have enough holes, drill a few more.
* Choosing the Right Potting Mix: Don’t use garden soil in your containers! It’s too heavy and doesn’t drain well. Instead, opt for a high-quality potting mix specifically designed for containers. I like to use a mix that contains peat moss, perlite, and vermiculite.
* Sunlight is Essential: Squash plants need at least 6-8 hours of direct sunlight per day. Choose a location that gets plenty of sun. If you don’t have a sunny spot, you might consider using grow lights.
* Location, Location, Location: Consider the mature size of your plant when choosing a location. Make sure it has enough room to grow without crowding other plants. Also, think about access to water. You’ll be watering your squash plants frequently, so you want to make sure it’s easy to reach them.
Planting Your Squash Seedlings or Seeds
Now for the fun part – planting! You can either start your squash seeds indoors or directly sow them into your containers. I usually prefer to start them indoors to get a head start, but direct sowing works just fine too.
* Starting Seeds Indoors (Optional):
1. Timing is Everything: Start your seeds indoors about 3-4 weeks before the last expected frost.
2. Use Seed Starting Mix: Fill small pots or seed trays with seed starting mix.
3. Planting Depth: Plant the seeds about 1 inch deep.
4. Water Gently: Water the soil gently to moisten it.
5. Provide Warmth and Light: Place the pots in a warm location (around 70-75°F) and provide plenty of light. A sunny windowsill or grow lights will work.
6. Transplant Carefully: Once the seedlings have developed a few sets of true leaves, they’re ready to be transplanted into your containers.
* Direct Sowing Seeds:
1. Wait for Warm Weather: Make sure the soil temperature is at least 60°F before direct sowing.
2. Prepare the Soil: Moisten the potting mix in your container.
3. Planting Depth: Plant the seeds about 1 inch deep.
4. Spacing: Plant 2-3 seeds per container and thin them out to one plant once they emerge.
5. Water Gently: Water the soil gently to moisten it.
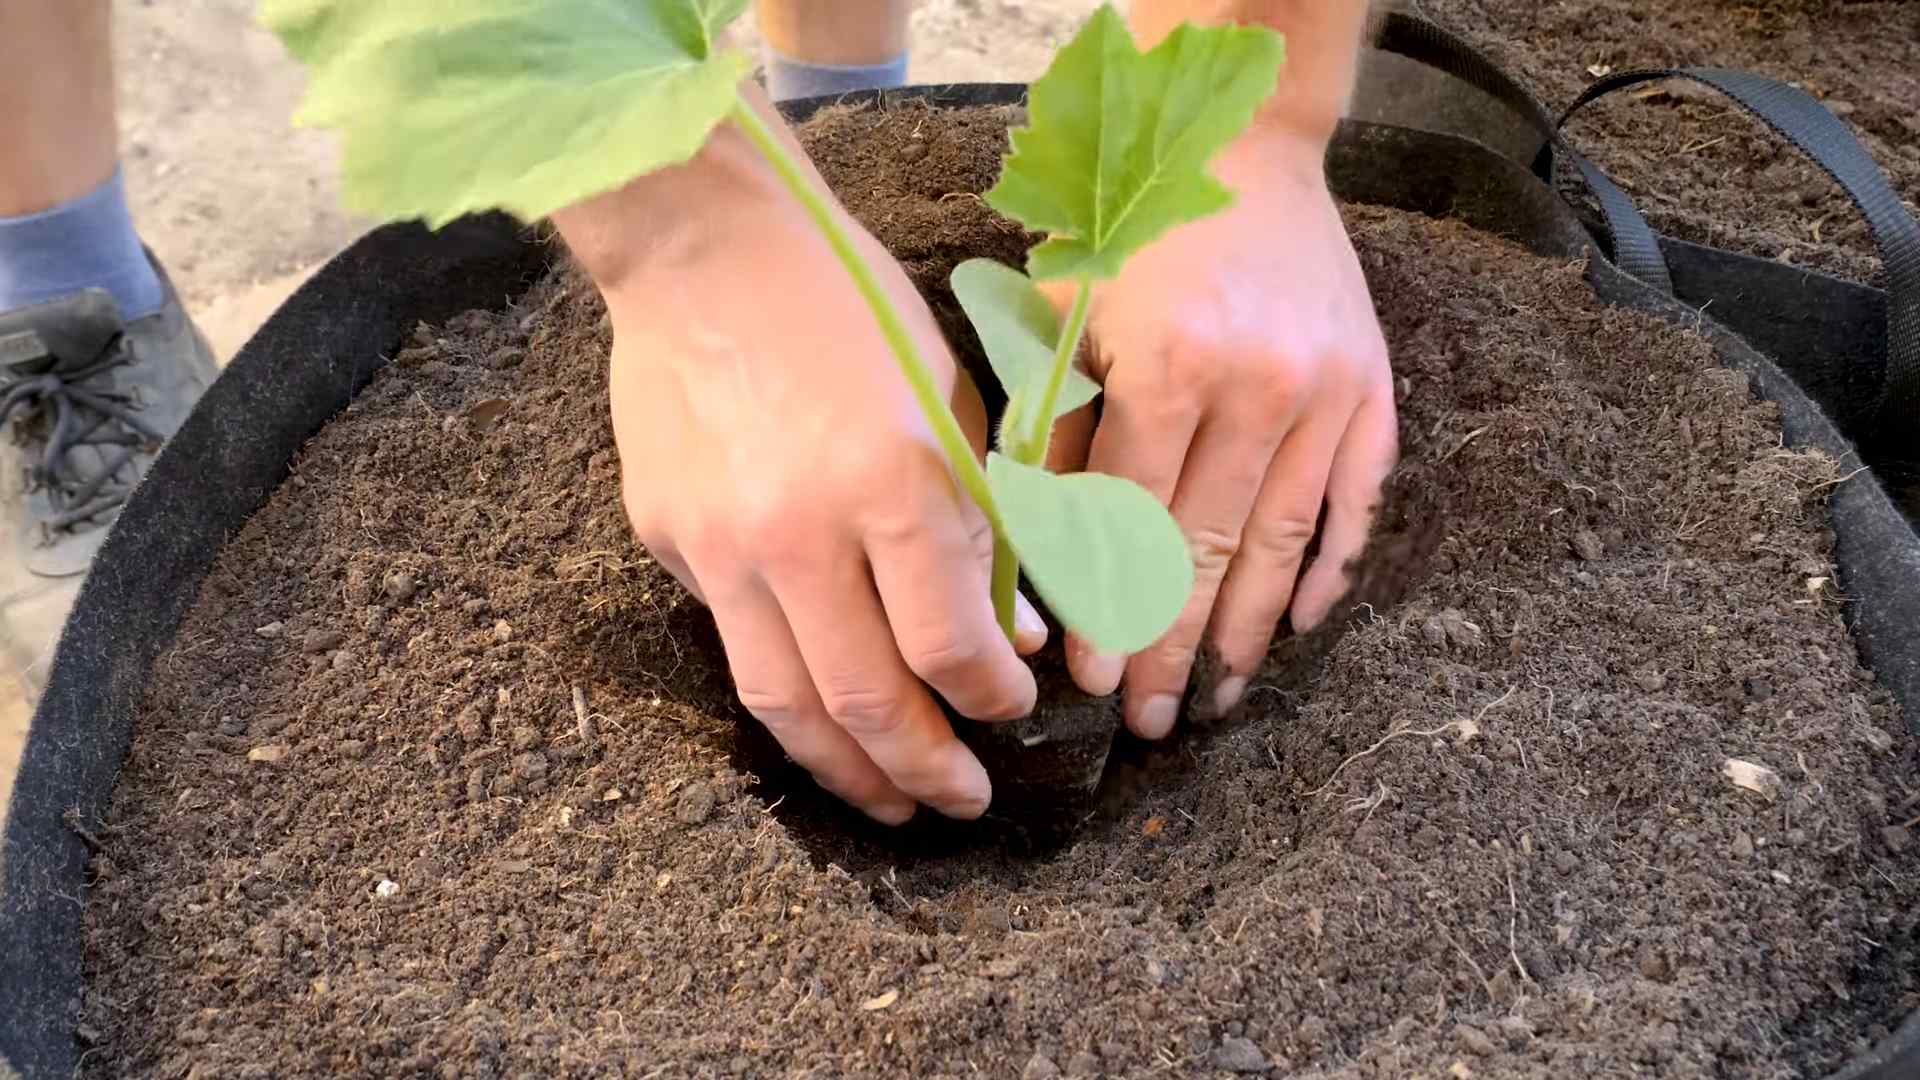
* Transplanting Seedlings:
1. Dig a Hole: Dig a hole in the potting mix that’s large enough to accommodate the root ball of the seedling.
2. Gently Remove the Seedling: Carefully remove the seedling from its pot, being careful not to damage the roots.
3. Place the Seedling in the Hole: Place the seedling in the hole and gently backfill with potting mix.
4. Water Thoroughly: Water the seedling thoroughly.
Caring for Your Container Squash Plants
Once your squash plants are in their containers, it’s time to provide them with the care they need to thrive. This includes watering, fertilizing, and pest control.
* Watering:
1. Water Deeply and Regularly: Squash plants need consistent moisture, especially during hot weather. Water deeply whenever the top inch of soil feels dry to the touch.
2. Avoid Overwatering: While squash plants need plenty of water, they don’t like sitting in soggy soil. Make sure your containers have good drainage.
3. Water in the Morning: Water in the morning to allow the foliage to dry before nightfall. This helps prevent fungal diseases.
* Fertilizing:
1. Use a Balanced Fertilizer: Feed your squash plants with a balanced fertilizer (e.g., 10-10-10) every 2-3 weeks.
2. Side-Dress with Compost: You can also side-dress your plants with compost every few weeks to provide them with extra nutrients.
3. Avoid Over-Fertilizing: Over-fertilizing can lead to excessive foliage growth and fewer fruits.
* Pollination:
1. Hand-Pollination (If Necessary): Squash plants have separate male and female flowers. If you’re not seeing a lot of bees or other pollinators in your garden, you may need to hand-pollinate the flowers.
2. How to Hand-Pollinate: Use a small paintbrush to transfer pollen from the male flowers to the female flowers. The female flowers have a small fruit at the base of the flower.
3. Timing is Key: Hand-pollinate in the morning when the flowers are open.
* Pest and Disease Control:
1. Inspect Regularly: Regularly inspect your plants for pests and diseases.
2. Common Pests: Common squash pests include squash bugs, squash vine borers, and aphids.
3. Organic Pest Control: Use organic pest control methods, such as insecticidal soap or neem oil, to control pests.
4. Common Diseases: Common squash diseases include powdery mildew and squash mosaic virus.
5. Preventative Measures: Preventative measures, such as good air circulation and proper watering, can help prevent diseases.
6. Remove Infected Leaves: Remove any infected leaves to prevent the spread of disease.
Harvesting Your Squash
The moment you’ve been waiting for – harvesting your delicious homegrown squash!
* Harvest Time Varies: The time it takes for squash to mature varies depending on the variety.
* Check the Seed Packet: Check the seed packet for the specific harvest time for your variety.
* Signs of Ripeness: Generally, summer squash (like zucchini and yellow squash) is ready to harvest when it’s young and tender. Winter squash (like butternut and acorn squash) is ready to harvest when the skin is hard and the stem is dry.
* Harvesting Summer Squash: Harvest summer squash when it’s about 6-8 inches long. Use a sharp knife to cut the squash from the plant.
* Harvesting Winter Squash: Harvest winter squash when the skin is hard and the stem is dry. Leave about 2 inches of stem attached to the squash.
* Curing Winter Squash: Cure winter squash in a warm, dry place for about 1-2 weeks to improve its storage life.
Troubleshooting Common Problems
Even with the best care, you might
Conclusion
So, there you have it! Container squash gardening isn’t just a possibility; it’s a pathway to fresh, homegrown goodness, even if you’re short on space. We’ve walked through the essentials, from choosing the right varieties to nurturing your plants for a bountiful harvest. But why should you take the plunge and try growing squash in containers?
The answer is simple: **accessibility and control**. Container gardening puts the power of fresh produce directly into your hands, regardless of whether you have a sprawling backyard or a small balcony. You control the soil quality, the watering schedule, and the plant’s environment, minimizing the risks associated with traditional in-ground gardening, like soilborne diseases and pests. Plus, the sheer satisfaction of harvesting your own squash, knowing you nurtured it from seed to table, is an experience that’s hard to beat.
Beyond the basics, there’s a world of experimentation waiting for you. Consider trying different container sizes to see how they impact yield. Explore companion planting by adding herbs like basil or marigolds to your squash containers to deter pests and attract pollinators. For a visually stunning display, try training your vining squash varieties up trellises or supports. This not only saves space but also adds an architectural element to your garden.
Don’t be afraid to experiment with different squash varieties too! While bush varieties are generally recommended for containers, some smaller vining varieties can also thrive with proper support and pruning. Think about trying a compact zucchini like ‘Spacemiser’ or a smaller butternut squash like ‘Butterbaby’. The possibilities are endless!
Container squash gardening is a rewarding and accessible way to enjoy fresh, homegrown produce. It’s a chance to connect with nature, learn new skills, and savor the delicious flavors of your own harvest.
We wholeheartedly encourage you to give container squash gardening a try. Start small, learn as you go, and don’t be discouraged by initial setbacks. Gardening is a journey, and every season brings new opportunities for growth and discovery.
And most importantly, we want to hear about your experiences! Share your successes, your challenges, and your tips with us in the comments below. Let’s build a community of container squash enthusiasts and learn from each other. What varieties did you try? What challenges did you face? What advice would you give to a beginner? Your insights could be invaluable to someone just starting out. So, get your hands dirty, embrace the process, and let’s grow some amazing squash together!
Frequently Asked Questions (FAQ)
What is the best type of squash to grow in a container?
The best types of squash for container gardening are bush varieties. These varieties are more compact and don’t require as much space as vining varieties. Some popular choices include:
* **Zucchini:** Look for bush varieties like ‘Black Beauty’, ‘Spacemiser’, or ‘Bush Baby’. These produce abundant harvests in a relatively small space.
* **Yellow Squash:** Similar to zucchini, bush varieties like ‘Early Crookneck’ or ‘Straightneck’ are excellent choices.
* **Patty Pan Squash:** These unique, saucer-shaped squash come in bush varieties that are well-suited for containers.
* **Acorn Squash:** While generally larger, some smaller acorn squash varieties like ‘Table Bush’ can be grown in larger containers.
* **Butternut Squash:** Look for compact butternut squash varieties like ‘Butterbaby’ or ‘Waltham Butternut’ for container growing.
While vining varieties are generally not recommended, if you’re determined to grow them in containers, choose smaller vining types and provide ample support like a trellis or sturdy stakes. Regular pruning will also be necessary to keep them manageable.
What size container do I need for squash?
The size of the container is crucial for successful container squash gardening. A general rule of thumb is to use a container that is at least 24 inches in diameter and 12 inches deep. Larger containers are always better, as they provide more room for the roots to grow and hold more moisture.
For bush varieties, a 15-20 gallon container is ideal. For smaller vining varieties, you might get away with a 10-gallon container, but be prepared to water and fertilize more frequently.
Make sure the container has adequate drainage holes to prevent waterlogging, which can lead to root rot.
What kind of soil should I use for container squash gardening?
Use a high-quality potting mix specifically designed for containers. Avoid using garden soil, as it can become compacted in containers and doesn’t drain well. A good potting mix should be lightweight, well-draining, and rich in organic matter.
You can also amend your potting mix with compost or other organic materials to improve its fertility and water-holding capacity. Adding perlite or vermiculite can also improve drainage.
How often should I water my container squash plants?
Squash plants are heavy drinkers, especially when grown in containers. Water deeply and regularly, especially during hot, dry weather. Check the soil moisture daily by sticking your finger into the soil about an inch deep. If the soil feels dry, it’s time to water.
Avoid overhead watering, as this can promote fungal diseases. Instead, water at the base of the plant, aiming for the soil.
During peak growing season, you may need to water your container squash plants every day, or even twice a day in very hot weather.
How often should I fertilize my container squash plants?
Container squash plants need regular fertilization to thrive. Use a balanced fertilizer (e.g., 10-10-10) or a fertilizer specifically formulated for vegetables.
Fertilize your plants every 2-3 weeks, following the instructions on the fertilizer label. You can also use a liquid fertilizer diluted in water for easier application.
Avoid over-fertilizing, as this can lead to excessive foliage growth and reduced fruit production.
How do I deal with pests and diseases in container squash gardening?
Container gardening can help reduce the risk of pests and diseases, but it’s still important to be vigilant. Regularly inspect your plants for signs of pests or diseases.
Some common pests that affect squash plants include squash bugs, squash vine borers, and aphids. You can control these pests with insecticidal soap, neem oil, or by hand-picking them off the plants.
Common diseases that affect squash plants include powdery mildew and squash mosaic virus. You can prevent these diseases by providing good air circulation, avoiding overhead watering, and using disease-resistant varieties.
If you encounter a serious pest or disease problem, consult with your local garden center or extension office for advice.
How do I pollinate my squash plants in containers?
Squash plants have separate male and female flowers. Pollination is necessary for fruit to develop. In container gardens, pollination may be less reliable than in traditional gardens, especially if there are few pollinators in your area.
You can hand-pollinate your squash plants by transferring pollen from the male flowers to the female flowers. To do this, use a small paintbrush or cotton swab to collect pollen from the male flower and then gently brush it onto the stigma of the female flower.
The female flowers can be identified by the small fruit (the squash) at the base of the flower. Male flowers have a long, slender stem.
How long does it take to grow squash in containers?
The time it takes to grow squash in containers depends on the variety and growing conditions. Generally, it takes about 50-70 days from planting to harvest.
Check the seed packet or plant label for specific information on the maturity time of your chosen variety.
Can I grow squash in containers indoors?
While it’s possible to grow squash in containers indoors, it’s more challenging than growing them outdoors. Squash plants need a lot of sunlight, so you’ll need to provide supplemental lighting if you’re growing them indoors.
You’ll also need to ensure adequate pollination, either by hand-pollinating or by using a fan to circulate air and encourage pollination.
Growing squash indoors can be a fun experiment, but it’s generally easier and more rewarding to grow them outdoors in containers.
Leave a Comment