
Grow Purple Bush Beans? Absolutely! Imagine strolling through your garden, the sun warming your face, and spotting vibrant, deep purple beans nestled amongst the green foliage. It’s not just a visual treat; it’s a delicious and rewarding experience that’s easier than you might think. For centuries, beans have been a staple crop in cultures around the world, providing essential nutrients and a connection to the land. From ancient civilizations to modern-day kitchen gardens, the humble bean has nourished and sustained us.
But why should you bother to grow purple bush beans? Well, beyond their stunning color, these beans offer a unique flavor profile – often described as sweeter and less “beany” than their green counterparts. Plus, growing your own food is incredibly empowering! You control the quality, avoid harmful pesticides, and enjoy the satisfaction of nurturing something from seed to table. In this article, I’m going to share some simple, DIY tricks and hacks that will help you successfully cultivate a bountiful harvest of purple bush beans, even if you’re a complete beginner. Get ready to transform your garden and your plate with this colorful and nutritious addition!
Growing Purple Bush Beans: A DIY Guide to a Vibrant Harvest
Okay, so you want to grow purple bush beans? Awesome! They’re not only delicious but also add a splash of color to your garden. I’ve been growing them for years, and trust me, it’s easier than you think. This guide will walk you through every step, from choosing the right spot to harvesting your beautiful purple bounty.
Choosing the Right Variety and Location
Before we get our hands dirty, let’s talk about the basics. Not all purple bush beans are created equal, and location is key to a successful harvest.
* Variety Selection: Look for varieties like ‘Royal Burgundy’, ‘Purple Queen’, or ‘Amethyst’. These are all reliable and produce vibrant purple pods. I personally love ‘Royal Burgundy’ because they’re super productive and the color is just stunning.
* Sunlight: Bush beans need at least 6-8 hours of direct sunlight per day. Pick a spot in your garden that gets plenty of sunshine. If you’re limited on space, consider a sunny balcony or patio.
* Soil: Well-draining soil is crucial. Beans don’t like to sit in soggy soil. Amend your soil with compost or other organic matter to improve drainage and fertility. A slightly acidic to neutral pH (around 6.0 to 7.0) is ideal. You can test your soil pH with a simple soil testing kit from your local garden center.
* Space: Bush beans don’t need a ton of space, but they do need room to breathe. Plant them in rows about 18-24 inches apart, or in raised beds with similar spacing.
Preparing the Soil
Now that you’ve chosen your spot, it’s time to get the soil ready. This is a crucial step, so don’t skip it!
1. Clear the Area: Remove any weeds, rocks, or debris from the planting area. Weeds compete with your beans for nutrients and water, so it’s important to get rid of them.
2. Amend the Soil: This is where the magic happens. Spread a 2-3 inch layer of compost or well-rotted manure over the planting area. This will add nutrients to the soil and improve drainage.
3. Till or Dig: Use a garden fork or tiller to incorporate the compost into the soil. Dig down about 6-8 inches, breaking up any clumps of soil. This will create a loose, well-aerated soil that’s perfect for bean roots.
4. Rake Smooth: Once you’ve tilled or dug the soil, rake it smooth to create a level planting surface. This will make it easier to plant your beans in straight rows.
Planting Your Purple Bush Beans
Alright, the fun part! Planting those little beans and watching them grow.
1. Timing is Key: Plant your bush beans after the last frost in your area. Beans are sensitive to cold temperatures, so it’s important to wait until the soil has warmed up. You can check your local frost dates online or at your local garden center. Soil temperature should be at least 60°F (15°C).
2. Direct Sowing: Bush beans are best direct-sown, meaning you plant the seeds directly into the ground. They don’t transplant well, so starting them indoors is generally not recommended.
3. Planting Depth: Plant the seeds about 1 inch deep and 2-3 inches apart. I usually use my finger to make a small hole, drop in a seed, and then cover it with soil.
4. Row Spacing: If you’re planting in rows, space the rows about 18-24 inches apart. This will give the plants enough room to grow and allow for good air circulation.
5. Water Gently: After planting, water the soil gently to moisten it. Be careful not to overwater, as this can cause the seeds to rot.
6. Mark Your Rows: Use plant markers or labels to identify your rows of beans. This will help you keep track of what you’ve planted and where.
Caring for Your Purple Bush Beans
Now that your beans are planted, it’s time to take care of them. This involves watering, weeding, and protecting them from pests and diseases.
* Watering: Water your beans regularly, especially during dry periods. Aim to keep the soil consistently moist, but not soggy. Water deeply and less frequently, rather than shallowly and often. Early morning watering is best to allow foliage to dry before nightfall, reducing the risk of fungal diseases.
* Weeding: Keep the area around your beans free of weeds. Weeds compete with your beans for nutrients and water, so it’s important to remove them regularly. Hand-pulling weeds is the best option, as it avoids damaging the bean plants.
* Fertilizing: Bush beans generally don’t need a lot of fertilizer, especially if you’ve amended the soil with compost. However, you can give them a boost with a side dressing of compost tea or a balanced organic fertilizer a few weeks after they emerge. Avoid high-nitrogen fertilizers, as they can promote leafy growth at the expense of bean production.
* Pest Control: Keep an eye out for common bean pests like aphids, bean beetles, and slugs. Aphids can be controlled with a strong spray of water or insecticidal soap. Bean beetles can be hand-picked or treated with neem oil. Slugs can be trapped with beer traps or diatomaceous earth.
* Disease Prevention: To prevent diseases, ensure good air circulation around your plants and avoid overhead watering. If you notice any signs of disease, such as yellowing leaves or spots on the pods, remove the affected plants immediately.
Harvesting Your Purple Bush Beans
The moment you’ve been waiting for! Harvesting your beautiful purple beans.
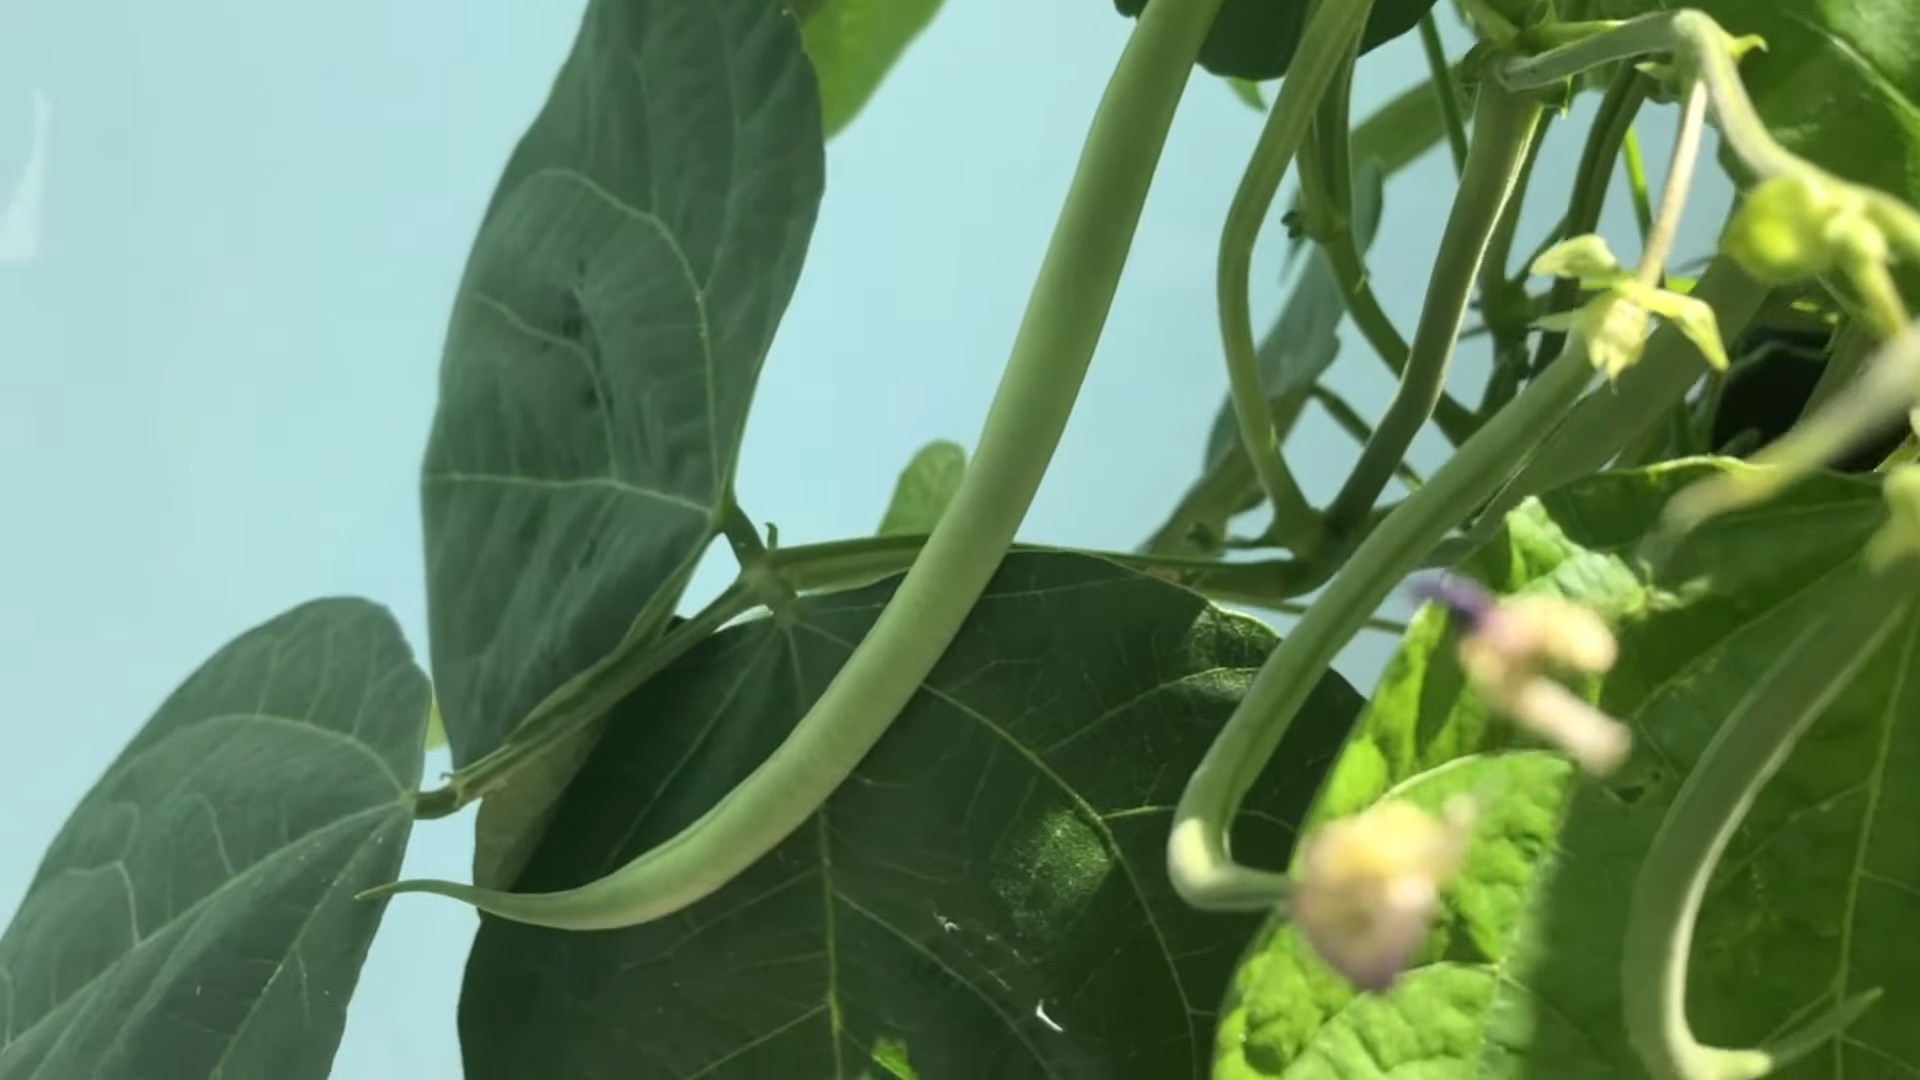
1. Harvest Time: Bush beans are typically ready to harvest about 50-60 days after planting. The pods should be firm, plump, and about 4-6 inches long.
2. Check Regularly: Check your bean plants regularly for ripe pods. The more you harvest, the more the plants will produce.
3. Harvesting Technique: Gently snap the pods off the plant, being careful not to damage the stems or leaves. I like to use two hands – one to hold the stem and the other to snap off the pod.
4. Don’t Wait Too Long: Harvest the beans before they become too large and tough. Overripe beans can be stringy and less flavorful.
5. Enjoy Your Harvest: Purple bush beans are delicious steamed, sautéed, or added to salads. They’re also great for freezing or canning.
Troubleshooting Common Problems
Even with the best care, you might encounter some problems along the way. Here are a few common issues and how to deal with them:
* Poor Germination: If your bean seeds aren’t germinating, it could be due to cold soil, overwatering, or poor-quality seeds. Make sure the soil temperature is at least 60°F (15°C) before planting. Avoid overwatering, and use fresh, high-quality seeds.
* Yellowing Leaves: Yellowing leaves can be a sign of nutrient deficiency, overwatering, or disease. Check the soil drainage and adjust your watering accordingly. Fertilize with a balanced organic fertilizer if necessary.
* Pest Infestations: As mentioned earlier, keep an eye out for common bean pests and take action to control them.
* Disease Problems: Prevent diseases by ensuring good air circulation and avoiding overhead watering. Remove any affected plants immediately.
Extending the Harvest
Want to keep those purple beans coming? Here are a few tips for extending your harvest:
* Succession Planting: Plant a new batch of beans every 2-3 weeks to ensure a continuous harvest throughout the growing season.
* Deadheading: Remove any spent flowers or pods to encourage the plant to produce more.
* Proper Watering and Fertilizing: Keep your plants well-watered and fertilized to promote healthy growth and bean production.
Saving Seeds for Next Year
If you want to save seeds from your purple bush beans for next year, here’s how:
1. Choose Healthy Plants: Select healthy, productive plants to save seeds from.
2. Allow Pods to Dry: Allow some of the pods to dry completely on the plant. They should turn brown and brittle.
3. Harvest the Pods: Harvest the dried pods and remove the seeds.
4. Dry the Seeds: Spread the seeds out on a tray and allow them to dry completely for a few days.
5. Store the Seeds: Store the dried seeds in an airtight container in a cool, dark, and dry place.
Enjoying Your Purple Bush Beans
Growing purple bush beans is a rewarding experience. Not only do you get to enjoy fresh, delicious beans, but you also get to add

Conclusion
So, there you have it! Growing your own purple bush beans is not only incredibly rewarding but also surprisingly simple. From the vibrant color they add to your garden to the delicious and nutritious meals they provide, these beans are a true garden gem. We’ve walked you through the entire process, from selecting the right seeds and preparing your soil to planting, nurturing, and harvesting your beautiful purple bounty.
Why is this DIY trick a must-try? Because it empowers you to connect with your food source, ensuring you know exactly what goes into your meals. Store-bought vegetables, even organic ones, can’t always guarantee the freshness and quality you get from your own garden. Plus, the unique color of purple bush beans makes them a conversation starter and a delightful addition to any dish. Imagine serving a salad with these stunning beans – your guests will be amazed!
But the benefits don’t stop there. Growing your own food is a fantastic way to reduce your carbon footprint, support sustainable practices, and even save money on your grocery bill. And let’s not forget the therapeutic aspect of gardening. Spending time outdoors, nurturing your plants, and watching them grow is a wonderful way to de-stress and connect with nature.
Looking for variations? Consider companion planting! Marigolds can help deter pests, while herbs like rosemary and thyme can enhance the flavor of your beans. You can also experiment with different varieties of purple bush beans. Some are bushier than others, and some have slightly different flavor profiles. Don’t be afraid to try new things and see what works best for you and your garden. Another variation is to try succession planting. Plant a new batch of seeds every few weeks to ensure a continuous harvest throughout the growing season. This way, you’ll always have fresh purple bush beans on hand for your culinary creations.
And speaking of culinary creations, the possibilities are endless! Use your purple bush beans in salads, stir-fries, soups, stews, or simply steam them as a side dish. Their vibrant color will add visual appeal to any meal, and their delicious flavor will leave you wanting more. You can even pickle them for a tangy and colorful treat.
We are confident that you’ll find growing purple bush beans to be a fulfilling and enjoyable experience. So, grab your seeds, get your hands dirty, and prepare to be amazed by the beauty and bounty of your own garden.
We wholeheartedly encourage you to try this DIY trick and share your experience with us! We’d love to see photos of your purple bush bean plants and hear about your favorite ways to prepare them. Share your tips, tricks, and successes in the comments below. Let’s create a community of purple bush bean enthusiasts! Happy gardening!
Frequently Asked Questions (FAQ)
What are the best conditions for growing purple bush beans?
Purple bush beans thrive in well-drained soil and require at least six hours of sunlight per day. The ideal soil pH is between 6.0 and 7.0. Before planting, amend your soil with compost or other organic matter to improve drainage and fertility. Consistent moisture is also crucial, especially during flowering and pod development. Avoid overhead watering, as this can lead to fungal diseases. Instead, water at the base of the plants.
How long does it take for purple bush beans to mature?
Generally, purple bush beans take about 50 to 60 days to mature from planting. However, this can vary depending on the specific variety, weather conditions, and soil quality. Keep an eye on your plants and harvest the beans when they are firm and plump, but before the seeds inside become too large and tough. Regular harvesting will encourage the plants to produce more beans.
What are some common pests and diseases that affect purple bush beans?
Common pests that can affect purple bush beans include aphids, bean beetles, and spider mites. You can control these pests with organic methods such as insecticidal soap, neem oil, or by introducing beneficial insects like ladybugs. Diseases that can affect purple bush beans include bean rust, powdery mildew, and anthracnose. To prevent these diseases, ensure good air circulation around your plants, avoid overhead watering, and practice crop rotation. If you notice signs of disease, remove affected leaves or plants immediately.
Can I grow purple bush beans in containers?
Yes, you can absolutely grow purple bush beans in containers! Choose a container that is at least 12 inches deep and wide to provide enough room for the roots to grow. Use a well-draining potting mix and ensure the container has drainage holes. Place the container in a sunny location and water regularly. Container-grown beans may require more frequent watering and fertilization than those grown in the ground.
How do I harvest purple bush beans?
Harvest your purple bush beans when the pods are firm, plump, and about the size of your finger. Gently snap the beans off the plant, being careful not to damage the stems. Harvest regularly, every few days, to encourage continued production. Overripe beans will become tough and less flavorful.
Are purple bush beans more nutritious than green beans?
While both purple and green bush beans are nutritious, purple bush beans contain anthocyanins, which are powerful antioxidants that give them their vibrant color. Anthocyanins have been linked to various health benefits, including reducing the risk of heart disease and cancer. Both types of beans are good sources of fiber, vitamins, and minerals.
How do I store purple bush beans?
Freshly harvested purple bush beans can be stored in the refrigerator for up to a week. To store them for longer, you can blanch them in boiling water for a few minutes, then freeze them in freezer bags. You can also pickle or can your purple bush beans for long-term storage.
What are some creative ways to use purple bush beans in cooking?
Purple bush beans are incredibly versatile in the kitchen. They can be used in salads, stir-fries, soups, stews, and side dishes. Their vibrant color adds visual appeal to any meal. Try adding them to a summer salad with tomatoes, cucumbers, and feta cheese. Or, sauté them with garlic and olive oil for a simple and delicious side dish. You can also use them in a hearty vegetable stew or add them to a stir-fry with other colorful vegetables. Don’t be afraid to experiment and get creative!
Can I save seeds from my purple bush bean plants for next year?
Yes, you can save seeds from your purple bush bean plants for next year, but it’s important to ensure that the plants are not cross-pollinated with other bean varieties. To save seeds, allow some of the bean pods to mature fully on the plant until they are dry and brown. Then, remove the seeds from the pods and store them in a cool, dry place until next planting season.
What if my purple bush beans aren’t producing many beans?
If your purple bush beans aren’t producing many beans, there could be several reasons. Ensure they are getting enough sunlight, water, and nutrients. Check for pests and diseases and take appropriate action. Also, make sure the soil is well-drained and has a pH between 6.0 and 7.0. Sometimes, extreme temperatures can also affect bean production. If the weather is too hot or too cold, the plants may not flower or set pods properly.

Leave a Comment