
Hanging mustard greens in small spaces? Absolutely! Imagine fresh, peppery mustard greens just an arm’s reach away, even if you only have a tiny balcony or patio. Forget those sprawling garden beds – we’re going vertical! For centuries, cultures around the globe have embraced vertical gardening, from the Hanging Gardens of Babylon to modern-day urban farms. It’s a testament to human ingenuity and our innate desire to connect with nature, regardless of our limitations.
But why should you consider this DIY project? Well, let’s face it, space is a premium these days. Many of us dream of growing our own food, but feel restricted by limited square footage. That’s where the magic of hanging gardens comes in. Plus, hanging mustard greens in small spaces isn’t just practical; it’s also incredibly rewarding. There’s something deeply satisfying about nurturing your own food from seed to table, knowing exactly where it came from and what went into it. And let’s not forget the aesthetic appeal – a vibrant cascade of leafy greens adds a touch of natural beauty to any environment.
This article is your ultimate guide to creating your own thriving hanging mustard green garden. We’ll walk you through every step, from choosing the right containers and soil to providing the perfect amount of sunlight and water. Get ready to unleash your inner gardener and transform your small space into a verdant oasis!

Senfgrün vertikal anbauen: Ein DIY-Leitfaden für kleine Räume
Hallo liebe Gartenfreunde! Habt ihr auch das Problem, dass ihr zwar Lust auf frisches Gemüse habt, aber der Platz einfach nicht ausreicht? Keine Sorge, ich habe die Lösung: Senfgrün vertikal anbauen! Das ist nicht nur platzsparend, sondern auch ein echter Hingucker. Und das Beste daran: Es ist super einfach und macht richtig Spaß! In diesem Artikel zeige ich euch Schritt für Schritt, wie ihr euren eigenen vertikalen Senfgrün-Garten anlegen könnt. Los geht’s!
Was du brauchst: Die Materialliste
Bevor wir loslegen, sollten wir sicherstellen, dass wir alles parat haben. Hier ist eine Liste der Materialien, die du für deinen vertikalen Senfgrün-Garten benötigst:
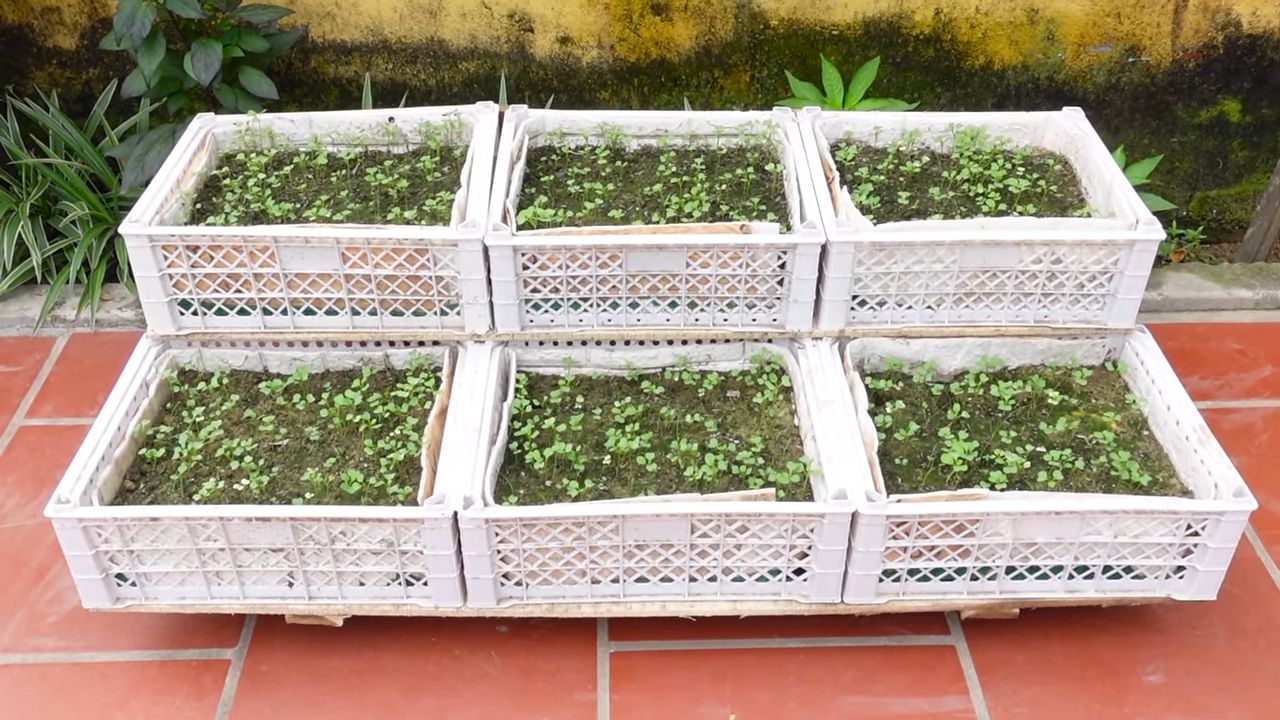
* Pflanzgefäße: Du kannst Tontöpfe, Plastikbehälter oder sogar recycelte Dosen verwenden. Achte darauf, dass sie Löcher im Boden haben, damit das Wasser ablaufen kann. Die Größe hängt davon ab, wie viel Senfgrün du anbauen möchtest. Ich empfehle, mit kleineren Töpfen anzufangen, um ein Gefühl dafür zu bekommen.
* Erde: Verwende hochwertige Blumenerde oder eine spezielle Erde für Gemüse. Ich persönlich mische gerne Blumenerde mit etwas Kompost, um die Nährstoffversorgung zu verbessern.
* Senfgrün-Samen: Du bekommst Senfgrün-Samen in jedem gut sortierten Gartencenter oder online. Es gibt verschiedene Sorten, also wähle die, die dir am besten schmeckt. Ich mag besonders die scharfen Sorten!
* Aufhängung: Hier sind deiner Kreativität keine Grenzen gesetzt! Du kannst stabile Schnüre, Ketten, Draht oder sogar alte Gürtel verwenden, um die Töpfe aufzuhängen. Achte darauf, dass die Aufhängung das Gewicht der bepflanzten Töpfe tragen kann.
* Bohrmaschine (optional): Wenn du Töpfe ohne Löcher im Boden verwendest, benötigst du eine Bohrmaschine, um Löcher zu bohren.
* Haken oder eine Stange: Um die Töpfe aufzuhängen, benötigst du Haken, die du an einer Wand oder einem Balkongeländer befestigen kannst, oder eine stabile Stange, an der du die Töpfe aufhängen kannst.
* Gießkanne: Zum Bewässern deiner Senfgrün-Pflanzen.
* Schere oder Messer: Zum Ernten des Senfgrüns.
* Handschuhe (optional): Um deine Hände sauber zu halten.
Schritt-für-Schritt-Anleitung: So baust du deinen vertikalen Senfgrün-Garten
Jetzt, wo wir alle Materialien haben, können wir mit dem Bau unseres vertikalen Senfgrün-Gartens beginnen. Folge einfach diesen Schritten:
1. Vorbereitung der Pflanzgefäße: Wenn deine Töpfe keine Löcher im Boden haben, bohre mit der Bohrmaschine einige Löcher hinein. Das ist wichtig, damit das Wasser ablaufen kann und die Wurzeln nicht faulen. Lege dann eine Schicht Kies oder Tonscherben auf den Boden der Töpfe, um die Drainage zu verbessern.
2. Befüllen der Töpfe mit Erde: Fülle die Töpfe mit Erde, aber lasse etwa 2-3 cm Platz bis zum Rand. Drücke die Erde leicht an.
3. Aussaat der Senfgrün-Samen: Verteile die Senfgrün-Samen gleichmäßig auf der Erde. Bedecke die Samen dann mit einer dünnen Schicht Erde (ca. 0,5 cm).
4. Bewässerung: Gieße die Erde vorsichtig mit einer Gießkanne, bis sie gut durchfeuchtet ist. Achte darauf, dass du die Samen nicht wegschwemmst.
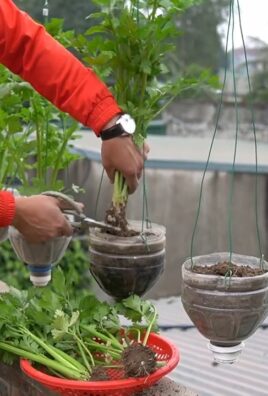
5. Aufhängung vorbereiten: Schneide die Schnüre, Ketten oder das Material deiner Wahl in gleich lange Stücke. Die Länge hängt davon ab, wie hoch du die Töpfe aufhängen möchtest. Befestige die Schnüre an den Töpfen. Du kannst sie entweder um den Topf binden oder durch Löcher im Topf ziehen. Achte darauf, dass die Töpfe sicher hängen und nicht herunterfallen können.
6. Aufhängen der Töpfe: Hänge die Töpfe an den Haken oder der Stange auf. Achte darauf, dass die Töpfe genügend Sonnenlicht bekommen. Senfgrün benötigt mindestens 4-6 Stunden Sonnenlicht pro Tag.
7. Pflege: Gieße die Senfgrün-Pflanzen regelmäßig, besonders an heißen Tagen. Die Erde sollte immer leicht feucht sein, aber nicht nass. Dünge die Pflanzen alle paar Wochen mit einem organischen Dünger.
Optimale Bedingungen schaffen: Licht, Wasser und mehr
Senfgrün ist relativ pflegeleicht, aber es gibt ein paar Dinge, die du beachten solltest, um optimale Bedingungen für deine Pflanzen zu schaffen:
* Licht: Senfgrün benötigt viel Sonnenlicht, mindestens 4-6 Stunden pro Tag. Wenn du keinen sonnigen Platz hast, kannst du auch eine Pflanzenlampe verwenden.
* Wasser: Gieße die Pflanzen regelmäßig, besonders an heißen Tagen. Die Erde sollte immer leicht feucht sein, aber nicht nass. Vermeide Staunässe, da dies zu Wurzelfäule führen kann.
* Temperatur: Senfgrün wächst am besten bei Temperaturen zwischen 15 und 25 Grad Celsius.
* Dünger: Dünge die Pflanzen alle paar Wochen mit einem organischen Dünger. Das sorgt für eine gute Nährstoffversorgung und kräftiges Wachstum.
* Schädlinge: Senfgrün kann von Blattläusen oder anderen Schädlingen befallen werden. Kontrolliere die Pflanzen regelmäßig und bekämpfe Schädlinge bei Bedarf mit natürlichen Mitteln.
Erntezeit: So erntest du dein Senfgrün richtig
Nach etwa 4-6 Wochen kannst du dein Senfgrün ernten. Schneide die Blätter einfach mit einer Schere oder einem Messer ab. Du kannst entweder die ganzen Pflanzen ernten oder nur einzelne Blätter. Wenn du nur einzelne Blätter erntest, wachsen die Pflanzen weiter und du kannst mehrmals ernten.
Wichtiger Tipp: Ernte das Senfgrün am besten am Morgen, wenn die Blätter noch frisch und knackig sind.
Kreative Ideen für deinen vertikalen Garten
Hier sind ein paar kreative Ideen, wie du deinen vertikalen Senfgrün-Garten gestalten kannst:
* Verschiedene Pflanzgefäße: Verwende verschiedene Arten von Pflanzgefäßen, um einen interessanten Look zu erzeugen. Du kannst Tontöpfe, Plastikbehälter, recycelte Dosen oder sogar alte Schuhe verwenden.
* Farben: Bemal die Pflanzgefäße in verschiedenen Farben, um deinen Garten aufzupeppen.
* Etiketten: Beschrifte die Töpfe mit den Namen der Pflanzen. Das sieht nicht nur gut aus, sondern hilft dir auch, den Überblick zu behalten.
* Kombination mit anderen Pflanzen: Kombiniere Senfgrün mit anderen Kräutern oder Gemüsesorten, die ähnliche Ansprüche haben.
* Vertikale Gärten an verschiedenen Orten: Hänge deinen vertikalen Garten an die Wand, an das Balkongeländer oder an eine Stange. Du kannst ihn auch in der Küche oder im Wohnzimmer aufstellen.
Senfgrün in der Küche: Vielseitige Verwendungsmöglichkeiten
Senfgrün ist nicht nur ein Hingucker im Garten, sondern auch eine vielseitige Zutat in der Küche. Du kannst es roh in Salaten verwenden, als Beilage zu Fleisch oder Fisch servieren oder in Suppen und Eintöpfen mitkochen. Senfgrün hat einen würzigen, leicht scharfen Geschmack, der vielen Gerichten eine besondere Note verleiht.
Rezept-Idee: Senfgrün-Salat mit gerösteten Nüssen und Honig-Senf-Dressing.
Fazit: Dein eigener vertikaler Senfgrün-Garten
Ich hoffe, dieser Artikel hat dir geholfen, deinen eigenen vertikalen Senfgrün-Garten anzulegen. Es ist wirklich einfach und macht Spaß! Und das Beste daran: Du hast immer frisches, gesundes Gemüse zur Hand. Also, worauf wartest du noch? Leg los und verwandle deinen kleinen Raum in einen grünen Dschungel! Viel Spaß beim G
Conclusion
So, there you have it! Transforming your small space into a thriving vertical garden with hanging mustard greens is not just a trendy project; it’s a practical, rewarding, and delicious endeavor. We’ve walked you through the simple steps, highlighting the ease and accessibility of this DIY trick. Forget those expensive, store-bought greens that wilt within days. Imagine stepping onto your balcony or into your kitchen and harvesting fresh, peppery mustard greens whenever you need them.
This isn’t just about saving money; it’s about connecting with your food, understanding its origins, and enjoying the unparalleled flavor of homegrown produce. The satisfaction of nurturing a plant from seed to table is immense, and it’s a feeling we believe everyone should experience. Plus, let’s be honest, those vibrant green leaves cascading from hanging containers add a touch of natural beauty to any environment, instantly boosting your mood and creating a more inviting atmosphere.
But the benefits don’t stop there. Growing your own mustard greens allows you to control the entire process, ensuring that your greens are free from harmful pesticides and herbicides. You know exactly what you’re putting into your body, and that peace of mind is priceless. Furthermore, this method is incredibly space-efficient, making it perfect for apartment dwellers, urban gardeners, or anyone with limited outdoor space. You can maximize your yield without sacrificing valuable square footage.
Don’t be afraid to experiment with different varieties of mustard greens. Some are spicier than others, while some have a milder, more subtle flavor. Try growing ‘Red Giant’ for its beautiful purple leaves or ‘Florida Broadleaf’ for its classic, robust taste. You can also adjust the size and style of your hanging containers to suit your personal preferences and aesthetic. Get creative with your setup and make it your own! Consider using recycled materials for an eco-friendly approach. Old plastic bottles, repurposed buckets, or even woven baskets can be transformed into charming hanging planters.
We’ve armed you with all the knowledge you need to embark on this exciting gardening adventure. Now, it’s your turn to put these tips into practice and experience the joy of growing your own hanging mustard greens. We are confident that you will find this DIY trick to be a game-changer, transforming your small space into a verdant oasis and providing you with a constant supply of fresh, flavorful greens.
We encourage you to take the plunge and give it a try. And most importantly, we want to hear about your experiences! Share your photos, tips, and stories with us in the comments section below. Let’s create a community of passionate gardeners who are dedicated to growing their own food and making the most of their small spaces. Happy gardening!
Frequently Asked Questions (FAQ)
What kind of soil should I use for hanging mustard greens?
The best soil for hanging mustard greens is a well-draining potting mix that is rich in organic matter. Avoid using garden soil, as it can be too heavy and compact, which can hinder drainage and suffocate the roots. Look for a potting mix that contains ingredients like peat moss, perlite, and vermiculite. These ingredients help to retain moisture while also providing adequate drainage. You can also amend your potting mix with compost or aged manure to boost its nutrient content. A slightly acidic to neutral pH (around 6.0 to 7.0) is ideal for mustard greens.
How often should I water my hanging mustard greens?
Watering frequency will depend on several factors, including the weather, the size of your containers, and the type of potting mix you’re using. As a general rule, you should water your mustard greens whenever the top inch of soil feels dry to the touch. Avoid overwatering, as this can lead to root rot. When you water, water thoroughly until water drains out of the bottom of the container. This ensures that the entire root system is adequately hydrated. During hot, dry weather, you may need to water your mustard greens more frequently, possibly even daily. Check the soil moisture regularly to determine the best watering schedule for your plants.
How much sunlight do mustard greens need?
Mustard greens thrive in full sun, which means they need at least 6 hours of direct sunlight per day. However, they can also tolerate partial shade, especially in hot climates. If you live in an area with intense summer heat, providing some afternoon shade can help prevent the leaves from scorching. When growing mustard greens indoors, place them near a sunny window or use grow lights to supplement natural light. Insufficient sunlight can result in leggy growth and reduced yields.
What are some common pests and diseases that affect mustard greens, and how can I prevent them?
Mustard greens can be susceptible to several pests and diseases, including aphids, flea beetles, cabbage worms, and downy mildew. To prevent these problems, start by using healthy, disease-free seeds or seedlings. Practice good garden hygiene by removing any dead or diseased leaves from your plants. Regularly inspect your plants for signs of pests or diseases, and take action promptly if you notice any problems. You can use organic pest control methods, such as insecticidal soap or neem oil, to control aphids, flea beetles, and cabbage worms. To prevent downy mildew, ensure good air circulation around your plants and avoid overhead watering. If downy mildew does occur, remove the affected leaves and treat the plants with a fungicide.
Can I grow mustard greens indoors?
Yes, you can absolutely grow mustard greens indoors! In fact, hanging mustard greens indoors is a great way to enjoy fresh greens year-round, regardless of the weather outside. To grow mustard greens indoors, you’ll need a sunny location, such as a south-facing window, or grow lights to provide adequate light. Use a well-draining potting mix and water regularly, allowing the soil to dry slightly between waterings. You may also need to fertilize your plants occasionally to provide them with the nutrients they need to thrive. Choose compact varieties of mustard greens that are well-suited for container gardening.
How long does it take for mustard greens to mature?
Mustard greens are relatively fast-growing, and you can typically start harvesting them within 4 to 6 weeks of planting. The exact time to maturity will depend on the variety of mustard greens you’re growing and the growing conditions. You can harvest the outer leaves as needed, allowing the inner leaves to continue to grow. Alternatively, you can harvest the entire plant at once. For the best flavor, harvest your mustard greens before they become too mature, as older leaves can be bitter.
Can I eat the stems of mustard greens?
Yes, the stems of mustard greens are edible, but they can be tougher and more fibrous than the leaves. To make the stems more palatable, you can chop them finely and cook them longer than the leaves. You can also remove the tough outer layer of the stems before cooking. The stems have a similar flavor to the leaves, but they can be slightly more pungent.
How do I harvest mustard greens?
Harvesting mustard greens is easy. You can either harvest individual leaves as needed or cut the entire plant at the base. If you’re harvesting individual leaves, start with the outer leaves, as these are the oldest and most mature. Use a sharp knife or scissors to cut the leaves cleanly from the plant. Avoid tearing the leaves, as this can damage the plant and make it more susceptible to disease. If you’re harvesting the entire plant, cut it off at the base, leaving about an inch of stem.
What are some ways to use mustard greens in cooking?
Mustard greens are incredibly versatile and can be used in a wide variety of dishes. They can be eaten raw in salads, added to smoothies, or sautéed, steamed, or stir-fried. They pair well with garlic, ginger, soy sauce, and other Asian-inspired flavors. Mustard greens can also be added to soups, stews, and casseroles. They have a slightly peppery and pungent flavor that adds a unique dimension to any dish.
How do I store mustard greens?
To store mustard greens, wrap them loosely in a damp paper towel and place them in a plastic bag in the refrigerator. They will typically last for about 3 to 5 days. Avoid washing the mustard greens before storing them, as this can cause them to spoil more quickly. Wash them just before you’re ready to use them.

Leave a Comment