
Sweet Potato Growing Tips: Ever dreamt of harvesting a bounty of vibrant, earthy sweet potatoes right from your own backyard? Imagine the satisfaction of roasting them to perfection, knowing you nurtured them from tiny slips to deliciousness! This isn’t just a pipe dream; it’s an achievable reality with a few clever DIY tricks and hacks.
For centuries, sweet potatoes have been a staple in cultures around the globe, from their origins in Central and South America to their widespread cultivation in Asia and Africa. They’re more than just a tasty treat; they’re packed with nutrients and represent a connection to the earth and the traditions of sustainable living. I think that’s pretty cool!
But let’s be honest, growing sweet potatoes can sometimes feel a little intimidating. Maybe you’ve tried before and ended up with spindly vines and disappointingly small tubers. Or perhaps you’re simply unsure where to even begin. That’s where these DIY tricks come in! I’m going to share some simple, effective techniques that will help you maximize your yield and enjoy a truly rewarding harvest. These sweet potato growing tips will cover everything from preparing your soil to protecting your precious plants from pests. So, grab your gardening gloves, and let’s get started on your sweet potato adventure!
Growing Sweet Potatoes: A DIY Guide from Sprout to Supper!
Alright, sweet potato lovers! Are you ready to ditch the grocery store and grow your own delicious, vibrant sweet potatoes right in your backyard (or even a large container!)? I’m here to guide you through the entire process, from sprouting your own slips to harvesting a bountiful crop. Trust me, it’s easier than you think, and the taste of homegrown sweet potatoes is simply unbeatable.
What You’ll Need
Before we dive in, let’s gather our supplies. This is what I’ve found works best:
* Sweet Potatoes: Choose organic sweet potatoes if possible. You’ll need at least one, but I recommend starting with a few to increase your chances of success. Look for firm potatoes without any soft spots or blemishes.
* Water: Tap water is fine.
* Glass Jars or Containers: Wide-mouthed jars work best, but any container that can hold water and suspend the sweet potato will do.
* Toothpicks: These are crucial for suspending the sweet potato in the water.
* Potting Mix: A well-draining potting mix is essential for planting the slips.
* Garden Soil: Amend your garden soil with compost or other organic matter to improve drainage and fertility.
* Gardening Gloves: Protect your hands!
* Trowel or Shovel: For planting.
* Watering Can or Hose: For watering your plants.
* Optional:
* Rooting hormone (to encourage faster root development)
* Black plastic mulch (to warm the soil and suppress weeds)
* Row covers (to protect against pests and frost)
Sprouting Your Sweet Potato Slips
This is where the magic begins! Sweet potato “slips” are the leafy sprouts that grow from the sweet potato itself. These are what you’ll plant in the ground.
Step 1: Preparing the Sweet Potato
1. First, give your sweet potato a good wash to remove any dirt or debris.
2. Decide which end is the “top” and which is the “bottom.” The top end usually has more “eyes” or small indentations where sprouts will emerge.
3. Insert toothpicks around the middle of the sweet potato, spacing them evenly. These toothpicks will act as a support system to suspend the potato in the water.
Step 2: Suspending the Sweet Potato in Water
1. Fill your glass jar or container with water, leaving about an inch of space at the top.
2. Carefully place the sweet potato in the jar, using the toothpicks to rest on the rim of the jar. The bottom half of the sweet potato should be submerged in water.
3. Place the jar in a warm, sunny location. A windowsill is perfect!
Step 3: Waiting for Sprouts (and Refreshing the Water)
1. Be patient! It can take several weeks for sprouts to appear.
2. Change the water every few days to prevent it from getting cloudy or stagnant. This will also help prevent rot.
3. Keep an eye on the water level and add more as needed to keep the bottom half of the sweet potato submerged.
4. You should start to see small roots emerging from the bottom of the sweet potato and green sprouts appearing on the top.
Step 4: Separating the Slips
1. Once the slips are about 6-8 inches long, they’re ready to be separated from the sweet potato.
2. Gently twist or cut the slips off the sweet potato. I prefer to twist them off, as it seems to cause less damage to the potato.
3. Place the slips in a glass of water to encourage root development. You can add a rooting hormone to the water at this stage, but it’s not essential.
4. Change the water in the glass every day or two.
5. Within a week or so, you should see roots forming on the slips. They’re now ready to be planted!
Planting Your Sweet Potato Slips
Now for the fun part – getting those slips into the ground!
Step 1: Preparing the Soil
1. Sweet potatoes thrive in well-drained soil that is rich in organic matter.
2. Choose a location that receives at least 6-8 hours of sunlight per day.
3. Amend your garden soil with compost or other organic matter to improve drainage and fertility. I like to add a generous amount of compost to my sweet potato beds.
4. If your soil is heavy clay, consider creating raised beds to improve drainage.
5. Sweet potatoes prefer slightly acidic soil, with a pH between 5.5 and 6.5. You can test your soil pH with a soil testing kit.
Step 2: Planting the Slips
1. Wait until the danger of frost has passed and the soil has warmed up to at least 60°F (15°C). Sweet potatoes are very sensitive to cold temperatures.
2. Dig a hole that is deep enough to accommodate the roots of the slip.
3. Plant the slip, burying the stem up to the first set of leaves.
4. Space the slips about 12-18 inches apart in rows that are 3-4 feet apart.
5. Water the slips thoroughly after planting.
Step 3: Mulching (Optional but Recommended)
1. Mulching helps to retain moisture, suppress weeds, and warm the soil.
2. I highly recommend using black plastic mulch, especially in cooler climates. The black plastic will absorb heat from the sun and warm the soil, which will encourage faster growth.
3. You can also use organic mulches such as straw, hay, or wood chips.
Step 4: Watering and Fertilizing
1. Water your sweet potato plants regularly, especially during dry periods.
2. Avoid overwatering, as this can lead to root rot.
3. Fertilize your sweet potato plants with a balanced fertilizer every few weeks. I like to use a fertilizer that is high in phosphorus and potassium, as these nutrients are important for root development.
4. Avoid fertilizing with too much nitrogen, as this can lead to excessive vine growth and reduced tuber production.
Caring for Your Sweet Potato Plants
Once your sweet potato plants are established, they’re relatively low-maintenance. However, there are a few things you can do to ensure a bountiful harvest.
Weeding: Keep your sweet potato beds free of weeds. Weeds compete with sweet potato plants for nutrients and water. Hand-pull weeds regularly or use a hoe to cultivate the soil.
Pest Control: Sweet potatoes are generally resistant to pests, but they can be susceptible to certain insects such as sweet potato weevils and flea beetles. Inspect your plants regularly for signs of pests. If you find pests, you can treat them with an insecticide or insecticidal soap. Row covers can also help to protect against pests.
Vine Training: Sweet potato vines can spread quite a bit. You can train the vines to grow in a specific direction or prune them back to keep them from taking over your garden. I usually just let them sprawl, but if space is limited, you can definitely train them.
Harvesting Your Sweet Potatoes
The moment we’ve all been waiting for! Harvesting your sweet potatoes is the most rewarding part of the process.
When to Harvest:
1. Sweet potatoes are typically ready to harvest about 90-120 days after planting.
2. The leaves will start to turn yellow and the vines will begin to die back.
3. You can also dig up a test potato to see if they are the size you want.
4. Harvest before the first frost, as frost can damage the sweet potatoes.
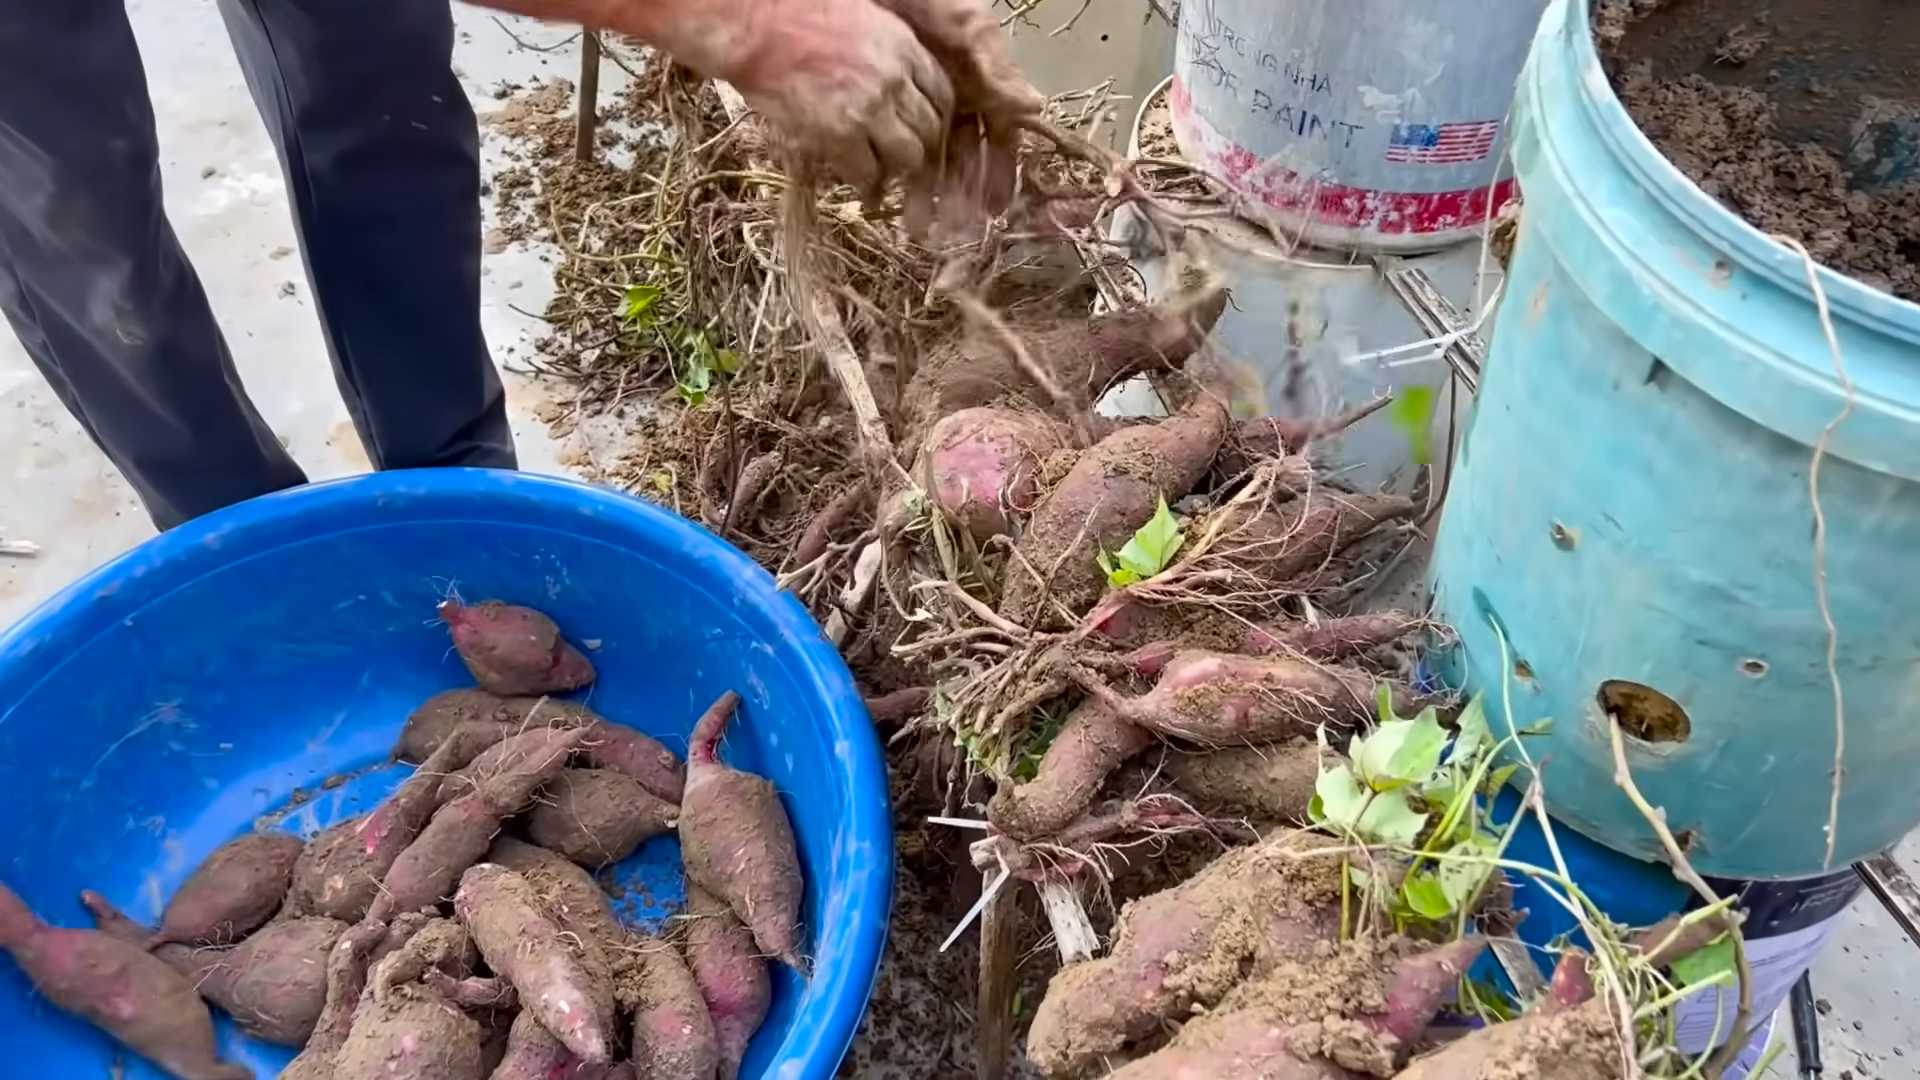
How to Harvest:
1. Use a garden fork or shovel to carefully dig up the sweet potatoes.
2. Be careful not to damage the sweet potatoes during harvesting.
3. Loosen the soil around the plants and gently lift them from the ground.
4. Brush off any excess soil from the sweet potatoes.
Curing Your Sweet Potatoes:
1. Curing is an important step in the sweet potato harvesting process. It helps to heal any wounds on the sweet potatoes and improves their flavor and storage life.
2. To cure your sweet potatoes, place them in a warm, humid location for about 7-10 days.
3. The ideal temperature for curing is 80-85°F (27-29°C) with a humidity of 85-90%.
4. You can use a greenhouse, a shed, or even a spare room in your house.
5. After curing, store your sweet potatoes in a cool, dry, and dark location. They should last for several months.
Enjoying Your Harvest:
1. Now that you’ve harvested and cured your sweet potatoes, it’s time to enjoy them!
2. Sweet potatoes

Conclusion
So, there you have it! Growing your own sweet potatoes isn’t just a fun gardening project; it’s a rewarding experience that connects you to your food source and provides you with incredibly delicious and nutritious produce. This DIY trick, focusing on starting slips indoors, is a game-changer, especially for those in cooler climates or with shorter growing seasons. It gives your sweet potatoes a significant head start, ensuring a bountiful harvest.
Why is this a must-try? Because it dramatically increases your chances of success. By nurturing your sweet potato slips indoors, you’re creating a controlled environment where they can thrive, protected from unpredictable weather and pests. You’re essentially giving them the VIP treatment, setting them up for robust growth once they’re transplanted outdoors. Plus, there’s something incredibly satisfying about watching those little slips sprout and flourish, knowing you’re playing an active role in bringing them to life.
But don’t stop there! Experiment with different varieties of sweet potatoes. Beauregard is a classic choice, known for its vibrant orange flesh and sweet flavor. But why not try Japanese sweet potatoes with their purple skin and creamy white flesh, or perhaps the Garnet variety, prized for its deep orange color and moist texture? Each variety offers a unique flavor profile and culinary experience.
Consider also experimenting with different growing mediums for your slips. While water works perfectly well, you could also try using a light potting mix or even vermiculite. Observe how the slips respond to each medium and see if you notice any differences in their growth rate or root development.
And remember, the key to successful sweet potato growing is patience and observation. Pay attention to your plants, monitor their growth, and adjust your care as needed. Don’t be afraid to experiment and learn from your mistakes. Gardening is a journey, and every season brings new opportunities for growth and discovery.
We wholeheartedly encourage you to give this DIY sweet potato growing trick a try. It’s easier than you might think, and the rewards are well worth the effort. Imagine the satisfaction of harvesting your own sweet potatoes, knowing that you nurtured them from tiny slips to mature, delicious tubers. Think of the incredible meals you can create with your homegrown bounty – sweet potato fries, sweet potato pie, roasted sweet potatoes with herbs, the possibilities are endless!
Once you’ve tried this method, we’d love to hear about your experience! Share your photos, tips, and stories in the comments below. Let’s create a community of sweet potato enthusiasts, sharing our knowledge and inspiring each other to grow the best sweet potatoes possible. Your insights could be invaluable to other gardeners, helping them to achieve their own sweet potato growing success. So, get your sweet potatoes ready, grab your jars, and let’s get growing! This **sweet potato growing** adventure awaits!
Frequently Asked Questions (FAQ)
Q: What kind of sweet potato should I use to grow slips?
A: You can use any sweet potato you buy from the grocery store, but organic sweet potatoes are generally recommended. Non-organic sweet potatoes may have been treated with growth inhibitors to prevent sprouting, which can hinder slip production. Look for firm, healthy sweet potatoes without any signs of rot or damage. Older sweet potatoes that have already started to sprout are also excellent candidates.
Q: How long does it take for sweet potato slips to grow?
A: It typically takes 4-8 weeks for sweet potato slips to grow large enough to transplant. The exact timeframe depends on factors such as temperature, light, and the variety of sweet potato. You’ll know the slips are ready when they are about 6-8 inches long and have a well-developed root system.
Q: What is the best way to water sweet potato slips?
A: If you’re growing slips in water, change the water every few days to prevent algae growth and keep the water fresh. If you’re using a potting mix, keep the soil consistently moist but not waterlogged. Allow the top inch of soil to dry out slightly between waterings.
Q: How much sunlight do sweet potato slips need?
A: Sweet potato slips need plenty of bright, indirect sunlight to thrive. Place them near a sunny window or under grow lights. Avoid direct sunlight, which can scorch the leaves. Aim for at least 6-8 hours of light per day.
Q: When is the best time to transplant sweet potato slips outdoors?
A: Transplant your sweet potato slips outdoors after the last frost and when the soil has warmed up to at least 60°F (15°C). Sweet potatoes are sensitive to cold temperatures, so it’s crucial to wait until the weather is consistently warm.
Q: What kind of soil do sweet potatoes need?
A: Sweet potatoes prefer well-drained, sandy loam soil that is rich in organic matter. Avoid heavy clay soils, which can become waterlogged and hinder root development. Amend your soil with compost or other organic matter to improve drainage and fertility.
Q: How far apart should I plant sweet potato slips?
A: Plant sweet potato slips 12-18 inches apart in rows that are 3-4 feet apart. This spacing allows the vines to spread out and provides adequate room for the tubers to develop.
Q: How often should I water sweet potatoes after transplanting?
A: Water sweet potatoes regularly after transplanting, especially during dry periods. Keep the soil consistently moist but not waterlogged. Once the plants are established, they are relatively drought-tolerant.
Q: Do sweet potatoes need fertilizer?
A: Sweet potatoes benefit from a balanced fertilizer applied at planting time. Avoid fertilizers that are high in nitrogen, as this can promote excessive vine growth at the expense of tuber development. A fertilizer with a higher phosphorus and potassium content is ideal.
Q: What are some common pests and diseases that affect sweet potatoes?
A: Common pests of sweet potatoes include sweet potato weevils, flea beetles, and aphids. Diseases include fusarium wilt, stem rot, and black rot. Monitor your plants regularly for signs of pests or diseases and take appropriate action if necessary.
Q: How do I know when my sweet potatoes are ready to harvest?
A: Sweet potatoes are typically ready to harvest 90-120 days after planting. The leaves will start to turn yellow and the vines will begin to die back. You can also dig up a test potato to check for size and maturity.
Q: How should I cure sweet potatoes after harvesting?
A: Curing sweet potatoes is essential for developing their sweetness and improving their storage life. After harvesting, gently brush off any excess soil and place the sweet potatoes in a warm, humid place (80-85°F and 85-90% humidity) for 7-10 days. This allows the skins to harden and any minor cuts or bruises to heal.
Q: How should I store sweet potatoes?
A: Store cured sweet potatoes in a cool, dry, and well-ventilated place (55-60°F). Avoid storing them in the refrigerator, as this can cause them to develop a hard core and lose their flavor. Properly cured and stored sweet potatoes can last for several months.
Q: Can I grow sweet potatoes in containers?
A: Yes, you can grow sweet potatoes in containers, but you’ll need a large container (at least 20 gallons) to accommodate their extensive root system. Choose a container with good drainage and fill it with a well-draining potting mix.
Q: What are some creative ways to use sweet potato leaves?
A: Sweet potato leaves are edible and nutritious! They can be used in salads, stir-fries, soups, and stews. They have a mild, spinach-like flavor and are a good source of vitamins and minerals. Just be sure to harvest leaves from plants that haven’t been treated with pesticides.

Leave a Comment