
Radish Growing Home: Ever dreamt of plucking crisp, peppery radishes straight from your own backyard? I know I have! There’s something incredibly satisfying about nurturing your own food, and radishes are the perfect gateway to the world of home gardening. They’re fast-growing, relatively low-maintenance, and pack a flavorful punch in salads, sandwiches, or even enjoyed on their own with a sprinkle of salt.
Radishes have a surprisingly long and vibrant history, dating back to ancient Egypt and Greece. They were even used as currency at one point! Today, they’re a staple in cuisines around the globe, and for good reason. But let’s face it, sometimes getting those perfect, plump radishes can be a bit tricky. That’s where these DIY tricks and hacks come in!
Are you tired of radishes that are too spicy, cracked, or just plain disappointing? I’ve been there! That’s why I’ve compiled this guide to share my favorite secrets for successful radish growing home. Whether you’re a seasoned gardener or just starting out, these tips will help you cultivate a bountiful harvest of delicious radishes. Get ready to impress your friends and family with your homegrown goodness!
Growing Radishes at Home: From Seed to Salad in Weeks!
Hey there, fellow gardening enthusiasts! I’m so excited to share my experience with growing radishes at home. They’re one of the fastest-growing veggies you can cultivate, perfect for impatient gardeners like me! Plus, that peppery crunch is just divine. Let’s dive into how you can have your own radish harvest in just a few weeks.
What You’ll Need:
Before we get our hands dirty, let’s gather our supplies. Here’s a checklist:
* Radish seeds (choose your favorite variety! I love French Breakfast and Cherry Belle)
* Well-draining soil (potting mix works great for containers, or amend your garden soil with compost)
* A sunny spot (at least 6 hours of sunlight per day)
* A container (if you’re growing in pots, make sure it’s at least 6 inches deep) or a prepared garden bed
* Watering can or hose with a gentle spray nozzle
* Optional: Organic fertilizer (for an extra boost)
* Optional: Row covers (to protect from pests)
Preparing Your Planting Area
Whether you’re using a container or a garden bed, proper preparation is key.
1. Choosing Your Location: Radishes thrive in full sun, so pick a spot that gets at least six hours of direct sunlight each day. If you’re in a particularly hot climate, a little afternoon shade can be beneficial.
2. Preparing the Soil (Container): If you’re using a container, fill it with a high-quality potting mix. Avoid using garden soil directly in containers, as it can compact and not drain well. I like to mix in a bit of compost for added nutrients.
3. Preparing the Soil (Garden Bed): If you’re planting in a garden bed, make sure the soil is loose and well-draining. Amend it with compost or well-rotted manure to improve fertility and drainage. Remove any rocks, weeds, or debris. I usually till the soil to a depth of about 6 inches.
4. Leveling the Soil: Rake the soil surface smooth to create an even planting area. This will help ensure consistent germination and growth.
Planting Your Radish Seeds
Now for the fun part! Planting the seeds is super easy.
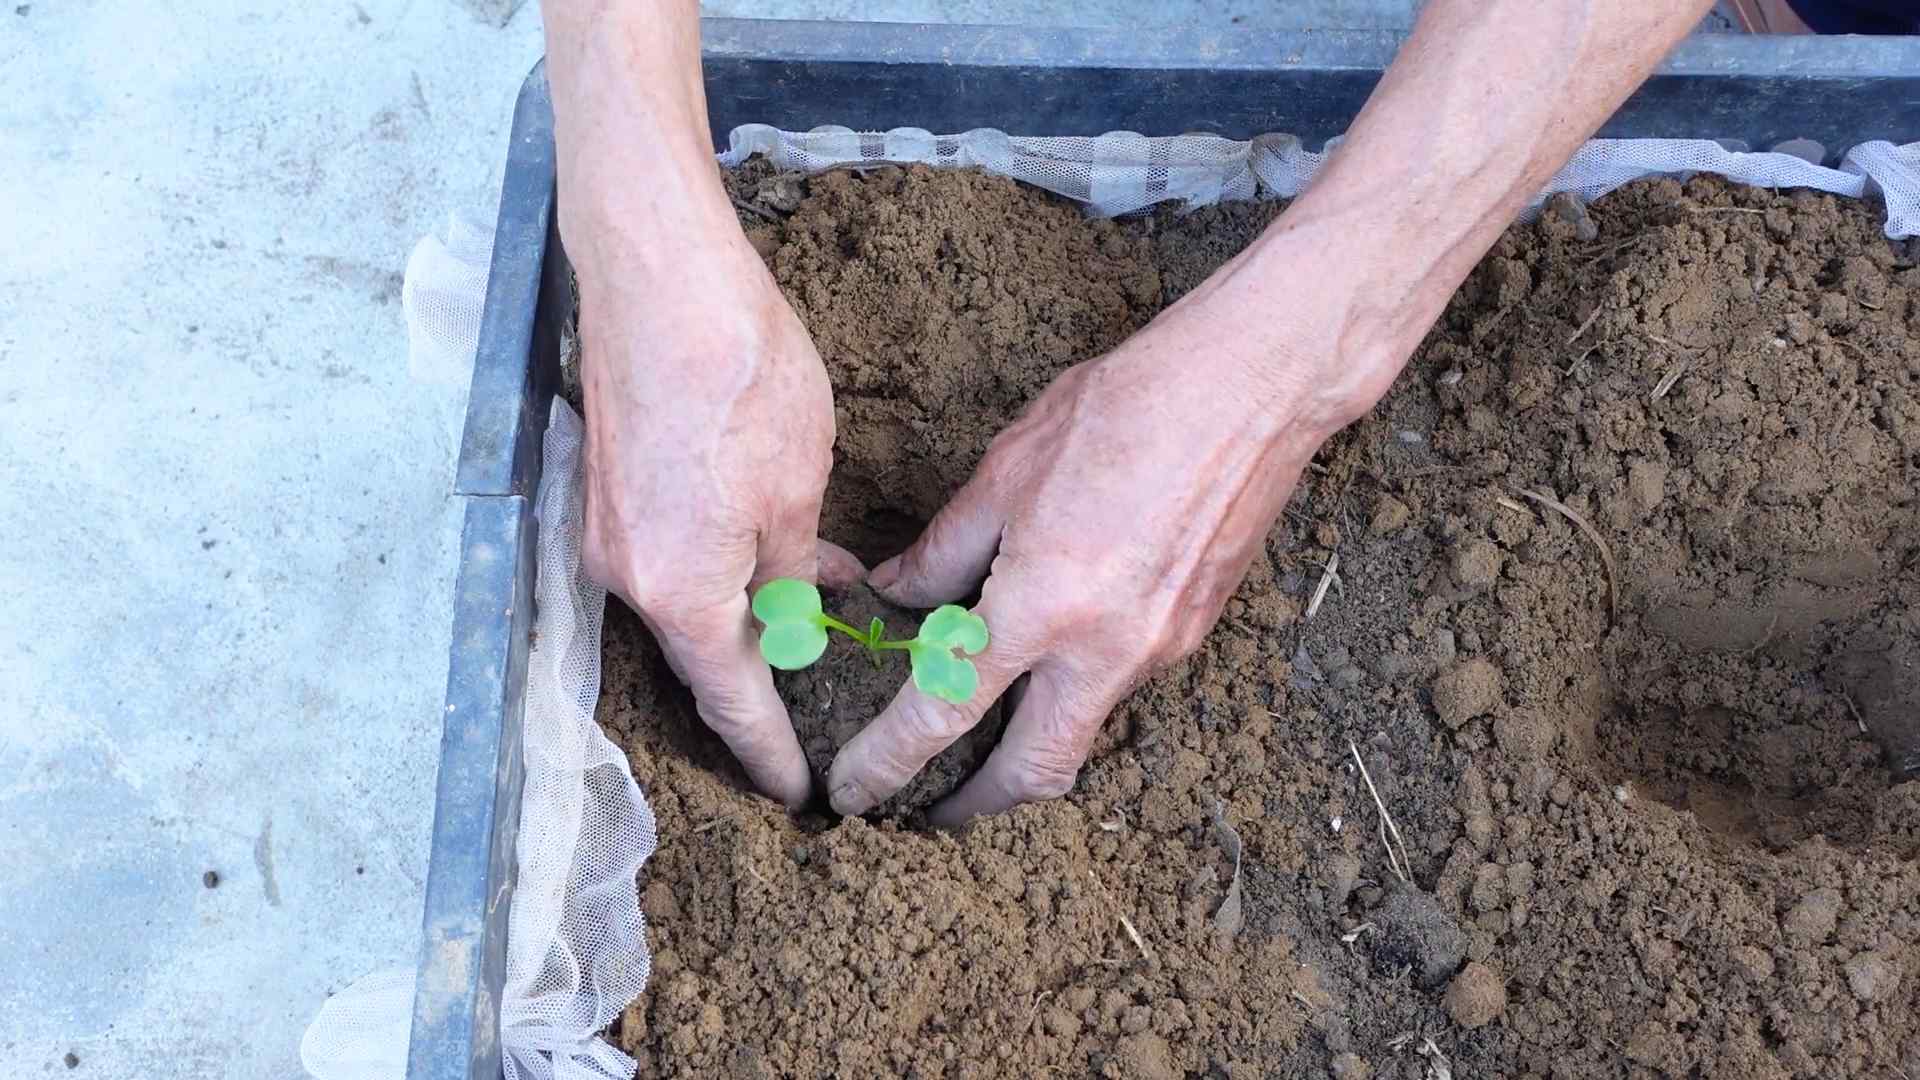
1. Spacing Your Seeds: Radishes need a little space to grow, so sow seeds about 1 inch apart. If you’re planting in rows, space the rows about 6 inches apart.
2. Sowing the Seeds: Create shallow furrows (about ½ inch deep) in the soil. You can use your finger or a small tool to make these furrows.
3. Placing the Seeds: Carefully drop the radish seeds into the furrows, spacing them about 1 inch apart.
4. Covering the Seeds: Gently cover the seeds with soil. I like to use my fingers to lightly pat the soil down.
5. Watering After Planting: Water the soil thoroughly after planting. Use a gentle spray nozzle to avoid disturbing the seeds. The soil should be moist but not waterlogged.
Caring for Your Radishes
Radishes are relatively low-maintenance, but here are a few tips to keep them happy and healthy.
1. Watering Regularly: Radishes need consistent moisture to grow quickly and develop a good flavor. Water them regularly, especially during dry spells. Aim to keep the soil consistently moist, but avoid overwatering, which can lead to rot. I usually water every other day, but I check the soil moisture first.
2. Thinning Seedlings: Once your seedlings emerge (usually within a few days), thin them to about 2 inches apart. This will give them enough space to grow and prevent overcrowding. Simply snip off the extra seedlings at the soil line with scissors. Don’t pull them out, as this can disturb the roots of the remaining plants.
3. Weeding: Keep the area around your radishes free of weeds. Weeds can compete with your radishes for nutrients and water. Hand-pull weeds carefully to avoid disturbing the radish roots.
4. Fertilizing (Optional): If you want to give your radishes an extra boost, you can fertilize them with a balanced organic fertilizer. Follow the instructions on the fertilizer package. I usually fertilize about two weeks after planting.
5. Pest Control (Optional): Radishes are generally pest-resistant, but sometimes flea beetles can be a problem. These tiny beetles can chew small holes in the leaves. If you notice flea beetles, you can cover your radishes with row covers to protect them. You can also try spraying them with insecticidal soap.
Harvesting Your Radishes
The best part! Radishes are ready to harvest in just 3-4 weeks, depending on the variety.
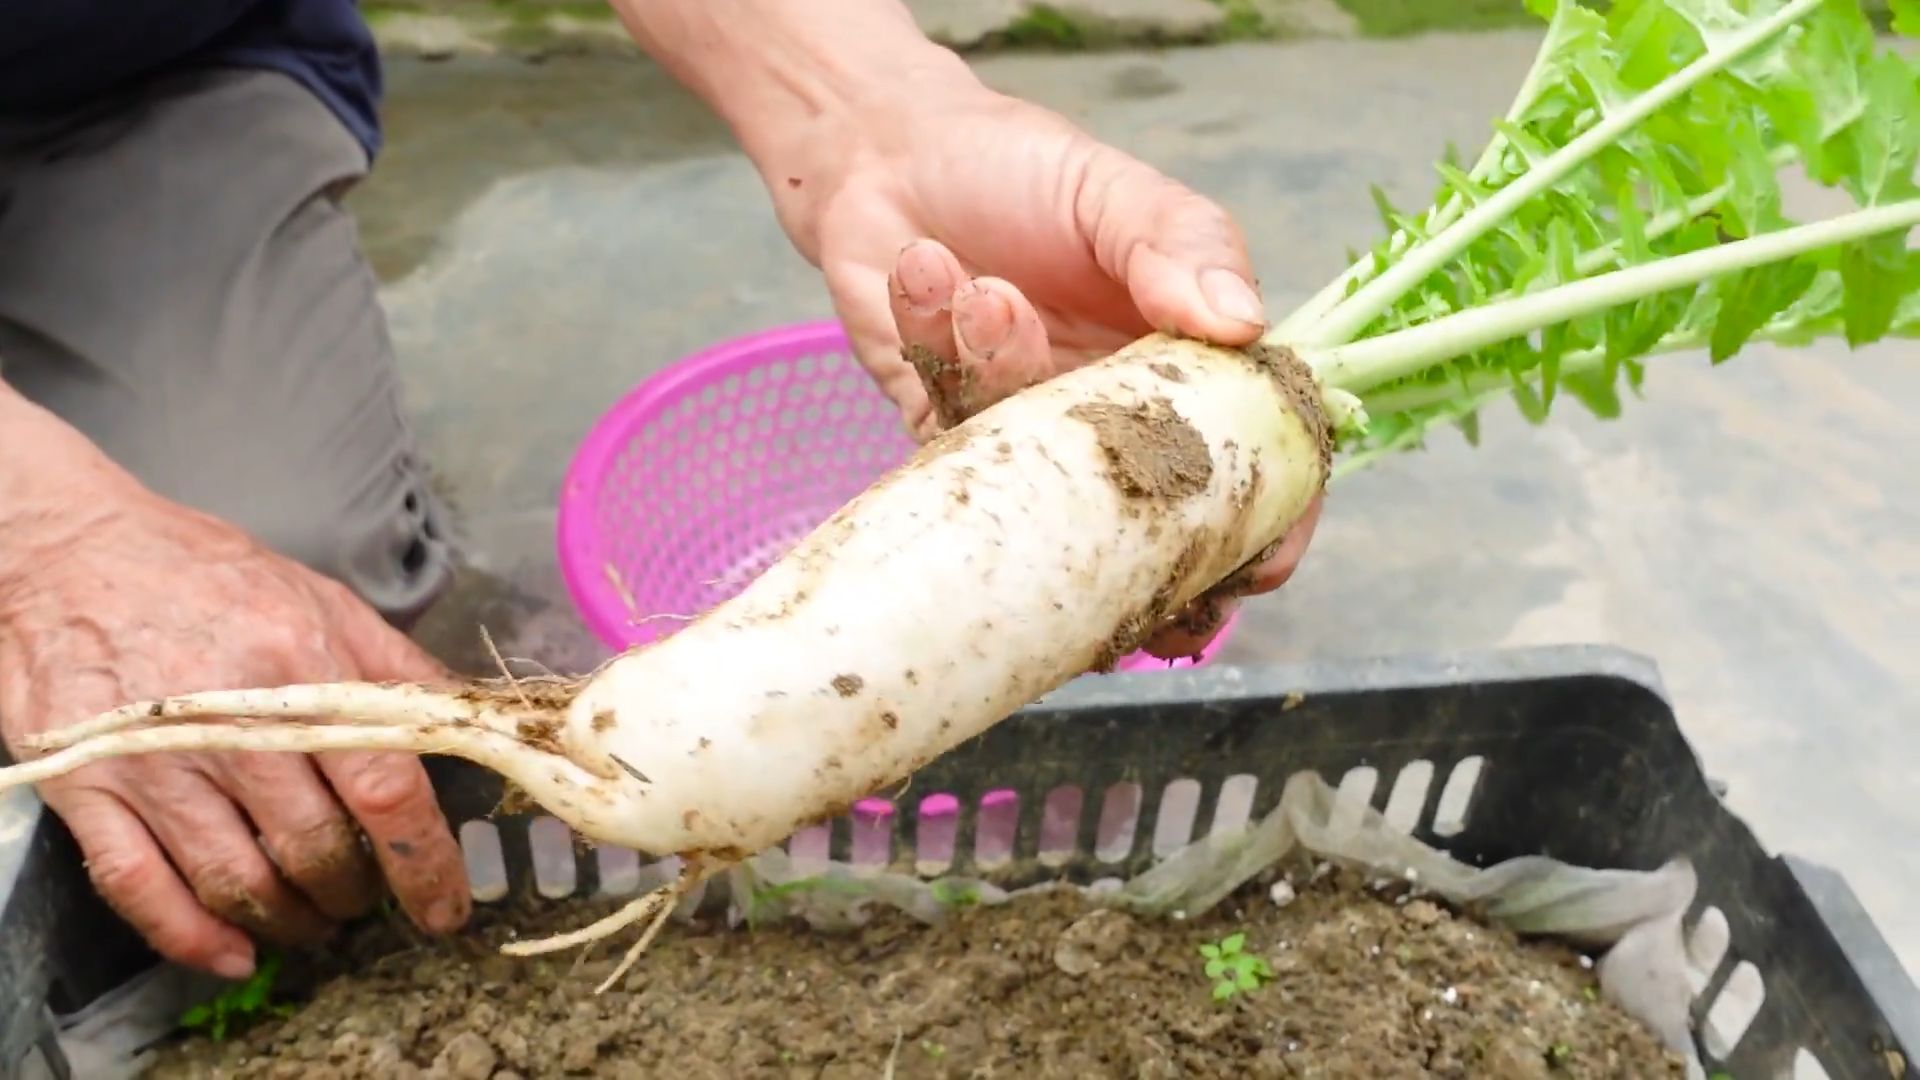
1. Checking for Readiness: Radishes are ready to harvest when the roots are about 1 inch in diameter. You can gently brush away some soil around the base of the plant to check the size of the root.
2. Harvesting: To harvest, gently pull the radishes from the soil. If the soil is dry, you may need to loosen it with a garden fork first.
3. Cleaning and Storing: Wash the radishes thoroughly to remove any soil. Trim off the tops and roots. Store the radishes in a plastic bag in the refrigerator. They will keep for about a week.
Troubleshooting
Even with the best care, sometimes things can go wrong. Here are a few common problems and how to fix them:
* Radishes are small and tough: This is usually caused by overcrowding or lack of water. Make sure you thin your seedlings properly and water them regularly.
* Radishes are cracked: This is usually caused by inconsistent watering. Try to keep the soil consistently moist.
* Radishes are bitter: This can be caused by hot weather or letting them grow too large. Harvest them when they are the right size and try to plant them in a cooler location.
* Pests are eating my radishes: Use row covers to protect your radishes from pests. You can also try spraying them with insecticidal soap.
Choosing the Right Radish Variety
There are so many different types of radishes to choose from! Here are a few of my favorites:
* Cherry Belle: These are classic red radishes that are crisp and mild.
* French Breakfast: These are elongated radishes with a mild, slightly sweet flavor.
* Easter Egg: These are a mix of different colored radishes, including red, pink, purple, and white.
* Black Spanish: These are large, black radishes with a strong, pungent flavor.
* Watermelon Radish: These are large, round radishes with a green exterior and a bright pink interior. They have a mild, slightly sweet flavor.
Succession Planting for a Continuous Harvest
To enjoy a continuous harvest of radishes, try succession planting. This means planting a new batch of seeds every 1-2 weeks. This way, you’ll always have fresh radishes to enjoy. I usually plant a new batch of seeds every two weeks during the spring and fall.
Radish Greens: Don’t Throw Them Away!
Did you know that radish greens are edible? They have a peppery flavor and can be used in salads, soups, and stir-fries. Just wash them thoroughly and trim off any tough stems. I love to sauté them with garlic and olive oil.
Enjoying Your Homegrown Radishes
Now that you’ve harvested your radishes, it’s time to enjoy them! Here are a few of my favorite ways to eat them:
* Raw: Radishes are delicious eaten raw in salads or as a snack.
* Roasted: Roasting radishes mellows their flavor and makes them tender.
* Pickled: Pickled radishes are a tangy and delicious condiment.
* In salads: Add sliced radishes to your favorite salads for a peppery crunch.
* On sandwiches: Radishes add a nice crunch and flavor to sandwiches.
* With butter and salt: This is a classic way to enjoy radishes. Just spread some butter on a slice of bread and top with sliced radishes and a sprinkle of salt.
Final Thoughts
Growing radishes at home is a rewarding experience. It’s a great way to get fresh, healthy vegetables on your table in just a few weeks. With a little bit of care and attention, you can have a bountiful radish harvest. Happy gardening!
Conclusion
So, there you have it! Growing radishes at home is not only incredibly easy, but it’s also a rewarding experience that brings fresh, peppery goodness right to your table. Forget those bland, store-bought radishes that lack that vibrant crunch and flavor. With just a few simple steps and a little bit of patience, you can cultivate your own supply of crisp, delicious radishes that are bursting with freshness.
This DIY approach to radish growing is a must-try for several reasons. First and foremost, it gives you complete control over the growing process. You know exactly what goes into your radishes – no harmful pesticides or questionable fertilizers. You’re nurturing a healthy, organic crop that’s good for you and good for the environment. Secondly, it’s incredibly cost-effective. A single packet of radish seeds is inexpensive and can yield a surprisingly large harvest. Compare that to the price of buying radishes at the grocery store week after week, and you’ll quickly see the savings add up.
But perhaps the most compelling reason to try growing radishes at home is the sheer satisfaction of harvesting your own food. There’s something truly special about nurturing a tiny seed into a vibrant, edible plant. It’s a connection to nature that’s both grounding and empowering. And when you finally get to pull those bright red orbs from the soil, wash them off, and take that first crunchy bite, you’ll understand why so many gardeners are passionate about growing their own food.
Looking for some variations to spice things up? Consider planting different varieties of radishes. From the classic Cherry Belle to the long, slender French Breakfast radish, to the spicy Daikon radish, there’s a whole world of radish flavors and textures to explore. You can also experiment with companion planting. Radishes are known to deter certain pests, so planting them alongside other vegetables like carrots or lettuce can be a beneficial strategy. Another fun variation is to grow radishes in containers. This is a great option if you have limited space or live in an apartment. Simply choose a pot that’s at least 6 inches deep and follow the same planting instructions as you would for growing radishes in the ground.
Don’t be intimidated if you’re a beginner gardener. Radishes are one of the easiest vegetables to grow, making them the perfect starting point for your gardening journey. The key is to provide them with well-drained soil, plenty of sunlight, and consistent moisture. And remember, radishes are fast growers, so you’ll be harvesting your first crop in just a few weeks.
So, what are you waiting for? Grab a packet of radish seeds, find a sunny spot in your garden or on your balcony, and get ready to experience the joy of growing your own food. We’re confident that you’ll be amazed at how easy and rewarding it is to grow radishes at home. And once you’ve harvested your first crop, we encourage you to share your experience with us. Post photos of your radishes on social media, tag us in your posts, and let us know what you think. We’d love to hear your tips, tricks, and favorite ways to enjoy your homegrown radishes. Happy gardening!
Frequently Asked Questions (FAQ)
What is the best time of year to plant radishes?
Radishes are cool-season crops, meaning they thrive in cooler temperatures. The best time to plant them is in early spring or late summer/early fall. In the spring, plant them as soon as the soil can be worked. In the fall, plant them about 4-6 weeks before the first expected frost. Avoid planting radishes during the hottest months of summer, as they tend to bolt (go to seed) in high temperatures, resulting in poor-tasting roots. You can succession plant radishes every 2-3 weeks to ensure a continuous harvest throughout the growing season.
How much sunlight do radishes need?
Radishes need at least 6 hours of sunlight per day to grow properly. Choose a location in your garden that receives full sun for the majority of the day. If you’re growing radishes in containers, make sure to place them in a sunny spot on your balcony or patio. While they prefer full sun, radishes can tolerate some partial shade, especially in hotter climates. However, insufficient sunlight can lead to leggy growth and smaller roots.
What kind of soil is best for growing radishes?
Radishes prefer loose, well-drained soil that is rich in organic matter. Heavy clay soil can hinder root development, resulting in misshapen or stunted radishes. Before planting, amend your soil with compost or other organic matter to improve drainage and fertility. A slightly acidic to neutral soil pH (around 6.0 to 7.0) is ideal for radish growth. You can test your soil pH with a home testing kit or by sending a sample to your local agricultural extension office.
How often should I water radishes?
Radishes need consistent moisture to grow quickly and develop crisp, flavorful roots. Water them regularly, especially during dry spells. Aim to keep the soil consistently moist but not waterlogged. Overwatering can lead to root rot, while underwatering can cause the radishes to become tough and bitter. A good rule of thumb is to water deeply whenever the top inch of soil feels dry to the touch. Mulching around your radish plants can help retain moisture and suppress weeds.
How long does it take for radishes to mature?
One of the great things about radishes is that they are very fast-growing. Most varieties mature in just 3-4 weeks. This makes them a great option for impatient gardeners or those who want to harvest a quick crop. Check the seed packet for the specific maturity time of the variety you are growing. You can start harvesting radishes as soon as they reach the desired size. Don’t let them get too large, as they can become woody and bitter.
What are some common pests and diseases that affect radishes?
While radishes are relatively pest-resistant, they can be susceptible to certain problems. Common pests include flea beetles, root maggots, and aphids. Flea beetles can chew small holes in the leaves, while root maggots can damage the roots. Aphids can suck the sap from the plants, weakening them. You can control these pests with organic insecticides or by using row covers to protect your plants. Diseases that can affect radishes include damping-off and clubroot. Damping-off is a fungal disease that can kill seedlings, while clubroot causes swollen, distorted roots. To prevent these diseases, make sure to plant your radishes in well-drained soil and avoid overcrowding.
Can I eat the radish greens?
Yes, absolutely! Radish greens are edible and nutritious. They have a peppery flavor similar to the roots, but slightly milder. You can use radish greens in salads, soups, stir-fries, or as a cooked vegetable. They are a good source of vitamins A and C, as well as calcium and iron. Make sure to wash the greens thoroughly before eating them.
How do I store radishes after harvesting?
To store radishes, remove the greens and wash the roots thoroughly. Place the radishes in a plastic bag or container and store them in the refrigerator. They will keep for about 1-2 weeks. You can also store radish greens separately in a plastic bag in the refrigerator. They will keep for about 3-5 days.
Why are my radishes cracking?
Radish cracking is often caused by inconsistent watering. If the soil dries out and then is suddenly flooded with water, the radishes can absorb the water too quickly, causing them to crack. To prevent cracking, make sure to water your radishes regularly and consistently, especially during dry spells. Mulching around your plants can also help retain moisture and prevent the soil from drying out too quickly.
My radishes are all tops and no bottoms. What did I do wrong?
This is a common problem with radishes, and it’s usually caused by one of a few factors. Insufficient sunlight, overcrowding, or poor soil can all contribute to this issue. Make sure your radishes are getting at least 6 hours of sunlight per day. Thin your seedlings to give them enough space to grow. And amend your soil with compost or other organic matter to improve drainage and fertility. Also, make sure you are harvesting at the right time. If you leave radishes in the ground too long, they can become woody and less flavorful.

Leave a Comment