
Growing Potatoes in Containers: Imagine harvesting a bounty of fresh, earthy potatoes right from your own patio or balcony! No sprawling garden needed. This isn’t just a dream; it’s an achievable reality with the right know-how. For centuries, potatoes have been a staple food source, sustaining civilizations and offering versatile culinary options. From the Andes Mountains, where they were first cultivated, to kitchens around the globe, potatoes have earned their place as a beloved and essential ingredient.
But what if you lack the space for a traditional potato patch? That’s where the magic of container gardening comes in! In this article, I’m going to share some simple yet effective DIY tricks and hacks to help you successfully grow potatoes in containers, even if you’re a complete beginner.
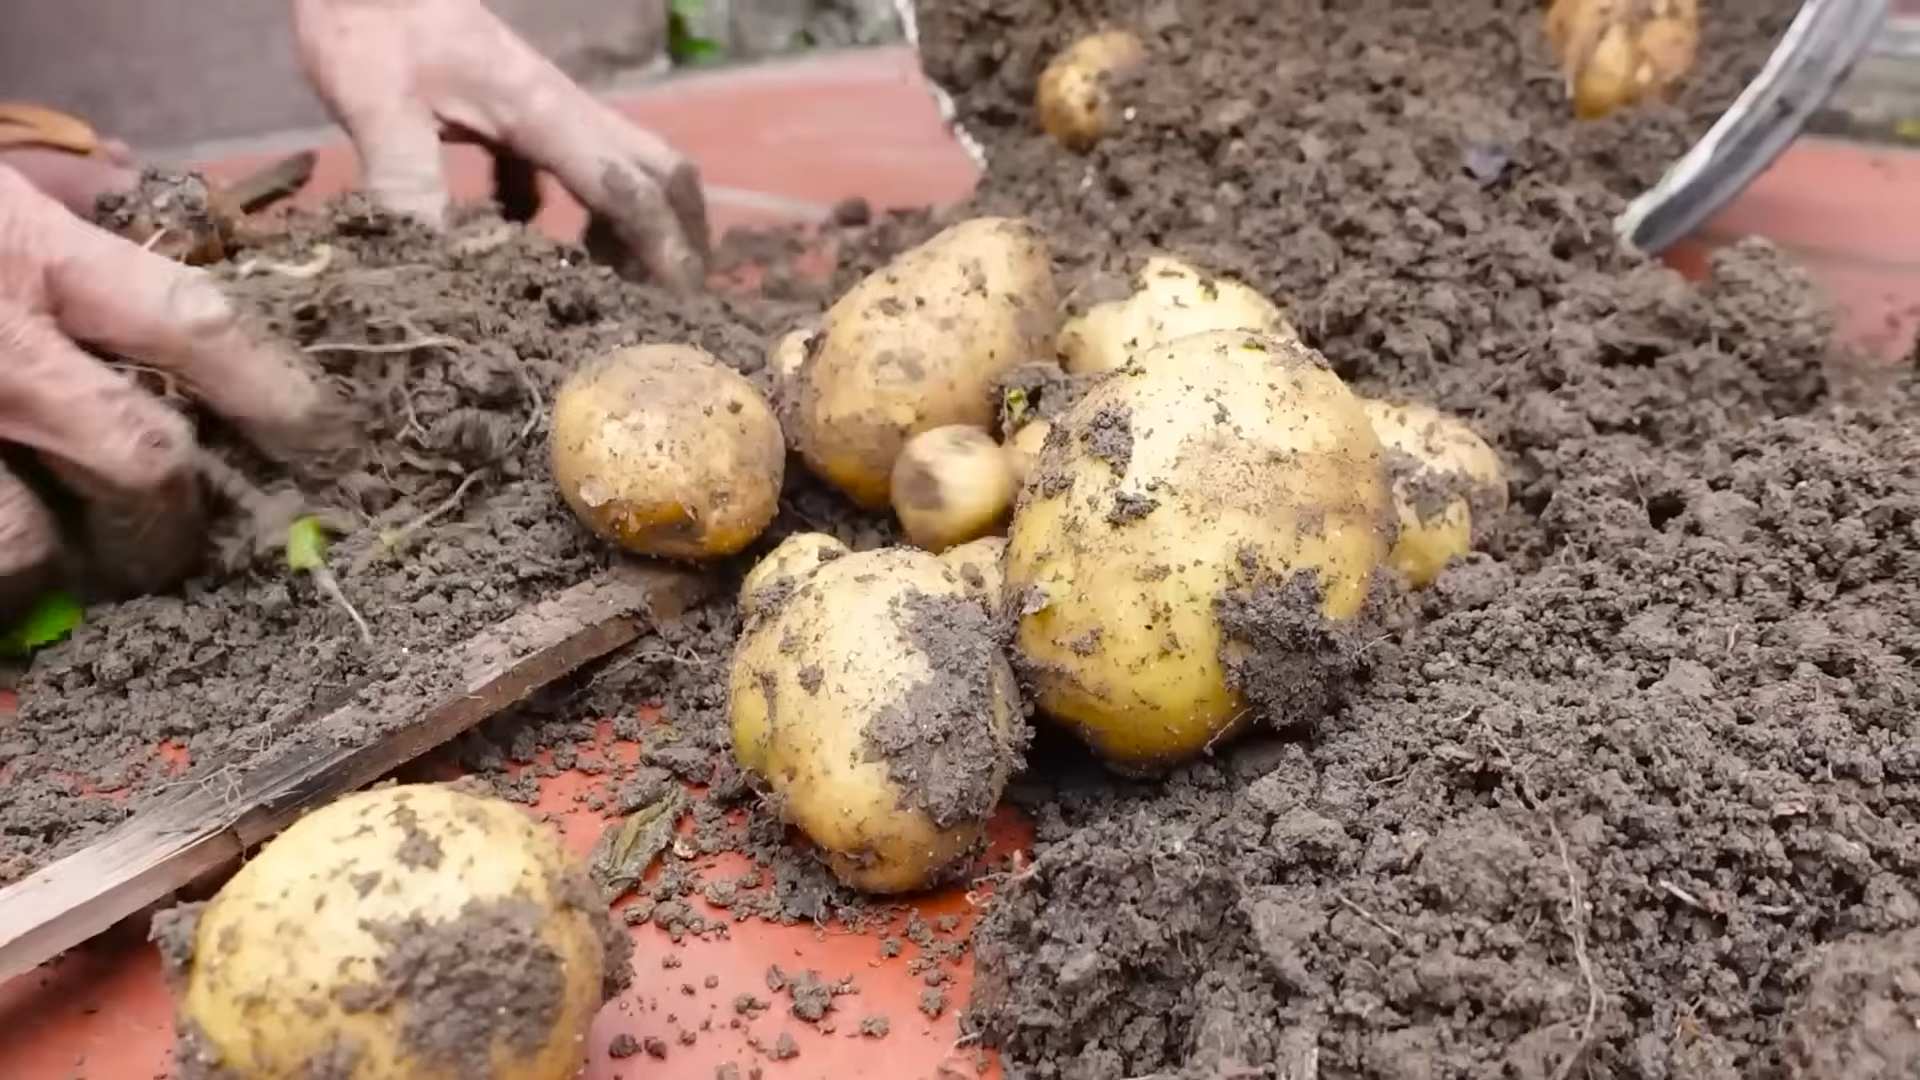
Why is this so important? Well, access to fresh, homegrown produce is becoming increasingly vital. Knowing where your food comes from and reducing your reliance on store-bought options is empowering. Plus, growing potatoes in containers is incredibly rewarding. There’s nothing quite like the satisfaction of digging into a container and unearthing your own homegrown treasure. So, let’s get started and transform your limited space into a potato-producing paradise!
Growing Potatoes in Containers: A Bumper Crop on Your Patio!
Hey there, fellow gardening enthusiasts! I’m so excited to share my tried-and-true method for growing potatoes in containers. Forget vast fields – you can enjoy a surprisingly abundant harvest right on your balcony, patio, or even a sunny windowsill. This method is perfect for small spaces, beginner gardeners, and anyone who wants to experience the joy of digging up their own homegrown spuds. Let’s get started!
Choosing the Right Container and Seed Potatoes
Before we dive into the planting process, let’s talk about the essentials: the container and the seed potatoes. These are crucial for a successful potato-growing adventure.
* Container Size: Bigger is better! I recommend a container that’s at least 15 gallons in size. Think large buckets, trash cans (with drainage holes, of course!), or even grow bags specifically designed for potatoes. The deeper the container, the more room the potatoes have to develop. A 20-gallon container is ideal.
* Material: Plastic, metal, or fabric containers all work well. Just make sure your chosen container has adequate drainage holes to prevent waterlogging, which can lead to rot.
* Seed Potatoes: These aren’t seeds in the traditional sense. They’re actually small potatoes or pieces of potatoes with “eyes” (those little buds that sprout). You can purchase certified seed potatoes from a garden center or online retailer. Avoid using potatoes from the grocery store, as they may be treated to prevent sprouting.
* Variety: Choose a potato variety that suits your taste and climate. Early-maturing varieties are a great choice for container gardening, as they tend to produce smaller plants and mature more quickly. Some popular options include Yukon Gold, Red Pontiac, and Fingerling potatoes.
Preparing Your Seed Potatoes
This step is optional, but I highly recommend it for a head start. It’s called “chitting,” and it encourages the seed potatoes to sprout before planting.
* Chitting Process: A few weeks before planting, place your seed potatoes in a cool, bright location (but out of direct sunlight). An egg carton or a shallow tray works perfectly.
* Encouraging Sprouts: The “eyes” of the potatoes will start to sprout, forming short, green shoots. This gives your potatoes a jumpstart once they’re planted.
* Cutting (Optional): If your seed potatoes are large, you can cut them into pieces, ensuring that each piece has at least one or two “eyes.” Let the cut pieces dry for a day or two to prevent rotting.
Planting Your Potatoes
Now for the fun part! Let’s get those potatoes in the ground (or, rather, in the container).
1. Prepare the Container: Fill the bottom of your container with about 4-6 inches of well-draining potting mix. I like to use a mix of compost, peat moss, and perlite for optimal drainage and nutrient content.
2. Plant the Seed Potatoes: Place the seed potatoes on top of the soil, with the sprouts facing upwards. Space them evenly if you’re planting multiple seed potatoes in the same container.
3. Cover with Soil: Cover the seed potatoes with another 4-6 inches of potting mix. Gently water the soil until it’s moist but not soggy.
4. Location, Location, Location: Place the container in a sunny location that receives at least 6-8 hours of direct sunlight per day. Potatoes love sunshine!
The “Hilling” Technique: Maximizing Your Harvest
This is where the magic happens! “Hilling” is the process of gradually adding more soil to the container as the potato plants grow. This encourages the plants to produce more potatoes along the buried stems.
1. Wait for Growth: Once the potato plants have grown about 6-8 inches tall, it’s time to start hilling.
2. Add More Soil: Add another 4-6 inches of potting mix to the container, burying the lower portion of the stems. Leave the top few inches of the plant exposed.
3. Repeat the Process: Continue hilling every few weeks as the plants grow, until the container is almost full.
4. Watering: Water regularly, keeping the soil consistently moist but not waterlogged.
Caring for Your Potato Plants
Proper care is essential for a healthy and productive potato crop.
* Watering: Potatoes need consistent moisture, especially during hot weather. Check the soil moisture regularly and water when the top inch feels dry to the touch.
* Fertilizing: Feed your potato plants with a balanced fertilizer every few weeks. Look for a fertilizer that’s specifically formulated for vegetables.
* Pest Control: Keep an eye out for common potato pests, such as aphids, potato beetles, and flea beetles. Handpick any pests you find or use an organic insecticide if necessary.
* Sunlight: Ensure your plants are getting enough sunlight. If you notice the leaves are pale or the plants are leggy, move the container to a sunnier location.
Harvesting Your Potatoes
The moment we’ve all been waiting for! Harvesting your homegrown potatoes is incredibly rewarding.
1. Timing: The timing of your harvest will depend on the variety of potatoes you’re growing. Generally, early-maturing varieties are ready to harvest in about 70-80 days, while later-maturing varieties may take 90-100 days.
2. Signs of Maturity: Look for signs that your potatoes are ready to harvest, such as the foliage turning yellow and starting to die back.
3. Gentle Digging: Carefully dig into the container with your hands or a small trowel, being careful not to damage the potatoes.
4. Harvesting: Gently lift the potatoes from the soil. You’ll be amazed at how many potatoes you can harvest from a single container!
5. Curing (Optional): If you plan to store your potatoes for an extended period, you can cure them by spreading them out in a cool, dry, and dark location for a week or two. This helps to toughen the skins and prevent spoilage.
Troubleshooting Common Issues
Even with the best care, you might encounter a few challenges along the way. Here are some common issues and how to address them:
* Potato Blight: This fungal disease can cause brown spots on the leaves and stems. To prevent blight, ensure good air circulation around the plants and avoid overhead watering. If blight does occur, remove affected foliage immediately and treat with a fungicide.
* Scab: This disease causes rough, scabby patches on the potato skins. It’s more common in alkaline soils. To prevent scab, maintain a slightly acidic soil pH (around 6.0).
* Pests: As mentioned earlier, keep an eye out for pests and take action promptly.
* Lack of Potatoes: If your plants are growing well but not producing many potatoes, it could be due to insufficient sunlight, poor soil, or inadequate hilling. Make sure your plants are getting enough sun, fertilize regularly, and continue hilling as needed.
Enjoying Your Homegrown Potatoes
Congratulations! You’ve successfully grown potatoes in containers. Now it’s time to savor the fruits (or rather, the tubers) of your labor.
* Freshly Harvested: There’s nothing quite like the taste of freshly harvested potatoes. Enjoy them roasted, mashed, fried, or in your favorite potato recipes.
* Storage: Store your potatoes in a cool, dark, and dry location. They should keep for several months if stored properly.
Growing potatoes in containers is a rewarding and enjoyable experience. With a little bit of care and attention, you can harvest a bountiful crop of delicious potatoes right in your own backyard (or balcony!). Happy gardening!

Conclusion
So, there you have it! Growing potatoes in containers isn’t just a gardening trend; it’s a game-changer for anyone with limited space, a desire for fresh, homegrown produce, or simply a love for getting their hands dirty. We’ve walked you through the entire process, from selecting the right container and seed potatoes to nurturing your plants and harvesting your bounty. But why is this DIY trick a must-try?
Firstly, the convenience is unparalleled. Forget about tilling vast fields or battling stubborn weeds in a sprawling garden. Container gardening brings the potato patch to your patio, balcony, or even your doorstep. This accessibility makes fresh, organic potatoes a reality for apartment dwellers and urban gardeners alike.
Secondly, the control you have over the growing environment is significant. You can tailor the soil composition, watering schedule, and sun exposure to perfectly suit your potato plants’ needs. This level of control often translates to healthier plants and a more abundant harvest compared to traditional in-ground gardening. Plus, you can easily move your containers to chase the sun or protect them from unexpected frost.
Thirdly, and perhaps most importantly, growing your own potatoes is incredibly rewarding. There’s nothing quite like the satisfaction of digging into a container and unearthing a treasure trove of freshly grown potatoes. The taste is simply unmatched – a far cry from the bland, mass-produced potatoes you find in the supermarket. You’ll experience the true flavor of the earth, enhanced by your own care and attention.
But don’t stop there! Experiment with different potato varieties to discover your favorites. Try growing colorful potatoes like purple or red varieties for a visually stunning and nutritious addition to your meals. You can also explore different container sizes and materials to find what works best for your space and climate. Consider adding companion plants like marigolds or basil to your potato containers to deter pests and attract beneficial insects.
For a fun twist, try layering different types of soil in your container. A base layer of compost-rich soil can provide a slow-release source of nutrients, while a top layer of well-draining potting mix can prevent waterlogging. You can even add a layer of straw or hay to help retain moisture and suppress weeds.
Remember, the key to successful container gardening is observation and adaptation. Pay close attention to your plants’ needs and adjust your care accordingly. Don’t be afraid to experiment and learn from your mistakes. Every season is a new opportunity to refine your technique and improve your harvest.
We wholeheartedly encourage you to give this DIY trick a try. It’s a fun, rewarding, and sustainable way to enjoy fresh, homegrown potatoes, no matter where you live. And once you’ve experienced the joy of harvesting your own spuds, we’re confident you’ll be hooked!
So, grab a container, some seed potatoes, and get ready to embark on a gardening adventure. And most importantly, don’t forget to share your experience with us! We’d love to hear about your successes, your challenges, and any tips or tricks you discover along the way. Share your photos and stories on social media using #ContainerPotatoes and let’s inspire others to join the container gardening movement. Happy growing! This method of growing potatoes in containers is a great way to get started.
Frequently Asked Questions (FAQs)
What is the best size container for growing potatoes?
The ideal container size depends on the potato variety you choose. Generally, a container that is at least 15 gallons (approximately 18 inches in diameter and 18 inches deep) is recommended for most potato varieties. Larger containers, such as 20-gallon or even 30-gallon containers, will provide more room for the roots to grow and can result in a larger harvest. Smaller containers may work for dwarf or early-maturing varieties, but be prepared for a smaller yield. The key is to provide enough space for the potatoes to develop without becoming overcrowded. Insufficient space can lead to stunted growth and smaller potatoes.
What type of soil should I use for growing potatoes in containers?
Potatoes thrive in well-draining, slightly acidic soil. A good potting mix specifically formulated for vegetables is an excellent choice. Avoid using garden soil, as it can be too heavy and compact, hindering drainage and root development. You can also create your own potting mix by combining equal parts of peat moss (or coconut coir), perlite, and compost. The peat moss or coconut coir helps retain moisture, the perlite improves drainage, and the compost provides essential nutrients. Ensure the soil is loose and airy to allow for proper root growth and tuber formation. Adding a slow-release fertilizer to the soil at planting time can also provide a steady supply of nutrients throughout the growing season.
How often should I water my potato plants in containers?
Watering frequency depends on several factors, including the weather, the size of the container, and the type of soil you’re using. Generally, you should water your potato plants whenever the top inch of soil feels dry to the touch. During hot, dry weather, you may need to water daily, while during cooler, wetter periods, you may only need to water every few days. Avoid overwatering, as this can lead to root rot. Ensure the container has adequate drainage holes to prevent water from accumulating at the bottom. When watering, water deeply until water drains out of the bottom of the container. This ensures that the entire root system is adequately hydrated.
How much sunlight do potato plants need?
Potato plants need at least six to eight hours of direct sunlight per day to thrive. Choose a location for your containers that receives ample sunlight throughout the day. If you live in a particularly hot climate, providing some afternoon shade can help prevent the plants from overheating. Insufficient sunlight can lead to leggy growth, reduced tuber production, and overall weaker plants. If you don’t have a sunny spot, you can supplement with grow lights.
How do I “hill” potatoes in containers?
“Hilling” is the process of adding more soil to the container as the potato plants grow. This encourages the plants to produce more tubers along the stems. When the potato plants are about 6-8 inches tall, add a few inches of soil to the container, burying the lower portion of the stems. Repeat this process every few weeks as the plants continue to grow, until the container is nearly full. Be careful not to bury the leaves of the plants. Hilling provides more space for tuber development and helps protect the developing potatoes from sunlight, which can cause them to turn green and produce solanine, a toxic compound.
When are potatoes ready to harvest from containers?
The time it takes for potatoes to mature depends on the variety you’re growing. Generally, early-maturing varieties are ready to harvest in about 70-80 days, while late-maturing varieties may take 100 days or more. You can start harvesting “new potatoes” (small, immature potatoes) a few weeks after the plants flower. To harvest new potatoes, carefully dig around the edges of the container and remove a few potatoes, leaving the rest to continue growing. For a full harvest, wait until the foliage begins to turn yellow and die back. This indicates that the potatoes have reached maturity. At this point, stop watering the plants and allow the soil to dry out slightly. Then, carefully tip the container over and harvest the potatoes.
What are common pests and diseases that affect potatoes in containers?
Common pests that can affect potatoes include aphids, potato beetles, and flea beetles. Aphids can be controlled with insecticidal soap or neem oil. Potato beetles can be hand-picked or treated with Bacillus thuringiensis (Bt). Flea beetles can be deterred with row covers or insecticidal soap. Common diseases include early blight, late blight, and potato scab. Early blight and late blight can be prevented by ensuring good air circulation and avoiding overhead watering. Potato scab can be minimized by maintaining a slightly acidic soil pH. If you notice any signs of pests or diseases, take action promptly to prevent them from spreading.
Can I reuse the soil from my potato containers?
Yes, you can reuse the soil from your potato containers, but it’s important to amend it before replanting. Remove any remaining plant debris and roots. Then, add fresh compost and fertilizer to replenish the nutrients that were depleted during the previous growing season. You may also want to sterilize the soil to kill any potential pathogens or pests. This can be done by baking the soil in the oven at 180°F (82°C) for 30 minutes or by solarizing it in a black plastic bag for several weeks during the hottest part of the summer. Reusing soil can save you money and reduce waste, but it’s important to ensure that the soil is healthy and free from pests and diseases before replanting.
Leave a Comment