
Growing Celery in Containers might sound like a challenge reserved for seasoned gardeners, but trust me, it’s totally achievable, even if you’re a beginner like I once was! Have you ever dreamt of snipping fresh, crisp celery stalks right from your own patio for a healthy snack or to add that perfect crunch to your soup? Well, dream no more! This DIY guide is your ticket to homegrown celery goodness, no sprawling garden required.
Celery, with its refreshing taste and satisfying crunch, has been cultivated for centuries. Originating in the Mediterranean region, it was initially valued more for its medicinal properties than its culinary uses. Over time, it evolved into the crisp, juicy vegetable we know and love today. But let’s face it, buying celery from the store often means ending up with a bunch that wilts before you can use it all. That’s where the magic of container gardening comes in!
In today’s world, where access to fresh, healthy produce can sometimes be limited or expensive, learning how to grow your own food is more important than ever. Growing Celery in Containers allows you to control the quality of your food, reduce waste, and enjoy the satisfaction of nurturing something from seed to table. Plus, it’s a fantastic way to add a touch of green to your balcony, patio, or even a sunny windowsill. So, grab your gardening gloves, and let’s dive into the wonderful world of container celery!
Growing Bok Choy Indoors: A Beginner’s Guide
Hey there, fellow plant enthusiasts! Ever thought about growing your own fresh veggies right in your kitchen? Bok choy is a fantastic choice – it’s quick to grow, delicious, and packed with nutrients. Plus, it’s surprisingly easy to cultivate indoors. I’m going to walk you through everything you need to know to get started. Let’s get our hands dirty!
What You’ll Need
Before we dive in, let’s gather our supplies. Here’s a checklist of everything you’ll need to successfully grow bok choy indoors:
* Bok Choy Seeds: Choose a variety that’s well-suited for indoor growing. Dwarf varieties tend to do best.
* Seed Starting Tray or Small Pots: These will be used to germinate your seeds.
* Potting Mix: Use a well-draining potting mix specifically formulated for vegetables.
* Larger Pots (6-8 inches in diameter): These will be the final homes for your bok choy plants.
* Grow Lights (Optional but Recommended): Bok choy needs plenty of light, so grow lights can be a lifesaver, especially during winter months.
* Watering Can or Spray Bottle: For gentle watering.
* Fertilizer: A balanced liquid fertilizer will help your bok choy thrive.
* Spray Bottle with Water: For misting the leaves to maintain humidity.
Starting Your Seeds
This is where the magic begins! Getting your seeds to sprout is the first crucial step.
1. Prepare Your Seed Starting Tray or Pots: Fill your seed starting tray or small pots with the potting mix. Gently pat it down to remove any large air pockets.
2. Sow the Seeds: Sprinkle 2-3 bok choy seeds in each cell or pot. Don’t bury them too deep – about ¼ inch is perfect.
3. Water Gently: Use a spray bottle or watering can with a gentle nozzle to moisten the soil. You want it damp, not soggy.
4. Provide Warmth and Light: Place the tray or pots in a warm location (around 65-75°F or 18-24°C). If you’re using grow lights, position them a few inches above the soil surface. If you’re relying on natural light, choose a sunny windowsill.
5. Keep the Soil Moist: Check the soil daily and water as needed to keep it consistently moist. Don’t let it dry out!
6. Wait for Germination: Bok choy seeds typically germinate within 5-10 days. Be patient!
Transplanting Your Seedlings
Once your seedlings have developed a few true leaves (the leaves that appear after the initial seed leaves), it’s time to transplant them into larger pots.
1. Prepare Your Larger Pots: Fill your 6-8 inch pots with fresh potting mix.
2. Carefully Remove the Seedlings: Gently loosen the soil around the seedlings in the seed starting tray or pots. Be careful not to damage the roots. You can use a small spoon or fork to help you.
3. Transplant the Seedlings: Make a small hole in the center of the potting mix in each larger pot. Place one seedling in each hole and gently cover the roots with soil.
4. Water Thoroughly: Water the transplanted seedlings well to help them settle in.
5. Provide Light and Warmth: Place the pots in a location with plenty of light, either natural or from grow lights. Maintain a temperature of around 60-70°F (15-21°C).
Caring for Your Bok Choy Plants
Now that your bok choy plants are in their final homes, it’s time to provide them with the care they need to thrive.
1. Watering: Bok choy needs consistent moisture, but avoid overwatering. Water when the top inch of soil feels dry to the touch. Ensure the pot has good drainage to prevent root rot.
2. Lighting: Bok choy requires at least 6 hours of sunlight per day. If you’re not getting enough natural light, use grow lights to supplement. Position the lights about 6-12 inches above the plants.
3. Fertilizing: Feed your bok choy plants every 2-3 weeks with a balanced liquid fertilizer. Follow the instructions on the fertilizer packaging.
4. Temperature: Bok choy prefers cooler temperatures, ideally between 60-70°F (15-21°C). Avoid exposing them to extreme heat or cold.
5. Humidity: Bok choy likes humidity. Mist the leaves with water regularly, especially if you live in a dry climate. You can also place a tray of water near the plants to increase humidity.
6. Pest Control: Keep an eye out for pests like aphids, slugs, and cabbage worms. If you spot any, you can try removing them by hand or using an organic insecticide.
7. Air Circulation: Good air circulation helps prevent fungal diseases. Make sure your plants have enough space between them and that the area is well-ventilated.
Harvesting Your Bok Choy
The best part! You can usually start harvesting your bok choy about 30-45 days after transplanting.
1. Harvesting Individual Leaves: You can harvest individual leaves as needed, starting with the outer leaves. This allows the plant to continue growing and producing more leaves.
2. Harvesting the Entire Plant: If you prefer, you can harvest the entire plant at once. Simply cut the stem at the base of the plant.
3. Timing is Key: Harvest your bok choy before it bolts (starts to flower). Bolting can make the leaves bitter.
Troubleshooting
Even with the best care, you might encounter some challenges along the way. Here are a few common problems and how to address them:
* Yellowing Leaves: This could be a sign of overwatering, underwatering, or nutrient deficiency. Check the soil moisture and adjust your watering accordingly. If the problem persists, try fertilizing your plants.
* Leggy Growth: This usually indicates insufficient light. Move your plants to a brighter location or use grow lights.
* Pest Infestation: Inspect your plants regularly for pests. If you find any, remove them by hand or use an organic insecticide.
* Slow Growth: This could be due to a variety of factors, including insufficient light, poor soil, or lack of nutrients. Make sure your plants are getting enough light, water, and fertilizer.
Choosing the Right Bok Choy Variety
Not all bok choy varieties are created equal, especially when it comes to indoor growing. Here are a few that I’ve found to be particularly well-suited for containers:
* ‘Dwarf Pak Choi’: As the name suggests, this variety stays relatively small, making it perfect for indoor containers. It matures quickly and produces tender, flavorful leaves.
* ‘Toy Choi’: Another compact variety that’s easy to grow indoors. It has a mild flavor and crisp texture.
* ‘Mei Qing Choi’: This variety is known for its light green leaves and white stalks. It’s relatively heat-tolerant, which can be an advantage if your indoor growing space tends to get warm.
* ‘Joi Choi’: While slightly larger than the other varieties listed, ‘Joi Choi’ is still manageable in containers. It has a robust flavor and is relatively slow to bolt.
Optimizing Your Indoor Growing Environment
To give your bok choy plants the best possible chance of success, consider these tips for optimizing your indoor growing environment:
* Temperature Control: As mentioned earlier, bok choy prefers cooler temperatures. If your home tends to be warm, try to keep your growing area as cool as possible. You can use fans or air conditioning to help regulate the temperature.
* Humidity Management: Maintaining adequate humidity is crucial for healthy bok choy growth. In addition to misting the leaves, you can also use a humidifier or place a tray of water near the plants.
* Air Circulation: Good air circulation helps prevent fungal diseases and promotes healthy growth. Make sure your plants have enough space between them and that the area is well-ventilated. You can use a small fan to improve air circulation.
* Container Selection: Choose pots that are the right size for your plants and that have good drainage. Terra cotta pots are a good option because they allow the soil to breathe.
* Soil Quality: Use a high-quality potting mix that is well-draining and rich in nutrients. You can also amend your potting mix with compost or other organic matter to improve its fertility.
Enjoying Your Homegrown Bok Choy
Once you’ve harvested your bok choy, it’s time to enjoy the fruits (or rather, vegetables) of your labor! Bok choy is incredibly versatile and

Conclusion
So, there you have it! Growing celery in containers isn’t just a quirky gardening experiment; it’s a genuinely rewarding experience that brings fresh, crisp celery right to your doorstep. We’ve walked through the entire process, from selecting the right container and soil to nurturing your celery plants and harvesting your bounty.
Why is this DIY trick a must-try? Because it empowers you to control the quality and freshness of your produce. No more wilted, store-bought celery that’s been sitting on shelves for days. Imagine the satisfaction of snipping off stalks from your own container garden, knowing exactly where they came from and what went into growing them. Plus, it’s a fantastic way to reduce your carbon footprint by minimizing transportation and packaging waste.
Beyond the practical benefits, growing celery in containers is also incredibly therapeutic. The simple act of tending to your plants, watching them grow, and nurturing them to maturity can be a calming and fulfilling activity. It’s a chance to connect with nature, even in the midst of a busy urban environment.
But the fun doesn’t stop there! Feel free to experiment with different celery varieties. Try growing ‘Utah Tall’ for its classic flavor, or ‘Redventure’ for a splash of color in your garden and a slightly sweeter taste. You can also companion plant your celery with herbs like parsley or basil to create a fragrant and productive container garden. Consider adding some marigolds nearby to deter pests naturally.
Another variation to consider is succession planting. By planting new celery seeds every few weeks, you can ensure a continuous harvest throughout the growing season. This way, you’ll always have fresh celery on hand for your salads, soups, and snacks.
And don’t forget about the celery leaves! They’re often discarded, but they’re packed with flavor and nutrients. Use them in soups, stews, or as a garnish for your favorite dishes. You can even dry them and grind them into a celery salt for a unique and flavorful seasoning.
Ultimately, the success of your container celery garden depends on your dedication and attention to detail. Pay close attention to watering, fertilizing, and pest control, and you’ll be rewarded with a bountiful harvest.
We wholeheartedly encourage you to give this DIY trick a try. It’s easier than you might think, and the rewards are well worth the effort. Once you’ve experienced the joy of growing your own celery, you’ll never look at store-bought celery the same way again.
So, grab a container, some soil, and some celery seeds, and get started today! And most importantly, don’t forget to share your experience with us. We’d love to hear about your successes, your challenges, and any tips or tricks you’ve discovered along the way. Share your photos and stories on social media using #ContainerCelery or leave a comment below. Let’s build a community of container celery growers and inspire others to embrace the joys of homegrown produce. Let us know how your **growing celery in containers** journey goes!
Frequently Asked Questions (FAQ)
1. What is the best size container for growing celery?
A container that is at least 8-12 inches deep and 8-12 inches in diameter is ideal for growing celery. Celery needs room for its roots to develop properly. A larger container will also retain moisture better, which is crucial for celery growth. You can grow multiple celery plants in a larger container, but be sure to space them at least 6 inches apart to allow for adequate air circulation and prevent overcrowding. A five-gallon bucket or a large planter box works well.
2. What type of soil is best for growing celery in containers?
Celery thrives in rich, well-draining soil that is high in organic matter. A good potting mix specifically formulated for vegetables is a great choice. You can also amend your own potting mix by adding compost, aged manure, or other organic materials. The ideal soil pH for celery is between 6.0 and 6.8. Avoid using garden soil in containers, as it can become compacted and doesn’t drain well.
3. How often should I water my container celery?
Celery needs consistent moisture to thrive. Water your container celery deeply whenever the top inch of soil feels dry to the touch. During hot, dry weather, you may need to water daily or even twice a day. Be careful not to overwater, as this can lead to root rot. Ensure your container has drainage holes to allow excess water to escape. A good rule of thumb is to water thoroughly until water drains out of the bottom of the container.
4. What kind of fertilizer does celery need?
Celery is a heavy feeder and requires regular fertilization to produce healthy stalks. Use a balanced fertilizer (e.g., 10-10-10) or a fertilizer specifically formulated for vegetables. Apply fertilizer according to the package instructions, typically every 2-3 weeks. You can also supplement with organic fertilizers like compost tea or fish emulsion. Avoid over-fertilizing, as this can lead to excessive foliage growth at the expense of stalk development.
5. How much sunlight does celery need?
Celery prefers full sun, which means at least 6-8 hours of direct sunlight per day. However, in hot climates, celery can benefit from some afternoon shade to prevent scorching. If you live in a particularly hot region, consider placing your container celery in a location that receives morning sun and afternoon shade. If you don’t have enough natural sunlight, you can supplement with grow lights.
6. How long does it take for celery to grow in containers?
Celery typically takes 100-130 days to mature from seed. However, you can start harvesting individual stalks as soon as they reach a usable size. If you purchase celery transplants, the growing time will be shorter, typically around 70-90 days. Be patient and allow your celery plants to fully mature for the best flavor and texture.
7. What are some common pests and diseases that affect celery?
Common pests that affect celery include aphids, celery leaf tiers, and spider mites. Diseases include celery blight, pink rot, and damping-off. Regularly inspect your plants for signs of pests or diseases. Treat infestations with insecticidal soap, neem oil, or other appropriate organic pesticides. Prevent diseases by providing good air circulation, avoiding overwatering, and removing any infected leaves promptly.
8. Can I grow celery from a store-bought stalk?
Yes, you can regrow celery from the base of a store-bought stalk. Cut off the celery stalks about 2 inches from the base. Place the base in a shallow dish of water, with the cut side facing up. Change the water every day or two. After a few days, you should see new roots and leaves emerging from the top. Once the roots are about an inch long, you can transplant the celery base into a container filled with potting mix. This method is a fun and easy way to propagate celery, but the resulting plants may not be as vigorous as those grown from seed.
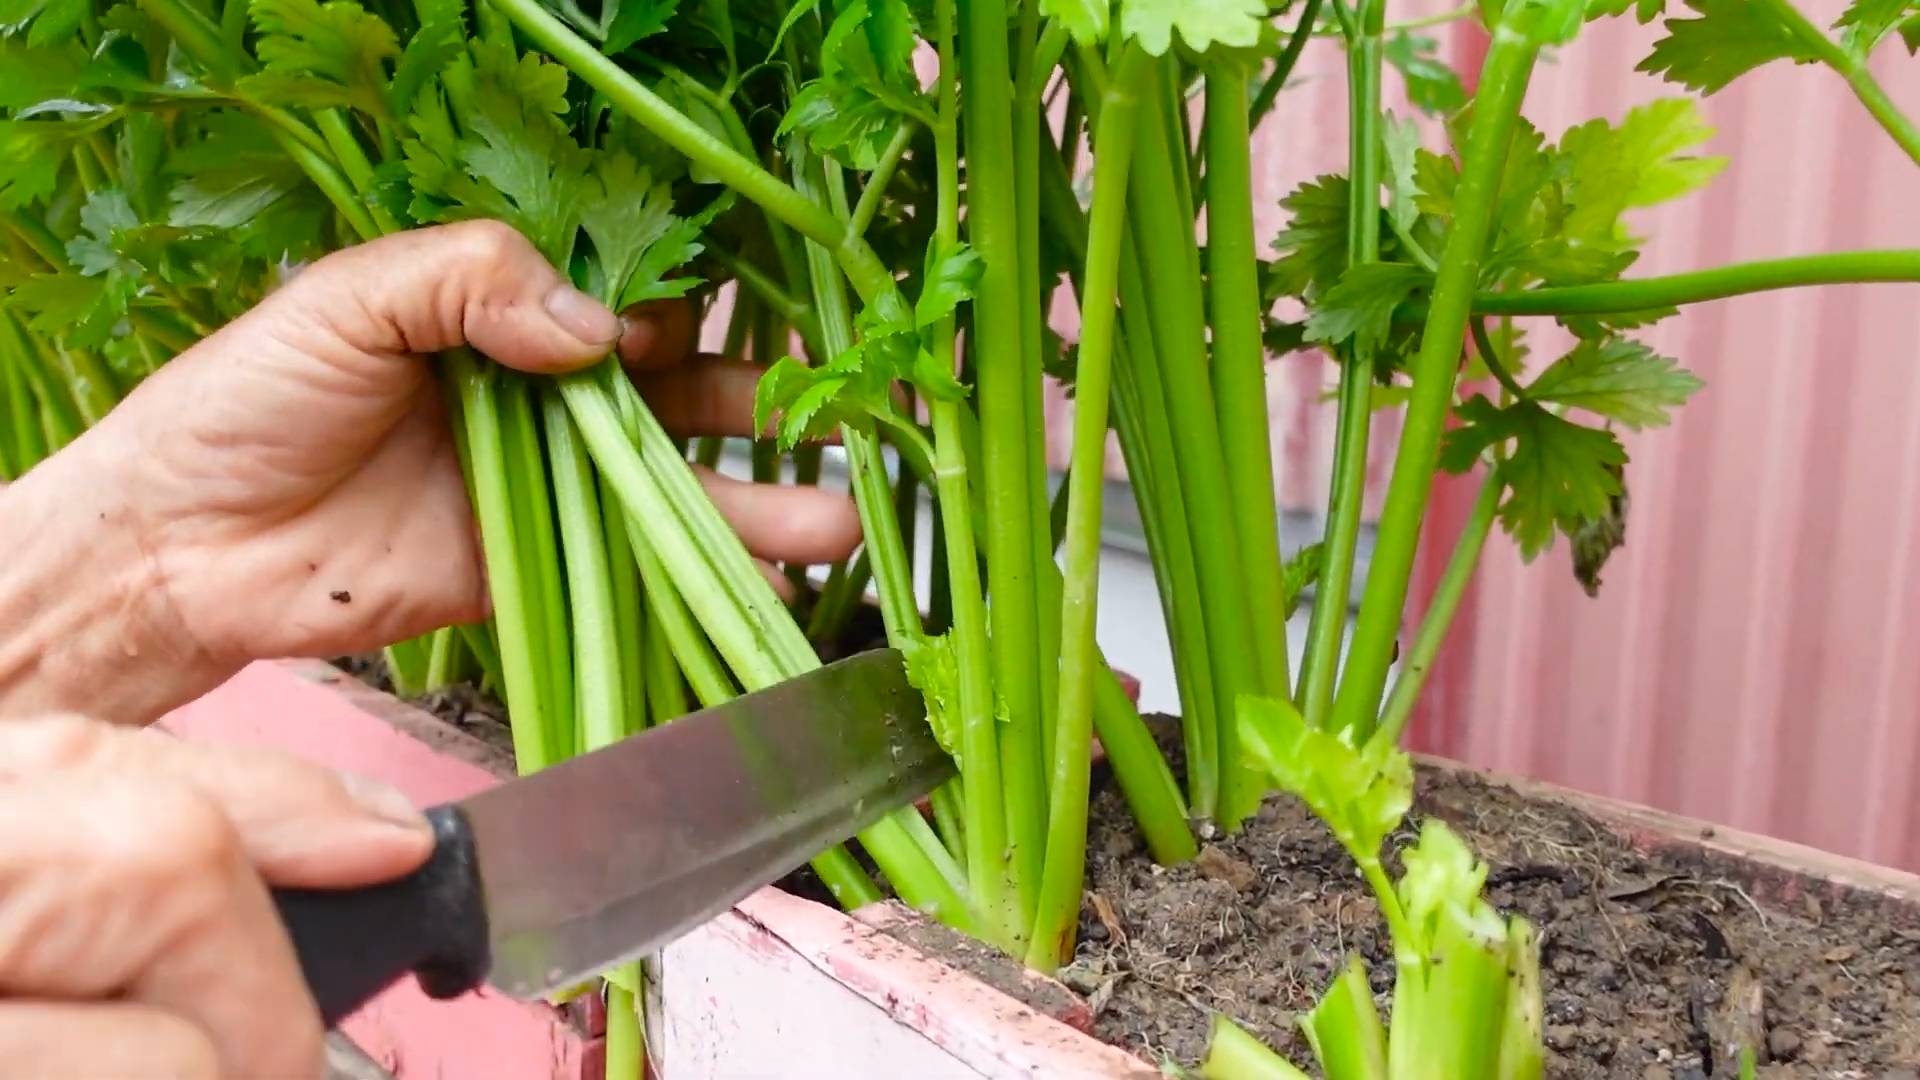
9. How do I harvest celery from a container?
You can harvest celery stalks individually as needed, or you can harvest the entire plant at once. To harvest individual stalks, simply cut them off at the base with a sharp knife. To harvest the entire plant, cut it off at the base just below the soil line. After harvesting, store celery in the refrigerator to keep it fresh.
10. My celery stalks are bitter. What could be the reason?
Bitter celery stalks can be caused by several factors, including insufficient watering, nutrient deficiencies, or hot weather. Ensure your celery plants are receiving consistent moisture and are adequately fertilized. Providing some afternoon shade during hot weather can also help to reduce bitterness. Some celery varieties are also naturally more bitter than others.


Leave a Comment