
Growing Celery in Containers: Imagine fresh, crisp celery stalks just steps from your kitchen door, ready to be harvested whenever you need them! Forget those limp, store-bought bunches that have seen better days. With a few simple tricks, you can cultivate your own thriving celery patch, even without a sprawling garden.
Celery, with its origins tracing back to the Mediterranean, has been enjoyed for centuries, not only for its culinary uses but also for its medicinal properties. Historically, it was more valued for its seeds and leaves than its stalks. But today, we’re all about that crunchy goodness! And the best part? You don’t need acres of land to enjoy it.
In this article, I’m going to share my favorite DIY hacks and tips for successfully growing celery in containers. Many people are intimidated by the idea of growing celery, thinking it’s too difficult or requires too much space. But I’m here to tell you that’s simply not true! Whether you have a sunny balcony, a small patio, or just a bright windowsill, you can absolutely grow your own celery. I’ll guide you through everything from choosing the right container and soil to watering and fertilizing techniques, ensuring you have a bountiful harvest. So, let’s ditch the grocery store celery and embark on this rewarding gardening adventure together!
Growing Bok Choy Indoors: A Beginner’s Guide
Hey there, fellow plant enthusiasts! Ever thought about growing your own fresh veggies right in your kitchen? Well, let me tell you, it’s totally doable, and bok choy is a fantastic place to start. It’s relatively easy to grow indoors, and nothing beats the taste of homegrown greens in your stir-fries or salads. I’m going to walk you through everything you need to know to successfully grow bok choy indoors, from seed to harvest.
What You’ll Need
Before we dive in, let’s gather our supplies. This is a pretty straightforward project, so you won’t need anything too fancy.
* Bok Choy Seeds: You can find these at most garden centers or online. Look for varieties specifically suited for container gardening, like ‘Dwarf Bok Choy’ or ‘Toy Choy.’
* Containers: Choose pots that are at least 6 inches deep and wide. You can use individual pots for each plant or a larger container to grow several together, spacing them about 4-6 inches apart.
* Potting Mix: Use a well-draining potting mix. Avoid using garden soil, as it can compact and not provide adequate drainage for container gardening.
* Grow Lights (Optional but Recommended): While bok choy can tolerate some shade, it thrives with plenty of light. If you don’t have a sunny windowsill, grow lights are a great investment.
* Watering Can or Spray Bottle: For gentle watering.
* Fertilizer: A balanced liquid fertilizer, diluted to half strength.
* Spray Bottle with Water: For misting the leaves.
Phase 1: Starting Your Bok Choy Seeds
Okay, let’s get those seeds started! This is where the magic begins.
1. Sowing the Seeds: Fill your containers with potting mix, leaving about an inch of space at the top. Moisten the soil thoroughly. Sow the bok choy seeds about ¼ inch deep and space them about an inch apart if you’re starting them in a larger container. If you’re using individual pots, sow 2-3 seeds per pot.
2. Covering and Watering: Gently cover the seeds with soil and water them lightly using a spray bottle or watering can with a gentle nozzle. You want to keep the soil moist but not waterlogged.
3. Creating a Humid Environment: To help with germination, you can cover the containers with plastic wrap or a clear plastic lid. This will create a humid environment that the seeds love. Make sure to poke a few holes in the plastic for ventilation.
4. Finding the Right Spot: Place the containers in a warm location, ideally around 70-75°F (21-24°C). A heat mat can be helpful if your home is cooler.
5. Waiting for Germination: Be patient! Bok choy seeds typically germinate in 5-10 days. Once the seedlings emerge, remove the plastic wrap or lid.
Phase 2: Nurturing Your Bok Choy Seedlings
Now that you have tiny bok choy plants, it’s time to give them the care they need to grow strong and healthy.
1. Thinning the Seedlings: If you sowed multiple seeds per pot, you’ll need to thin them out. Once the seedlings have a few true leaves (the leaves that look like miniature bok choy leaves), choose the strongest seedling in each pot and snip off the others at the soil line. This will give the remaining seedling enough space and nutrients to thrive.
2. Providing Adequate Light: Bok choy needs at least 6 hours of light per day. If you’re growing them near a sunny windowsill, rotate the pots regularly to ensure even growth. If you’re using grow lights, position them about 6-12 inches above the plants and keep them on for 12-14 hours per day.
3. Watering Regularly: Keep the soil consistently moist, but not soggy. Water when the top inch of soil feels dry to the touch. Avoid overwatering, as this can lead to root rot.
4. Fertilizing: Start fertilizing your bok choy seedlings about 2-3 weeks after they emerge. Use a balanced liquid fertilizer, diluted to half strength, and apply it every 2-3 weeks.
5. Maintaining Humidity: Bok choy prefers a slightly humid environment. You can increase humidity by misting the leaves with water regularly or placing a tray of water near the plants.
6. Monitoring for Pests: Keep an eye out for common pests like aphids or spider mites. If you spot any, you can try washing them off with a strong stream of water or using an insecticidal soap.
Phase 3: Harvesting Your Homegrown Bok Choy
The moment you’ve been waiting for! Harvesting your own bok choy is incredibly rewarding.
1. When to Harvest: You can start harvesting bok choy when the leaves are about 4-6 inches long. This usually takes about 30-45 days from planting.
2. Harvesting Methods: There are two main ways to harvest bok choy:
* Cut-and-Come-Again: This method involves harvesting the outer leaves as needed, allowing the plant to continue growing and producing more leaves. Simply use a sharp knife or scissors to cut the outer leaves near the base of the plant.
* Whole Head Harvest: If you prefer, you can harvest the entire head of bok choy at once. Simply cut the plant off at the base.
3. Post-Harvest Care: After harvesting, wash the bok choy leaves thoroughly and store them in the refrigerator in a plastic bag or container. They should stay fresh for several days.
Troubleshooting Tips
Even with the best care, you might encounter a few challenges along the way. Here are some common issues and how to address them:
* Leggy Seedlings: If your seedlings are tall and spindly, it means they’re not getting enough light. Move them to a sunnier location or provide supplemental light with grow lights.
* Yellowing Leaves: Yellowing leaves can be a sign of overwatering, underwatering, or nutrient deficiency. Check the soil moisture and adjust your watering accordingly. If the soil is consistently moist, you might be overwatering. If the soil is dry, water more frequently. If you suspect a nutrient deficiency, try fertilizing with a balanced liquid fertilizer.
* Slow Growth: Slow growth can be caused by a variety of factors, including insufficient light, poor soil, or cool temperatures. Make sure your bok choy is getting enough light, use a well-draining potting mix, and keep the temperature consistent.
* Pest Infestations: Keep a close eye on your plants for signs of pests. If you spot any, take action immediately to prevent them from spreading. You can try washing them off with water, using insecticidal soap, or introducing beneficial insects like ladybugs.
Tips for Success
Here are a few extra tips to help you succeed in growing bok choy indoors:
* Choose the Right Variety: As mentioned earlier, look for dwarf varieties that are specifically bred for container gardening.
* Provide Good Air Circulation: Good air circulation helps prevent fungal diseases. You can improve air circulation by placing a small fan near your plants.
* Don’t Overcrowd: Give your bok choy plants enough space to grow. Overcrowding can lead to poor air circulation and increased risk of disease.
* Be Patient: Growing plants takes time and patience. Don’t get discouraged if you don’t see results immediately. Just keep providing the right care, and you’ll eventually be rewarded with a bountiful harvest.
* Successive Planting: To ensure a continuous supply of fresh bok choy, sow new seeds every few weeks. This is called successive planting.
Enjoy Your Homegrown Bok Choy!
Growing bok choy indoors is a fun and rewarding experience. Not only will you have fresh, delicious greens at your fingertips, but you’ll also gain a deeper appreciation for the process of growing your own food. So, grab some seeds, get your hands dirty, and enjoy the fruits (or rather, vegetables) of your labor! I hope this guide has been helpful. Happy gardening!
Conclusion
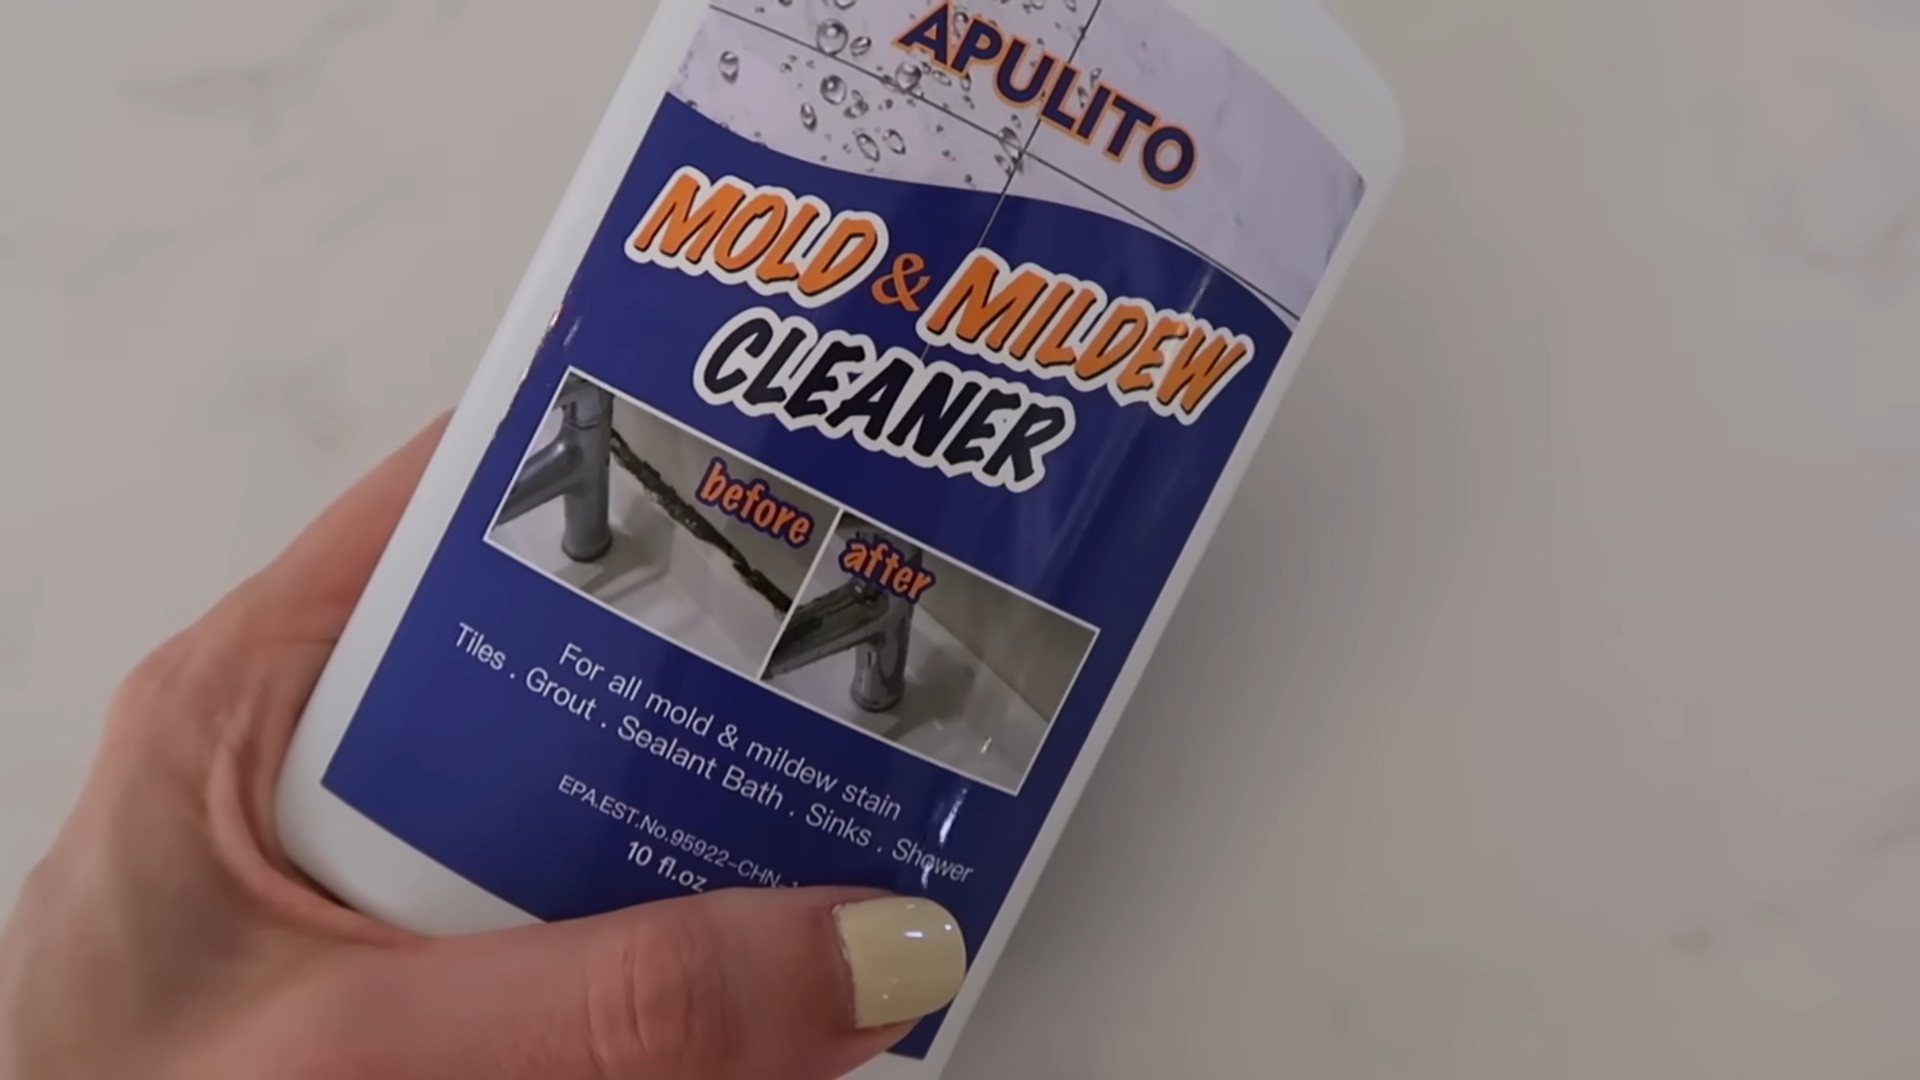
So, there you have it! Ditching those harsh chemicals and embracing this DIY mold mildew cleaner is more than just a trend; it’s a smart, effective, and environmentally conscious choice. We’ve walked you through the simple steps, highlighting the power of readily available ingredients like vinegar, baking soda, and essential oils. The beauty of this approach lies not only in its efficacy but also in its versatility. You’re not stuck with a one-size-fits-all solution. You can tailor the recipe to suit the specific needs of your home and your sensitivity to different scents.
Why is this DIY trick a must-try? Because it empowers you to take control of your cleaning routine, knowing exactly what you’re using and avoiding potentially harmful chemicals that can irritate your skin, lungs, and the environment. It’s also incredibly cost-effective. Think about how much you spend on commercial mold and mildew removers each year. This DIY alternative significantly reduces that expense, freeing up your budget for other things. Plus, the satisfaction of creating something yourself that works so well is an added bonus!
Consider these variations to personalize your DIY mold mildew cleaner even further:
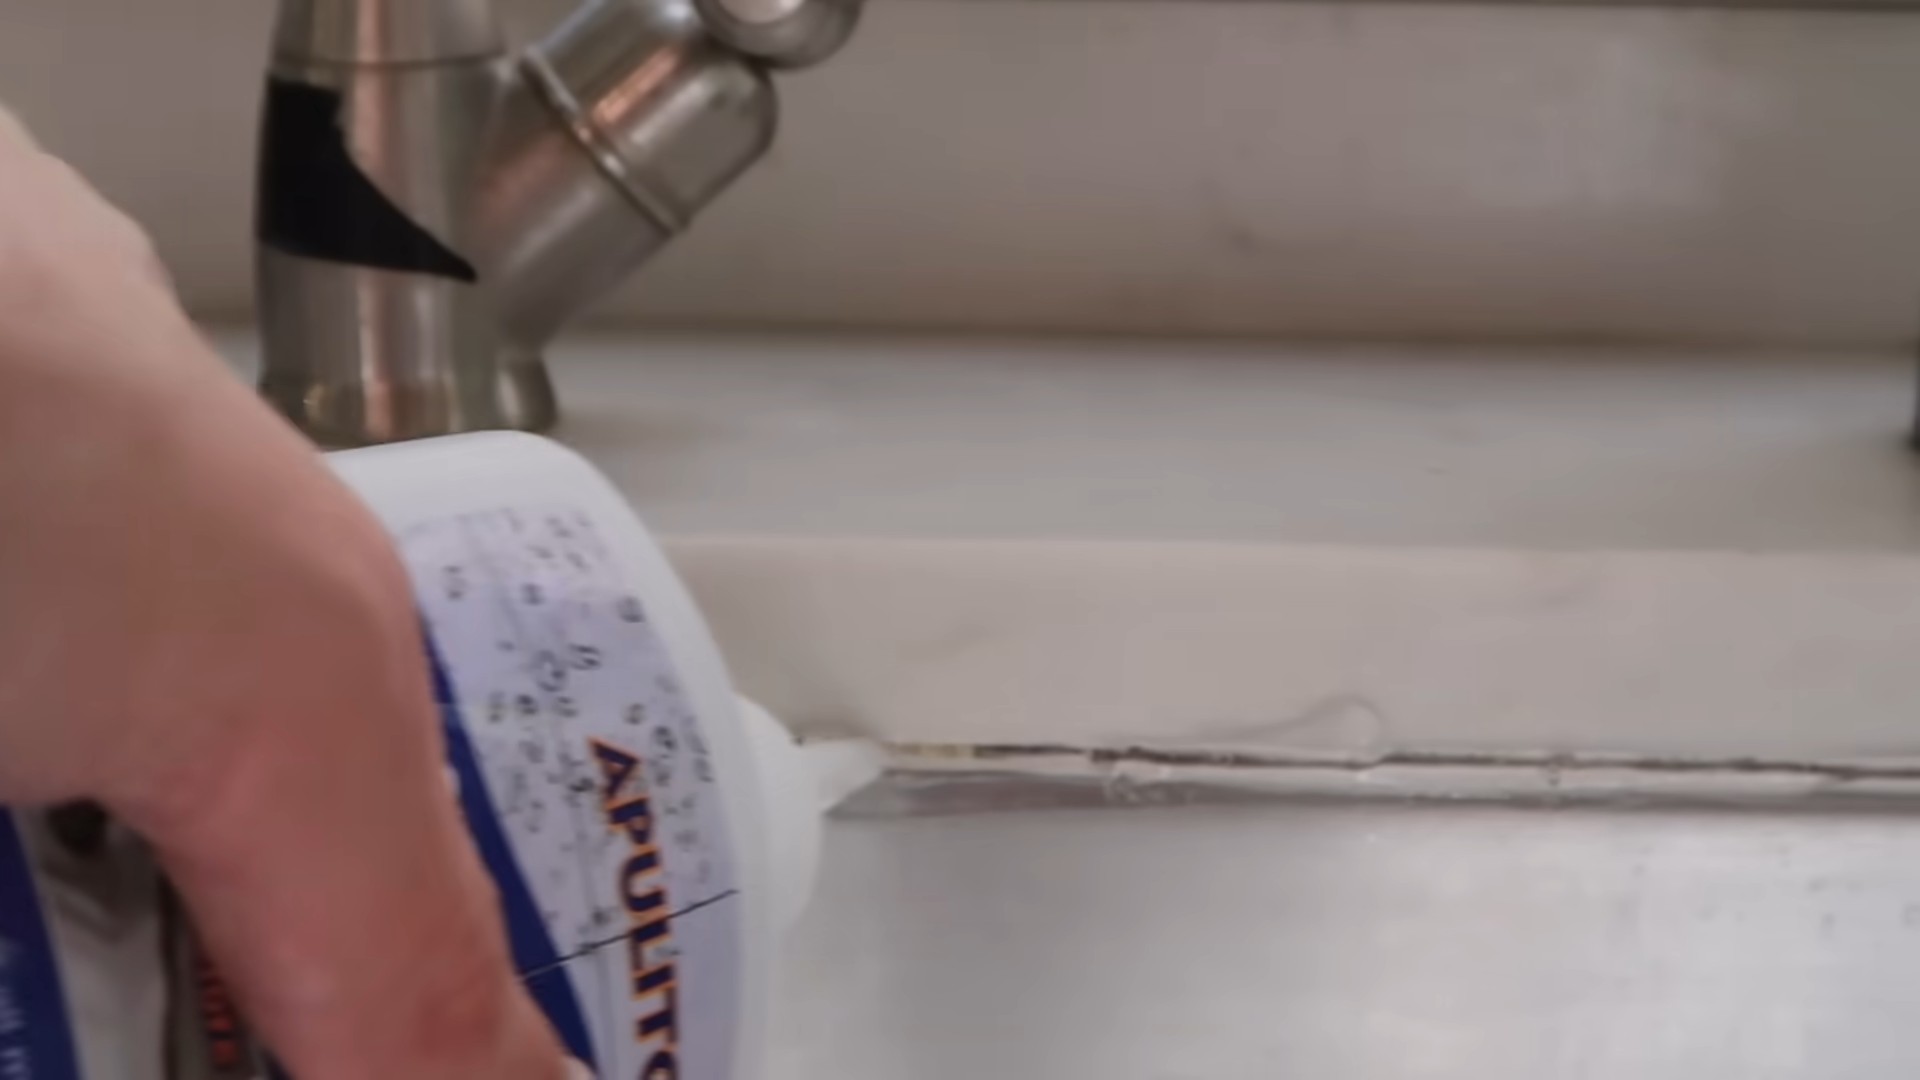
* **For stubborn stains:** Create a paste of baking soda and hydrogen peroxide. Apply it to the affected area, let it sit for a few hours, and then scrub gently.
* **For a refreshing scent:** Add a few drops of tea tree, eucalyptus, or lavender essential oil to your spray bottle. These oils not only smell great but also possess antifungal properties that can enhance the cleaner’s effectiveness.
* **For porous surfaces:** Dilute the vinegar solution with more water to prevent damage. Always test in an inconspicuous area first.
* **For grout:** Use an old toothbrush to scrub the grout lines with the baking soda paste.
We’re confident that once you try this DIY mold mildew cleaner, you’ll be amazed by the results. It’s a game-changer for maintaining a clean and healthy home. But don’t just take our word for it! We encourage you to give it a try and see for yourself.
And most importantly, we want to hear about your experience! Share your tips, variations, and success stories in the comments below. Let’s build a community of DIY enthusiasts who are committed to creating a cleaner, healthier, and more sustainable world, one homemade cleaner at a time. Your feedback will not only help others but also inspire us to continue developing and sharing innovative DIY solutions. So, grab your ingredients, get cleaning, and let us know how it goes! We can’t wait to hear from you.
Frequently Asked Questions
What exactly is mold and mildew, and why is it important to remove it?
Mold and mildew are types of fungi that thrive in damp, poorly ventilated environments. They appear as discolored patches (often black, green, or white) and can have a musty odor. Removing them is crucial for several reasons. First, they can damage surfaces like walls, tiles, and fabrics. Second, and more importantly, they can pose health risks, especially for individuals with allergies, asthma, or weakened immune systems. Mold and mildew can trigger allergic reactions, respiratory problems, and other health issues. Therefore, regular cleaning and prevention are essential for maintaining a healthy living environment.
Is this DIY mold mildew cleaner safe to use on all surfaces?
While this DIY cleaner is generally safe, it’s always best to test it on an inconspicuous area first, especially on delicate or porous surfaces like natural stone, wood, or painted walls. Vinegar, while effective, can be acidic and may damage certain materials. Diluting the vinegar solution with more water can help mitigate this risk. For grout, baking soda is generally safe, but avoid using abrasive scrub brushes that could scratch the surface. If you’re unsure about a particular surface, consult the manufacturer’s instructions or a professional cleaner.
How often should I use this DIY mold mildew cleaner?
The frequency of cleaning depends on the humidity levels and ventilation in your home. In areas prone to moisture, such as bathrooms and kitchens, it’s recommended to clean regularly, perhaps once a week or every other week. For other areas, monthly cleaning may suffice. Regularly inspecting for signs of mold and mildew is also important. If you notice any discoloration or musty odors, address the issue promptly. Prevention is key, so ensure adequate ventilation and address any leaks or water damage immediately.
Can I use this DIY cleaner to prevent mold and mildew growth?
Yes, this DIY cleaner can be used as a preventative measure. After cleaning, spray the affected area with the solution and let it air dry. The vinegar and essential oils (if used) have antifungal properties that can help inhibit mold and mildew growth. However, it’s important to address the underlying cause of the moisture problem to prevent recurrence. Ensure proper ventilation, fix any leaks, and consider using a dehumidifier in damp areas.
What are the best essential oils to use in this DIY mold mildew cleaner?
Several essential oils have antifungal properties and can enhance the effectiveness of this DIY cleaner. Tea tree oil is a popular choice due to its strong antifungal and antibacterial properties. Eucalyptus oil is another excellent option, known for its refreshing scent and ability to kill mold spores. Lavender oil not only smells pleasant but also possesses antifungal and antiseptic properties. Other effective essential oils include clove, peppermint, and grapefruit seed extract. When using essential oils, remember to use them sparingly, as they are highly concentrated. A few drops per spray bottle is usually sufficient.
What if the mold and mildew are very severe? Will this DIY cleaner still work?
For severe mold and mildew infestations, this DIY cleaner may not be sufficient. In such cases, it’s best to consult a professional mold remediation service. They have the expertise and equipment to safely and effectively remove large-scale mold growth. Attempting to remove severe mold yourself can be hazardous and may spread the spores to other areas of your home. It’s also important to identify and address the source of the moisture problem to prevent future mold growth.
Is it safe to mix vinegar and baking soda together? I’ve heard it can create a dangerous reaction.
While mixing vinegar and baking soda creates a fizzing reaction that releases carbon dioxide, it’s generally safe for cleaning purposes. The reaction neutralizes both substances, resulting in water and sodium acetate. However, it’s best to mix them in an open container and avoid using a sealed container, as the pressure from the carbon dioxide could cause it to burst. For this DIY cleaner, it’s recommended to spray the vinegar solution first and then apply the baking soda paste separately, rather than mixing them together beforehand. This allows each ingredient to work independently and maximizes their effectiveness.
I’m allergic to vinegar. Is there an alternative I can use?
If you’re allergic to vinegar, you can try using hydrogen peroxide as an alternative. Hydrogen peroxide is a natural disinfectant and antifungal agent that can effectively kill mold and mildew. Dilute it with water (a 3% solution is typically recommended) and spray it on the affected area. Let it sit for a few minutes, then scrub gently and rinse with water. Another option is to use a borax solution. Borax is a natural mineral that has antifungal and antibacterial properties. Mix borax with water to create a paste or solution and apply it to the mold and mildew. Remember to always test any cleaning solution on an inconspicuous area first to ensure it doesn’t damage the surface.
Leave a Comment