
Bay Leaf Cuttings Propagation: Ever dreamed of having an endless supply of aromatic bay leaves right at your fingertips? Imagine stepping into your garden, snipping a fresh leaf, and adding that distinct flavor to your favorite soups, stews, and sauces. Well, stop dreaming and start doing! This DIY guide will unlock the secrets to successfully propagating bay leaf plants from cuttings, a skill that’s easier than you might think.
Bay leaves have a rich history, dating back to ancient Greece and Rome, where they were symbols of victory and honor, woven into wreaths for heroes and emperors. Today, while we might not be crowning victors with them, the culinary value of bay leaves remains undeniable. But buying them from the store can be expensive, and let’s be honest, nothing beats the taste of fresh, homegrown herbs.
That’s where this DIY trick comes in. Many gardeners find bay leaf plants tricky to grow from seed, making propagation from cuttings the preferred method. It’s a cost-effective way to expand your herb garden, share plants with friends, and enjoy the satisfaction of nurturing new life. Plus, mastering bay leaf cuttings propagation means you’ll never have to worry about running out of this essential culinary ingredient again. I’m excited to share my tried-and-true methods with you, so let’s get started and transform your garden into a fragrant, flavorful haven!
Propagating Bay Laurel from Cuttings: A Gardener’s Guide
Hey there, fellow plant enthusiasts! Ever admired the fragrant leaves of a Bay Laurel ( *Laurus nobilis*) and wished you could have more of these beauties in your garden? Well, you’re in luck! Propagating Bay Laurel from cuttings is totally doable, and I’m here to guide you through the process. It might seem a little intimidating at first, but trust me, with a little patience and the right steps, you’ll be well on your way to expanding your Bay Laurel collection.
What You’ll Need
Before we dive in, let’s gather our supplies. Having everything ready beforehand will make the whole process smoother and more enjoyable. Here’s what you’ll need:
* Healthy Bay Laurel plant: This is your source for cuttings. Choose a mature, healthy plant that’s free from pests and diseases.
* Sharp, clean pruning shears or knife: Sterilize your cutting tools with rubbing alcohol to prevent the spread of any potential diseases.
* Rooting hormone: This isn’t strictly necessary, but it significantly increases your chances of success. I highly recommend using it!
* Rooting medium: A well-draining mix is crucial. I like to use a combination of perlite and peat moss, or you can use a commercial seed-starting mix.
* Small pots or containers: Choose pots that are about 3-4 inches in diameter. Make sure they have drainage holes!
* Clear plastic bag or humidity dome: This will help create a humid environment, which is essential for rooting.
* Spray bottle with water: For misting the cuttings.
* Warm, bright location: Indirect sunlight is best. Avoid direct sunlight, which can scorch the cuttings.
* Labels: To keep track of your cuttings (optional, but helpful!).
Choosing the Right Cuttings
The success of your propagation efforts largely depends on the quality of the cuttings you take. Here’s what to look for:
* Time of year: The best time to take Bay Laurel cuttings is in late spring or early summer, when the plant is actively growing.
* Type of cutting: Semi-hardwood cuttings are ideal. These are stems that have started to harden off but are still somewhat flexible.
* Length of cutting: Aim for cuttings that are about 4-6 inches long.
* Health of cutting: Choose stems that are healthy, green, and free from any signs of pests or diseases.
* Nodes: Make sure your cuttings have at least a few nodes (the points where leaves emerge). These are where the roots will develop.
Taking the Cuttings: Step-by-Step
Alright, let’s get to the fun part! Here’s how to take Bay Laurel cuttings:
1. Prepare your tools: Sterilize your pruning shears or knife with rubbing alcohol. This is a crucial step to prevent the spread of diseases.
2. Select your cutting: Choose a healthy, semi-hardwood stem that’s about 4-6 inches long.
3. Make the cut: Using your sterilized pruning shears or knife, make a clean cut just below a node. A clean cut helps prevent infection and encourages rooting.
4. Remove the lower leaves: Remove the leaves from the bottom 1-2 inches of the cutting. This will prevent them from rotting when they’re buried in the rooting medium.
5. Optional: Scrape the bottom: Gently scrape the outer layer of the stem on one side near the cut end. This can encourage root formation.
6. Apply rooting hormone: Dip the cut end of the cutting into rooting hormone powder or liquid. Follow the instructions on the rooting hormone package. This step is optional, but it significantly increases your chances of success.
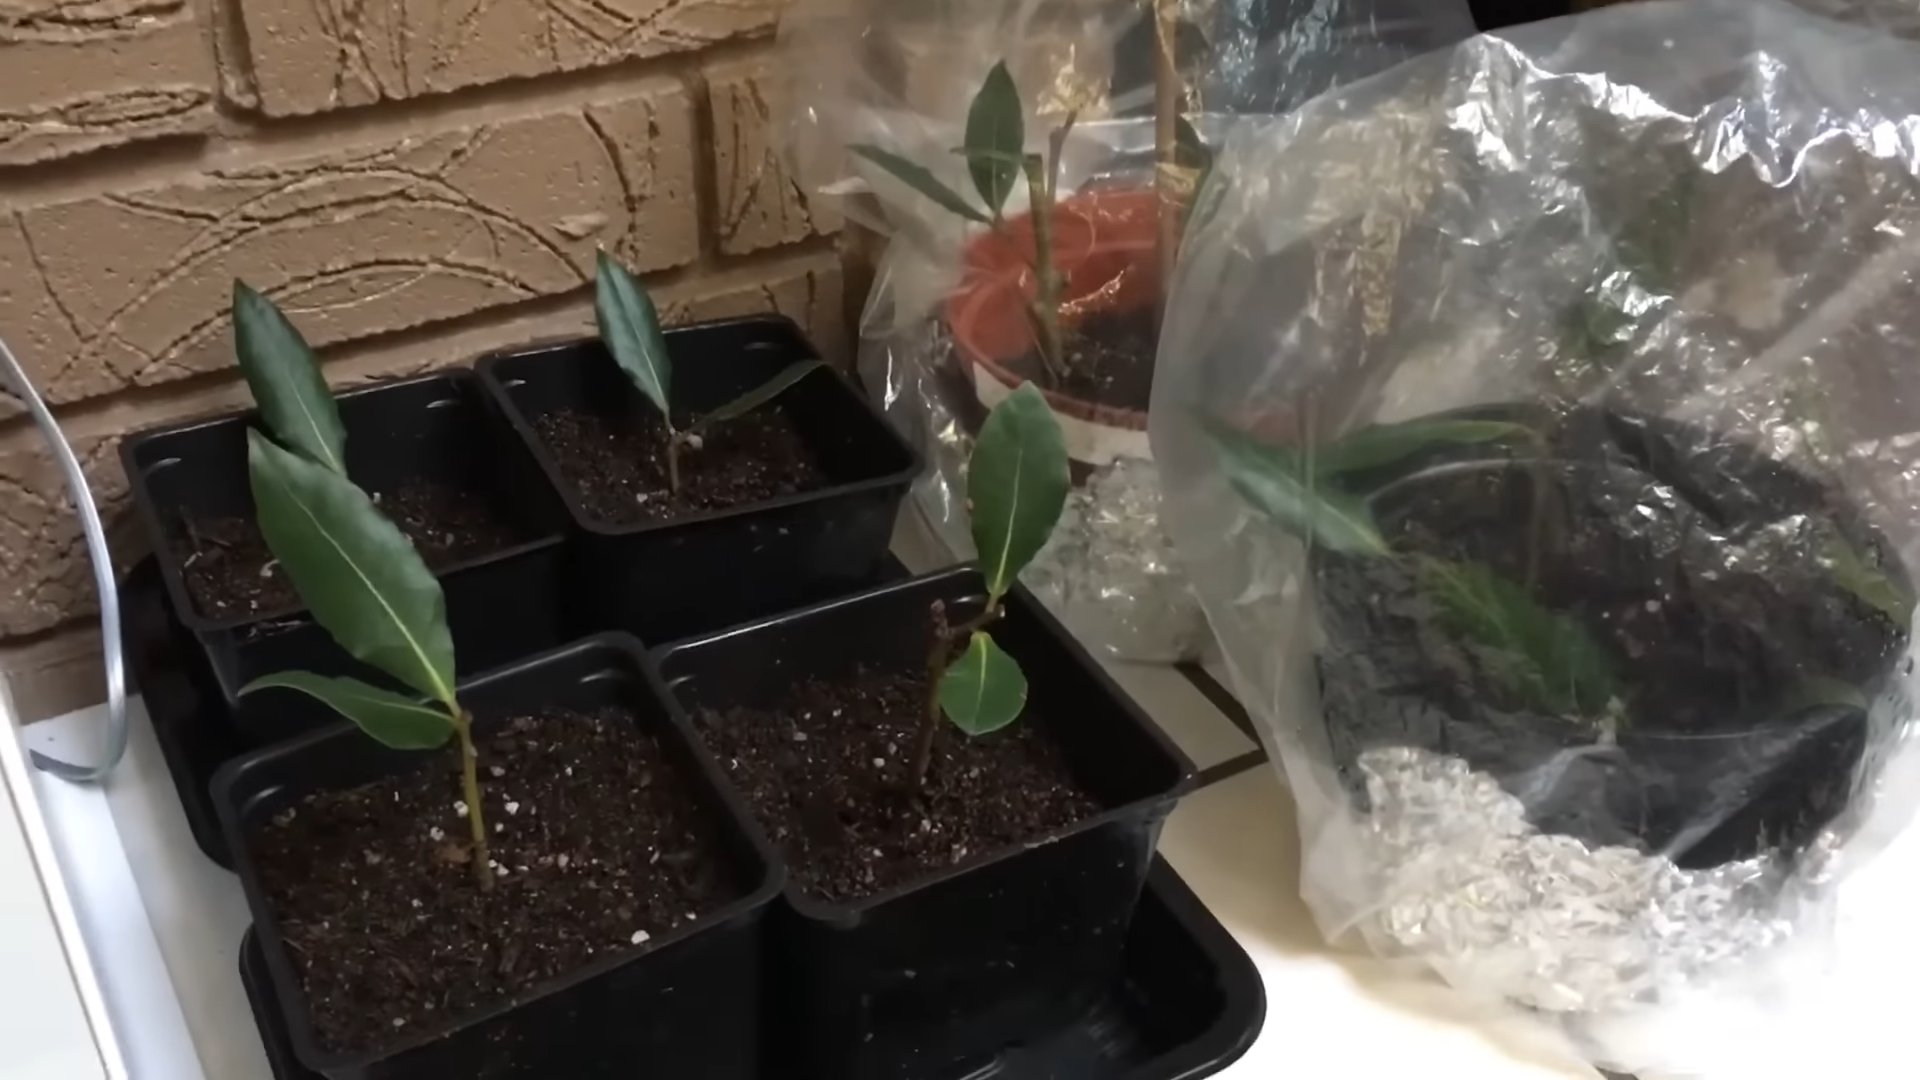
Planting the Cuttings: Creating the Perfect Environment
Now that you have your cuttings, it’s time to plant them and create the ideal environment for rooting.
1. Prepare your pots: Fill your small pots or containers with your chosen rooting medium (e.g., perlite and peat moss mix). Moisten the medium thoroughly, but don’t let it get soggy.
2. Make a hole: Use a pencil or your finger to create a hole in the center of the rooting medium. The hole should be deep enough to accommodate the bottom 1-2 inches of the cutting.
3. Plant the cutting: Gently insert the cutting into the hole, making sure that the bottom nodes are buried in the rooting medium.
4. Firm the soil: Gently firm the rooting medium around the cutting to provide support.
5. Water gently: Water the cutting gently to settle the rooting medium.
6. Create a humid environment: Place the pot inside a clear plastic bag or under a humidity dome. This will help create a humid environment, which is essential for rooting. If using a plastic bag, make sure it doesn’t touch the leaves of the cutting. You can use skewers or chopsticks to prop it up.
7. Label your cuttings: If you’re propagating multiple cuttings, label each pot with the date and type of plant. This will help you keep track of your progress.
Caring for Your Cuttings: Patience is Key
The next few weeks are crucial for the success of your propagation efforts. Here’s how to care for your Bay Laurel cuttings:
1. Location: Place the cuttings in a warm, bright location with indirect sunlight. Avoid direct sunlight, which can scorch the cuttings.
2. Humidity: Keep the humidity high by misting the cuttings regularly with water. If you’re using a plastic bag or humidity dome, you may not need to mist as often.
3. Watering: Keep the rooting medium consistently moist, but not soggy. Check the moisture level regularly and water as needed.
4. Ventilation: If you’re using a plastic bag or humidity dome, open it up for a few minutes every day to provide ventilation and prevent the growth of mold or fungus.
5. Patience: Rooting can take several weeks, so be patient! Avoid the temptation to pull up the cuttings to check for roots.
Checking for Root Development
After a few weeks, you can start checking for root development. Here’s how:
1. Gently tug: Gently tug on the cutting. If you feel resistance, it means that roots have started to form.
2. Look for new growth: New growth on the cutting is another sign that it has rooted.
3. Transplant: Once the cutting has developed a good root system, you can transplant it into a larger pot with well-draining potting soil.
Hardening Off Your New Bay Laurel
Before planting your newly rooted Bay Laurel outdoors, it’s important to harden it off. This process gradually acclimates the plant to outdoor conditions.
1. Gradual exposure: Start by placing the plant outdoors in a sheltered location for a few hours each day.
2. Increase exposure: Gradually increase the amount of time the plant spends outdoors each day.
3. Protect from harsh conditions: Protect the plant from direct sunlight, wind, and frost.
4. Monitor: Monitor the plant closely for any signs of stress, such as wilting or leaf burn.
5. Planting: After a week or two of hardening off, your Bay Laurel will be ready to plant in its permanent location in your garden.
Troubleshooting
Even with the best care, sometimes things don’t go as planned. Here are some common problems you might encounter when propagating Bay Laurel from cuttings and how to troubleshoot them:
* Cuttings rotting: This is usually caused by overwatering or poor drainage. Make sure your rooting medium is well-draining and avoid overwatering.
* Cuttings not rooting: This could be due to a number of factors, such as poor quality cuttings, lack of humidity, or insufficient light. Make sure you’re using healthy cuttings, providing adequate humidity, and placing the cuttings in a bright location with indirect sunlight. Using rooting hormone can also help.
* Cuttings wilting: This is usually caused by lack of humidity. Make sure you’re providing adequate humidity by misting the cuttings regularly or using a plastic bag or humidity dome.
Final Thoughts
Propagating Bay Laurel from cuttings can be a rewarding experience. It takes a little time and effort, but the satisfaction of growing new plants from cuttings is well worth it. With a little patience and the right techniques, you’ll be able to expand your Bay Laurel collection and enjoy the fragrant leaves for years to come. Happy gardening!

Conclusion
So, there you have it! Propagating bay leaf cuttings might seem a little daunting at first, but with a little patience and the right technique, you can successfully cultivate your own thriving bay laurel plant. This DIY trick is a must-try for any herb enthusiast or gardener looking to expand their collection without breaking the bank. Think about it: fresh, aromatic bay leaves readily available right in your backyard, ready to enhance your culinary creations whenever you need them. No more trips to the grocery store or settling for dried leaves that have lost their potency!
The beauty of this method lies in its simplicity and the satisfaction of nurturing a new plant from a simple cutting. It’s a rewarding experience that connects you more deeply with the natural world and provides a sustainable source of one of the most versatile herbs in your kitchen.
But don’t stop there! Experiment with different types of rooting hormones to see which works best for you. Some gardeners swear by willow water as a natural rooting agent, while others prefer commercial hormone powders or gels. You can also try varying the humidity levels by using different types of propagation domes or even a simple plastic bag. Consider the type of potting mix you use; a well-draining mix is crucial to prevent root rot.
For those living in colder climates, consider starting your bay leaf cuttings indoors during the winter months and transplanting them outdoors in the spring. You can also grow your bay laurel in a container, allowing you to bring it indoors during freezing temperatures. This ensures a continuous supply of fresh bay leaves, regardless of the season.
Ultimately, the success of propagating bay leaf cuttings depends on your attention to detail and your willingness to experiment. Don’t be discouraged if your first attempt isn’t successful. Like any gardening endeavor, it takes practice and patience. The key is to learn from your mistakes and keep trying.
We are confident that with the information provided, you’ll be well on your way to successfully propagating your own bay leaf plants. So, grab your pruning shears, gather your supplies, and get ready to embark on this exciting gardening adventure.
We encourage you to try this DIY trick and share your experiences with us! Let us know in the comments below how your bay leaf cuttings are doing, what challenges you encountered, and what tips you discovered along the way. Your insights could be invaluable to other gardeners who are just starting out. Share your photos and videos on social media using #BayLeafPropagation and let’s create a community of bay laurel enthusiasts! We can’t wait to hear your success stories and learn from your experiences. Happy propagating!
Frequently Asked Questions (FAQ)
What is the best time of year to take bay leaf cuttings?
The ideal time to take bay leaf cuttings is in late spring or early summer, when the plant is actively growing. This is when the cuttings are most likely to root successfully. Avoid taking cuttings during the dormant season (winter) as they are less likely to root.
What type of bay leaf plant is best for propagation?
The common bay laurel (Laurus nobilis) is the most commonly propagated type of bay leaf plant. It’s the variety typically used in cooking and is readily available in nurseries. Other varieties may be more difficult to propagate.
How long does it take for bay leaf cuttings to root?
It typically takes 4-8 weeks for bay leaf cuttings to root. However, this can vary depending on factors such as the temperature, humidity, and the type of rooting hormone used. Be patient and continue to provide the cuttings with the proper care.
What is the best rooting hormone to use for bay leaf cuttings?
Both powdered and liquid rooting hormones can be used for bay leaf cuttings. Choose a rooting hormone that contains indole-3-butyric acid (IBA) or naphthaleneacetic acid (NAA) as the active ingredient. Follow the instructions on the product label for proper application. Some gardeners also have success with natural rooting agents like willow water.
What type of potting mix should I use for bay leaf cuttings?
Use a well-draining potting mix that is specifically formulated for starting seeds or cuttings. A mix of perlite, vermiculite, and peat moss is a good option. Avoid using garden soil, as it can be too heavy and may contain pathogens that can harm the cuttings.
How much light do bay leaf cuttings need?
Bay leaf cuttings need bright, indirect light. Avoid placing them in direct sunlight, as this can scorch the leaves. A location near an east-facing window is ideal. If you don’t have access to natural light, you can use a grow light.
How often should I water bay leaf cuttings?
Keep the potting mix consistently moist, but not soggy. Water the cuttings when the top inch of soil feels dry to the touch. Avoid overwatering, as this can lead to root rot.
How can I increase the humidity around my bay leaf cuttings?
High humidity is essential for successful rooting. You can increase the humidity by placing the cuttings in a propagation dome or covering them with a plastic bag. Make sure to vent the dome or bag regularly to prevent the buildup of mold.
What are the signs that my bay leaf cuttings have rooted?
The first sign of rooting is usually the appearance of new growth. You may also see roots emerging from the drainage holes in the pot. To confirm that the cuttings have rooted, gently tug on them. If they resist, they have likely rooted.
When can I transplant my rooted bay leaf cuttings?
Once the cuttings have developed a strong root system, you can transplant them into individual pots. Use a well-draining potting mix and choose a pot that is slightly larger than the root ball.
Can I grow bay leaf plants indoors?
Yes, bay leaf plants can be grown indoors, especially in colder climates. Provide them with bright, indirect light and well-draining soil. Water regularly and fertilize occasionally.
How do I care for my bay leaf plant after it has been transplanted?
Water your bay leaf plant regularly, allowing the soil to dry slightly between waterings. Fertilize it every few months with a balanced fertilizer. Prune the plant regularly to maintain its shape and encourage bushier growth. Protect the plant from frost and freezing temperatures.
Why are my bay leaf cuttings turning yellow?
Yellowing leaves can indicate several problems, including overwatering, underwatering, nutrient deficiencies, or pest infestations. Check the soil moisture and adjust your watering accordingly. Fertilize the cuttings with a balanced fertilizer. Inspect the leaves for signs of pests and treat them as needed.
My bay leaf cuttings are not rooting. What am I doing wrong?
There are several reasons why your bay leaf cuttings may not be rooting. Make sure you are using fresh cuttings, a well-draining potting mix, and a rooting hormone. Provide the cuttings with bright, indirect light and high humidity. Avoid overwatering and underwatering. Be patient and continue to provide the cuttings with the proper care. If you’ve tried everything and your cuttings still aren’t rooting, try taking cuttings from a different part of the plant or at a different time of year.
Leave a Comment