
Soil Free Rosemary Growing: Imagine fresh, fragrant rosemary sprigs always at your fingertips, ready to elevate your culinary creations. What if I told you that you don’t even need soil to achieve this? That’s right! We’re diving into the fascinating world of hydroponics and other soil-free methods to cultivate this beloved herb right in your home.
For centuries, rosemary has been cherished not only for its culinary uses but also for its medicinal and symbolic significance. From ancient Greece, where it was believed to enhance memory, to traditional weddings where it symbolized love and fidelity, rosemary boasts a rich history. But let’s face it, sometimes traditional gardening can be a bit…messy. And not everyone has the space or the green thumb to nurture rosemary in a conventional garden.
That’s where soil free rosemary growing comes in! This DIY guide is your ticket to a cleaner, more efficient, and often faster way to enjoy fresh rosemary. Whether you’re a seasoned gardener looking to experiment or a complete beginner intimidated by soil, these tricks and hacks will empower you to grow thriving rosemary plants without the hassle. I’m excited to share these simple yet effective methods that will transform your kitchen into a fragrant, herb-filled haven. Let’s get started!
Growing Rosemary Without Soil: A DIY Hydroponic Adventure!
Hey there, fellow plant enthusiasts! Ever wanted to grow fresh rosemary right in your kitchen, without the mess of soil? Well, you’ve come to the right place! I’m going to walk you through creating your very own hydroponic rosemary setup. It’s easier than you think, and the results are incredibly rewarding. Get ready for a fragrant, soil-free rosemary garden!
What You’ll Need
Before we dive in, let’s gather our supplies. This is crucial for a smooth and enjoyable DIY experience. Trust me, having everything ready beforehand saves a lot of frustration!
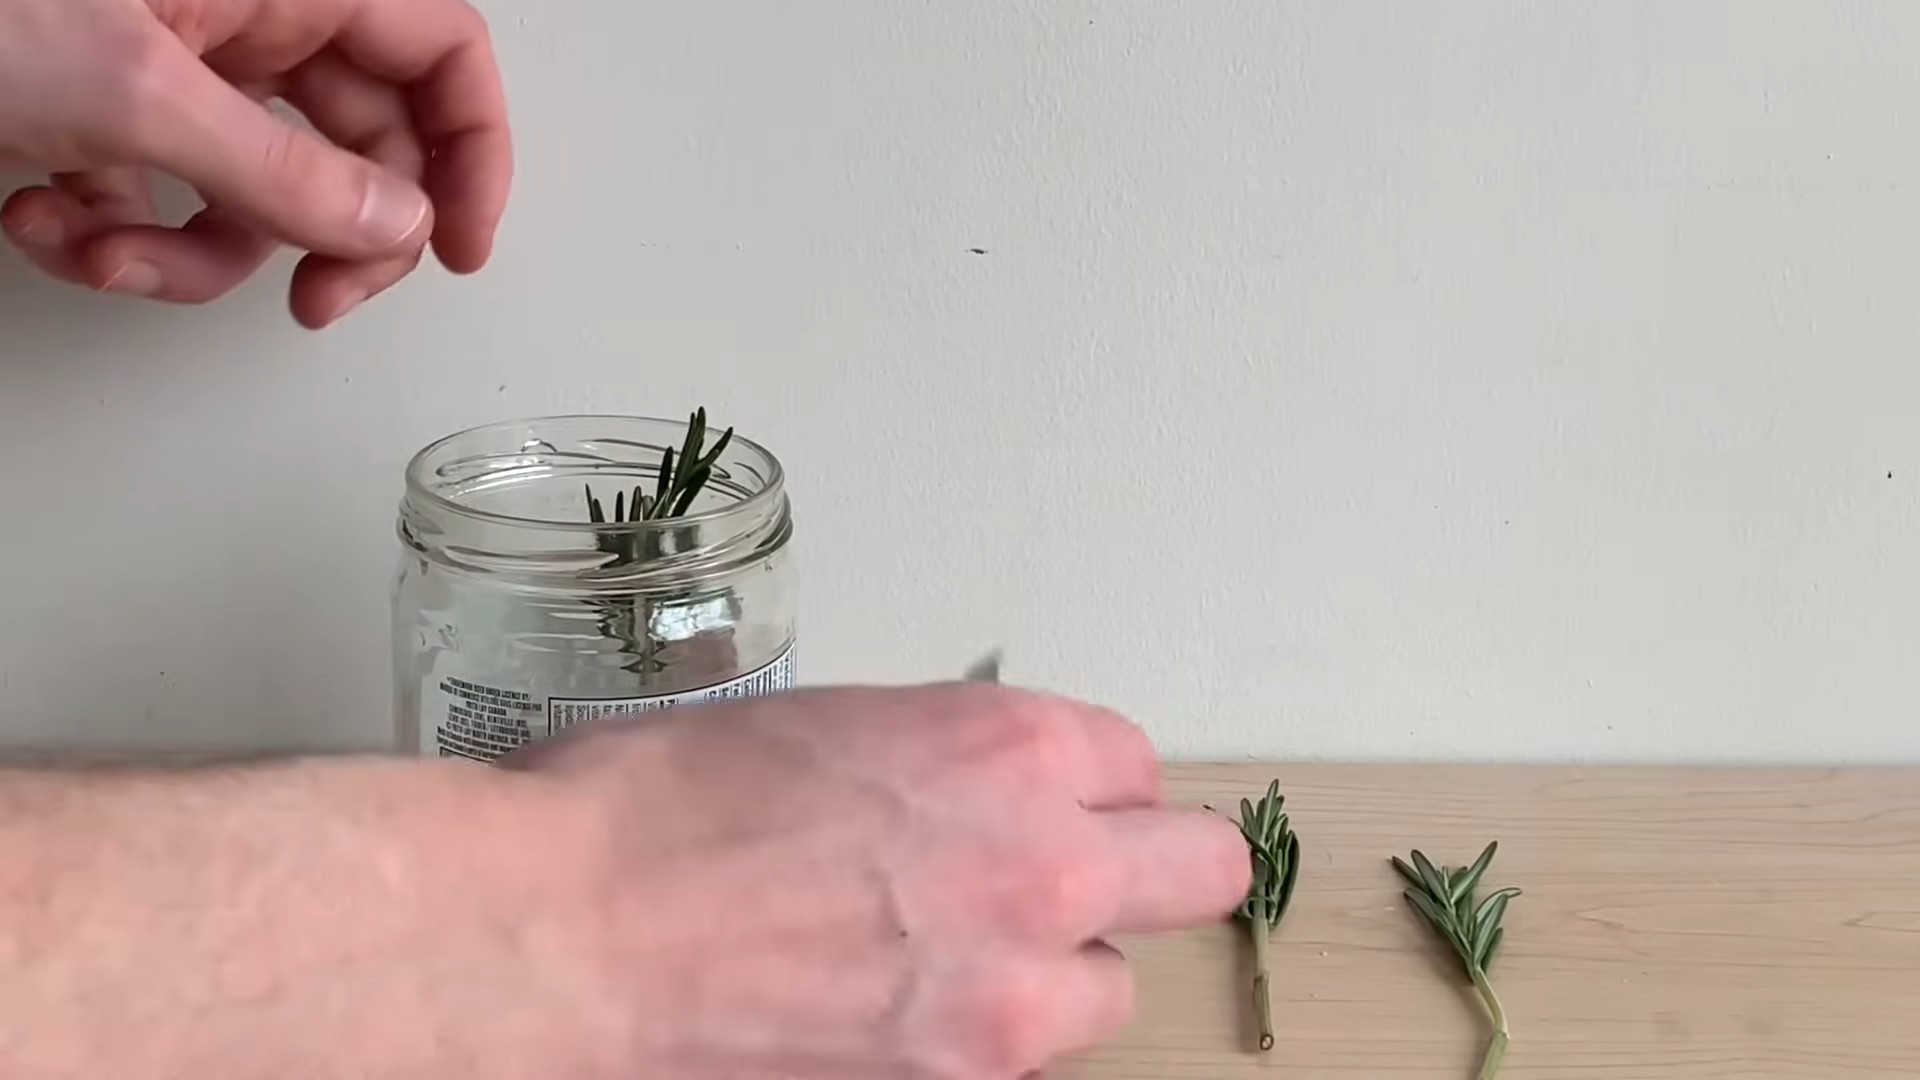
* **Rosemary Cuttings:** You can either take cuttings from an existing rosemary plant (about 4-6 inches long) or purchase them from a nursery. Make sure they’re healthy and free from any signs of disease.
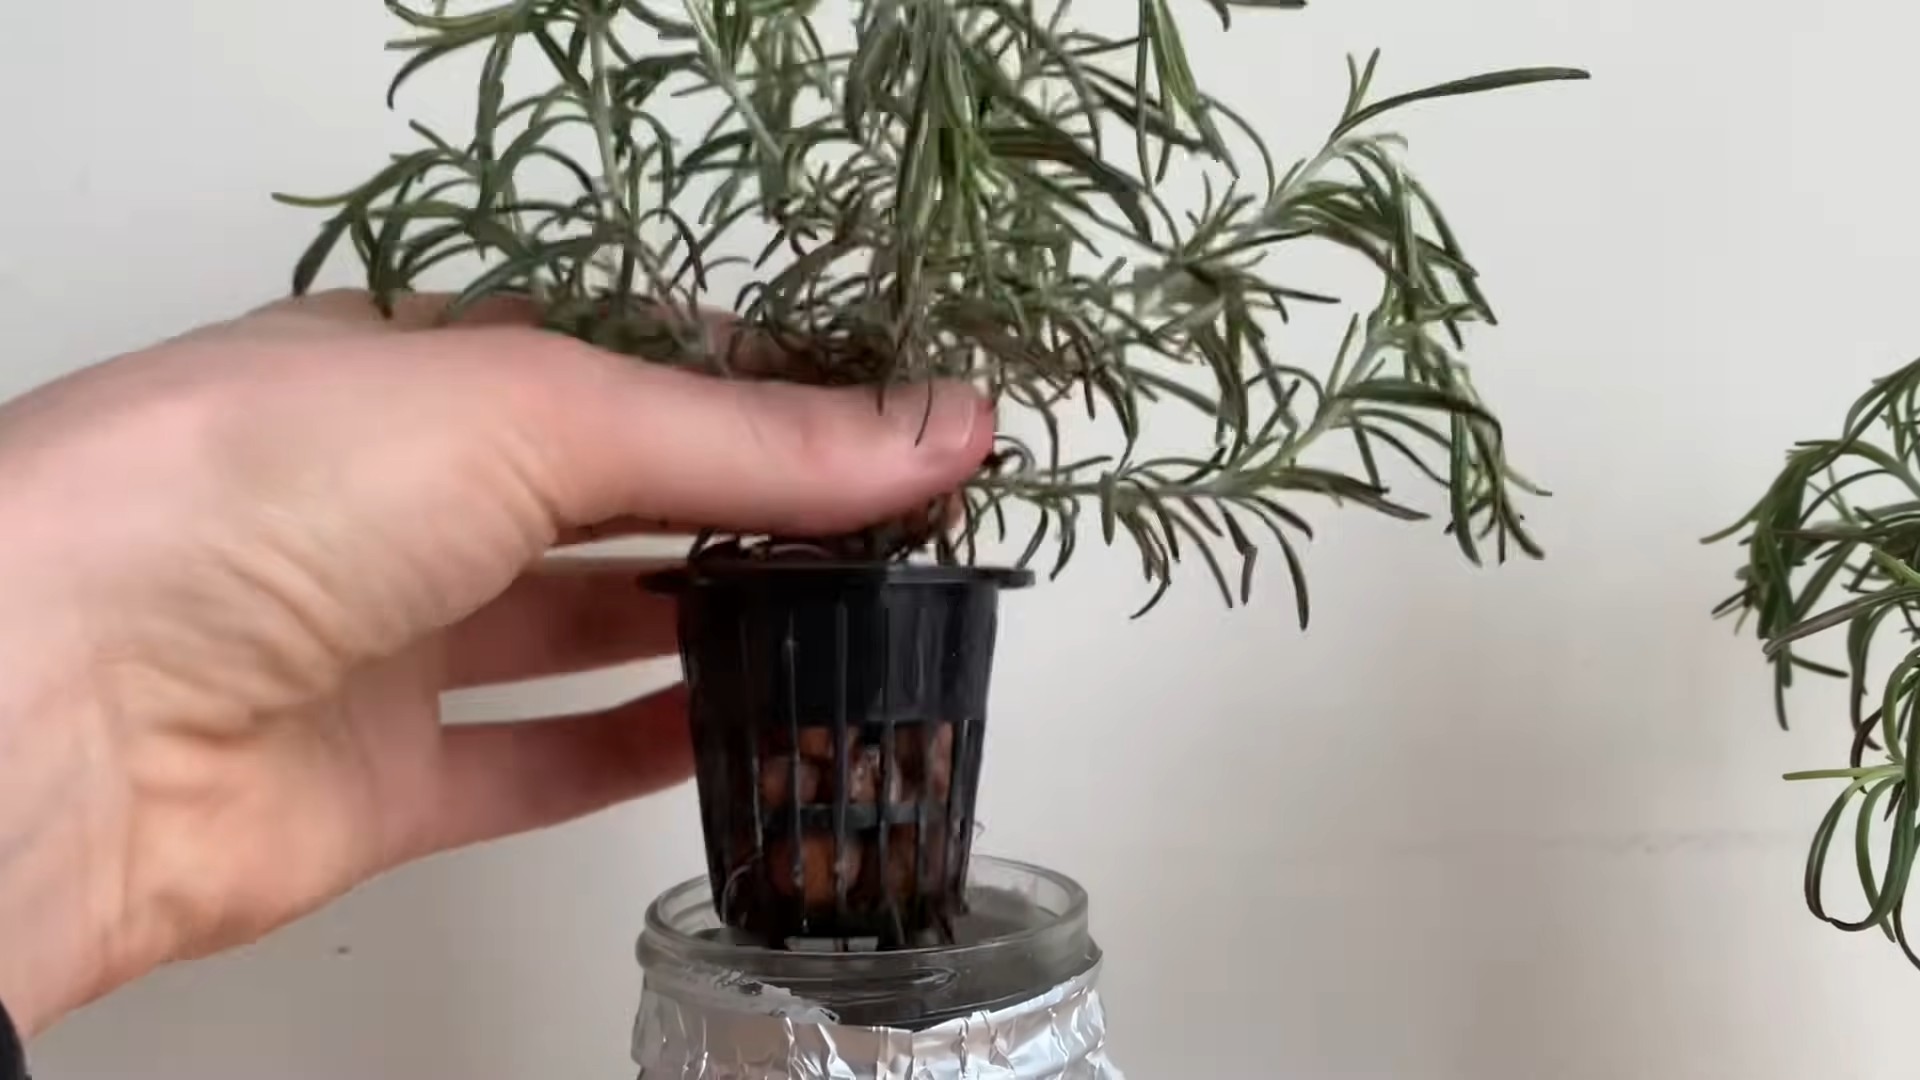
* **Net Pots:** These are small, plastic pots with holes in the sides and bottom, designed to hold your plants in a hydroponic system. I recommend 2-3 inch net pots.
* **Hydroponic Growing Medium:** This will support your rosemary cuttings and provide aeration for the roots. I prefer using clay pebbles (also known as LECA – Lightweight Expanded Clay Aggregate), but you can also use rockwool cubes or coco coir.
* **A Container:** This will hold your nutrient solution and the net pots. A dark-colored plastic container (like a storage bin or a repurposed bucket) is ideal to prevent algae growth. The size will depend on how many rosemary plants you want to grow.
* **Hydroponic Nutrient Solution:** This is the food for your rosemary! You’ll need a balanced nutrient solution specifically formulated for hydroponics. You can find these at most garden centers or online. Make sure it’s suitable for herbs.
* **Air Pump and Air Stone:** These are essential for oxygenating the nutrient solution. The air stone diffuses the air into tiny bubbles, increasing the surface area for oxygen absorption.
* **pH Meter or pH Test Kit:** Maintaining the correct pH level is crucial for nutrient absorption. A pH meter is more accurate, but a test kit is a more affordable option.
* **pH Up and pH Down Solutions:** These will allow you to adjust the pH of your nutrient solution as needed.
* **Measuring Cups and Spoons:** For accurately measuring the nutrient solution and pH adjusters.
* **Scissors or Pruning Shears:** For taking rosemary cuttings.
* **Rooting Hormone (Optional):** This can help speed up the rooting process, but it’s not strictly necessary.
* **Grow Lights (Optional):** If you don’t have a sunny spot, you’ll need grow lights to provide your rosemary with sufficient light.
Taking Rosemary Cuttings
If you’re taking cuttings from an existing rosemary plant, here’s how to do it right:
1. **Choose Healthy Stems:** Select healthy, non-flowering stems from your rosemary plant. These should be about 4-6 inches long.
2. **Make the Cut:** Using clean scissors or pruning shears, make a clean cut just below a leaf node (the point where a leaf grows from the stem).
3. **Remove Lower Leaves:** Remove the leaves from the bottom 1-2 inches of the cutting. This will encourage root growth in that area.
4. **Apply Rooting Hormone (Optional):** Dip the cut end of the cutting into rooting hormone powder or solution. This will help stimulate root development.
Setting Up Your Hydroponic System
Now for the fun part! Let’s assemble our hydroponic system.
1. **Prepare the Container:** Clean your container thoroughly with soap and water. Rinse it well to remove any soap residue.
2. **Add the Nutrient Solution:** Fill the container with water, leaving a few inches of space at the top. Then, add the hydroponic nutrient solution according to the manufacturer’s instructions. It’s crucial to follow the instructions carefully to avoid over- or under-fertilizing your rosemary.
3. **Check and Adjust the pH:** Use your pH meter or test kit to check the pH of the nutrient solution. Rosemary prefers a pH between 5.5 and 6.5. If the pH is too high, add a small amount of pH down solution. If it’s too low, add a small amount of pH up solution. Always add these solutions gradually and re-check the pH after each addition.
4. **Prepare the Net Pots:** Rinse your clay pebbles (or other growing medium) thoroughly to remove any dust or debris. Fill the net pots with the growing medium, leaving a small space at the top.
5. **Plant the Rosemary Cuttings:** Gently insert the rosemary cuttings into the net pots, making sure the bottom 1-2 inches of the stem are buried in the growing medium.
6. **Place the Net Pots in the Container:** Place the net pots into the container, ensuring that the bottom of the net pots are submerged in the nutrient solution. The water level should be high enough to reach the growing medium, but not so high that it covers the stems of the rosemary cuttings.
7. **Install the Air Pump and Air Stone:** Place the air stone at the bottom of the container and connect it to the air pump with the tubing. Turn on the air pump. You should see bubbles rising from the air stone, indicating that the nutrient solution is being oxygenated.
Caring for Your Hydroponic Rosemary
Now that your hydroponic system is set up, it’s time to care for your rosemary and watch it grow!
1. **Light:** Rosemary needs plenty of light to thrive. If you have a sunny windowsill that gets at least 6 hours of direct sunlight per day, that’s ideal. If not, you’ll need to use grow lights. Position the grow lights about 6-12 inches above the rosemary plants and keep them on for 14-16 hours per day.
2. **Nutrient Solution:** Monitor the nutrient solution regularly. Check the pH every few days and adjust as needed. You’ll also need to replenish the nutrient solution as the water evaporates. Every 2-3 weeks, completely replace the nutrient solution with fresh solution.
3. **Water Level:** Make sure the water level in the container remains consistent. The bottom of the net pots should always be submerged in the nutrient solution.
4. **Air Circulation:** Good air circulation is important to prevent fungal diseases. If your growing area is enclosed, consider using a small fan to circulate the air.
5. **Pruning:** Prune your rosemary regularly to encourage bushier growth. Simply pinch off the tips of the stems. You can use the pruned leaves for cooking or drying.
6. **Pest Control:** Keep an eye out for pests like aphids or spider mites. If you spot any pests, treat them with an organic insecticide or insecticidal soap.
Troubleshooting
Even with the best care, you might encounter some challenges along the way. Here are a few common problems and how to solve them:
* **Yellowing Leaves:** This could be a sign of nutrient deficiency. Make sure you’re using a balanced hydroponic nutrient solution and that the pH is within the optimal range.
* **Slow Growth:** This could be due to insufficient light, low temperatures, or nutrient deficiencies. Make sure your rosemary is getting enough light and that the temperature is warm enough (around 65-75°F). Also, check the nutrient solution and adjust as needed.
* **Root Rot:** This is a fungal disease that can occur if the roots are not properly oxygenated. Make sure your air pump and air stone are working properly and that the nutrient solution is not stagnant.
* **Algae Growth:** Algae can grow in the nutrient solution if it’s exposed to too much light. Use a dark-colored container to prevent algae growth. You can also add a small amount of hydrogen peroxide to the nutrient solution to kill algae.
Harvesting Your Rosemary
After a few weeks, your rosemary plants should be well-established and growing vigorously. You can start harvesting the leaves as needed. Simply snip off the stems with scissors or pruning shears. The more you harvest, the bushier your rosemary will become!
Enjoy Your Soil-Free Rosemary!
And there you have it! You’ve successfully grown rosemary without soil using a simple hydroponic system. Now you can enjoy fresh, fragrant rosemary in your cooking all year round. I hope you found this guide helpful and inspiring. Happy growing!
Conclusion
So, there you have it! Growing rosemary without soil might sound like something out of a science fiction novel, but it’s surprisingly simple, incredibly rewarding, and a fantastic way to enjoy fresh herbs year-round, regardless of your outdoor space. This DIY trick isn’t just about convenience; it’s about unlocking a new level of control over your rosemary’s environment, ensuring optimal growth and flavor. Forget battling soil-borne diseases, pesky weeds, or unpredictable weather patterns. With this method, you’re in charge.
Why is this a must-try? Because it’s a game-changer for herb lovers! Imagine having a thriving rosemary plant right on your kitchen counter, ready to add its aromatic magic to your culinary creations. It’s also a fantastic project for anyone interested in hydroponics or simply looking for a low-maintenance way to grow herbs. Plus, it’s a conversation starter! Your friends and family will be amazed by your soil-free rosemary growing prowess.
But the fun doesn’t stop there. Feel free to experiment with different nutrient solutions to see what works best for your rosemary. Some growers swear by specific hydroponic blends, while others prefer a diluted organic fertilizer. You can also play around with the lighting. While rosemary loves sunlight, you can supplement with grow lights, especially during the darker winter months. Consider using different containers too. While a mason jar works perfectly well, you could explore using a repurposed plastic bottle or even a small hydroponic system designed for herbs.
Don’t be afraid to get creative and personalize your soil-free rosemary setup!
And if you’re feeling adventurous, why not try propagating new rosemary plants from cuttings using this method? It’s a great way to expand your herb garden and share the joy of soil-free growing with others. You can also experiment with different varieties of rosemary. Some are more compact and well-suited for indoor growing than others.
We’re confident that once you try this DIY trick, you’ll be hooked. It’s a simple, effective, and incredibly satisfying way to grow your own rosemary. So, gather your supplies, follow the steps outlined, and get ready to enjoy the fresh, fragrant flavor of homegrown rosemary, no soil required!
We highly encourage you to give this soil-free rosemary growing method a try.
Once you’ve embarked on your soil-free rosemary journey, we want to hear all about it! Share your experiences, tips, and tricks in the comments below. Let us know what worked for you, what challenges you faced, and any variations you tried. Your feedback will not only help other readers but also contribute to a growing community of soil-free rosemary enthusiasts. Let’s learn and grow together!
Frequently Asked Questions (FAQ)
What exactly is soil-free rosemary growing, and how does it work?
Soil-free rosemary growing, often referred to as hydroponics, is a method of cultivating plants without using soil. Instead, the plant’s roots are suspended in a nutrient-rich water solution that provides all the essential elements for growth. In the case of rosemary, this involves placing the rosemary cutting or plant in a container filled with water and a carefully balanced nutrient solution. The roots absorb the nutrients directly from the water, eliminating the need for soil as a medium. This method allows for precise control over the plant’s nutritional intake, leading to faster growth and healthier plants.
What are the benefits of growing rosemary without soil compared to traditional soil-based methods?
There are several advantages to growing rosemary without soil. Firstly, it eliminates the risk of soil-borne diseases and pests, which can be a major problem for rosemary plants grown in soil. Secondly, it allows for better control over the plant’s nutrient intake, leading to faster growth and more flavorful leaves. Thirdly, it’s a more space-efficient method, making it ideal for indoor growing or for those with limited garden space. Fourthly, it reduces the need for watering, as the roots are constantly submerged in water. Finally, it’s a cleaner method, as there’s no soil to spill or make a mess.
What kind of nutrient solution should I use for soil-free rosemary growing?
The ideal nutrient solution for soil-free rosemary growing should be specifically formulated for hydroponics or herbs. Look for a balanced nutrient solution that contains all the essential macronutrients (nitrogen, phosphorus, potassium) and micronutrients (iron, manganese, zinc, copper, boron, molybdenum). You can find these solutions at most garden centers or online retailers. Follow the instructions on the label for dilution rates. It’s generally recommended to start with a weaker solution and gradually increase the concentration as the plant grows. You can also use a diluted organic fertilizer, but be sure to choose one that is specifically designed for hydroponics to avoid clogging the system.
How often should I change the nutrient solution?
It’s generally recommended to change the nutrient solution every 1-2 weeks, or more frequently if you notice any signs of algae growth or nutrient deficiencies. Changing the solution ensures that the rosemary plant is receiving a fresh supply of nutrients and prevents the buildup of harmful salts or bacteria. When changing the solution, be sure to rinse the container and roots thoroughly to remove any debris.
How much light does soil-free rosemary need?
Rosemary thrives in bright, sunny conditions. Ideally, it should receive at least 6-8 hours of direct sunlight per day. If you’re growing rosemary indoors, you may need to supplement with grow lights, especially during the winter months. LED grow lights are a good option, as they are energy-efficient and provide a full spectrum of light. Position the grow lights about 6-12 inches above the plant.
Can I propagate rosemary cuttings using this soil-free method?
Yes, you can absolutely propagate rosemary cuttings using this soil-free method. Take a 4-6 inch cutting from a healthy rosemary plant, remove the lower leaves, and place the cutting in a container filled with water and a diluted nutrient solution. Make sure that the leaves are not submerged in the water. Place the container in a bright, warm location and wait for roots to develop. This usually takes about 2-4 weeks. Once the roots are about an inch long, you can transplant the cutting into a larger container with fresh nutrient solution.
What are some common problems I might encounter when growing rosemary without soil, and how can I fix them?
Some common problems you might encounter include nutrient deficiencies, algae growth, and root rot. Nutrient deficiencies can be identified by yellowing leaves or stunted growth. To fix this, adjust the nutrient solution according to the manufacturer’s instructions. Algae growth can be prevented by keeping the container clean and opaque and by changing the nutrient solution regularly. Root rot can be caused by overwatering or poor aeration. To fix this, ensure that the roots are not constantly submerged in water and that there is adequate air circulation around the plant. You can also add an air stone to the container to improve aeration.
Is soil-free rosemary growing suitable for beginners?
Yes, soil-free rosemary growing is a relatively simple and straightforward method that is suitable for beginners. It requires minimal equipment and maintenance, and it’s a great way to learn about hydroponics. With a little bit of research and attention to detail, anyone can successfully grow rosemary without soil.
Can I use tap water for soil-free rosemary growing?
While you can use tap water, it’s generally recommended to use filtered or distilled water, especially if your tap water is hard or contains high levels of chlorine or other chemicals. These chemicals can be harmful to rosemary plants and can interfere with nutrient absorption. If you do use tap water, let it sit for 24 hours to allow the chlorine to evaporate.
How do I know when my soil-free rosemary is ready to harvest?
You can harvest rosemary leaves at any time, but the flavor is most intense when the plant is actively growing. Simply snip off the stems with scissors or pruning shears. Avoid cutting more than one-third of the plant at a time, as this can stress the plant. Regular harvesting will encourage the plant to produce more new growth.


Leave a Comment