
Bell Peppers in Plastic Bottles: Sounds a little crazy, right? But trust me, this quirky DIY gardening trick might just revolutionize your pepper growing game! I know, I know, you’re probably thinking, “Plastic bottles? Really?” But before you dismiss it, let me tell you why this surprisingly simple method is gaining popularity among home gardeners everywhere.
While the exact origin of using plastic bottles for gardening is a bit murky, the spirit of resourcefulness and upcycling has always been a cornerstone of gardening culture. Think about it – generations have used repurposed containers, from old tires to coffee cans, to nurture their plants. This method taps into that same resourceful spirit, giving new life to discarded plastic and helping us grow delicious bell peppers in the process.
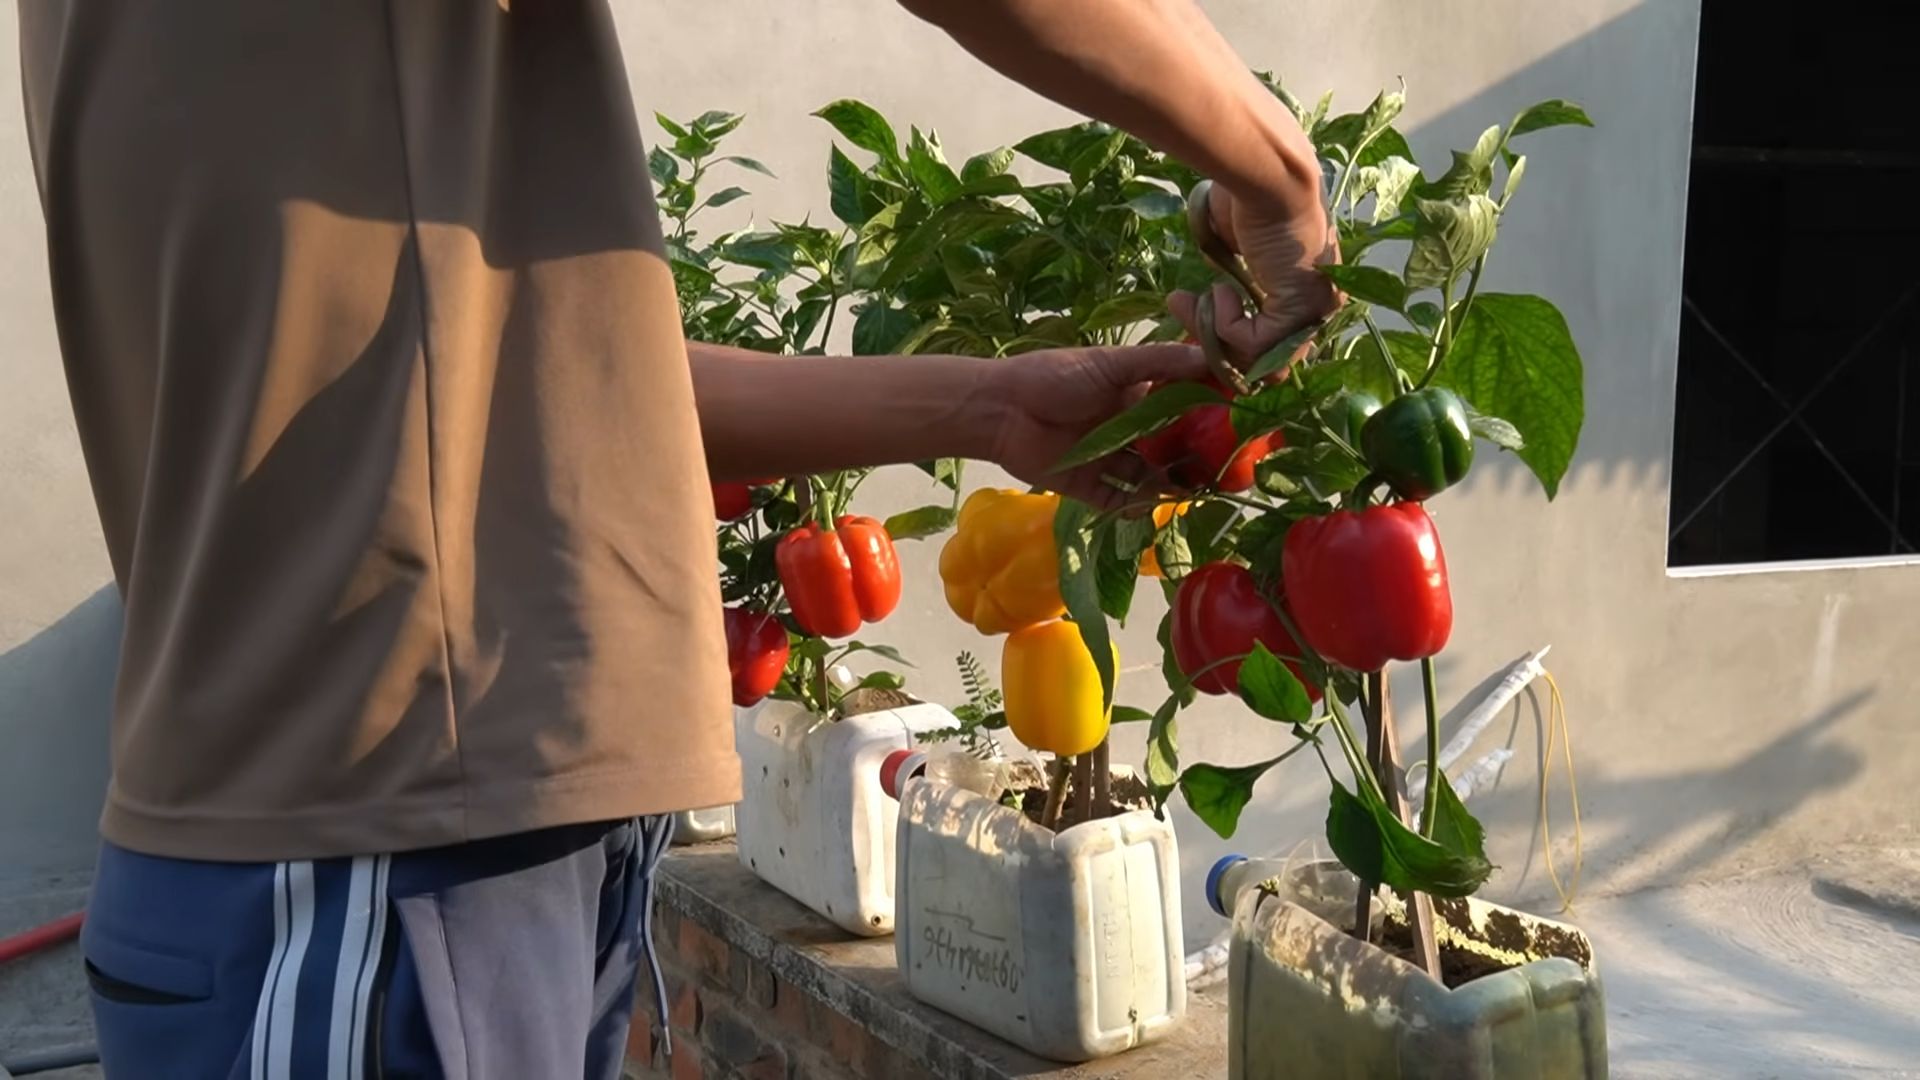
So, why should you even bother trying to grow bell peppers in plastic bottles? Well, for starters, it’s a fantastic way to maximize space, especially if you’re working with a small balcony, patio, or even just a sunny windowsill. Plus, the plastic bottles create a mini-greenhouse effect, warming the soil and protecting your precious pepper plants from harsh weather. But the best part? It’s incredibly easy and budget-friendly! Who doesn’t love a good DIY project that saves money and helps the environment? In this article, I’m going to walk you through everything you need to know to successfully grow your own vibrant, juicy bell peppers using nothing more than a few plastic bottles and a little bit of gardening know-how. Let’s get started!
Growing Bell Peppers Upside Down in Plastic Bottles: A DIY Guide
Hey there, fellow gardening enthusiasts! I’m so excited to share one of my favorite DIY gardening hacks with you: growing bell peppers upside down in repurposed plastic bottles. Not only is this a fantastic way to recycle, but it also saves space, keeps pests at bay, and adds a unique touch to your garden or balcony. Trust me, once you try this, you’ll be hooked!
Why Grow Bell Peppers Upside Down?
Before we dive into the how-to, let’s quickly touch on why this method is so awesome:
* Space Saving: Perfect for small gardens, balconies, or patios. You can hang them anywhere!
* Pest Control: Less ground contact means fewer slugs, snails, and other creepy crawlies bothering your precious peppers.
* Better Air Circulation: Hanging plants get better airflow, reducing the risk of fungal diseases.
* Unique Aesthetic: Let’s be honest, it looks pretty darn cool!
* Easy Harvesting: No bending over to pick your peppers.
What You’ll Need
Alright, let’s gather our supplies. Here’s what you’ll need to get started:
* Plastic Bottles: 2-liter soda bottles or similar sizes work great. Make sure they’re clean!
* Bell Pepper Seedlings: Choose healthy seedlings from your local nursery or start your own from seeds.
* Potting Mix: A good quality potting mix is essential for healthy growth.
* Landscape Fabric or Burlap: To prevent soil from falling out of the bottle’s neck.
* Scissors or Utility Knife: For cutting the plastic bottles.
* Drill or Nail: To create drainage holes.
* Hanging Wire or Rope: To hang your upside-down planters.
* Watering Can: For, well, watering!
* Gloves: To keep your hands clean. (Optional, but recommended!)
Step-by-Step Instructions: Creating Your Upside-Down Bell Pepper Planter
Okay, let’s get our hands dirty! Here’s the step-by-step guide to creating your upside-down bell pepper planter:
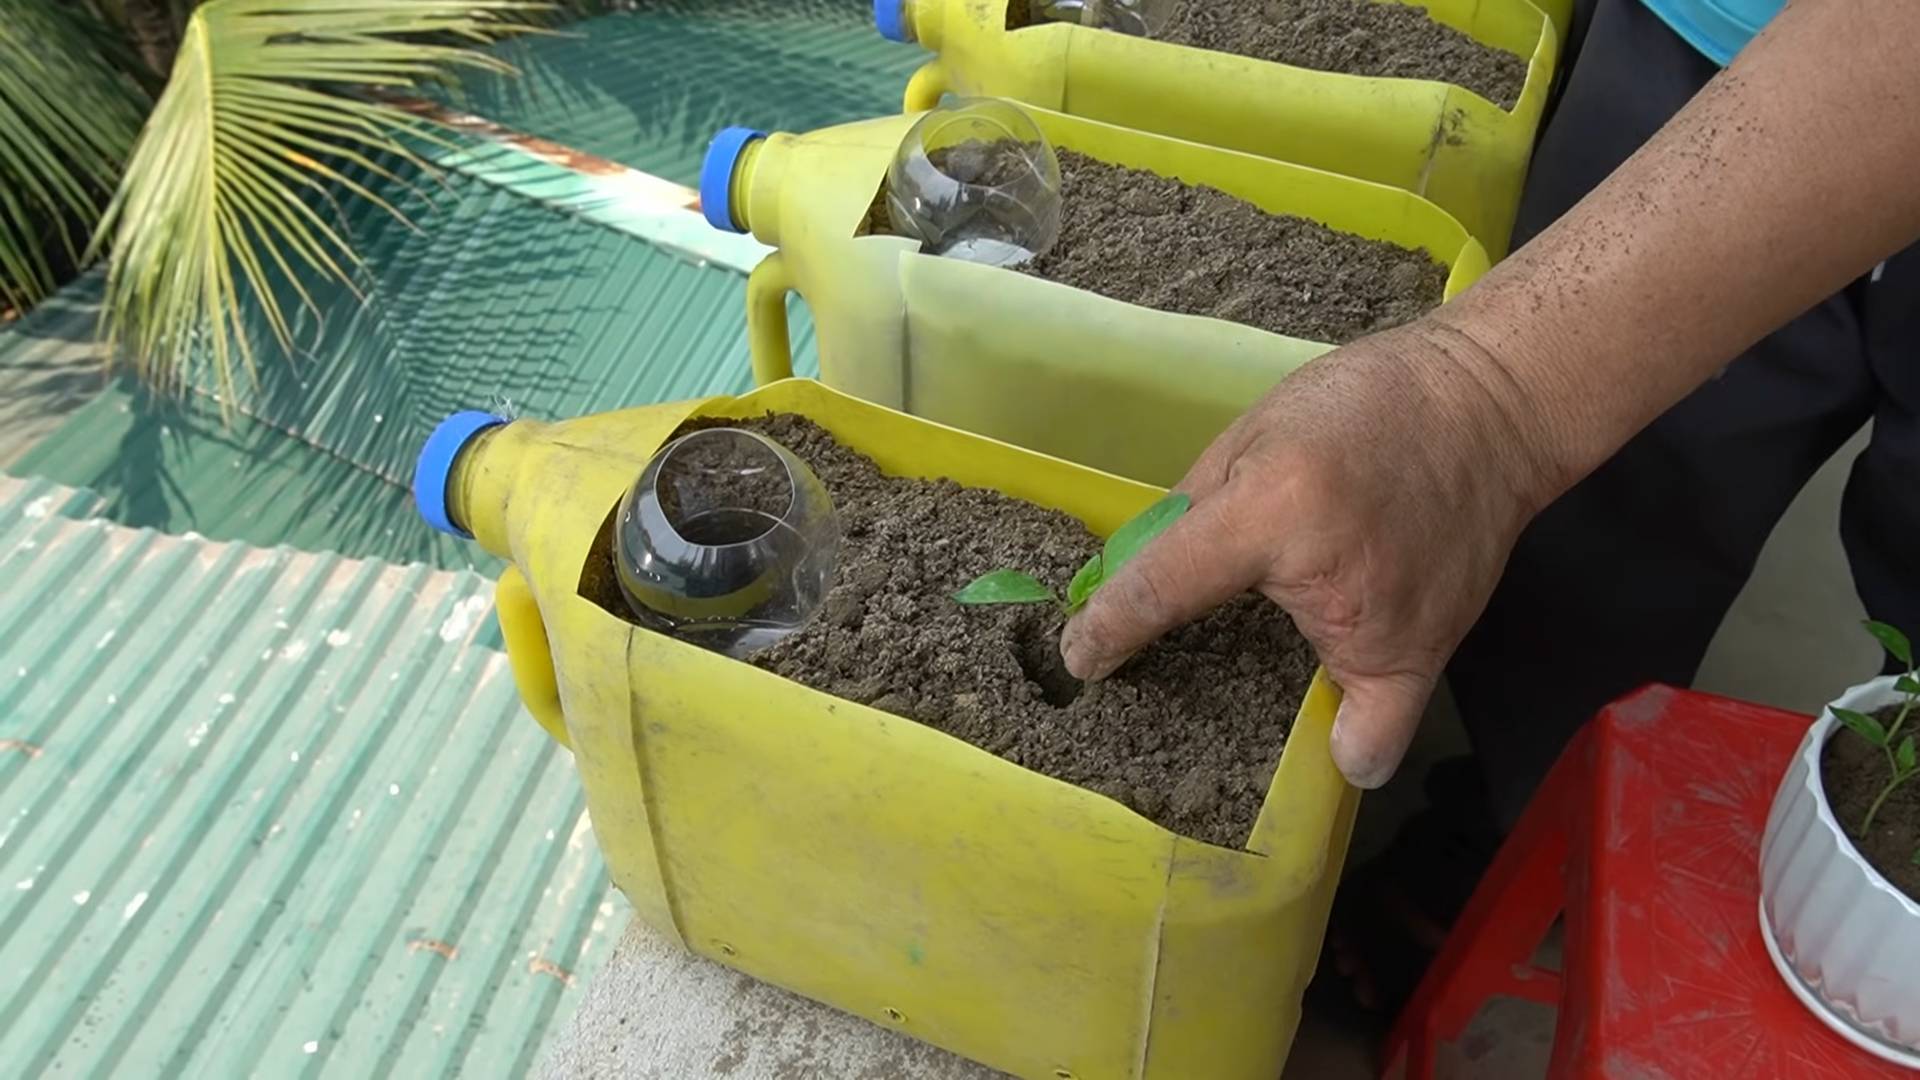
1. Prepare the Plastic Bottle:
* First, rinse out your plastic bottle thoroughly with soap and water. Make sure to remove any labels.
* Next, cut off the bottom of the bottle. You’ll want to cut it about 4-6 inches from the bottom, creating a wide opening. This will be the top of your planter.
* Now, drill or poke several drainage holes in the bottle cap. This is crucial for preventing waterlogging. I usually make about 4-5 small holes.
2. Secure the Landscape Fabric:
* Cut a square of landscape fabric or burlap that’s slightly larger than the bottle’s neck opening.
* Carefully push the fabric into the neck of the bottle, creating a barrier to prevent soil from falling out. Make sure it’s snug! You can use a small stick or your finger to help push it in.
3. Add the Potting Mix:
* Slowly add potting mix to the bottle, filling it about one-third of the way. Gently tap the bottle to settle the soil.
4. Plant the Bell Pepper Seedling:
* Carefully remove the bell pepper seedling from its container. Gently loosen the roots a bit.
* Turn the bottle upside down (with the neck pointing downwards).
* Carefully insert the seedling through the neck of the bottle, positioning the roots inside the bottle. Gently guide the leaves and stem through the opening.
* Add more potting mix around the roots, filling the bottle almost to the top. Leave about an inch or two of space at the top for watering.
5. Water Thoroughly:
* Water the newly planted seedling thoroughly until water drains out of the drainage holes in the bottle cap. This helps settle the soil and ensures the roots are well-hydrated.
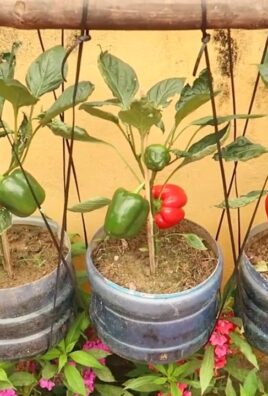
6. Attach Hanging Wire or Rope:
* Now, we need to create a way to hang our planter. There are a few ways to do this:
* Option 1: Drill two small holes on opposite sides of the bottle, near the top (the cut-off end). Thread wire or rope through the holes, creating a loop for hanging.
* Option 2: Use a sturdy wire hanger. Bend it into a shape that will support the bottle from the sides.
* Option 3: Use a macrame plant hanger. These are readily available online or at garden centers.
* Make sure the hanging wire or rope is strong enough to support the weight of the bottle, soil, and plant.
7. Hang Your Planter:
* Choose a sunny location to hang your upside-down bell pepper planter. Bell peppers need at least 6-8 hours of sunlight per day.
* Make sure the location is sheltered from strong winds, which could damage the plant.
* Hang the planter securely from a hook, branch, or other sturdy support.
Caring for Your Upside-Down Bell Pepper Plant
Now that your bell pepper plant is hanging happily, here’s how to keep it thriving:
* Watering: Water regularly, especially during hot, dry weather. Check the soil moisture by sticking your finger into the top inch of soil. If it feels dry, it’s time to water. Water until water drains out of the drainage holes.
* Fertilizing: Feed your bell pepper plant with a balanced liquid fertilizer every 2-3 weeks. Follow the instructions on the fertilizer package. I like to use a fertilizer specifically formulated for vegetables.
* Sunlight: Ensure your plant receives at least 6-8 hours of sunlight per day. If you live in a very hot climate, you may need to provide some afternoon shade to prevent the leaves from scorching.
* Pest Control: Keep an eye out for pests like aphids, whiteflies, and spider mites. If you spot any, treat them with an insecticidal soap or neem oil.
* Pruning: Prune away any yellowing or dead leaves. You can also pinch off the tips of the branches to encourage bushier growth.
* Support: As the bell peppers grow, they may become heavy and weigh down the plant. You may need to provide additional support to the branches to prevent them from breaking. You can use twine or plant clips to support the peppers.
Troubleshooting
Even with the best care, you might encounter a few challenges. Here are some common issues and how to address them:
* Yellowing Leaves: This could be a sign of overwatering, underwatering, nutrient deficiency, or pest infestation. Check the soil moisture, fertilize if needed, and inspect for pests.
* Blossom End Rot: This is a common problem in bell peppers, caused by a calcium deficiency. Ensure your soil is rich in calcium and water regularly. You can also add calcium supplements to the soil.
* Lack of Fruit: This could be due to insufficient sunlight, poor pollination, or extreme temperatures. Ensure your plant receives enough sunlight, hand-pollinate the flowers if necessary, and protect the plant from extreme temperatures.
* Plant Falling Out: If the plant starts to droop or fall out of the bottle, it could be due to insufficient soil or a weak root system. Add more soil to the bottle and provide support to the plant.
Harvesting Your Bell Peppers
The best part! You’ll know your bell peppers are ready to harvest when they’ve reached their mature size and color. Gently twist the pepper from the stem, using scissors or pruning shears if needed. Enjoy your homegrown bell peppers in salads, stir-fries, or stuffed peppers!
Tips and Tricks for Success
* Choose the Right Variety: Some bell pepper varieties are better suited for container gardening than others. Look for compact or dwarf varieties.
* Use High-Quality Potting Mix: Don’t skimp on the potting mix! A good quality potting mix will provide the nutrients and drainage your bell pepper plant needs to thrive.
* Water Consistently: Bell peppers need consistent moisture, especially during hot weather. Check the soil moisture regularly and water as needed.
* Fertilize Regularly: Bell peppers are heavy feeders and need regular fertilization to produce a good crop.
* Protect from Pests: Keep an eye out for pests and treat them promptly.
* Rotate Your Crops: If you’re growing bell peppers in the same location year after year, rotate your crops to prevent soilborne diseases.
Growing bell peppers upside down in plastic bottles is a fun and rewarding project. With a little bit of effort, you can enjoy fresh, homegrown bell peppers all season long. Happy gardening!
Conclusion
So, there you have it! Transforming ordinary plastic bottles into miniature greenhouses for your bell peppers is not just a quirky gardening hack; it’s a game-changer. We’ve explored how this simple DIY trick can offer a multitude of benefits, from protecting your precious seedlings from unpredictable weather and hungry pests to creating a warmer, more humid microclimate that encourages faster growth and earlier harvests.
But why is this method a must-try? Because it’s accessible, affordable, and incredibly effective. You’re likely already recycling plastic bottles, so you’re giving them a second life while simultaneously boosting your bell pepper yield. It’s a win-win! Plus, the visual appeal of these little bottle greenhouses adds a touch of whimsy to your garden.
Beyond the basic method, there’s room for experimentation. Consider painting the bottles white to reflect even more sunlight and prevent overheating in hotter climates. You could also add small ventilation holes near the top to regulate humidity and airflow, especially as your bell pepper plants mature. For larger bell pepper varieties, you might need to use larger bottles or even cut and combine multiple bottles to create a taller enclosure. Think about using different colored bottles to see if it affects the growth of your bell peppers.
Don’t limit yourself to just bell peppers! This technique can also be adapted for other vegetables and herbs, such as tomatoes, eggplants, and basil. The principles remain the same: protect the seedlings, create a favorable microclimate, and enjoy the fruits (or vegetables!) of your labor.
We’re confident that once you try this DIY bell pepper bottle greenhouse method, you’ll be amazed by the results. It’s a simple yet powerful way to give your plants a head start and ensure a bountiful harvest. The beauty of this method is that it is a sustainable and cost-effective way to grow your own bell peppers.
Now, it’s your turn! Gather your plastic bottles, prepare your seedlings, and get ready to witness the magic. We encourage you to try this DIY trick and share your experiences with us. Let us know what works best for you, what challenges you encounter, and any variations you discover. Share your photos and stories in the comments below – we can’t wait to see your bell pepper bottle greenhouses in action! Let’s cultivate a community of resourceful gardeners, one plastic bottle at a time. This is a great way to get the most out of your garden and enjoy fresh, homegrown bell peppers all season long. Remember, even small changes can make a big difference in your garden, and this DIY project is proof of that. So, go ahead, give it a try, and let’s grow some amazing bell peppers together!
Frequently Asked Questions (FAQ)
What type of plastic bottles are best for this DIY project?
Ideally, you should use clear plastic bottles, such as those from water or soda. Clear bottles allow the maximum amount of sunlight to reach your bell pepper seedlings. Avoid using colored or opaque bottles, as they will block sunlight and hinder growth. Make sure the bottles are clean and free of any residue before using them. Remove any labels or glue that might obstruct sunlight. The size of the bottle will depend on the size of your bell pepper plant, so consider using larger bottles for varieties that grow taller.
How do I prevent the bottles from overheating my bell pepper plants?
Overheating can be a concern, especially in warmer climates. To prevent this, consider painting the bottles white or using reflective tape to reflect sunlight. You can also add small ventilation holes near the top of the bottles to allow for airflow. Monitor the temperature inside the bottles regularly, especially during the hottest part of the day. If you notice the plants wilting or showing signs of heat stress, remove the bottles temporarily or provide shade. Watering your bell pepper plants in the morning can also help keep them cool throughout the day.
How often should I water my bell pepper plants when they are inside the bottles?
The frequency of watering will depend on the weather conditions and the type of soil you are using. Generally, you should water your bell pepper plants when the soil feels dry to the touch. Be careful not to overwater, as this can lead to root rot. When watering, lift the bottle slightly and pour water directly onto the soil around the base of the plant. Avoid getting water on the leaves, as this can encourage fungal diseases. Check the soil moisture levels regularly and adjust your watering schedule accordingly.
When should I remove the plastic bottles from my bell pepper plants?
The timing of removal will depend on the weather conditions and the size of your bell pepper plants. Generally, you should remove the bottles when the plants have outgrown them or when the weather has warmed up consistently. This is usually around the time when the risk of frost has passed. Before removing the bottles completely, you can gradually acclimate the plants to the outdoor environment by removing the bottles for a few hours each day. This will help them adjust to the temperature and humidity changes.
Can I reuse the plastic bottles for other plants or purposes?
Absolutely! Once you’ve finished using the plastic bottles for your bell pepper plants, you can clean them and reuse them for other plants or purposes. They can be used as mini-greenhouses for other seedlings, as planters for herbs or flowers, or even as storage containers. Get creative and find new ways to give these bottles a second life. Recycling and reusing materials is a great way to reduce waste and promote sustainability in your garden.
What if I don’t have enough plastic bottles? Are there alternatives?
If you don’t have enough plastic bottles, there are several alternatives you can use to protect your bell pepper seedlings. You can use cloches, which are bell-shaped covers made of glass or plastic. You can also use row covers, which are lightweight fabrics that are draped over plants to protect them from pests and weather. Another option is to use cold frames, which are enclosed structures that provide a sheltered environment for plants. You can also create your own DIY covers using materials such as cardboard boxes, plastic containers, or even old blankets. The key is to provide some form of protection for your seedlings until they are strong enough to withstand the elements.
Will using plastic bottles affect the taste of my bell peppers?
No, using plastic bottles as mini-greenhouses will not affect the taste of your bell peppers. The bottles are simply providing a protective environment for the plants to grow. The taste of your bell peppers will depend on factors such as the variety of bell pepper you are growing, the quality of the soil, and the amount of sunlight and water the plants receive. As long as you are using clean plastic bottles and providing proper care for your plants, you can expect to harvest delicious and flavorful bell peppers.
Are there any specific bell pepper varieties that benefit most from this method?
While all bell pepper varieties can benefit from this method, some may benefit more than others. Varieties that are particularly sensitive to cold weather or pests may see the most significant improvement in growth and yield. Consider using this method for heirloom varieties or those that are known to be more challenging to grow in your specific climate. Experiment with different varieties to see which ones respond best to the plastic bottle greenhouse technique.
Leave a Comment