
Sweet Potatoes in Soil Bags: Imagine harvesting a bounty of vibrant, earthy sweet potatoes right from your own backyard, without the need for a sprawling garden! For generations, resourceful gardeners have sought innovative ways to maximize their yields, even in limited spaces. From ancient Incan terrace farming to modern urban gardening, the spirit of ingenuity has always been at the heart of growing our own food.
But let’s face it, not everyone has the luxury of acres of land or the time for extensive gardening projects. That’s where this DIY trick comes in! Growing sweet potatoes in soil bags is a game-changer for apartment dwellers, balcony gardeners, or anyone looking for a low-effort, high-reward gardening experience. I’m going to show you how to create your own mini sweet potato farm using simple, readily available materials.
Why do you need this hack? Because fresh, homegrown sweet potatoes are simply unbeatable! They taste better, are packed with nutrients, and offer a satisfying connection to the earth. Plus, this method is incredibly space-efficient, cost-effective, and surprisingly easy. Get ready to ditch the store-bought spuds and embark on a rewarding journey of growing your own delicious sweet potatoes!
Grow Sweet Potatoes in Bags: A Beginner’s Guide
Hey there, fellow gardening enthusiasts! Have you ever dreamed of harvesting your own sweet potatoes, but thought you didn’t have the space? Well, I’m here to tell you that you absolutely can, even if you only have a balcony or a small patio! I’m going to walk you through how to grow sweet potatoes in bags – it’s easier than you think, and incredibly rewarding.
Why Grow Sweet Potatoes in Bags?
Growing sweet potatoes in bags offers several advantages:
* Space-saving: Perfect for small gardens, patios, balconies, or even decks.
* Portability: You can move the bags around to optimize sunlight exposure.
* Soil control: You have complete control over the soil composition, ensuring optimal growing conditions.
* Easy harvesting: Harvesting is a breeze – simply dump the bag and collect your sweet potato bounty!
* Fewer pests: Bags can sometimes offer a bit more protection from ground-dwelling pests.
What You’ll Need
Before we dive in, let’s gather our supplies. This is what you’ll need to get started:
* Sweet Potato Slips: These are sprouts grown from sweet potatoes. You can buy them online, at a local nursery, or even grow your own (more on that later!).
* Grow Bags: I recommend using grow bags that are at least 15-20 gallons in size. Fabric grow bags are ideal because they allow for good drainage and aeration.
* Potting Mix: A well-draining potting mix is crucial. I like to use a mix of compost, peat moss (or coco coir), and perlite.
* Compost: This will provide essential nutrients for your sweet potatoes.
* Water: Obviously!
* Gardening Gloves: To keep your hands clean.
* Trowel or Small Shovel: For planting.
* Optional: Slow-release fertilizer specifically formulated for root vegetables.
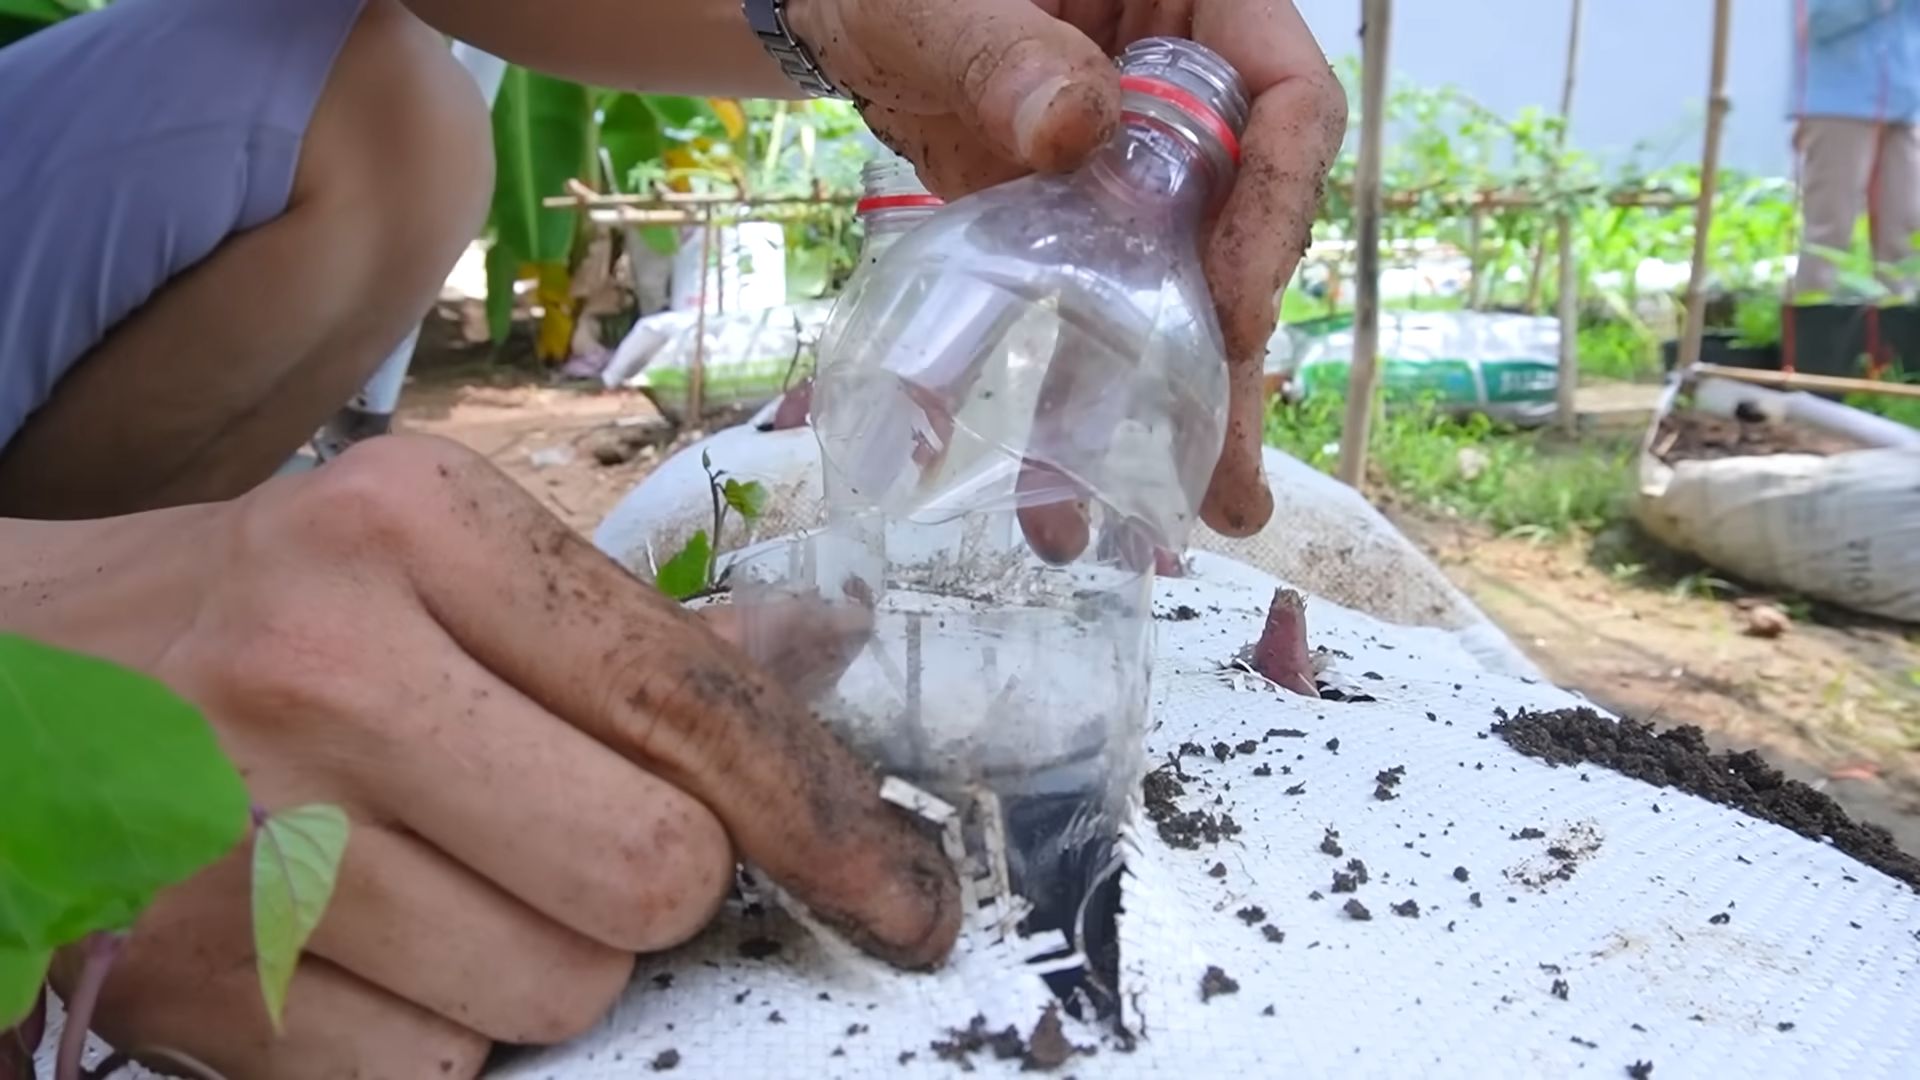
Getting Started: Growing Your Own Sweet Potato Slips (Optional)
If you’re feeling adventurous, you can grow your own sweet potato slips! It’s a fun project and can save you some money. Here’s how:
1. Choose a Sweet Potato: Select a healthy, organic sweet potato from the grocery store or farmer’s market. Organic is important to avoid any growth inhibitors.
2. Prepare the Sweet Potato: Wash the sweet potato thoroughly. You can either suspend it in a jar of water or bury it halfway in moist potting mix.
* Water Method: Use toothpicks to suspend the sweet potato over a jar or glass filled with water, with the bottom half submerged.
* Soil Method: Fill a container with moist potting mix and bury the sweet potato halfway, leaving the top exposed.
3. Provide Warmth and Light: Place the jar or container in a warm, sunny location.
4. Maintain Moisture: Change the water in the jar every few days. Keep the potting mix consistently moist, but not soggy.
5. Wait Patiently: In a few weeks, you should start to see sprouts (slips) emerging from the sweet potato.
6. Harvest the Slips: Once the slips are 6-8 inches long, gently twist them off the sweet potato.
7. Root the Slips: Place the slips in a jar of water, making sure the bottom inch or two is submerged. Roots should develop in a few days.
8. Plant the Slips: Once the slips have developed a good root system, they’re ready to be planted in your grow bags.
Planting Your Sweet Potato Slips
Now for the fun part – planting!
1. Prepare the Grow Bags: Fill your grow bags with the potting mix, leaving a few inches of space at the top. Mix in a generous amount of compost. If you’re using slow-release fertilizer, incorporate it into the soil according to the package directions.
2. Water the Soil: Thoroughly water the soil in the grow bags until it’s evenly moist.
3. Plant the Slips: Dig small holes in the soil, about 4-6 inches apart. Gently place the sweet potato slips into the holes, making sure the roots are covered with soil.
4. Water Again: Water the newly planted slips gently to help them settle in.
5. Mulch (Optional): Add a layer of mulch around the base of the plants to help retain moisture and suppress weeds. Straw or shredded leaves work well.
Caring for Your Sweet Potato Plants
Sweet potatoes are relatively low-maintenance, but here are a few things to keep in mind:
1. Sunlight: Sweet potatoes need at least 6-8 hours of sunlight per day. Place your grow bags in a sunny location.
2. Watering: Water regularly, especially during hot, dry weather. The soil should be consistently moist, but not waterlogged. Check the soil moisture by sticking your finger into the soil – if it feels dry an inch or two down, it’s time to water.
3. Fertilizing: Sweet potatoes are heavy feeders. In addition to the compost you added at planting, you can fertilize them every few weeks with a balanced fertilizer or a fertilizer specifically formulated for root vegetables. Follow the package directions carefully.
4. Weeding: Keep the grow bags free of weeds. Weeds can compete with your sweet potato plants for nutrients and water.
5. Pest Control: Sweet potatoes are generally pest-resistant, but keep an eye out for common garden pests like aphids, flea beetles, and vine borers. If you notice any pests, treat them with an appropriate organic insecticide.
6. Vine Management: Sweet potato vines can get quite long and sprawling. You can let them trail along the ground, or you can train them to climb a trellis or support structure. This can help save space and improve air circulation.
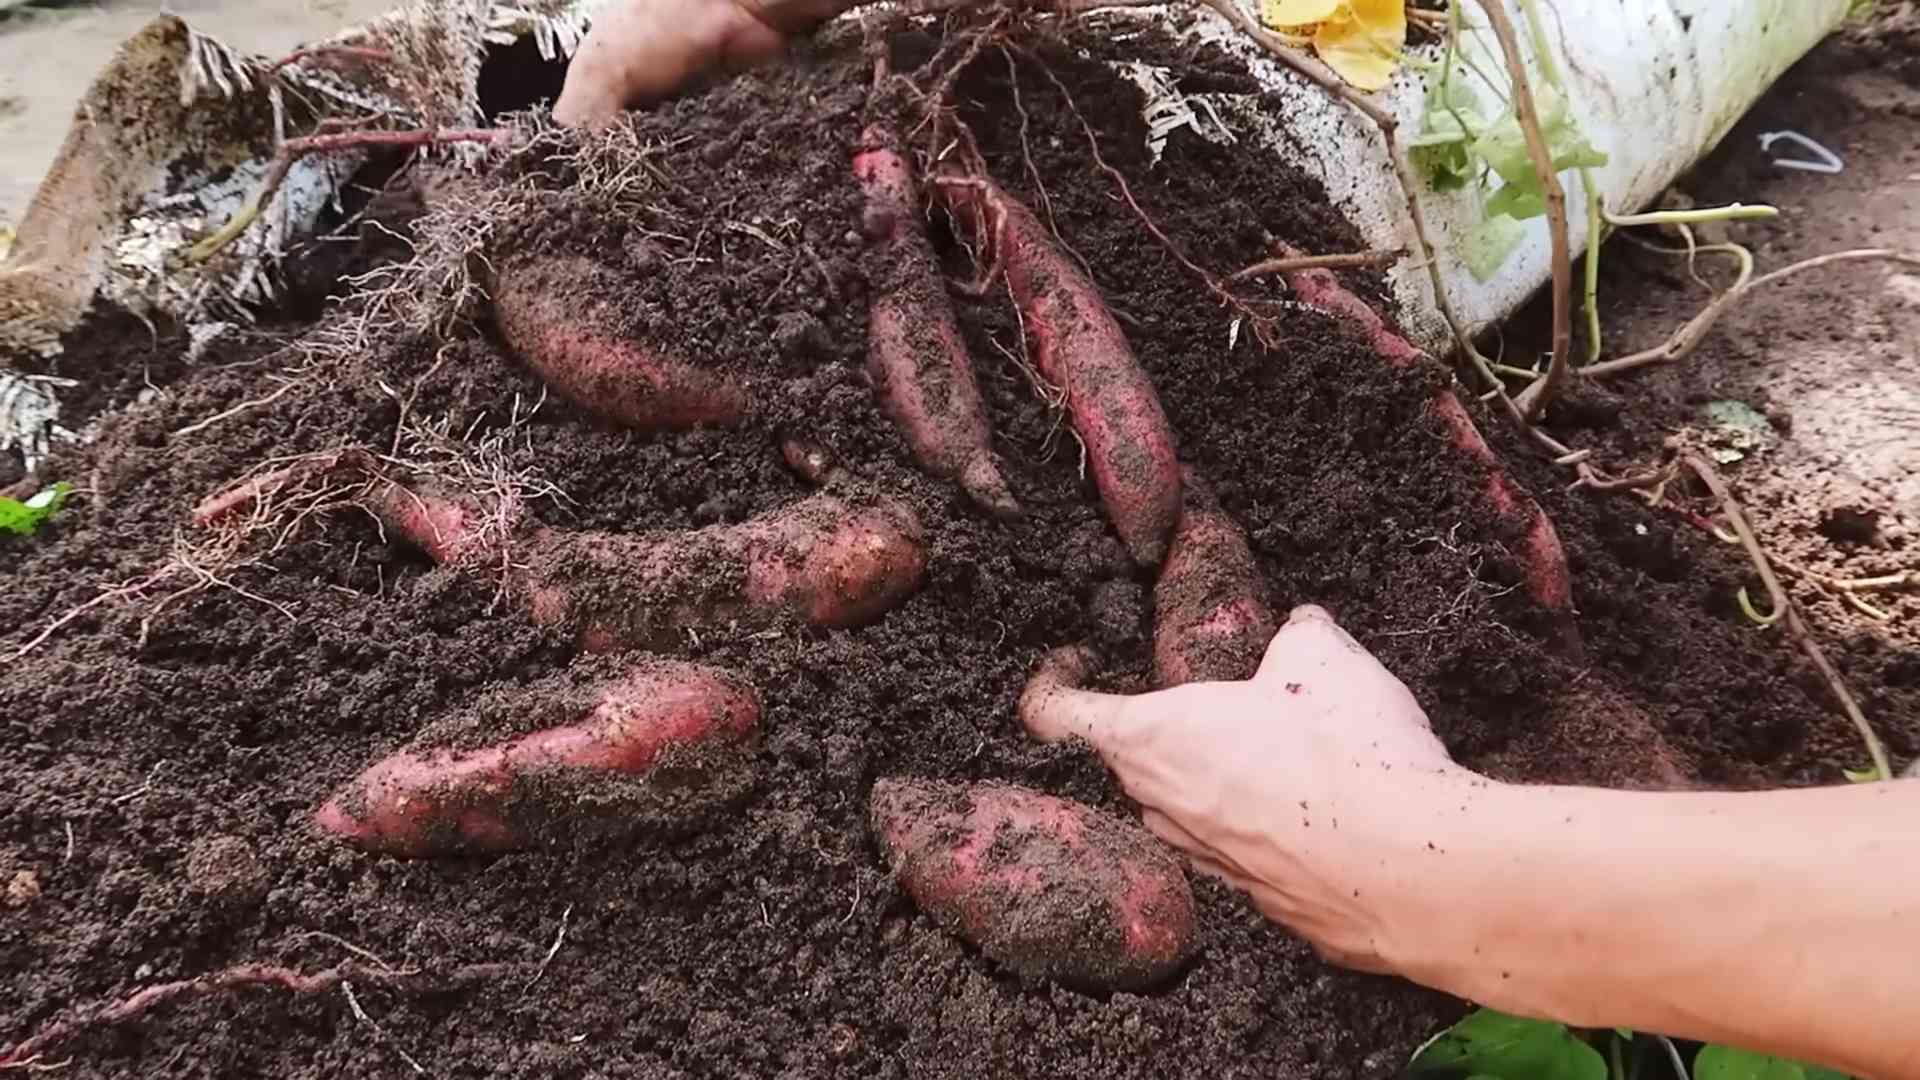
Harvesting Your Sweet Potatoes
The moment we’ve all been waiting for! Sweet potatoes are typically ready to harvest about 90-120 days after planting. Here’s how to tell when they’re ready:
1. Check the Foliage: The leaves will start to turn yellow and die back.
2. Test Dig: Gently dig around the base of one plant to check the size of the sweet potatoes. If they’re a good size (about the size of your fist or larger), it’s time to harvest.
3. Harvest Carefully: Gently dump the grow bag onto a tarp or other surface. Carefully dig through the soil to unearth your sweet potatoes. Be careful not to damage them.
4. Curing: Curing is an important step that improves the flavor and storage life of your sweet potatoes. To cure them, place them in a warm, humid location (80-85°F and 85-90% humidity) for about a week. A greenhouse or a warm, sunny room with a humidifier works well.
5. Storage: After curing, store your sweet potatoes in a cool, dry, and dark place (55-60°F). They should keep for several months.
Troubleshooting
Here are a few common problems you might encounter and how to solve them:
* Yellowing Leaves: This could be a sign of nutrient deficiency. Fertilize with a balanced fertilizer or a fertilizer specifically formulated for root vegetables.
* Slow Growth: Make sure your plants are getting enough sunlight and water. Also, check the soil pH. Sweet potatoes prefer a slightly acidic soil (pH 6.0-6.5).
* Pests: Inspect your plants regularly for pests. Treat any infestations with an appropriate organic insecticide.
* Rotting Sweet Potatoes: This could be caused by overwatering or poor drainage. Make sure your grow bags have good drainage and don’t overwater.
Tips for Success
* Choose the Right Variety: Some sweet potato varieties are better suited for container growing than others. Look for varieties that are compact and early-maturing.
* Don’t Overcrowd: Give your sweet potato plants plenty of space to grow. Don’t plant too many slips in one bag.
* Rotate Your Crops: If you’re growing sweet potatoes in the same bags year after year, rotate your crops to prevent soilborne diseases.
* Have Fun! Gardening should be enjoyable. Don’t be afraid to experiment and learn from your mistakes.
Growing sweet potatoes in bags is a fantastic way to enjoy fresh, homegrown produce, even if you have limited space. With a little bit of care and attention, you can harvest a bountiful crop of delicious sweet potatoes. Happy gardening!
Conclusion
So, there you have it! Growing sweet potatoes in soil bags is not just a gardening trend; it’s a game-changer for anyone looking to maximize their yield, minimize space, and enjoy the unparalleled satisfaction of harvesting their own homegrown goodness. This method offers a unique blend of convenience and control, allowing even apartment dwellers or those with limited yard space to indulge in the joy of cultivating these vibrant, nutritious tubers.
Why is this DIY trick a must-try? Because it simplifies the process, reduces the risk of pests and diseases often associated with traditional in-ground planting, and provides a contained environment where you can meticulously manage soil quality, moisture levels, and sunlight exposure. Imagine the pride you’ll feel as you gently upend that soil bag and unearth a bounty of beautiful, organically grown sweet potatoes, ready to be transformed into delectable dishes.
But the beauty of this method lies not only in its practicality but also in its adaptability. Feel free to experiment with different varieties of sweet potatoes to discover your personal favorite. Beauregard, with its classic orange flesh, is always a reliable choice, but don’t shy away from trying more exotic options like Japanese sweet potatoes with their purple skin and creamy white interior, or even the Covington variety, known for its disease resistance and high yields.
Consider adding companion plants to your soil bags to further enhance your growing environment. Marigolds can help deter nematodes, while basil can repel aphids and other unwanted pests. A sprinkle of Epsom salts can provide your sweet potatoes with an extra boost of magnesium, promoting healthy growth and abundant tuber production.
And don’t limit yourself to just one soil bag! Create a mini sweet potato farm on your patio or balcony by arranging multiple bags in a sunny spot. This will not only increase your harvest but also add a touch of rustic charm to your outdoor space.
The key to success with this method is consistent monitoring and care. Regularly check the moisture levels of the soil, ensuring that it remains consistently moist but not waterlogged. Provide adequate sunlight, ideally at least six hours per day, and fertilize your plants every few weeks with a balanced organic fertilizer.
We are confident that once you experience the ease and rewards of growing sweet potatoes in soil bags, you’ll be hooked. It’s a truly fulfilling and sustainable way to enjoy fresh, healthy produce right from your own home.
So, what are you waiting for? Grab some soil bags, sweet potato slips, and get ready to embark on a gardening adventure. We encourage you to try this DIY trick and share your experiences with us. Post photos of your sweet potato harvests on social media using #SweetPotatoSoilBags and let us know what varieties you grew and any tips or tricks you discovered along the way. We can’t wait to see your success stories! Happy gardening!
Frequently Asked Questions (FAQ)
What type of soil should I use for growing sweet potatoes in soil bags?
The ideal soil mix for sweet potatoes in soil bags is a well-draining, loamy soil that is rich in organic matter. A good starting point is a mix of equal parts garden soil, compost, and peat moss or coco coir. This combination provides the necessary nutrients, drainage, and water retention for healthy sweet potato growth. Avoid using heavy clay soils, as they can become waterlogged and inhibit tuber development. You can also purchase pre-mixed potting soil specifically formulated for vegetables, which often contains a balanced blend of nutrients and drainage materials.
How many sweet potato slips can I plant in one soil bag?
The number of sweet potato slips you can plant in one soil bag depends on the size of the bag. For a standard 10-gallon soil bag, we recommend planting no more than 2-3 slips. Overcrowding can lead to competition for resources, resulting in smaller tubers and reduced yields. If you are using a larger bag, such as a 20-gallon bag, you can plant up to 4-5 slips. Ensure that the slips are spaced evenly within the bag to allow for adequate root development and air circulation.
How often should I water my sweet potatoes in soil bags?
Watering frequency will depend on the weather conditions and the type of soil you are using. Generally, you should water your sweet potatoes whenever the top inch of soil feels dry to the touch. During hot, dry weather, this may mean watering daily or even twice a day. In cooler, wetter weather, you may only need to water every few days. Be sure to water deeply, allowing the water to penetrate the entire soil bag. Avoid overwatering, as this can lead to root rot. A good way to check if your sweet potatoes need water is to insert your finger into the soil near the base of the plant. If the soil feels dry, it’s time to water.
What kind of fertilizer should I use for sweet potatoes in soil bags?
Sweet potatoes benefit from regular fertilization throughout the growing season. A balanced organic fertilizer with an NPK ratio of 5-10-10 is a good choice. This provides a moderate amount of nitrogen for leafy growth, along with higher levels of phosphorus and potassium to promote tuber development. Apply the fertilizer according to the package directions, typically every 2-3 weeks. You can also supplement with compost tea or liquid seaweed extract to provide additional nutrients and micronutrients. Avoid using fertilizers that are too high in nitrogen, as this can lead to excessive foliage growth at the expense of tuber production.
How long does it take for sweet potatoes to mature in soil bags?
Sweet potatoes typically take 90-120 days to mature, depending on the variety and growing conditions. You’ll know your sweet potatoes are ready to harvest when the foliage starts to turn yellow and die back. You can also gently dig around the base of the plant to check the size of the tubers. If they are large enough for your liking, it’s time to harvest. Be careful not to damage the tubers when digging them up.
Can I reuse the soil bags for growing sweet potatoes next year?
Yes, you can reuse the soil bags for growing sweet potatoes next year, but it’s important to amend the soil before replanting. After harvesting your sweet potatoes, remove any remaining plant debris and add fresh compost or other organic matter to replenish the nutrients in the soil. You may also want to consider rotating your crops to prevent the buildup of soilborne diseases. If you notice any signs of pests or diseases in the soil, you can sterilize it by baking it in the oven or solarizing it in the sun.
What are some common pests and diseases that affect sweet potatoes in soil bags?
Some common pests that can affect sweet potatoes include aphids, sweet potato weevils, and nematodes. Aphids can be controlled with insecticidal soap or neem oil. Sweet potato weevils are more difficult to control, but you can prevent them by using certified disease-free slips and practicing good sanitation. Nematodes can be managed by adding organic matter to the soil and using nematode-resistant varieties. Common diseases that can affect sweet potatoes include fusarium wilt and black rot. These diseases can be prevented by using disease-free slips, practicing crop rotation, and avoiding overwatering.
How do I store my harvested sweet potatoes?
Proper curing and storage are essential for preserving the quality and flavor of your harvested sweet potatoes. After harvesting, gently brush off any excess soil and allow the sweet potatoes to cure in a warm, humid place (80-85°F and 85-90% humidity) for 7-10 days. This process allows the skins to harden and any minor cuts or bruises to heal. After curing, store your sweet potatoes in a cool, dry, and dark place (55-60°F) with good ventilation. Avoid storing them in the refrigerator, as this can cause them to develop a hard core and lose their flavor. Properly cured and stored sweet potatoes can last for several months.


Leave a Comment