
Grow Celery at Home, you say? Absolutely! Imagine stepping into your backyard and snipping fresh, crisp celery stalks for your salads, soups, or even just a healthy snack. No more limp, store-bought celery that’s been sitting in the fridge for days! This isn’t just about convenience; it’s about connecting with nature and enjoying the unparalleled flavor of homegrown produce.
Celery, believe it or not, has a rich history. Originating in the Mediterranean, it was initially valued more for its medicinal properties than its culinary uses. Ancient Greeks used it to crown victors in athletic games, symbolizing triumph and achievement. Now, centuries later, you can achieve your own small victory by successfully cultivating this versatile vegetable in your very own garden!
But why should you bother learning how to grow celery at home? Well, for starters, it’s incredibly rewarding. Plus, store-bought celery can be expensive and often lacks the vibrant flavor of freshly harvested stalks. More importantly, growing your own allows you to control what goes into your food, ensuring it’s free from harmful pesticides and chemicals. I’m going to share some simple DIY tricks and hacks that will make growing celery at home easier than you ever thought possible. Get ready to ditch the grocery store celery and embrace the joy of homegrown goodness!
Zieh dein eigenes Staudensellerie zu Hause: Ein umfassender DIY-Leitfaden
Hey Gartenfreunde! Habt ihr euch jemals gefragt, wie ihr frischen, knackigen Staudensellerie direkt aus eurem eigenen Garten oder sogar von eurer Fensterbank ernten könnt? Ich zeige euch, wie es geht! Es ist einfacher als ihr denkt und super befriedigend. Lasst uns gemeinsam in die Welt des Staudensellerie-Anbaus eintauchen.
Was du brauchst: Deine Werkzeugkiste für den Sellerie-Erfolg
Bevor wir loslegen, hier eine Liste der Dinge, die ihr bereithalten solltet. Keine Sorge, die meisten davon habt ihr wahrscheinlich schon zu Hause:
* Ein Staudensellerie-Strunk (am besten aus dem Supermarkt, mit intaktem Wurzelansatz)
* Ein scharfes Messer
* Ein Glas oder eine Schüssel mit Wasser
* Ein Pflanzgefäß (ca. 15-20 cm Durchmesser)
* Hochwertige Blumenerde oder Gemüseerde
* Optional: Flüssigdünger für Gemüse
* Optional: Mulch (z.B. Stroh oder Holzhackschnitzel)
* Eine Gießkanne oder Sprühflasche
Phase 1: Die Wiedergeburt des Sellerie-Strunks
Dieser erste Schritt ist entscheidend für den Erfolg. Wir wecken den Strunk quasi wieder zum Leben.
1. Vorbereitung des Strunks: Nehmt euren Staudensellerie-Strunk und schneidet den oberen Teil mit den Stangen ab. Lasst etwa 5-7 cm des unteren Teils mit dem Wurzelansatz übrig. Keine Sorge, die Stangen könnt ihr natürlich für Suppen, Salate oder Smoothies verwenden!
2. Das Wasserbad: Stellt den Strunk in ein Glas oder eine Schüssel mit Wasser. Achtet darauf, dass der untere Teil, wo die Wurzeln waren, im Wasser steht, aber der obere Teil nicht komplett untergetaucht ist.
3. Der richtige Standort: Platziert das Glas mit dem Strunk an einem hellen, aber nicht direkt sonnigen Ort. Ein Fensterbrett ist ideal.
4. Geduld ist eine Tugend: Wechselt das Wasser alle 1-2 Tage, um Fäulnis zu vermeiden. Nach etwa einer Woche solltet ihr sehen, wie kleine Wurzeln aus dem Strunk sprießen und neue grüne Blätter in der Mitte wachsen. Das ist ein Zeichen, dass euer Sellerie bereit ist für den nächsten Schritt!
Phase 2: Umzug ins neue Zuhause: Das Einpflanzen
Jetzt geht es darum, dem kleinen Sellerie-Sprössling ein gemütliches Zuhause in Erde zu geben.
1. Vorbereitung des Pflanzgefäßes: Füllt euer Pflanzgefäß mit hochwertiger Blumenerde oder Gemüseerde. Lasst etwa 2-3 cm Platz bis zum Rand.
2. Das Einpflanzen: Macht ein kleines Loch in die Mitte der Erde, das groß genug ist, um den Sellerie-Strunk aufzunehmen. Setzt den Strunk vorsichtig in das Loch und bedeckt die Wurzeln mit Erde. Achtet darauf, dass der obere Teil des Strunks, wo die neuen Blätter wachsen, frei bleibt.
3. Angießen: Gießt die Erde vorsichtig an, bis sie gut durchfeuchtet ist. Vermeidet Staunässe, da dies zu Fäulnis führen kann.
4. Der richtige Standort (Teil 2): Stellt das Pflanzgefäß an einen hellen, aber nicht direkt sonnigen Ort. Staudensellerie mag es hell, aber die pralle Mittagssonne kann die Blätter verbrennen.
Phase 3: Pflege und Verwöhnung: So bleibt dein Sellerie glücklich
Damit euer Staudensellerie prächtig gedeiht, braucht er regelmäßige Pflege.
1. Gießen: Gießt euren Sellerie regelmäßig, aber nicht zu viel. Die Erde sollte immer leicht feucht sein, aber nicht nass. Überprüft die Feuchtigkeit mit eurem Finger. Wenn sich die oberste Schicht trocken anfühlt, ist es Zeit zum Gießen.
2. Düngen: Um das Wachstum zu fördern, könnt ihr euren Sellerie alle 2-3 Wochen mit einem Flüssigdünger für Gemüse düngen. Achtet auf die Dosierungsanleitung auf der Verpackung.
3. Mulchen (Optional): Eine Schicht Mulch (z.B. Stroh oder Holzhackschnitzel) um die Pflanze herum hilft, die Feuchtigkeit im Boden zu halten und Unkraut zu unterdrücken.
4. Schutz vor Schädlingen: Achtet auf Schädlinge wie Blattläuse oder Schnecken. Bei Bedarf könnt ihr natürliche Schädlingsbekämpfungsmittel verwenden.
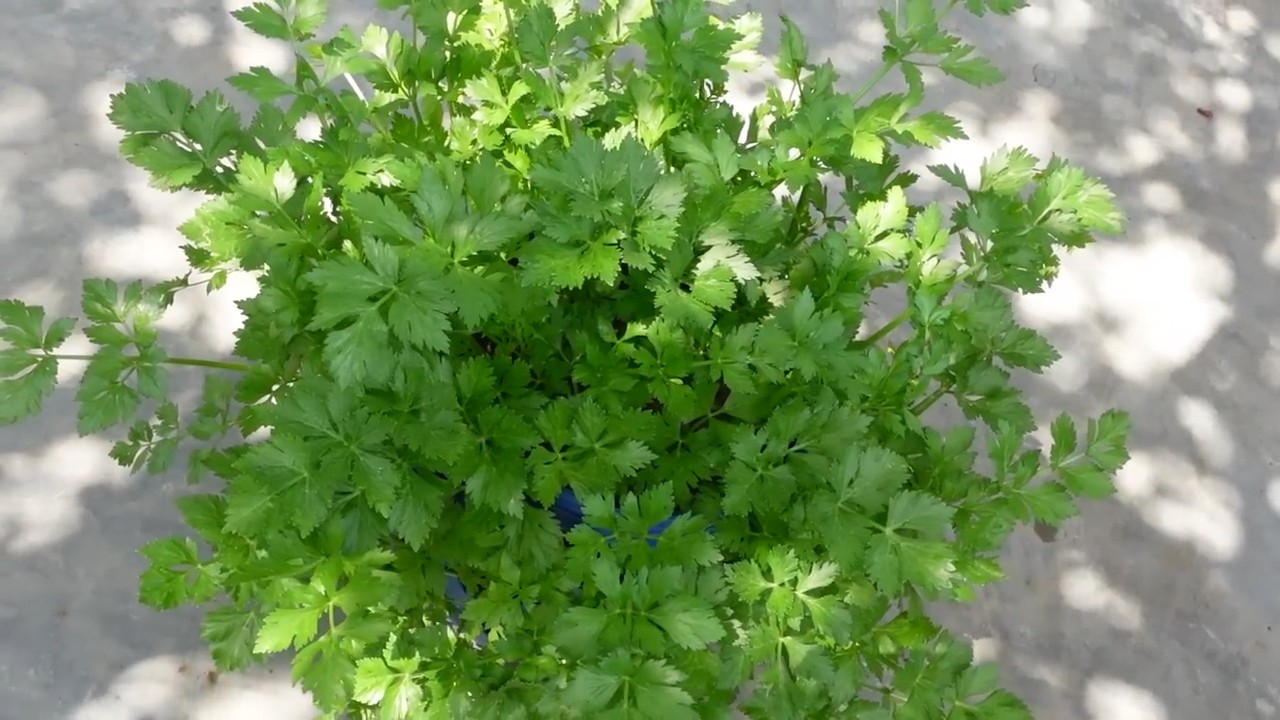
5. Auslichten: Wenn euer Sellerie zu dicht wird, könnt ihr einige der äußeren Blätter entfernen, um mehr Licht und Luft an die inneren Blätter zu lassen. Diese Blätter könnt ihr natürlich auch in der Küche verwenden!
Phase 4: Die Ernte: Der Lohn deiner Mühe
Nach einigen Wochen oder Monaten (je nach Sorte und Bedingungen) ist es endlich soweit: Die Ernte!
1. Der richtige Zeitpunkt: Ihr könnt euren Staudensellerie ernten, sobald die Stangen die gewünschte Größe erreicht haben. Das ist normalerweise nach etwa 80-100 Tagen der Fall.
2. Die Erntetechnik: Schneidet die äußeren Stangen mit einem scharfen Messer ab. Lasst die inneren Stangen stehen, damit die Pflanze weiterwachsen kann.
3. Die Lagerung: Frischer Staudensellerie hält sich im Kühlschrank am besten, wenn er in ein feuchtes Tuch eingewickelt ist.
Zusätzliche Tipps und Tricks für den Sellerie-Profi
* Sellerie bleichen: Um hellere und zartere Stangen zu erhalten, könnt ihr euren Sellerie etwa zwei Wochen vor der Ernte bleichen. Dazu umwickelt ihr die Stangen mit Papier oder Pappe, sodass nur die oberen Blätter herausschauen.
* Sellerie im Topf überwintern: In milden Klimazonen könnt ihr euren Sellerie im Topf überwintern. Stellt ihn an einen kühlen, hellen Ort und gießt ihn nur sparsam.
* Sellerie aus Samen ziehen: Wenn ihr noch ambitionierter seid, könnt ihr Staudensellerie auch aus Samen ziehen. Das ist etwas aufwendiger, aber es lohnt sich!
* Verschiedene Sorten ausprobieren: Es gibt verschiedene Staudensellerie-Sorten mit unterschiedlichen Geschmacksrichtungen und Farben. Probiert verschiedene Sorten aus, um euren Favoriten zu finden!
Ich hoffe, dieser Leitfaden hat euch geholfen und inspiriert, euren eigenen Staudensellerie zu Hause anzubauen. Es ist ein tolles Gefühl, frische, gesunde Zutaten direkt aus dem eigenen Garten zu ernten. Viel Spaß beim Gärtnern!

Conclusion
So, there you have it! Growing celery at home from scraps isn’t just a fun experiment; it’s a sustainable way to reduce food waste, enjoy fresh, flavorful celery, and connect with the natural world. It’s a surprisingly simple process that yields impressive results, transforming what would otherwise be kitchen scraps into a vibrant, thriving plant.
Why is this DIY trick a must-try? Because it’s economical, environmentally friendly, and incredibly rewarding. Think about it: instead of tossing those celery bases into the compost bin, you’re giving them a second life, a chance to flourish and provide you with a continuous supply of crisp, delicious celery stalks. You’re actively participating in reducing food waste, a significant environmental concern, and saving money on your grocery bill in the process. Plus, there’s a certain satisfaction that comes from nurturing a plant from its humble beginnings to a fully grown vegetable.
But the benefits don’t stop there. Homegrown celery boasts a flavor that’s often superior to store-bought varieties. It’s fresher, crisper, and more intensely flavored, adding a delightful zest to your salads, soups, and snacks. And because you’re in control of the growing process, you can ensure that your celery is free from harmful pesticides and chemicals.
Looking for variations? Consider experimenting with different celery varieties. While the standard Pascal celery is a popular choice, you can also try growing other types, such as Chinese celery, which has a stronger, more peppery flavor. You can also adjust the growing conditions to influence the flavor and texture of your celery. For example, providing more sunlight can result in sweeter, more flavorful stalks, while ensuring consistent moisture can help prevent bitterness.
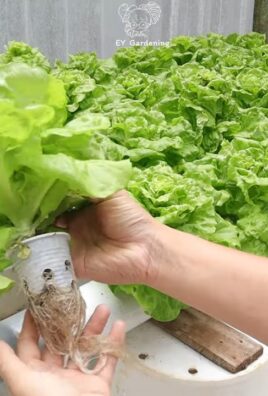
Another fun variation is to grow your celery in different containers. While a simple glass of water is sufficient for the initial rooting stage, you can later transplant your celery into a larger pot or even directly into your garden bed. Experiment with different soil types and fertilizers to see what works best for your growing environment. You can even try companion planting, growing your celery alongside other vegetables and herbs that can benefit its growth, such as onions, garlic, and tomatoes.
Don’t be afraid to get creative and personalize your celery-growing experience. The possibilities are endless!
We wholeheartedly encourage you to give this DIY trick a try. It’s a simple, sustainable, and satisfying way to enjoy fresh, flavorful celery while reducing food waste and connecting with nature. Once you’ve experienced the joy of growing your own celery from scraps, you’ll never look at a celery base the same way again.
So, grab a celery base, a glass of water, and a sunny windowsill, and get ready to embark on a rewarding gardening adventure. And don’t forget to share your experiences with us! We’d love to hear about your successes, your challenges, and any tips or tricks you’ve discovered along the way. Share your photos and stories on social media using #HomegrownCelery and let’s inspire others to join the movement of sustainable, homegrown goodness. Let’s all learn how to **grow celery at home**!
Frequently Asked Questions (FAQ)
How long does it take to grow celery from a base?
The initial rooting process, where you place the celery base in water, typically takes about 5-7 days. You’ll start to see small roots emerging from the bottom of the base and new leaves sprouting from the top. Once the roots are well-established, you can transplant the celery into soil. From there, it can take several weeks to a few months for the celery to fully mature and be ready for harvest. The exact timeframe depends on factors such as sunlight, temperature, and soil conditions. Be patient and consistent with watering and care, and you’ll be rewarded with delicious, homegrown celery.
What kind of water should I use?
Tap water is generally fine for rooting celery, but it’s best to let it sit out for a few hours to allow any chlorine to dissipate. Filtered water or rainwater are also excellent options. Avoid using distilled water, as it lacks the minerals that plants need to thrive. Change the water every 1-2 days to keep it fresh and prevent the growth of bacteria or mold.
How much sunlight does celery need?
Celery thrives in full sun, which means it needs at least 6-8 hours of direct sunlight per day. However, in hotter climates, it can benefit from some afternoon shade to prevent the leaves from scorching. If you’re growing celery indoors, place it near a sunny window or supplement with a grow light. Insufficient sunlight can result in leggy, weak growth and a less flavorful harvest.
What kind of soil is best for growing celery?
Celery prefers rich, well-draining soil that is high in organic matter. A good potting mix amended with compost or aged manure is ideal. The soil should be able to retain moisture without becoming waterlogged. Before planting, loosen the soil and remove any rocks or debris. You can also add a slow-release fertilizer to provide your celery with the nutrients it needs to grow.
How often should I water my celery?
Celery needs consistent moisture to thrive. Water deeply whenever the top inch of soil feels dry to the touch. Avoid letting the soil dry out completely, as this can stress the plant and lead to bitterness. However, be careful not to overwater, as this can cause root rot. A good rule of thumb is to water thoroughly every 2-3 days, depending on the weather and soil conditions.
How do I know when my celery is ready to harvest?
Celery is typically ready to harvest when the stalks are at least 6-8 inches long and have reached a desirable thickness. The exact size will depend on the variety you’re growing. The stalks should be firm and crisp, not limp or wilted. You can harvest individual stalks as needed, or you can harvest the entire plant at once. To harvest, simply cut the stalks at the base of the plant with a sharp knife.
Can I grow celery indoors year-round?
Yes, you can grow celery indoors year-round, provided you have adequate sunlight or a grow light. Indoor celery may not grow as large as outdoor celery, but it can still provide you with a steady supply of fresh stalks. Be sure to choose a pot that is large enough to accommodate the plant’s root system, and provide consistent moisture and nutrients.
What are some common problems when growing celery and how do I fix them?
Some common problems when growing celery include pests, diseases, and nutrient deficiencies. Pests such as aphids and celery worms can be controlled with insecticidal soap or neem oil. Diseases such as early blight and pink rot can be prevented by ensuring good air circulation and avoiding overwatering. Nutrient deficiencies can be addressed by fertilizing with a balanced fertilizer.
Can I eat the leaves of the celery plant?
Yes, the leaves of the celery plant are perfectly edible and can be used in a variety of dishes. They have a stronger flavor than the stalks and can be used to add a boost of flavor to soups, salads, and stir-fries. You can also dry the leaves and use them as a seasoning.
My celery is bitter. What can I do?
Bitterness in celery can be caused by several factors, including insufficient watering, excessive heat, and nutrient deficiencies. To prevent bitterness, ensure that your celery receives consistent moisture, especially during hot weather. Provide adequate shade during the hottest part of the day. Fertilize with a balanced fertilizer to ensure that your celery has the nutrients it needs. You can also try blanching the stalks by covering them with soil or paper for a few weeks before harvesting.

Leave a Comment