
Grow Pineapples at Home? Absolutely! Imagine plucking a juicy, sun-ripened pineapple straight from your own backyard. Sounds like a tropical dream, right? Well, it’s more attainable than you might think! For centuries, pineapples have symbolized hospitality and luxury, gracing tables from royal feasts to humble gatherings. Their exotic allure has captivated cultures worldwide, and now, you can bring that same allure to your own home.
But why should you bother with growing your own pineapple? Let’s face it, store-bought pineapples can sometimes be disappointing – either too sour, too expensive, or just lacking that vibrant, fresh flavor. That’s where this DIY guide comes in! I’m going to share some simple, yet effective tricks and hacks to help you successfully grow pineapples at home, regardless of your gardening experience.
This isn’t just about saving money; it’s about experiencing the joy of nurturing a plant from start to finish and enjoying the unparalleled taste of a homegrown pineapple. Plus, it’s a fantastic conversation starter! So, grab your gardening gloves, and let’s embark on this exciting journey to cultivate your very own tropical paradise, one pineapple at a time!
Ananas zu Hause ziehen: Dein DIY-Guide für tropische Früchte
Hey Leute! Habt ihr euch jemals gefragt, wie es wäre, eure eigenen Ananas zu Hause anzubauen? Ich habe es ausprobiert und es ist einfacher als ihr denkt! Es braucht zwar etwas Geduld, aber das Ergebnis ist eine superleckere, selbstgezogene Ananas. In diesem Artikel zeige ich euch Schritt für Schritt, wie ihr das auch schaffen könnt. Los geht’s!
Was du brauchst: Die Zutaten für deinen tropischen Garten
Bevor wir loslegen, brauchen wir ein paar Dinge. Keine Sorge, die meisten davon habt ihr wahrscheinlich schon zu Hause:
* Eine reife Ananas: Wichtig ist, dass sie reif ist, aber nicht überreif. Die Blätter sollten grün und gesund aussehen. Am besten eine aus dem Supermarkt oder Bioladen.
* Ein scharfes Messer: Zum Abschneiden des Ananaskopfes.
* Ein Glas oder eine Vase: Für die Bewurzelung.
* Zahnstocher (optional): Um den Ananaskopf im Wasser zu stabilisieren.
* Blumenerde: Am besten eine gut durchlässige Mischung.
* Ein Topf: Der Topf sollte groß genug sein, um die Ananas aufzunehmen. Mindestens 20 cm Durchmesser sind ideal.
* Geduld: Ananas brauchen Zeit zum Wachsen!
Phase 1: Den Ananaskopf vorbereiten
Der erste Schritt ist entscheidend für den Erfolg. Wir müssen den Ananaskopf so vorbereiten, dass er Wurzeln schlagen kann.
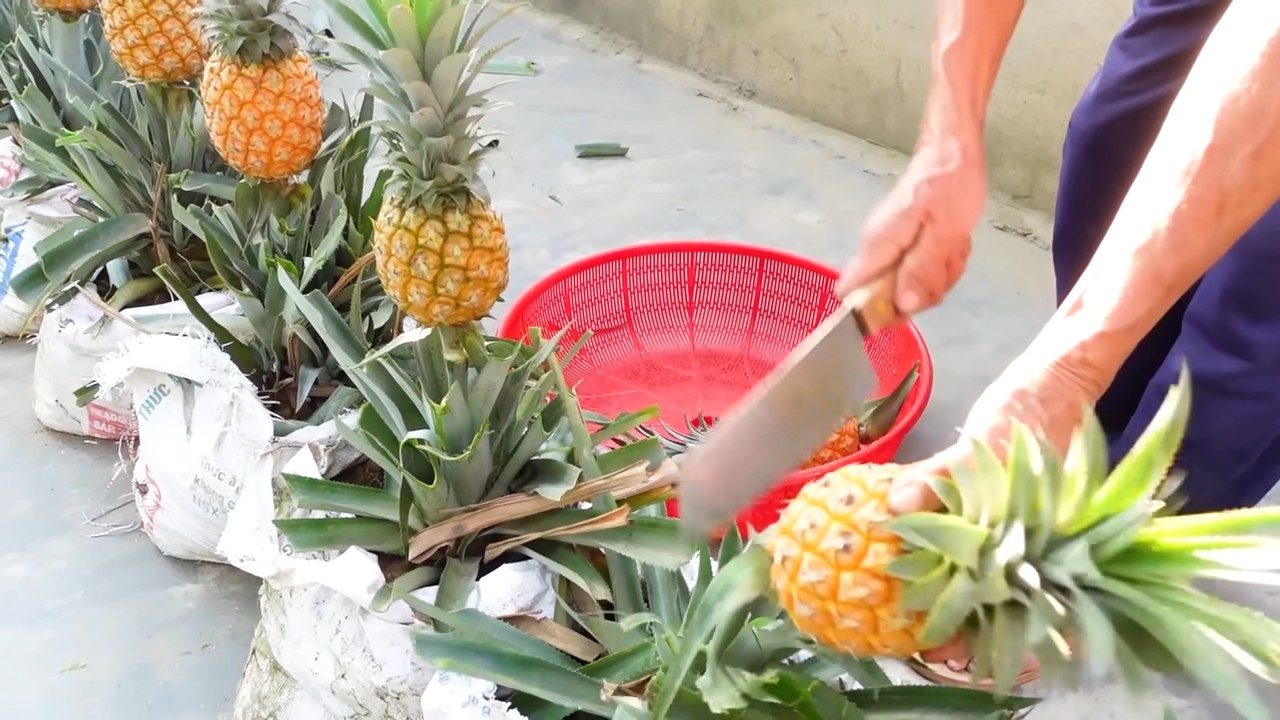
1. Den Kopf abschneiden: Nehmt euer scharfes Messer und schneidet den Kopf der Ananas ab. Achtet darauf, dass ihr etwa 2-3 cm Fruchtfleisch am Kopf lasst.
2. Fruchtfleisch entfernen: Entfernt vorsichtig das restliche Fruchtfleisch vom Kopf. Das ist wichtig, da das Fruchtfleisch sonst faulen kann und die Wurzelbildung behindert. Ich habe dafür ein kleines Messer oder einen Löffel benutzt.
3. Die unteren Blätter entfernen: Entfernt die untersten Blätter des Ananaskopfes. Zieht sie einfach nach unten ab. So legt ihr den Stiel frei, aus dem die Wurzeln wachsen werden. Etwa 2-3 cm des Stiels sollten frei sein.
4. Trocknen lassen: Lasst den Ananaskopf 2-3 Tage an einem trockenen, gut belüfteten Ort trocknen. Das hilft, Fäulnis zu verhindern. Ich habe ihn einfach auf ein Küchenpapier gelegt.
Phase 2: Bewurzelung im Wasser
Jetzt kommt der spannende Teil: Wir bringen den Ananaskopf dazu, Wurzeln zu schlagen!
1. Den Ananaskopf ins Wasser stellen: Füllt euer Glas oder eure Vase mit Wasser. Achtet darauf, dass nur der Stiel des Ananaskopfes im Wasser ist, nicht die Blätter.
2. Zahnstocher verwenden (optional): Wenn ihr möchtet, könnt ihr Zahnstocher verwenden, um den Ananaskopf im Wasser zu stabilisieren. Steckt die Zahnstocher einfach rundherum in den Stiel, so dass sie auf dem Rand des Glases aufliegen.
3. An einen hellen Ort stellen: Stellt das Glas mit dem Ananaskopf an einen hellen Ort, aber nicht in direktes Sonnenlicht. Ein Fensterbrett ist ideal.
4. Wasser regelmäßig wechseln: Wechselt das Wasser alle 2-3 Tage, um Fäulnis zu verhindern.
5. Geduld haben: Es kann einige Wochen dauern, bis sich Wurzeln bilden. Habt Geduld und gebt nicht auf! Ich habe meine Ananas etwa 4 Wochen im Wasser gelassen, bis die Wurzeln etwa 2-3 cm lang waren.
Phase 3: Einpflanzen in Erde
Sobald die Wurzeln ausreichend lang sind, können wir die Ananas in Erde einpflanzen.
1. Den Topf vorbereiten: Füllt euren Topf mit Blumenerde. Achtet darauf, dass die Erde gut durchlässig ist.
2. Einpflanzen: Macht ein Loch in die Erde, das groß genug ist, um die Wurzeln der Ananas aufzunehmen. Setzt die Ananas vorsichtig in das Loch und bedeckt die Wurzeln mit Erde.
3. Angießen: Gießt die Ananas nach dem Einpflanzen gut an.
4. An einen warmen, sonnigen Ort stellen: Stellt den Topf an einen warmen, sonnigen Ort. Ananas lieben Wärme und Sonne!
5. Regelmäßig gießen: Gießt die Ananas regelmäßig, aber vermeidet Staunässe. Die Erde sollte immer leicht feucht sein.
Phase 4: Pflege und Geduld
Jetzt heißt es: Pflegen und warten! Ananas brauchen Zeit, um zu wachsen und Früchte zu tragen.
1. Düngen: Düngt die Ananas alle paar Wochen mit einem Flüssigdünger für Zimmerpflanzen.
2. Drehen: Dreht den Topf regelmäßig, damit die Ananas gleichmäßig Licht bekommt.
3. Auf Schädlinge achten: Achtet auf Schädlinge wie Spinnmilben oder Wollläuse. Wenn ihr Schädlinge entdeckt, behandelt die Ananas mit einem geeigneten Mittel.
4. Geduld haben: Es kann 2-3 Jahre dauern, bis eure Ananas Früchte trägt. Aber es lohnt sich!
Zusätzliche Tipps für eine erfolgreiche Ananaszucht
* Die richtige Temperatur: Ananas lieben Wärme. Die ideale Temperatur liegt zwischen 20 und 30 Grad Celsius.
* Luftfeuchtigkeit: Ananas mögen eine hohe Luftfeuchtigkeit. Ihr könnt die Luftfeuchtigkeit erhöhen, indem ihr die Ananas regelmäßig mit Wasser besprüht oder den Topf auf einen Untersetzer mit Wasser und Kieselsteinen stellt.
* Winterruhe: Im Winter kann die Ananas eine Ruhephase einlegen. Reduziert in dieser Zeit das Gießen und Düngen.
* Blütenbildung anregen: Um die Blütenbildung anzuregen, könnt ihr die Ananas mit Ethylen behandeln. Das geht ganz einfach, indem ihr einen Apfel in eine Plastiktüte zusammen mit der Ananas steckt und die Tüte verschließt. Der Apfel gibt Ethylen ab, was die Blütenbildung anregen kann. Lasst die Tüte ein paar Tage geschlossen.
Häufige Probleme und Lösungen
* Gelbe Blätter: Gelbe Blätter können ein Zeichen für Überwässerung oder Nährstoffmangel sein. Überprüft die Bewässerung und düngt die Ananas gegebenenfalls.
* Braune Blattspitzen: Braune Blattspitzen können ein Zeichen für zu trockene Luft sein. Besprüht die Ananas regelmäßig mit Wasser.
* Keine Fruchtbildung: Wie bereits erwähnt, kann es lange dauern, bis eine Ananas Früchte trägt. Geduld ist hier der Schlüssel. Wenn ihr die Blütenbildung anregen möchtet, könnt ihr die Ethylen-Methode ausprobieren.
Ich hoffe, dieser Guide hilft euch dabei, eure eigenen Ananas zu Hause anzubauen. Es ist ein tolles Gefühl, seine eigenen tropischen Früchte zu ernten! Viel Erfolg und viel Spaß beim Gärtnern!

Conclusion
So, there you have it! Growing pineapples at home, while it might seem like a tropical dream reserved for professional farmers, is surprisingly achievable with a little patience and the right approach. This DIY trick isn’t just about saving money on store-bought fruit; it’s about experiencing the unique satisfaction of nurturing a plant from a simple pineapple top to a thriving, fruit-bearing specimen. It’s a testament to the power of nature and a rewarding project for gardeners of all levels.
Why is this a must-try? Because beyond the delicious, homegrown pineapple you’ll eventually harvest, you’ll gain a deeper appreciation for the plant life cycle and the effort that goes into producing the food we often take for granted. It’s an educational experience for kids, a relaxing hobby for adults, and a conversation starter for anyone who visits your home and sees your impressive pineapple plant. Plus, the taste of a homegrown pineapple, ripened to perfection under your care, is simply unparalleled. It’s sweeter, juicier, and bursting with flavor in a way that store-bought pineapples often can’t match.
But the fun doesn’t stop there! Consider these variations to personalize your pineapple-growing journey:
* Experiment with different pineapple varieties: While the Smooth Cayenne is a popular choice, explore other varieties like the MD-2 or even ornamental pineapples for a unique twist.
* Get creative with your containers: While a standard pot works well, consider using repurposed containers like old buckets or even a raised garden bed for a larger-scale project.
* Try hydroponics: For a more advanced approach, explore growing your pineapple hydroponically, which can accelerate growth and reduce the risk of soilborne diseases.
* Pineapple Companion Planting: Consider planting companion plants like marigolds or basil around your pineapple to deter pests and attract beneficial insects.
Ultimately, the success of your pineapple-growing adventure hinges on your willingness to experiment, learn, and adapt to the specific conditions in your environment. Don’t be afraid to make mistakes – they’re all part of the learning process. The key is to provide your pineapple with plenty of sunlight, well-draining soil, and consistent moisture, while protecting it from frost and extreme temperatures.
We wholeheartedly encourage you to try this DIY trick and embark on your own pineapple-growing journey. It’s a rewarding experience that will bring a touch of the tropics to your home and garden. And most importantly, don’t forget to share your experiences with us! We’d love to hear about your successes, challenges, and any tips or tricks you discover along the way. Share your photos and stories on social media using #HomeGrownPineapple and let’s create a community of pineapple enthusiasts! Growing pineapples at home is easier than you think, and the rewards are well worth the effort. So, grab a pineapple, get your hands dirty, and prepare to enjoy the sweet taste of success!
Frequently Asked Questions (FAQ)
How long does it take to grow a pineapple from a top?
The time it takes to grow a pineapple from a top can vary depending on several factors, including the variety of pineapple, the climate, and the growing conditions. Generally, it takes anywhere from 2 to 3 years for a pineapple plant grown from a top to produce its first fruit. The first few months are crucial for root development, followed by vegetative growth. Once the plant is mature enough, it will eventually flower and produce a pineapple. Patience is key!
What kind of soil is best for growing pineapples?
Pineapples thrive in well-draining, slightly acidic soil. A sandy loam soil is ideal, as it allows for good drainage and aeration. You can create a suitable soil mix by combining equal parts of potting soil, perlite, and sand. Avoid heavy clay soils, as they can retain too much moisture and lead to root rot. Adding organic matter, such as compost or well-rotted manure, can also improve soil fertility and drainage. The pH level of the soil should ideally be between 5.5 and 6.5.
How much sunlight do pineapples need?
Pineapples are sun-loving plants and require at least 6 to 8 hours of direct sunlight per day to thrive. If you’re growing your pineapple indoors, place it near a sunny window or supplement with artificial grow lights. Insufficient sunlight can lead to stunted growth and reduced fruit production. When growing outdoors, choose a location that receives full sun throughout the day.
How often should I water my pineapple plant?
Water your pineapple plant regularly, especially during the growing season (spring and summer). Keep the soil consistently moist, but avoid overwatering, which can lead to root rot. Allow the top inch of soil to dry out between waterings. In the fall and winter, reduce watering frequency as the plant’s growth slows down. A good rule of thumb is to water thoroughly when the soil feels dry to the touch.
How do I fertilize my pineapple plant?
Pineapples are heavy feeders and benefit from regular fertilization. Use a balanced fertilizer (e.g., 10-10-10) diluted to half strength every 2 to 3 months during the growing season. You can also use a fertilizer specifically formulated for bromeliads, as they have similar nutrient requirements. Avoid over-fertilizing, as this can damage the plant. Foliar feeding with a diluted liquid fertilizer can also be beneficial.
How do I protect my pineapple plant from frost?
Pineapples are sensitive to frost and can be damaged or killed by freezing temperatures. If you live in an area with cold winters, it’s essential to protect your pineapple plant from frost. If your pineapple is in a pot, bring it indoors before the first frost. If it’s planted in the ground, cover it with a frost blanket or burlap sack to insulate it from the cold. You can also build a temporary shelter around the plant using stakes and plastic sheeting.
How do I know when my pineapple is ripe?
Determining when a pineapple is ripe can be tricky, but there are several indicators to look for. The pineapple should have a vibrant golden-yellow color, and the eyes (the individual segments of the fruit) should be relatively flat. The pineapple should also have a sweet, fragrant aroma. Gently tug on one of the leaves near the top of the pineapple; if it comes off easily, the pineapple is likely ripe. You can also tap the pineapple; a ripe pineapple will have a dull, solid sound.
My pineapple plant is flowering, what do I do?
Congratulations! Your pineapple plant is about to produce fruit. Once your pineapple plant starts flowering, continue to provide it with plenty of sunlight, water, and fertilizer. Avoid disturbing the plant during this critical stage. It will take several months for the pineapple to develop and ripen after flowering. Be patient and continue to provide the plant with optimal growing conditions.
What are some common pests and diseases that affect pineapple plants?
Pineapple plants can be susceptible to various pests and diseases, including mealybugs, scale insects, spider mites, and root rot. Regularly inspect your plant for signs of infestation or disease. Mealybugs and scale insects can be treated with insecticidal soap or neem oil. Spider mites can be controlled with a strong spray of water or miticide. Root rot is caused by overwatering and can be prevented by ensuring good drainage.
Can I grow a pineapple indoors?
Yes, you can grow a pineapple indoors, but it requires providing the plant with the right conditions. Ensure that your pineapple plant receives at least 6 to 8 hours of direct sunlight per day, either from a sunny window or artificial grow lights. Use a well-draining potting mix and water regularly, allowing the top inch of soil to dry out between waterings. Fertilize every 2 to 3 months during the growing season. Maintain a warm temperature and avoid exposing the plant to drafts. While indoor-grown pineapples may not be as large or flavorful as those grown outdoors, they can still be a rewarding and decorative addition to your home.
Leave a Comment