
Growing Okra in Containers might seem like a challenge, but trust me, it’s totally achievable and incredibly rewarding! Have you ever dreamt of stepping outside your door and harvesting fresh, vibrant okra right from your patio? Well, dream no more! This guide is packed with simple, effective DIY tricks and hacks that will transform your container garden into an okra oasis.
Okra, also known as “lady’s fingers,” has a rich history, tracing back to ancient Ethiopia and Egypt. It gradually made its way across the globe, becoming a staple in Southern American cuisine and various culinary traditions worldwide. For generations, okra has been celebrated for its unique flavor and nutritional benefits.
But why bother with growing okra in containers? Well, not everyone has access to a sprawling backyard. Container gardening allows even apartment dwellers and those with limited space to enjoy the satisfaction of growing their own food. Plus, it gives you complete control over the growing environment, protecting your precious okra from pests and diseases. Imagine the joy of serving up a delicious gumbo or fried okra, knowing that you nurtured those pods from tiny seedlings to harvest-ready perfection. Let’s dive in and unlock the secrets to successful container okra gardening!
Growing Okra in Containers: A Beginner’s Guide
Okra, also known as lady’s fingers, is a warm-season vegetable that’s surprisingly easy to grow in containers. I’ve had great success growing okra on my patio, and I’m excited to share my tips and tricks with you! This guide will walk you through everything you need to know, from choosing the right container to harvesting your delicious okra pods.
Choosing the Right Container and Soil
Before we get our hands dirty, let’s talk about the essentials: the container and the soil. These are crucial for a happy and productive okra plant.
* Container Size: Okra plants have deep taproots, so you’ll need a fairly large container. I recommend a pot that’s at least 12 inches in diameter and 12 inches deep. A 5-gallon container is a good starting point, but bigger is generally better. The larger the container, the more room the roots have to grow, and the more stable the plant will be.
* Material: You can use plastic, terracotta, or even fabric pots. Plastic pots retain moisture better, which can be helpful in hot climates. Terracotta pots are more breathable, which can prevent root rot. Fabric pots are also a good option, as they allow for excellent drainage and aeration.
* Drainage: This is non-negotiable! Make sure your container has plenty of drainage holes. Okra doesn’t like soggy roots. If your pot doesn’t have enough drainage, you can drill some extra holes in the bottom.
* Soil: Use a high-quality potting mix that’s well-draining and rich in organic matter. Avoid using garden soil, as it can become compacted in containers and doesn’t drain well. I like to amend my potting mix with compost or aged manure to give my okra plants an extra boost. You can also add some perlite or vermiculite to improve drainage.
Planting Your Okra Seeds
Now for the fun part: planting! Okra is best started directly in the container, as it doesn’t transplant well.
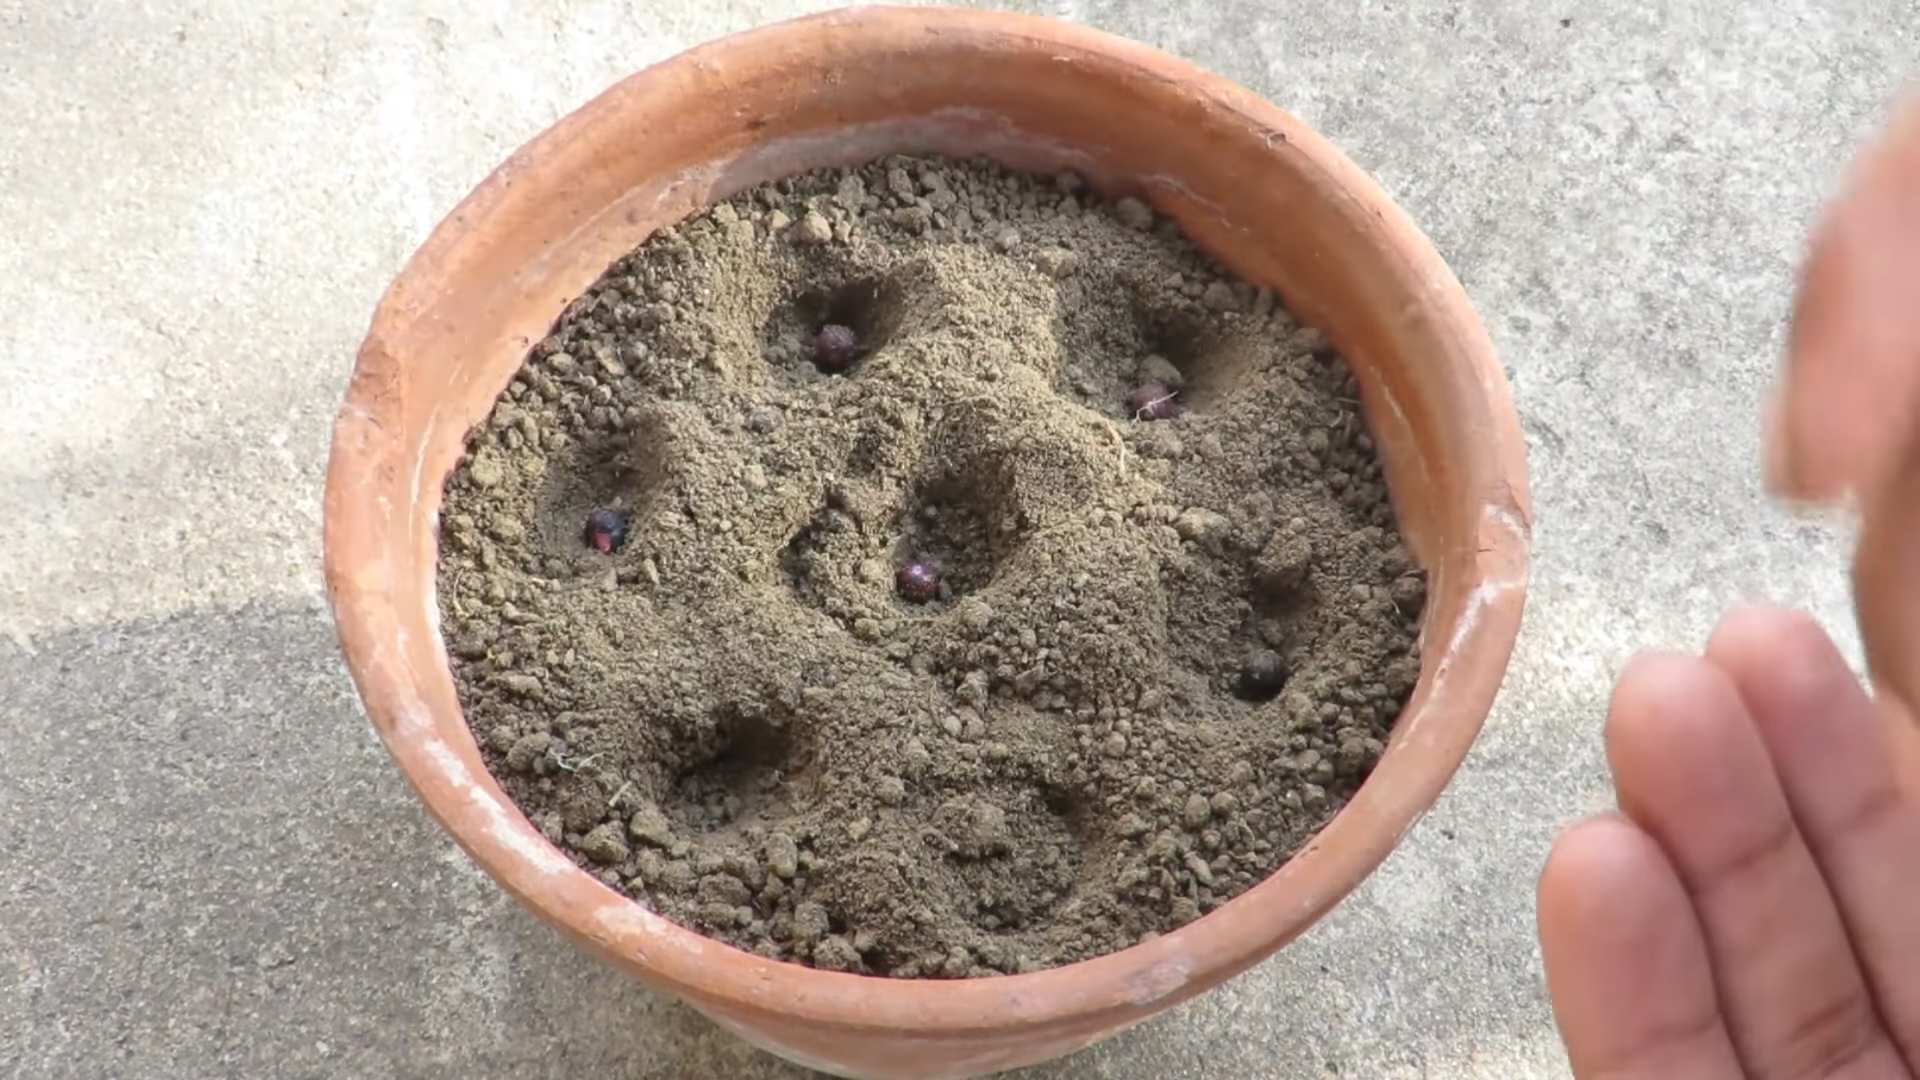
1. Soaking the Seeds: To speed up germination, I like to soak my okra seeds in warm water for 12-24 hours before planting. This softens the seed coat and helps the seedlings emerge more quickly.
2. Filling the Container: Fill your container with your chosen potting mix, leaving about an inch or two of space at the top.
3. Planting the Seeds: Make small holes about 1/2 inch deep and 2-3 inches apart. Place 2-3 seeds in each hole. Planting multiple seeds ensures that at least one will germinate.
4. Covering the Seeds: Gently cover the seeds with soil and water thoroughly.
5. Placement: Place the container in a warm, sunny location. Okra needs at least 6-8 hours of sunlight per day.
6. Watering: Keep the soil consistently moist, but not soggy. Check the soil moisture regularly and water when the top inch feels dry.
7. Thinning Seedlings: Once the seedlings emerge (usually within 7-14 days), thin them to one plant per hole. Choose the strongest, healthiest-looking seedling and snip off the others at the soil line.
Caring for Your Okra Plants
Once your okra plants are established, it’s important to provide them with the care they need to thrive.
* Watering: Okra needs consistent watering, especially during hot, dry weather. Water deeply whenever the top inch of soil feels dry. Avoid overhead watering, as this can lead to fungal diseases.
* Fertilizing: Okra is a heavy feeder, so you’ll need to fertilize it regularly. I like to use a balanced liquid fertilizer every 2-3 weeks. You can also side-dress the plants with compost or aged manure. Look for a fertilizer with a higher phosphorus content to encourage flowering and pod production.
* Mulching: Mulching around the base of the plants helps to retain moisture, suppress weeds, and regulate soil temperature. I like to use straw, wood chips, or shredded leaves as mulch.
* Pruning: Okra plants can get quite tall, so you may need to prune them to keep them manageable. You can prune off the lower leaves as they start to yellow or brown. This will improve air circulation and prevent fungal diseases.
* Pest Control: Okra can be susceptible to pests such as aphids, spider mites, and flea beetles. Inspect your plants regularly for signs of infestation. You can control these pests with insecticidal soap, neem oil, or by hand-picking them off the plants.
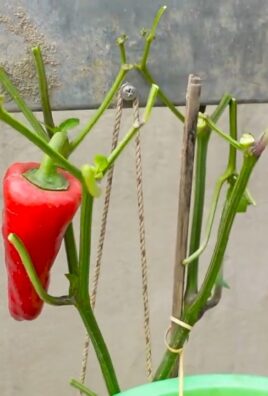
* Supporting the Plants: As your okra plants grow taller, they may need some support. You can use stakes, trellises, or cages to keep them from falling over. This is especially important in windy areas.
Harvesting Your Okra Pods
Harvesting okra at the right time is crucial for getting tender, delicious pods.
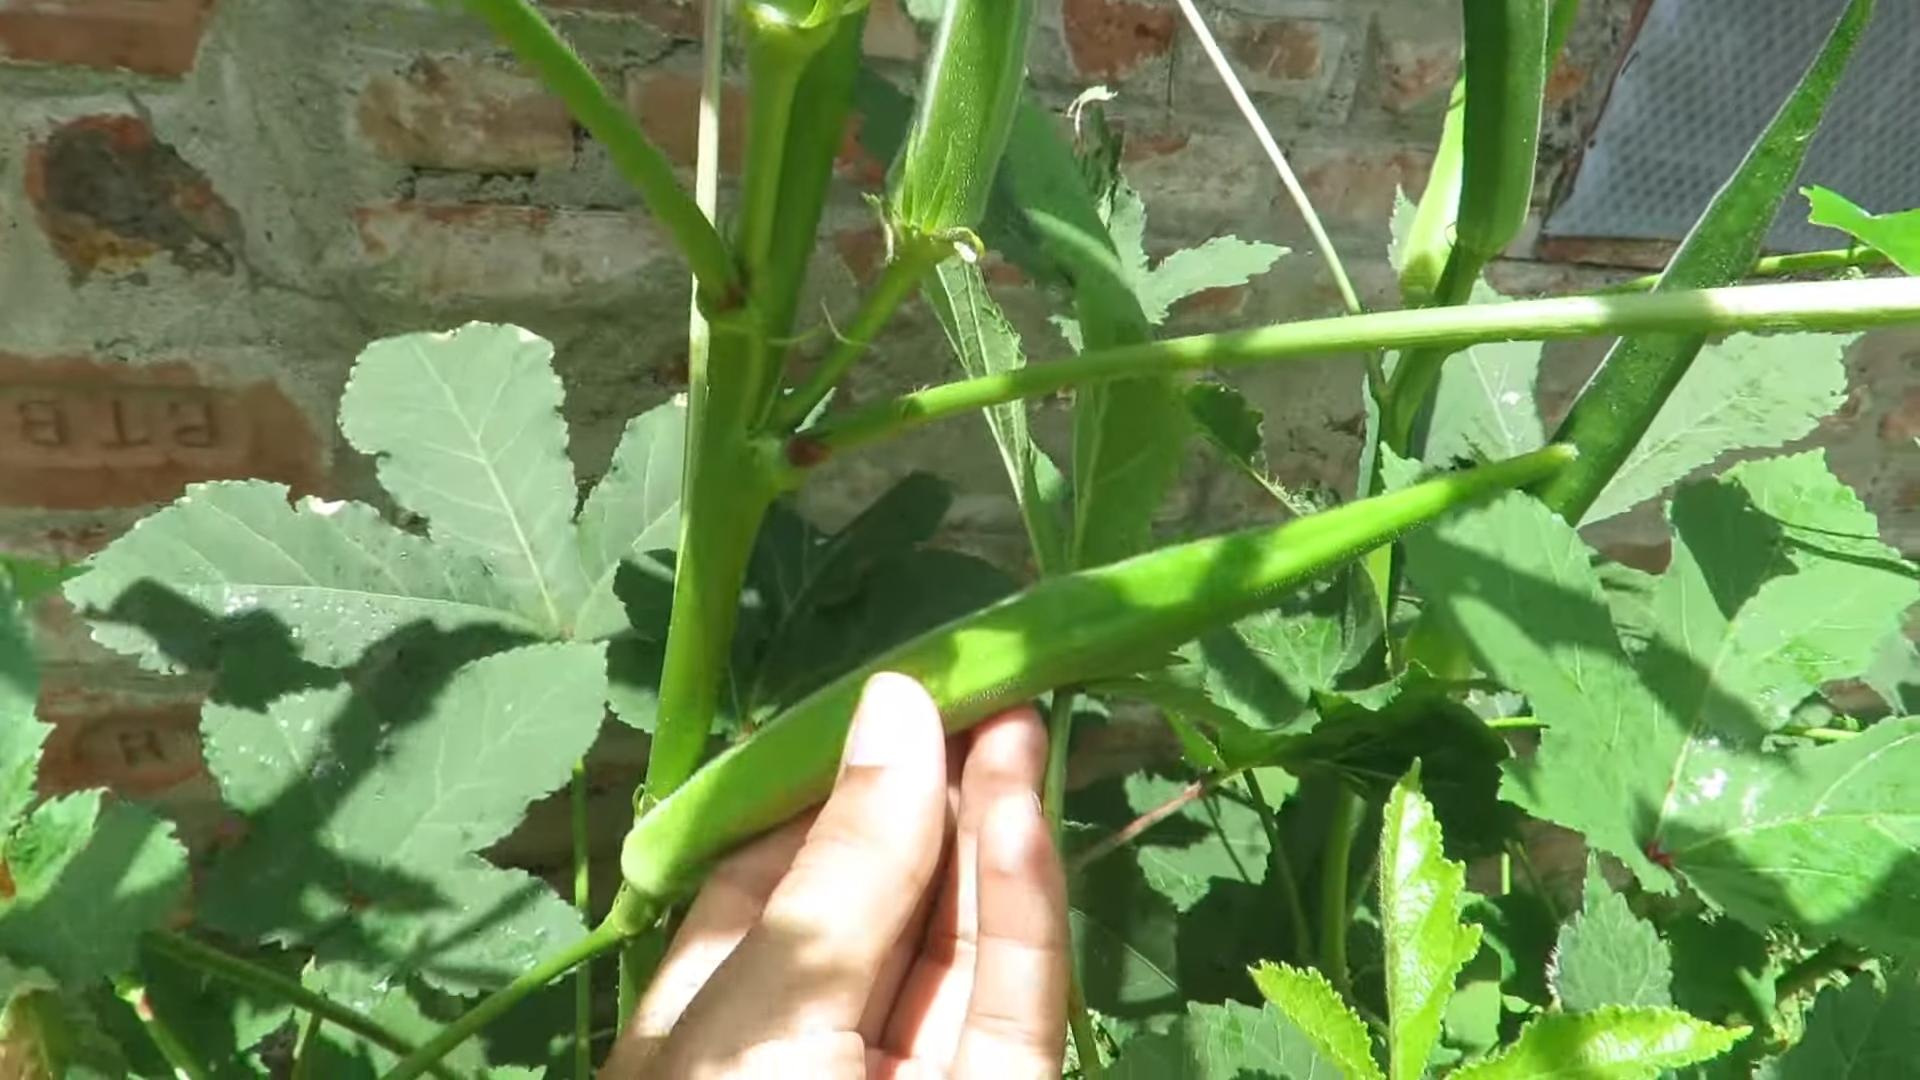
1. Timing: Okra pods are ready to harvest about 50-60 days after planting. The ideal time to harvest is when the pods are 2-4 inches long. If you let them grow too large, they’ll become tough and fibrous.
2. Frequency: Okra plants produce pods quickly, so you’ll need to harvest them every 1-2 days. This will also encourage the plant to produce more pods.
3. Method: Use a sharp knife or pruning shears to cut the pods from the plant. Be careful not to damage the plant. Wear gloves when harvesting okra, as the pods can be prickly.
4. Handling: Handle the pods gently to avoid bruising them. Store them in the refrigerator for up to a week.
Troubleshooting Common Problems
Even with the best care, you may encounter some problems when growing okra in containers. Here are some common issues and how to address them:
* Yellowing Leaves: This can be caused by overwatering, underwatering, nutrient deficiencies, or pests. Check the soil moisture and adjust your watering accordingly. Fertilize the plants with a balanced fertilizer. Inspect the plants for pests and treat them as needed.
* Lack of Flowers: This can be caused by insufficient sunlight, over-fertilizing with nitrogen, or extreme temperatures. Make sure your plants are getting at least 6-8 hours of sunlight per day. Use a fertilizer with a higher phosphorus content. Protect the plants from extreme temperatures.
* Small Pods: This can be caused by insufficient watering, nutrient deficiencies, or pests. Water the plants deeply and regularly. Fertilize the plants with a balanced fertilizer. Inspect the plants for pests and treat them as needed.
* Tough Pods: This is usually caused by harvesting the pods too late. Harvest the pods when they are 2-4 inches long.
Choosing Okra Varieties for Containers
While most okra varieties can be grown in containers, some are better suited than others. Look for compact or dwarf varieties that won’t get too large. Here are a few of my favorites:
* ‘Baby Bubba’: This is a dwarf variety that only grows to about 3-4 feet tall. It produces small, tender pods.
* ‘Cajun Jewel’: This variety is known for its early maturity and high yields. It produces dark green pods.
* ‘Clemson Spineless’: This is a classic okra variety that’s easy to grow and produces spineless pods.
* ‘Emerald’: This variety produces smooth, dark green pods that are tender and flavorful.
Extending the Growing Season
If you live in a cooler climate, you can extend the okra growing season by starting the seeds indoors or using row covers.
* Starting Seeds Indoors: Start the seeds indoors 4-6 weeks before the last expected frost. Use a seed-starting mix and keep the soil moist. Transplant the seedlings into containers after the last frost.
* Using Row Covers: Row covers can protect the plants from frost and cold temperatures. They can also help to keep pests away.
Enjoying Your Harvest
Once you’ve harvested your okra pods, there are many ways to enjoy them. You can fry them, grill them, roast them, or add them to soups and stews. Okra is a versatile vegetable that’s packed with nutrients.
I hope this guide has inspired you to grow your own okra in containers. It’s a rewarding experience that will provide you with fresh, delicious vegetables all summer long. Happy gardening!
Conclusion
So, there you have it! Growing okra in containers isn’t just a possibility; it’s a surprisingly rewarding and accessible gardening adventure, even if you’re short on space or new to the world of gardening. We’ve walked through the essential steps, from selecting the right container and soil to nurturing your okra plants with sunlight, water, and the occasional boost of fertilizer. But why should you actually *do* it?
The answer is multifaceted. First, the sheer convenience of having fresh okra readily available right outside your door (or on your balcony!) is unparalleled. Imagine whipping up a batch of gumbo or a quick side of fried okra with ingredients you’ve grown yourself. The flavor is noticeably fresher and more vibrant than anything you’ll find at the grocery store.
Second, growing okra in containers offers a level of control you simply don’t have with in-ground gardening. You can easily move your plants to chase the sun, protect them from unexpected frost, and monitor their health more closely. This is particularly beneficial for those living in areas with unpredictable weather patterns or less-than-ideal soil conditions.
Third, and perhaps most importantly, it’s incredibly satisfying. There’s something deeply fulfilling about nurturing a plant from seed to harvest, witnessing its growth, and enjoying the fruits (or, in this case, the pods!) of your labor. It’s a tangible connection to nature that can be incredibly grounding and therapeutic.
But don’t stop there! Feel free to experiment with different okra varieties. Clemson Spineless is a classic choice, but why not try Burgundy okra for its beautiful red pods or Emerald okra for its exceptionally smooth texture? You can also explore companion planting by adding herbs like basil or thyme to your container to deter pests and enhance the flavor of your okra. Consider adding marigolds to your container to help deter nematodes.
And speaking of pests, keep a watchful eye out for common okra problems like aphids or spider mites. A simple solution of insecticidal soap or neem oil can usually take care of these issues without resorting to harsh chemicals. Regular inspection is key to catching problems early and preventing them from becoming major headaches.
Growing okra in containers is a must-try for any gardener, regardless of experience level. It’s a simple, rewarding, and delicious way to bring a touch of the South to your own backyard (or balcony!).
We wholeheartedly encourage you to give this DIY trick a try. Don’t be afraid to get your hands dirty, experiment with different techniques, and learn from your mistakes. Gardening is a journey, not a destination, and every plant you grow is a valuable learning experience.
Once you’ve harvested your first batch of homegrown okra, we’d love to hear about your experience! Share your photos, tips, and recipes in the comments below. Let’s build a community of container okra growers and inspire others to discover the joys of homegrown goodness. Happy gardening!
Frequently Asked Questions (FAQ)
What size container is best for growing okra?
The ideal container size for growing okra is at least 10-15 gallons. Okra plants have deep taproots, and a larger container provides ample space for the roots to develop properly. A smaller container may restrict root growth, leading to stunted plants and reduced yields. Consider using a container that is at least 12-18 inches in diameter and depth. Fabric pots are also a great option as they allow for better aeration and drainage.
What type of soil should I use for growing okra in containers?
Use a well-draining potting mix specifically formulated for containers. Avoid using garden soil, as it can become compacted in containers and hinder drainage. A good potting mix should contain a blend of peat moss, perlite, and vermiculite. You can also amend the potting mix with compost or aged manure to provide additional nutrients. Ensure the soil pH is between 6.0 and 7.0 for optimal okra growth.
How often should I water my okra plants in containers?
Water your okra plants deeply and regularly, especially during hot and dry weather. Check the soil moisture level daily by sticking your finger about an inch into the soil. If the soil feels dry, it’s time to water. Water until excess water drains out of the bottom of the container. Avoid overwatering, as this can lead to root rot. Mulching around the base of the plants can help retain moisture and reduce the frequency of watering.
How much sunlight do okra plants need?
Okra plants require at least 6-8 hours of direct sunlight per day to thrive. Choose a location for your container that receives plenty of sunlight throughout the day. If you live in a particularly hot climate, you may need to provide some afternoon shade to prevent the plants from overheating. If you don’t have a sunny spot, consider using grow lights to supplement the natural sunlight.
When should I fertilize my okra plants?
Fertilize your okra plants every 2-3 weeks with a balanced fertilizer, such as a 10-10-10 or 14-14-14 formula. You can also use a liquid fertilizer diluted according to the package instructions. Avoid over-fertilizing, as this can lead to excessive foliage growth at the expense of pod production. Side-dressing with compost or aged manure can also provide a slow-release source of nutrients.
How do I harvest okra pods?
Harvest okra pods when they are 2-4 inches long and still tender. Use a sharp knife or pruning shears to cut the pods from the plant. Harvest regularly, every 1-2 days, to encourage continued production. Overripe pods become tough and fibrous. Wear gloves when harvesting okra, as the pods can be prickly and irritating to the skin.
What are some common pests and diseases that affect okra plants?
Common pests that affect okra plants include aphids, spider mites, and flea beetles. These pests can be controlled with insecticidal soap, neem oil, or horticultural oil. Diseases that can affect okra plants include powdery mildew and root rot. Powdery mildew can be treated with a fungicide, while root rot can be prevented by ensuring proper drainage and avoiding overwatering. Regularly inspect your plants for signs of pests or diseases and take action promptly.
Can I grow okra from seed directly in the container?
Yes, you can directly sow okra seeds in the container. Sow the seeds about 1/2 inch deep and 2-3 inches apart. Keep the soil moist until the seeds germinate, which usually takes 7-14 days. Once the seedlings emerge, thin them to one plant per container. Starting okra from seed directly in the container eliminates the need for transplanting, which can sometimes stress the plants.
How do I prevent okra plants from getting too tall?
Okra plants can grow quite tall, sometimes reaching 6-8 feet in height. To prevent them from getting too tall, you can pinch back the growing tip of the plant when it reaches about 3-4 feet tall. This will encourage the plant to branch out and produce more pods. You can also choose a shorter okra variety, such as Dwarf Green Long Pod, which is better suited for container gardening.
Can I overwinter my okra plants?
Okra is a warm-season annual and typically does not survive frost. In colder climates, you will need to replant okra each year. However, in warmer climates, you may be able to overwinter your okra plants by providing protection from frost and cold temperatures. Cut back the plants to about 12 inches tall and move the container to a sheltered location. Water sparingly during the winter months and resume regular watering and fertilizing in the spring.
Leave a Comment