
Growing watermelons tips can seem daunting, but trust me, with a few clever tricks, you can be harvesting your own juicy, homegrown watermelons before you know it! Imagine biting into a perfectly ripe, sweet watermelon that you nurtured from a tiny seed – that’s the magic we’re unlocking today.
Watermelons have a rich history, dating back thousands of years to Africa, where they were prized for their hydrating properties in arid climates. Over time, they’ve spread across the globe, becoming a symbol of summer and backyard barbecues. But let’s be honest, buying a watermelon from the store can be a gamble. Is it ripe? Is it sweet? Will it be worth the money? That’s where these DIY tips come in!
I’m going to share some simple, yet effective, growing watermelons tips and hacks that will help you overcome common challenges like limited space, pest control, and ensuring proper pollination. Whether you’re a seasoned gardener or just starting out, these tricks will empower you to grow delicious watermelons right in your own backyard. No more disappointing store-bought melons – get ready to enjoy the sweet taste of success!
Wassermelonen selbst anbauen: Mein ultimativer DIY-Guide für eine reiche Ernte
Hallo liebe Gartenfreunde! Ich liebe Wassermelonen, und es gibt nichts Besseres, als eine saftige, selbst angebaute Melone an einem heißen Sommertag zu genießen. Ich habe im Laufe der Jahre viele Erfahrungen gesammelt, und ich möchte euch heute meine besten Tipps und Tricks verraten, damit auch ihr erfolgreich Wassermelonen anbauen könnt. Lasst uns gemeinsam loslegen!
Die Grundlagen: Was Wassermelonen zum Wachsen brauchen
Bevor wir ins Detail gehen, ist es wichtig zu verstehen, was Wassermelonen wirklich brauchen, um zu gedeihen. Hier eine kurze Übersicht:
* Sonne: Wassermelonen sind Sonnenanbeter! Sie brauchen mindestens 6-8 Stunden direkte Sonneneinstrahlung pro Tag.
* Wärme: Wassermelonen lieben warmes Wetter. Die Bodentemperatur sollte mindestens 18°C betragen, idealerweise sogar über 21°C.
* Guter Boden: Der Boden sollte gut durchlässig, locker und reich an organischen Stoffen sein.
* Ausreichend Wasser: Wassermelonen brauchen viel Wasser, besonders während der Fruchtbildung.
* Platz: Wassermelonenpflanzen brauchen viel Platz, da ihre Ranken sich weit ausbreiten.
Schritt-für-Schritt-Anleitung: Wassermelonen anbauen
Hier ist meine detaillierte Anleitung, wie ihr Wassermelonen erfolgreich anbauen könnt:
1. Die richtige Sorte auswählen
Es gibt unzählige Wassermelonensorten, und die Wahl der richtigen Sorte ist entscheidend für den Erfolg. Berücksichtigt euer Klima, die Größe eures Gartens und eure persönlichen Vorlieben. Hier sind einige beliebte Sorten:
* Sugar Baby: Eine kleine, frühe Sorte, ideal für kleinere Gärten.
* Crimson Sweet: Eine klassische, süße Sorte mit rotem Fruchtfleisch.
* Yellow Doll: Eine Sorte mit gelbem Fruchtfleisch, die besonders süß ist.
* Black Diamond: Eine große, dunkle Sorte mit intensivem Geschmack.
* Mini Love: Eine kernlose Sorte, die perfekt für Kinder ist.
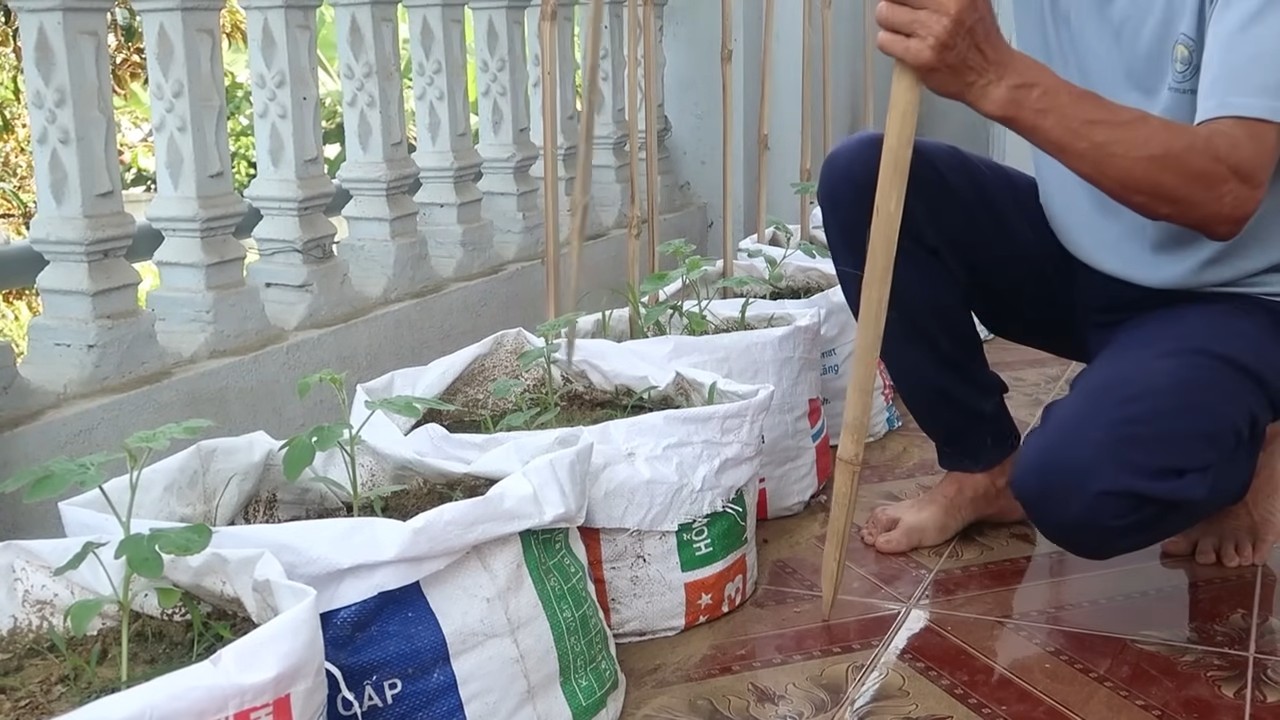
2. Vorkultur oder Direktsaat?
Ihr habt zwei Möglichkeiten: die Vorkultur im Haus oder die Direktsaat im Garten. Ich bevorzuge die Vorkultur, da sie den Pflanzen einen Vorsprung verschafft.
* Vorkultur (ca. 4-6 Wochen vor dem letzten Frost):
1. Füllt kleine Töpfe (ca. 8-10 cm Durchmesser) mit Anzuchterde.
2. Legt 2-3 Samen pro Topf ca. 2 cm tief in die Erde.
3. Gießt die Erde vorsichtig an und stellt die Töpfe an einen warmen, hellen Ort (z.B. auf eine Fensterbank oder in ein Gewächshaus).
4. Haltet die Erde feucht, aber nicht nass.
5. Sobald die Sämlinge aufgegangen sind und 2-3 Blätter haben, könnt ihr den schwächsten Sämling pro Topf entfernen.
* Direktsaat (nach dem letzten Frost, wenn die Bodentemperatur mindestens 18°C beträgt):
1. Bereitet den Boden vor (siehe Schritt 3).
2. Sät die Samen ca. 2 cm tief in Gruppen von 2-3 Samen im Abstand von ca. 90-120 cm.
3. Gießt die Erde vorsichtig an.
4. Sobald die Sämlinge aufgegangen sind, könnt ihr den schwächsten Sämling pro Gruppe entfernen.
3. Den Boden vorbereiten
Ein guter Boden ist das A und O für gesunde Wassermelonenpflanzen.
1. Wählt einen sonnigen Standort mit gut durchlässigem Boden.
2. Lockert den Boden gründlich auf und entfernt Unkraut und Steine.
3. Verbessert den Boden mit Kompost oder gut verrottetem Mist. Ich gebe immer eine ordentliche Portion Kompost dazu, das lieben meine Melonen!
4. Ihr könnt auch etwas Langzeitdünger (z.B. Hornspäne) in den Boden einarbeiten.
5. Der pH-Wert des Bodens sollte idealerweise zwischen 6,0 und 6,8 liegen.
4. Die Pflanzen auspflanzen
Wenn die Gefahr von Frost vorüber ist und die Bodentemperatur mindestens 18°C beträgt, könnt ihr die vorgezogenen Pflanzen auspflanzen.
1. Härtet die Pflanzen vor dem Auspflanzen ab, indem ihr sie tagsüber für einige Stunden ins Freie stellt.
2. Grabt Löcher im Abstand von ca. 90-120 cm.
3. Setzt die Pflanzen vorsichtig in die Löcher und achtet darauf, dass der Wurzelballen nicht beschädigt wird.
4. Füllt die Löcher mit Erde und drückt sie leicht an.
5. Gießt die Pflanzen gründlich an.
6. Mulcht den Boden um die Pflanzen herum mit Stroh oder Holzhackschnitzeln, um die Feuchtigkeit zu halten und Unkraut zu unterdrücken.
5. Gießen und Düngen
Wassermelonen brauchen viel Wasser, besonders während der Fruchtbildung.
1. Gießt die Pflanzen regelmäßig, besonders bei trockenem Wetter.
2. Vermeidet es, die Blätter zu gießen, da dies Pilzkrankheiten fördern kann.
3. Gießt am besten früh morgens, damit die Blätter tagsüber abtrocknen können.
4. Düngt die Pflanzen alle 2-3 Wochen mit einem kaliumbetonten Dünger. Ich verwende gerne organischen Flüssigdünger.
5. Sobald die Früchte reifen, reduziert ihr die Wassergabe, um den Zuckergehalt zu erhöhen.
6. Ranken leiten und Früchte schützen
Wassermelonenranken können sich weit ausbreiten.
1. Leitet die Ranken in die gewünschte Richtung, um Platz zu sparen.
2. Ihr könnt die Ranken auch an einem Rankgitter oder Zaun hochleiten.
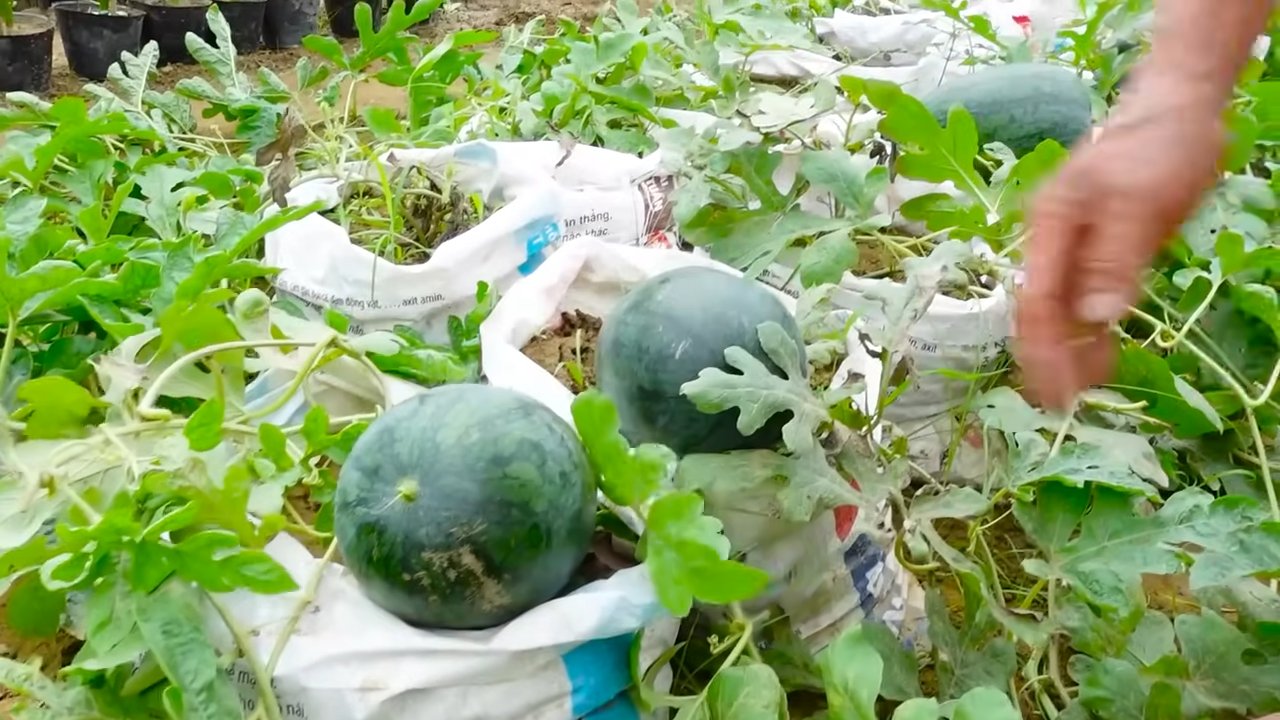
3. Legt die Früchte auf Stroh oder Holzbretter, um sie vor Bodenfeuchtigkeit und Schädlingen zu schützen. Das verhindert auch, dass sie faulen.
7. Schädlinge und Krankheiten
Wassermelonen können von verschiedenen Schädlingen und Krankheiten befallen werden.
* Blattläuse: Bekämpft sie mit einem Wasserstrahl oder mit Nützlingen wie Marienkäfern.
* Gurkenmosaikvirus: Entfernt befallene Pflanzen sofort.
* Echter Mehltau: Spritzt die Pflanzen mit einem Fungizid.
* Schnecken: Sammelt sie ab oder verwendet Schneckenkorn.
8. Die Ernte
Der Zeitpunkt der Ernte ist entscheidend für den Geschmack der Wassermelone.
1. Achtet auf die Reifezeichen:
* Die Ranke, die mit der Frucht verbunden ist, wird trocken und braun.
* Die Stelle, an der die Frucht auf dem Boden liegt, wird gelblich.
* Klopft auf die Frucht: Eine reife Wassermelone klingt hohl.
2. Schneidet die Frucht vorsichtig mit einem scharfen Messer von der Ranke ab.
3. Lasst die Wassermelone noch ein paar Tage an einem kühlen, trockenen Ort nachreifen.
Zusätzliche Tipps für eine erfolgreiche Wassermelonenernte
Hier sind noch ein paar zusätzliche Tipps, die euch helfen werden, eine reiche Wassermelonenernte zu erzielen:
* Bestäubung: Wassermelonen sind auf die Bestäubung durch Bienen angewiesen. Pflanzt bienenfreundliche Blumen in der Nähe eurer Wassermelonenpflanzen, um Bienen anzulocken. Wenn es wenig Bienen gibt, könnt ihr die Blüten auch von Hand bestäuben.
* Beschneiden: Entfernt überflüssige Ranken, um die Energie der Pflanze auf die Fruchtbildung zu konzentrieren.
* Sortenwahl: Wählt Sorten, die für euer Klima geeignet sind.
* Bodenanalyse: Lasst eine Bodenanalyse durchführen, um den Nährstoffgehalt des Bodens zu bestimmen und ihn entsprechend zu düngen.
* Geduld: Wassermelonen brauchen Zeit, um zu reifen.
Conclusion
So, there you have it! Mastering the art of growing watermelons doesn’t have to be a daunting task. By implementing these simple yet effective DIY tricks, you’re setting yourself up for a season of juicy, sweet, and incredibly rewarding harvests. We’ve covered everything from optimizing soil conditions and providing adequate support to warding off pests and ensuring proper pollination. Each tip is designed to maximize your watermelon yield and improve the overall quality of your fruit.
Why is this a must-try? Because store-bought watermelons simply can’t compare to the flavor and satisfaction of enjoying a watermelon you’ve nurtured from seed to table. Plus, you have complete control over the growing process, ensuring your watermelon is free from unwanted chemicals and pesticides. Think of the bragging rights! Imagine serving slices of your homegrown watermelon at your next barbecue – your friends and family will be amazed.
But the beauty of gardening lies in experimentation. Feel free to adapt these tips to your specific climate and growing conditions. For example, if you live in a particularly hot and dry region, consider using shade cloth during the hottest part of the day to prevent sunscald. Or, if you’re short on space, try growing bush-type watermelons in containers. You can even experiment with different varieties of watermelons, from the classic Crimson Sweet to the unique Yellow Doll.
Consider these variations to elevate your watermelon growing game:
* Vertical Growing: If space is a constraint, train your watermelon vines to grow vertically on a trellis. This not only saves space but also improves air circulation, reducing the risk of fungal diseases.
* Companion Planting: Plant basil, marigolds, or nasturtiums near your watermelons to deter pests and attract beneficial insects. These companion plants can create a healthier and more vibrant garden ecosystem.
* Watermelon Tea: Don’t throw away the rinds! Watermelon rind can be used to make a refreshing and hydrating tea. Simply boil the rinds in water with a touch of honey or lemon for a unique and flavorful beverage.
* Grafted Watermelons: For increased disease resistance and vigor, consider grafting your watermelon seedlings onto rootstocks of other cucurbits like squash or gourds. This technique is commonly used by commercial growers to improve yields and reduce the need for pesticides.
We’re confident that these DIY tricks will transform your watermelon growing experience. But the real magic happens when you put them into practice. So, grab your seeds, prepare your soil, and get ready to embark on a watermelon growing adventure!
We’re eager to hear about your experiences. Did you try any of these tips? Did you discover any other helpful tricks along the way? Share your stories, successes, and even your challenges in the comments below. Let’s create a community of watermelon enthusiasts and learn from each other. Your insights could be invaluable to other gardeners who are just starting out.
Remember, growing watermelons is a journey, not a destination. Embrace the process, learn from your mistakes, and most importantly, have fun! With a little patience and these DIY tricks, you’ll be enjoying the sweet taste of homegrown watermelon in no time. So, get out there and start growing! We can’t wait to hear about your watermelon growing success!
Frequently Asked Questions (FAQ)
Q: How much sun do watermelons really need?
A: Watermelons are sun-loving plants and require at least 6-8 hours of direct sunlight per day to thrive. Insufficient sunlight can lead to smaller fruits, reduced sweetness, and increased susceptibility to diseases. Choose a planting location that receives full sun throughout the day. If you live in a particularly hot climate, providing some afternoon shade can help prevent sunscald.
Q: What’s the best soil for growing watermelons?
A: Watermelons prefer well-drained, sandy loam soil with a pH between 6.0 and 6.8. This type of soil allows for good root development and drainage, preventing waterlogging which can lead to root rot. Before planting, amend your soil with compost or well-rotted manure to improve its fertility and drainage. Avoid heavy clay soils, as they tend to retain too much water. If you have clay soil, consider growing your watermelons in raised beds or containers with a well-draining potting mix.
Q: How often should I water my watermelons?
A: Watermelons need consistent watering, especially during fruit development. Water deeply and regularly, aiming for about 1-2 inches of water per week. Avoid overhead watering, as this can promote fungal diseases. Instead, use a soaker hose or drip irrigation to deliver water directly to the roots. Reduce watering as the fruits ripen to concentrate the sugars and improve their sweetness.
Q: How do I know when my watermelon is ripe?
A: Determining watermelon ripeness can be tricky, but here are a few indicators to look for:
* The Tendril: The tendril closest to the watermelon stem should be brown and dry.
* The Ground Spot: The underside of the watermelon, where it rests on the ground, should be a creamy yellow color. A white or pale green ground spot indicates that the watermelon is not yet ripe.
* The Thump: Tap the watermelon with your knuckles. A ripe watermelon will sound hollow and deep. A dull or high-pitched sound indicates that the watermelon is not yet ripe.
* The Weight: Ripe watermelons will feel heavy for their size.
Q: What are some common watermelon pests and diseases, and how can I prevent them?
A: Common watermelon pests include aphids, squash bugs, and cucumber beetles. Diseases include powdery mildew, fusarium wilt, and anthracnose. Here are some preventative measures:
* Crop Rotation: Avoid planting watermelons in the same location year after year to prevent the buildup of soilborne diseases.
* Good Air Circulation: Space your watermelon plants properly to allow for good air circulation, which helps prevent fungal diseases.
* Insecticidal Soap: Use insecticidal soap to control aphids and other soft-bodied insects.
* Neem Oil: Apply neem oil to control a variety of pests and diseases.
* Disease-Resistant Varieties: Choose disease-resistant watermelon varieties to reduce the risk of disease problems.
* Remove Infected Leaves: Promptly remove and dispose of any leaves that show signs of disease.
Q: Can I grow watermelons in containers?
A: Yes, you can grow watermelons in containers, but you’ll need to choose a large container (at least 20 gallons) and select a bush-type or dwarf watermelon variety. Ensure the container has good drainage and use a well-draining potting mix. Provide adequate support for the vines and water regularly. Container-grown watermelons may require more frequent fertilization than those grown in the ground.
Q: How do I pollinate my watermelons if I don’t see any bees?
A: Watermelons require pollination to set fruit. If you don’t see any bees or other pollinators in your garden, you may need to hand-pollinate your watermelons. To hand-pollinate, use a small paintbrush to transfer pollen from the male flowers to the female flowers. Male flowers have a slender stem, while female flowers have a small, immature watermelon at the base. Pollinate in the morning, when the flowers are open and the pollen is fresh.
Q: What can I do with leftover watermelon rinds?
A: Don’t throw away those watermelon rinds! They’re surprisingly versatile. You can pickle them, make watermelon rind preserves, or even blend them into smoothies for added nutrients and hydration. As mentioned earlier, you can also make a refreshing tea by boiling the rinds in water. Get creative and experiment with different recipes to reduce waste and enjoy all parts of the watermelon.
Q: How can I improve the sweetness of my watermelons?
A: Several factors contribute to watermelon sweetness. Ensure your watermelons receive plenty of sunlight, water them consistently during fruit development, and reduce watering as they ripen. Avoid over-fertilizing with nitrogen, as this can promote leafy growth at the expense of fruit sweetness. Consider adding Epsom salts to the soil, as magnesium can help improve sugar production. Finally, harvest your watermelons at the peak of ripeness for the sweetest flavor.

Leave a Comment