
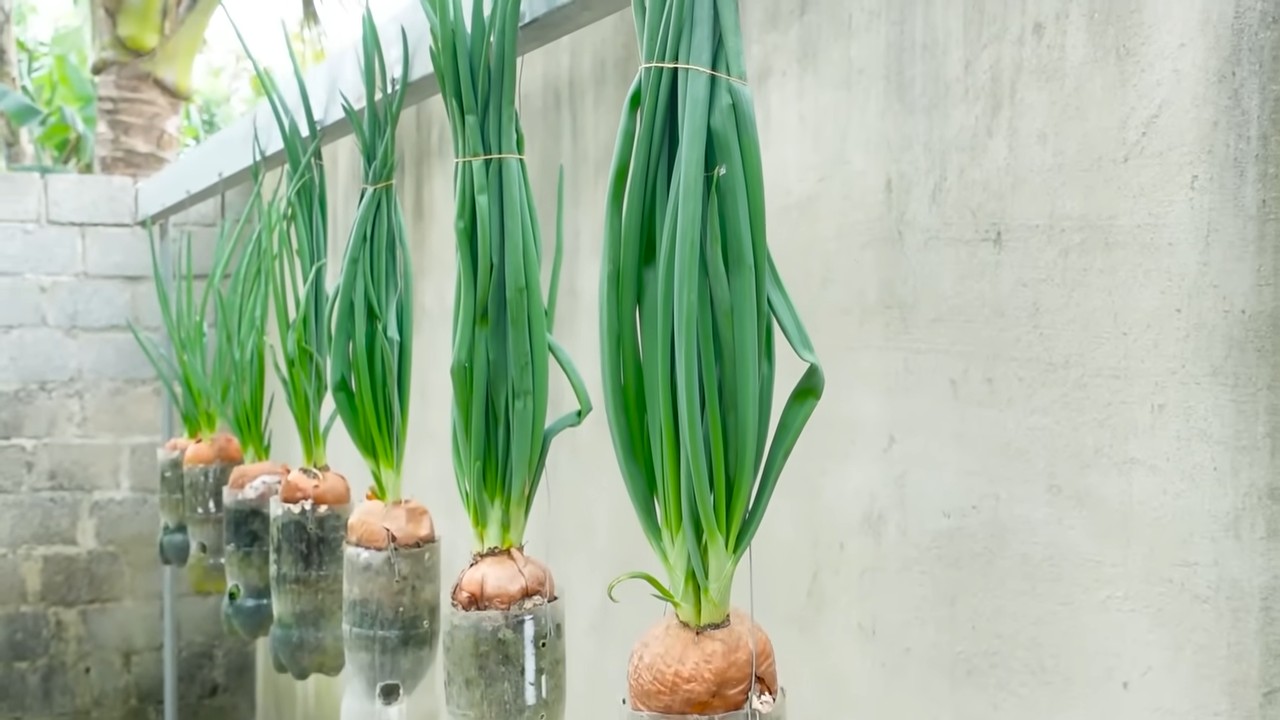
Growing Onions in Bottles: Sounds a little crazy, right? But trust me, this ingenious DIY trick will revolutionize your small-space gardening game! Forget sprawling garden beds; we’re taking onion cultivation vertical, and it’s surprisingly effective. For centuries, humans have cultivated onions, dating back to ancient Egypt where they were even revered as symbols of eternity. Now, we’re bringing this ancient crop into the modern age with a clever twist.
Are you tired of battling garden pests, limited by space, or simply looking for a fun and unique gardening project? Then this DIY guide is for you! Growing Onions in Bottles not only saves space but also offers a protected environment for your precious bulbs, shielding them from soil-borne diseases and hungry critters. I’ve personally found this method incredibly rewarding, yielding surprisingly large and healthy onions even on my tiny balcony. So, ditch the traditional garden plot and let’s explore this innovative and space-saving way to grow your own delicious onions!
Zwiebeln in Flaschen ziehen: Ein DIY-Gartenprojekt für kleine Räume
Hallo liebe Gartenfreunde! Habt ihr auch das Problem, dass ihr zwar Lust auf frische Zwiebeln habt, aber keinen Platz für ein großes Gemüsebeet? Keine Sorge, ich habe die perfekte Lösung für euch: Zwiebeln in Flaschen ziehen! Das ist nicht nur platzsparend, sondern auch ein echter Hingucker und super einfach umzusetzen. Lasst uns gemeinsam loslegen!
Was ihr für dieses Projekt braucht:
* Leere Plastikflaschen (am besten 1,5 oder 2 Liter)
* Ein scharfes Messer oder eine Schere
* Erde (am besten Blumenerde oder Gemüseerde)
* Zwiebeln (am besten Steckzwiebeln oder kleine Speisezwiebeln, die bereits ausgetrieben haben)
* Wasser
* Optional: Dünger (flüssiger Gemüsedünger)
* Optional: Kleine Steine oder Kies für die Drainage
Die Vorbereitung der Flaschen
1. Flaschen reinigen: Zuerst müsst ihr die Plastikflaschen gründlich reinigen. Entfernt alle Etiketten und spült sie mit warmem Wasser und Spülmittel aus. Achtet darauf, dass keine Spülmittelreste zurückbleiben.
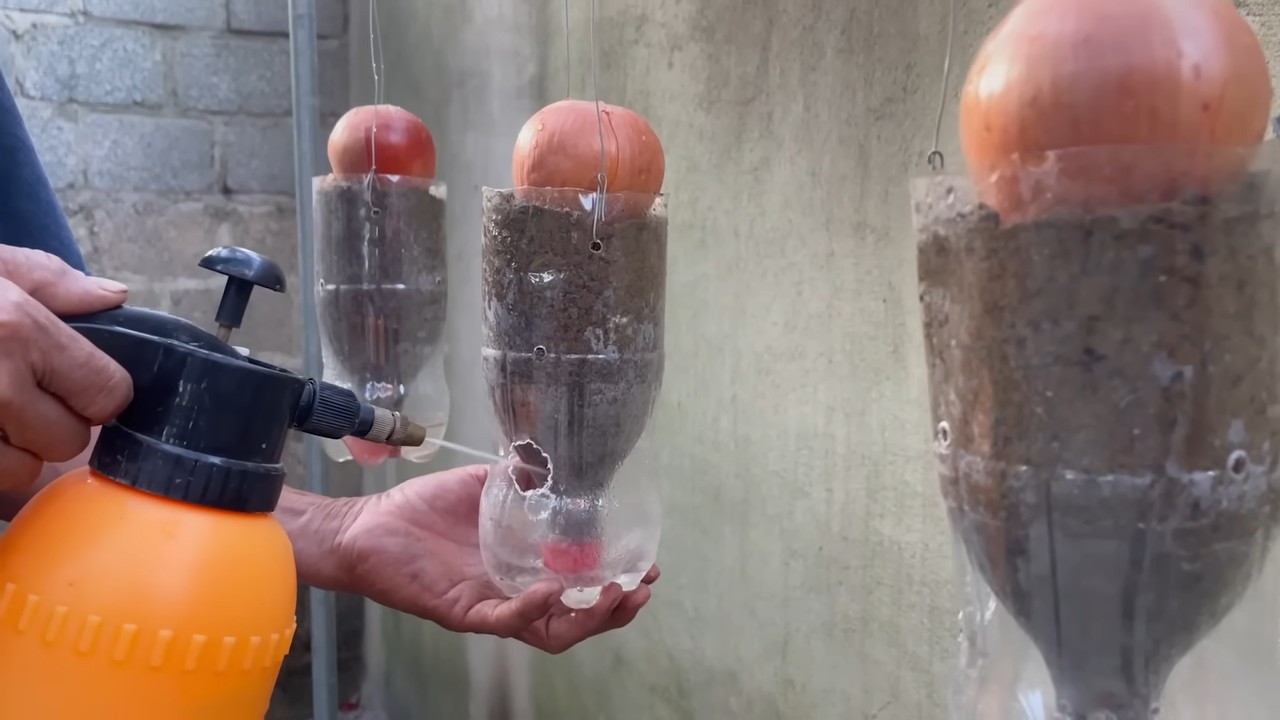
2. Löcher bohren (für die Drainage): Damit das Wasser gut ablaufen kann und eure Zwiebeln nicht in Staunässe stehen, bohrt ihr mit einem Messer oder einer Schere mehrere kleine Löcher in den Boden der Flasche. Achtet darauf, dass die Löcher nicht zu groß sind, damit die Erde nicht herausfällt.
3. Flaschen zuschneiden: Jetzt kommt der knifflige Teil. Ihr müsst die Flaschen so zuschneiden, dass ihr genügend Platz für die Erde und die Zwiebeln habt. Ich empfehle, die Flasche etwa 10-15 cm unterhalb des Flaschenhalses abzuschneiden. So erhaltet ihr einen kleinen Topf. Achtet darauf, dass die Schnittkanten glatt sind, damit ihr euch nicht daran schneidet. Ihr könnt die Kanten auch mit Klebeband abkleben, um sie zu entschärfen.
Das Bepflanzen der Flaschen
1. Drainage einfüllen (optional): Wenn ihr möchtet, könnt ihr eine Schicht kleine Steine oder Kies auf den Boden der Flasche geben. Das sorgt für eine bessere Drainage und verhindert Staunässe.
2. Erde einfüllen: Füllt die Flasche mit Erde. Lasst etwa 2-3 cm Platz bis zum Rand, damit ihr beim Gießen nicht gleich alles überschwemmt. Drückt die Erde leicht an.
3. Zwiebeln einsetzen: Nun könnt ihr die Zwiebeln einsetzen. Achtet darauf, dass die Zwiebeln nicht zu tief in der Erde stecken. Die Spitze der Zwiebel sollte noch aus der Erde herausschauen. Wenn ihr Steckzwiebeln verwendet, könnt ihr mehrere Zwiebeln in eine Flasche pflanzen. Bei größeren Speisezwiebeln empfehle ich, nur eine Zwiebel pro Flasche zu verwenden.
4. Angießen: Gießt die Zwiebeln vorsichtig an. Achtet darauf, dass die Erde gut durchfeuchtet ist, aber nicht zu nass.
Die Pflege der Zwiebeln
1. Standort wählen: Zwiebeln brauchen viel Sonne, um gut zu wachsen. Stellt die Flaschen an einen sonnigen Standort, zum Beispiel auf den Balkon, die Terrasse oder ans Fensterbrett.
2. Gießen: Gießt die Zwiebeln regelmäßig, aber nicht zu viel. Die Erde sollte immer leicht feucht sein, aber nicht nass. Achtet darauf, dass das Wasser gut ablaufen kann, damit keine Staunässe entsteht.
3. Düngen (optional): Wenn ihr möchtet, könnt ihr die Zwiebeln regelmäßig düngen. Verwendet dafür einen flüssigen Gemüsedünger und haltet euch an die Dosierungsanleitung auf der Verpackung.
4. Beobachten: Beobachtet eure Zwiebeln regelmäßig. Achtet auf Schädlinge oder Krankheiten. Wenn ihr etwas Ungewöhnliches entdeckt, solltet ihr schnell handeln.
Erntezeit!
Die Erntezeit hängt von der Zwiebelsorte und den Wachstumsbedingungen ab. In der Regel könnt ihr die Zwiebeln ernten, wenn das Laub gelb wird und umknickt. Zieht die Zwiebeln vorsichtig aus der Erde und lasst sie an einem trockenen Ort trocknen, bevor ihr sie verwendet.
Tipps und Tricks
* Verschiedene Zwiebelsorten: Probiert verschiedene Zwiebelsorten aus, um herauszufinden, welche euch am besten schmecken und am besten in Flaschen wachsen.
* Kräuter dazu pflanzen: Ihr könnt auch Kräuter wie Schnittlauch oder Petersilie zusammen mit den Zwiebeln in die Flasche pflanzen. Das spart Platz und sieht hübsch aus.
* Flaschen dekorieren: Bemalt die Flaschen mit bunten Farben oder beklebt sie mit Mustern. So werden sie zu einem echten Hingucker auf eurem Balkon oder eurer Terrasse.
* Upcycling: Verwendet alte Plastikflaschen, um Ressourcen zu schonen und die Umwelt zu entlasten.
* Zwiebeln aus dem Supermarkt: Wenn ihr keine Steckzwiebeln habt, könnt ihr auch Zwiebeln aus dem Supermarkt verwenden, die bereits ausgetrieben haben. Schneidet die Zwiebel in der Mitte durch und pflanzt beide Hälften in die Erde.
Häufige Probleme und Lösungen
* Staunässe: Wenn die Blätter der Zwiebeln gelb werden und faulen, kann das an Staunässe liegen. Achtet darauf, dass das Wasser gut ablaufen kann und gießt weniger.
* Schädlinge: Zwiebeln können von verschiedenen Schädlingen befallen werden, zum Beispiel von Zwiebelfliegen oder Thripsen. Untersucht die Pflanzen regelmäßig und bekämpft die Schädlinge bei Bedarf mit geeigneten Mitteln.
* Krankheiten: Zwiebeln können auch von verschiedenen Krankheiten befallen werden, zum Beispiel von Falschem Mehltau oder Zwiebelbrand. Achtet auf die Symptome und behandelt die Pflanzen bei Bedarf mit geeigneten Mitteln.
* Zu wenig Sonne: Wenn die Zwiebeln nicht gut wachsen, kann das an zu wenig Sonne liegen. Stellt die Flaschen an einen sonnigeren Standort.
* Zu wenig Nährstoffe: Wenn die Blätter der Zwiebeln blass werden, kann das an zu wenig Nährstoffen liegen. Düngt die Zwiebeln regelmäßig mit einem flüssigen Gemüsedünger.
Warum Zwiebeln in Flaschen ziehen?
* Platzsparend: Ideal für kleine Balkone, Terrassen oder Fensterbänke.
* Einfach: Auch für Gartenanfänger geeignet.
* Nachhaltig: Upcycling von Plastikflaschen.
* Dekorativ: Ein echter Hingucker im Garten oder auf dem Balkon.
* Frische Zwiebeln: Immer frische Zwiebeln zur Hand.
Noch ein paar abschließende Gedanken
Ich hoffe, diese Anleitung hat euch gefallen und ihr habt Lust bekommen, eure eigenen Zwiebeln in Flaschen zu ziehen. Es ist wirklich ein tolles Projekt, das nicht nur Spaß macht, sondern auch noch nützlich ist. Und wer weiß, vielleicht entdeckt ihr ja so eure Leidenschaft für das Gärtnern! Viel Erfolg und viel Spaß beim Ausprobieren! Lasst mich wissen, wie es bei euch geklappt hat! Ich freue mich auf eure Kommentare und Fotos!
Conclusion
So, there you have it! Growing onions in bottles isn’t just a quirky gardening experiment; it’s a genuinely effective method for maximizing space, controlling growing conditions, and enjoying a continuous supply of fresh, green onions right at your fingertips. This DIY trick transforms discarded plastic bottles into miniature onion farms, offering a sustainable and rewarding gardening experience, even if you’re short on space or time.
The beauty of this method lies in its simplicity and adaptability. You don’t need acres of land or specialized equipment. Just a few bottles, some soil, and onion sets or seeds are all it takes to embark on this exciting gardening adventure. Imagine the satisfaction of snipping fresh onion greens for your salads, soups, and stir-fries, knowing you grew them yourself in a recycled bottle!
But the benefits extend beyond mere convenience. Growing onions in bottles allows for better control over the growing environment. You can easily move your bottle gardens indoors during harsh weather, protecting your precious onions from frost or excessive heat. The contained environment also minimizes the risk of soilborne diseases and pests, ensuring healthier and more productive plants.
This method is particularly beneficial for urban dwellers, apartment residents, or anyone with limited outdoor space. Balconies, patios, and even sunny windowsills can be transformed into thriving onion gardens. It’s a fantastic way to connect with nature, reduce your reliance on store-bought produce, and add a touch of green to your living space.
Looking for variations? Consider experimenting with different types of onions. While scallions and green onions are the most popular choices for bottle gardening, you can also try growing smaller bulb onions like shallots or pearl onions. Just be sure to select varieties that are well-suited to container gardening and have a relatively short growing season.
You can also customize your soil mix to suit the specific needs of your onions. A well-draining mix of potting soil, compost, and perlite will provide the necessary nutrients and aeration for healthy growth. Adding a slow-release fertilizer can also help ensure a steady supply of nutrients throughout the growing season.
Another fun variation is to create a vertical onion garden by stacking multiple bottles on top of each other. This is a great way to maximize space and create a visually appealing display. Just be sure to provide adequate support for the bottles and ensure that each layer receives sufficient sunlight.
Don’t be afraid to get creative and experiment with different techniques. The key is to have fun and learn from your experiences. Gardening is a journey, not a destination, and there’s always something new to discover.
We wholeheartedly encourage you to try this DIY trick for growing onions in bottles. It’s a simple, sustainable, and rewarding way to enjoy fresh, homegrown onions, regardless of your gardening experience or space constraints. Once you’ve given it a try, we’d love to hear about your experience! Share your photos, tips, and tricks in the comments below. Let’s build a community of bottle gardeners and inspire others to embrace this innovative and eco-friendly approach to growing their own food. Happy gardening!
Frequently Asked Questions (FAQ)
What kind of bottles are best for growing onions?
The ideal bottles are clear plastic bottles, such as those used for water, soda, or juice. Look for bottles that are at least 2 liters in size to provide enough space for the onion roots to grow. Make sure the bottles are clean and free of any residue before using them. You can also use glass bottles, but plastic is generally preferred due to its lighter weight and durability. Avoid using bottles that have contained harsh chemicals or pesticides.
How often should I water my onions grown in bottles?
Watering frequency depends on several factors, including the size of the bottle, the type of soil, the weather conditions, and the stage of growth. As a general rule, water your onions when the top inch of soil feels dry to the touch. Avoid overwatering, as this can lead to root rot. Ensure that the bottles have adequate drainage holes to prevent water from accumulating at the bottom. During hot and dry weather, you may need to water more frequently, while during cooler and wetter weather, you can reduce the watering frequency. Check the soil moisture regularly and adjust your watering schedule accordingly.
What kind of soil should I use for growing onions in bottles?
A well-draining potting mix is essential for growing healthy onions in bottles. A good mix consists of equal parts potting soil, compost, and perlite or vermiculite. The potting soil provides the necessary nutrients, the compost adds organic matter and improves soil structure, and the perlite or vermiculite enhances drainage and aeration. Avoid using heavy garden soil, as it can become compacted and restrict root growth. You can also add a slow-release fertilizer to the soil mix to provide a steady supply of nutrients throughout the growing season.
How much sunlight do onions need when grown in bottles?
Onions require at least 6-8 hours of direct sunlight per day to thrive. Place your bottle gardens in a sunny location, such as a south-facing window, balcony, or patio. If you don’t have access to enough natural sunlight, you can supplement with artificial grow lights. Rotate the bottles regularly to ensure that all sides of the plants receive adequate sunlight. Insufficient sunlight can lead to weak and leggy growth.
Can I grow onions from seed in bottles?
Yes, you can grow onions from seed in bottles, but it’s generally easier and faster to start with onion sets (small, immature onion bulbs). If you choose to grow from seed, sow the seeds directly into the bottles, spacing them about 1 inch apart. Keep the soil moist and warm until the seeds germinate, which usually takes about 7-14 days. Once the seedlings emerge, thin them out to allow for adequate spacing. Growing onions from seed takes longer than growing from sets, so be patient and provide the seedlings with plenty of sunlight and nutrients.
How do I harvest onions grown in bottles?
You can harvest green onions (scallions) at any time once they reach a desired size. Simply snip off the green tops with scissors, leaving about an inch of the plant above the soil. The onions will continue to grow and produce more greens. If you’re growing bulb onions, you’ll need to wait until the bulbs have matured. This usually takes about 90-120 days. Harvest the bulbs when the tops start to turn yellow and fall over. Gently pull the bulbs from the soil and allow them to dry in a warm, sunny place for a few days before storing them.
What are some common problems when growing onions in bottles and how can I fix them?
Some common problems include yellowing leaves, stunted growth, and pest infestations. Yellowing leaves can be caused by overwatering, underwatering, or nutrient deficiencies. Adjust your watering schedule and fertilize the plants as needed. Stunted growth can be caused by insufficient sunlight, poor soil, or overcrowding. Ensure that the plants receive adequate sunlight, use a well-draining potting mix, and thin out the seedlings if necessary. Pest infestations can be controlled with organic pesticides or by handpicking the pests off the plants. Regularly inspect your plants for signs of problems and take action promptly to prevent them from escalating.
Can I reuse the soil in the bottles for growing onions again?
While you can reuse the soil, it’s generally recommended to replace it with fresh soil for each planting. Over time, the soil can become depleted of nutrients and may harbor diseases or pests. If you choose to reuse the soil, amend it with compost and fertilizer to replenish the nutrients. You can also sterilize the soil by baking it in the oven or microwaving it to kill any harmful organisms. However, replacing the soil is the best way to ensure healthy and productive onion growth.
How do I prevent root rot when growing onions in bottles?
Root rot is a common problem when growing plants in containers, especially if the drainage is poor. To prevent root rot, use a well-draining potting mix, ensure that the bottles have adequate drainage holes, and avoid overwatering. Allow the soil to dry out slightly between waterings. You can also add a layer of gravel or pebbles to the bottom of the bottles to improve drainage. If you notice signs of root rot, such as yellowing leaves and a foul odor, remove the affected plants and replace the soil.
Is growing onions in bottles a good way to control pests?
Yes, growing onions in bottles can help control pests to some extent. The contained environment makes it more difficult for pests to reach the plants. However, it’s still important to monitor your plants regularly for signs of pests and take action if necessary. You can use organic pesticides, such as neem oil or insecticidal soap, to control pests. You can also try companion planting with herbs like basil or marigolds, which can repel certain pests.

Leave a Comment