
Foam Box Peanut Growing: Ever dreamt of harvesting your own delicious, homegrown peanuts right in your backyard, or even on your balcony? I know I have! Forget those sprawling fields – we’re talking about a compact, convenient, and surprisingly effective method: growing peanuts in a foam box. This DIY project isn’t just about fresh snacks; it’s about connecting with nature and experiencing the joy of nurturing life from a tiny seed.
While peanuts are now a global staple, their history is deeply rooted in South America, where they were cultivated thousands of years ago. From ancient Incan tombs to modern-day peanut butter sandwiches, this humble legume has nourished and delighted people for centuries. But you don’t need to be an expert farmer to enjoy the fruits (or rather, nuts!) of your labor. That’s where this DIY trick comes in!
Why should you try foam box peanut growing? Well, for starters, it’s incredibly space-saving, perfect for apartment dwellers or those with limited garden space. Plus, it offers better control over soil conditions and pests, leading to a healthier and more abundant harvest. Imagine the satisfaction of cracking open your own homegrown peanuts, knowing you nurtured them from start to finish. This guide will walk you through every step, from selecting the right foam box to harvesting your nutty bounty. Let’s get growing!

DIY Erdnussanbau in einer Styroporbox: Eine Schritt-für-Schritt-Anleitung
Hallo liebe Gartenfreunde! Habt ihr Lust, eure eigenen Erdnüsse anzubauen? Es ist einfacher als ihr denkt, und mit dieser Anleitung könnt ihr das sogar in einer recycelten Styroporbox machen! Ich zeige euch, wie ihr mit einfachen Mitteln und ein bisschen Geduld eure eigenen kleinen Erdnuss-Farmen erschaffen könnt. Los geht’s!
Was ihr braucht:
* Eine Styroporbox (z.B. von Fischtransporten oder Gemüselieferungen – fragt einfach mal im Supermarkt nach!)
* Erdnüsse (roh, ungesalzen und ungeröstet – am besten Bio-Erdnüsse aus dem Reformhaus oder Bioladen)
* Gute Blumenerde oder Anzuchterde
* Sand (optional, zur Verbesserung der Drainage)
* Kompost (optional, zur Nährstoffversorgung)
* Einen Bohrer oder Schraubenzieher
* Gießkanne oder Sprühflasche
* Geduld und Liebe!
Vorbereitung der Styroporbox:
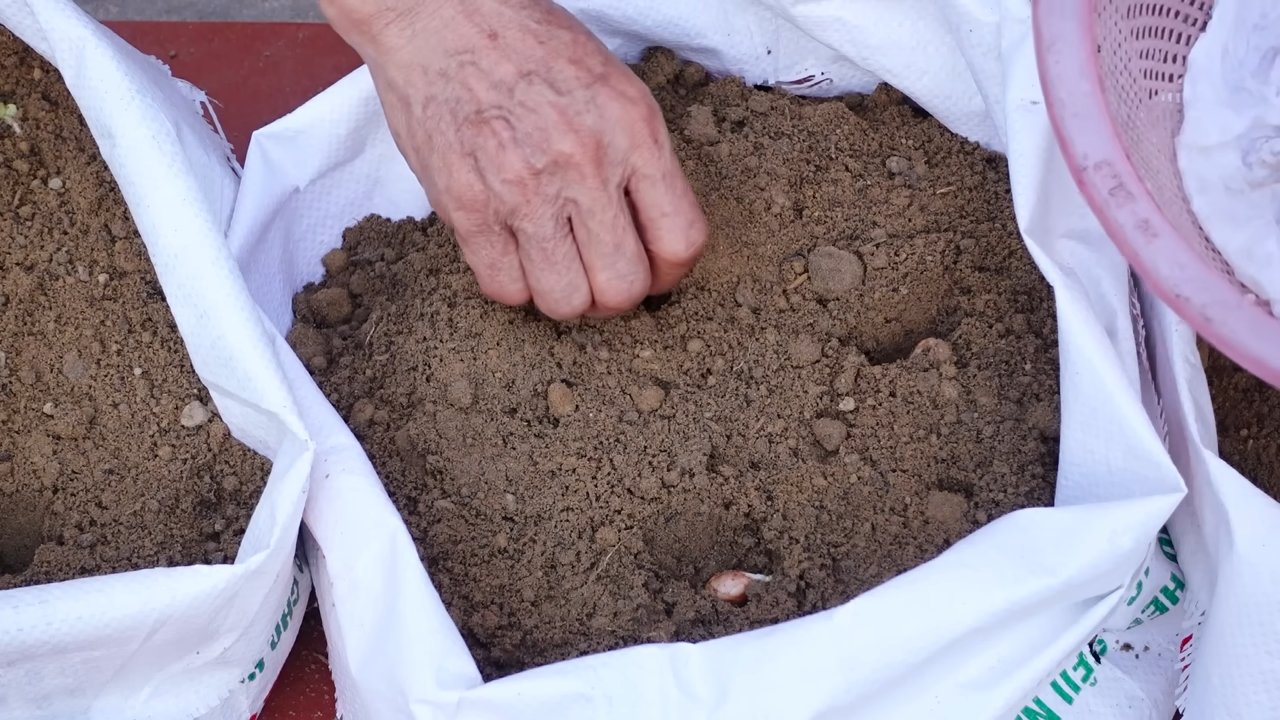
1. Löcher bohren: Das Wichtigste zuerst: Wir brauchen Löcher für die Drainage! Nehmt euren Bohrer oder Schraubenzieher und bohrt mehrere Löcher in den Boden der Styroporbox. Ich empfehle mindestens 6-8 Löcher, je nach Größe der Box. Achtet darauf, dass die Löcher nicht zu groß sind, damit die Erde nicht gleich wieder rausfällt.
2. Drainageschicht anlegen (optional): Um Staunässe zu vermeiden, könnt ihr eine Drainageschicht anlegen. Dazu gebt ihr eine Schicht Kies, Blähton oder groben Sand (ca. 5-10 cm hoch) auf den Boden der Box. Das hilft, überschüssiges Wasser abzuleiten.
3. Erde vorbereiten: Mischt eure Blumenerde mit etwas Sand (ca. 1/4 des Volumens) und Kompost (ca. 1/4 des Volumens). Der Sand sorgt für eine bessere Drainage, und der Kompost liefert wichtige Nährstoffe für eure Erdnusspflanzen. Wenn ihr keine Kompost habt, ist das auch kein Problem, die Blumenerde allein reicht auch.
4. Box befüllen: Füllt die Styroporbox mit der vorbereiteten Erde. Lasst oben ca. 5-10 cm Platz, damit ihr später noch Erde nachfüllen könnt, wenn die Pflanzen wachsen.
Erdnüsse säen:
1. Erdnüsse vorbereiten: Nehmt eure rohen Erdnüsse und weicht sie für ca. 12-24 Stunden in lauwarmem Wasser ein. Das hilft, die Keimung zu beschleunigen.
2. Erdnüsse säen: Macht kleine Löcher (ca. 2-3 cm tief) in die Erde. Der Abstand zwischen den Löchern sollte ca. 10-15 cm betragen. Legt in jedes Loch eine Erdnuss und bedeckt sie mit Erde.
3. Angießen: Gießt die Erde vorsichtig an, sodass sie gut durchfeuchtet ist. Achtet darauf, dass ihr nicht zu viel gießt, damit die Erdnüsse nicht faulen.
Pflege der Erdnusspflanzen:
1. Standort: Stellt die Styroporbox an einen sonnigen und warmen Ort. Erdnüsse lieben die Sonne! Ein Südbalkon oder eine Terrasse sind ideal.
2. Gießen: Gießt die Erdnusspflanzen regelmäßig, aber nicht zu viel. Die Erde sollte immer leicht feucht sein, aber nicht nass. Vermeidet Staunässe! Am besten testet ihr mit dem Finger, ob die Erde trocken ist, bevor ihr gießt.
3. Düngen (optional): Wenn ihr möchtet, könnt ihr eure Erdnusspflanzen während der Wachstumsphase (ca. alle 2-3 Wochen) mit einem organischen Dünger düngen. Ich verwende gerne Brennnesseljauche oder Komposttee.
4. Häufeln: Das ist ein wichtiger Schritt! Wenn die Erdnusspflanzen ca. 15-20 cm hoch sind, solltet ihr sie anhäufeln. Das bedeutet, dass ihr Erde um die Basis der Pflanzen herum aufschüttet. Dadurch werden die sogenannten “Fruchtstiele” (die Stiele, an denen die Erdnüsse wachsen) besser geschützt und können leichter in die Erde eindringen. Wiederholt das Anhäufeln alle paar Wochen, bis die Pflanzen blühen.
5. Blüten beobachten: Erdnusspflanzen haben gelbe Blüten, die sich selbst bestäuben. Nach der Bestäubung bilden sich die Fruchtstiele, die in die Erde wachsen und dort die Erdnüsse bilden.
6. Unkraut entfernen: Haltet die Styroporbox unkrautfrei, damit die Erdnusspflanzen genügend Platz und Nährstoffe haben.
Ernte der Erdnüsse:
1. Wann ernten? Die Erntezeit ist abhängig vom Wetter und der Sorte, aber in der Regel sind die Erdnüsse nach ca. 4-5 Monaten reif. Ihr erkennt das daran, dass die Blätter der Pflanzen gelb werden und absterben.
2. Ernte: Zieht die gesamten Pflanzen vorsichtig aus der Erde. Schüttelt die Erde ab und lasst die Erdnüsse an den Pflanzen trocknen.
3. Trocknen: Hängt die Pflanzen kopfüber an einem trockenen und luftigen Ort auf, oder legt sie auf ein Gitter. Lasst sie dort für ca. 2-3 Wochen trocknen.
4. Erdnüsse ernten: Wenn die Pflanzen trocken sind, könnt ihr die Erdnüsse von den Pflanzen abpflücken.
5. Erdnüsse lagern: Lagert die getrockneten Erdnüsse an einem kühlen, trockenen und dunklen Ort. So halten sie sich mehrere Monate.
Zusätzliche Tipps und Tricks:
* Schnecken: Achtet auf Schnecken! Sie lieben junge Erdnusspflanzen. Ihr könnt Schneckenkorn streuen oder die Pflanzen mit einem Schneckenzaun schützen.
* Vögel: Auch Vögel können an den Erdnüssen knabbern. Schützt die Pflanzen gegebenenfalls mit einem Netz.
* Bodenverbesserung: Wenn ihr merkt, dass die Erde in der Styroporbox zu schnell austrocknet, könnt ihr etwas Vermiculit oder Perlit untermischen. Das speichert Wasser und hält die Erde länger feucht.
* Sortenwahl: Es gibt verschiedene Erdnusssorten. Informiert euch, welche Sorte für eure Region am besten geeignet ist.
* Mehrere Boxen: Wenn ihr mehr Erdnüsse ernten möchtet, könnt ihr natürlich auch mehrere Styroporboxen bepflanzen.
Herausforderungen und Lösungen:
* Schlechte Keimung: Manchmal keimen die Erdnüsse nicht gut. Das kann verschiedene Gründe haben: Die Erdnüsse waren zu alt, die Erde war zu trocken oder zu nass, oder die Temperatur war nicht optimal. Achtet darauf, frische Erdnüsse zu verwenden, die Erde richtig zu gießen und die Box an einen warmen Ort zu stellen.
* Pilzbefall: Bei zu hoher Luftfeuchtigkeit kann es zu Pilzbefall kommen. Sorgt für eine gute Belüftung und vermeidet Staunässe.
* Schädlinge: Neben Schnecken und Vögeln können auch andere Schädlinge an den Erdnusspflanzen knabbern. Beobachtet die Pflanzen regelmäßig und bekämpft Schädlinge gegebenenfalls mit natürlichen Mitteln.
Ich hoffe, diese Anleitung hilft euch dabei, eure eigenen Erdnüsse in einer Styroporbox anzubauen. Es ist ein tolles Projekt, das Spaß macht und euch mit leckeren, selbst geernteten Erdnüssen belohnt. Viel Erfolg und viel Spaß beim Gärtnern!
Conclusion
So, there you have it! Transforming a simple foam box into a thriving peanut patch is not only surprisingly easy, but also incredibly rewarding. We’ve walked you through the steps, highlighting the benefits of this DIY approach – from its cost-effectiveness and space-saving design to the sheer joy of nurturing your own food source. Forget those expensive, pre-packaged peanuts from the store; imagine the satisfaction of harvesting your own homegrown bounty, knowing exactly where they came from and how they were grown.
This method is a game-changer, especially if you’re limited on garden space or live in an area with less-than-ideal soil conditions. The foam box provides a controlled environment, allowing you to optimize drainage and temperature for optimal peanut growth. Plus, it’s a fantastic project for families, offering a hands-on learning experience about plant life cycles and sustainable gardening practices.
But the beauty of this DIY project lies in its adaptability. Feel free to experiment with different peanut varieties to discover your personal favorite. Virginia peanuts, known for their large size, thrive in warmer climates, while Spanish peanuts, with their smaller kernels, are more tolerant of cooler temperatures. You can also try adding companion plants like marigolds or basil around the perimeter of your foam box to deter pests naturally. Consider adding a layer of mulch on top of the soil to help retain moisture and suppress weed growth.
Don’t be afraid to get creative with your foam box design! You can paint it with vibrant colors, add decorative elements, or even create a miniature trellis for the peanut plants to climb. The possibilities are endless!
Ultimately, growing peanuts in a foam box is more than just a gardening project; it’s an opportunity to connect with nature, cultivate patience, and enjoy the fruits (or rather, nuts!) of your labor. We firmly believe that this **foam box peanut growing** method is a must-try for any aspiring gardener, regardless of their experience level.
We’re confident that you’ll be amazed by the results. So, gather your supplies, follow our guide, and embark on this exciting gardening adventure. And most importantly, we want to hear about your experience! Share your photos, tips, and stories with us in the comments below. Let’s build a community of foam box peanut growers and inspire others to embrace the joy of homegrown goodness. Happy growing!
Frequently Asked Questions (FAQ)
What type of foam box is best for growing peanuts?
The ideal foam box is one that is sturdy, clean, and has adequate drainage. Look for boxes that are at least 12 inches deep to provide enough room for the peanut plants to develop their root systems and produce peanuts underground. Boxes that previously held food items are generally safe to use, but make sure they are thoroughly cleaned to remove any residue that could harm the plants. Avoid using foam boxes that have been treated with chemicals or pesticides. The size of the box will depend on how many peanut plants you want to grow. A good rule of thumb is to allow at least 6-8 inches of space between each plant.
How often should I water my peanut plants in a foam box?
Peanut plants need consistent moisture, especially during the flowering and pegging stages (when the pegs, which eventually become peanuts, start to grow into the soil). Water deeply whenever the top inch of soil feels dry to the touch. Avoid overwatering, as this can lead to root rot. The frequency of watering will depend on the weather conditions and the drainage of your foam box. In hot, dry weather, you may need to water daily, while in cooler, wetter weather, you may only need to water every few days. A good way to check if your plants need water is to stick your finger into the soil. If the soil feels dry, it’s time to water.
What kind of soil should I use for growing peanuts in a foam box?
Peanuts thrive in well-draining, sandy loam soil. Avoid heavy clay soils, as they can become waterlogged and hinder peanut development. You can purchase a pre-mixed potting mix specifically formulated for vegetables, or you can create your own mix by combining equal parts of garden soil, compost, and sand. The compost will provide essential nutrients, while the sand will improve drainage. Make sure the soil is loose and airy to allow the peanut pegs to easily penetrate the soil.
How much sunlight do peanut plants need?
Peanut plants need at least 6-8 hours of direct sunlight per day to thrive. Choose a location for your foam box that receives plenty of sunlight throughout the day. If you live in an area with intense summer heat, you may need to provide some afternoon shade to prevent the plants from scorching. You can use shade cloth or move the foam box to a partially shaded area during the hottest part of the day.
When is the best time to plant peanuts in a foam box?
The best time to plant peanuts is after the last frost, when the soil has warmed up to at least 65 degrees Fahrenheit. Peanuts are warm-season crops and will not tolerate frost. In most regions, this is typically in late spring or early summer. You can start peanut seeds indoors a few weeks before the last frost to get a head start, but be sure to harden them off gradually before transplanting them into the foam box.
How do I know when my peanuts are ready to harvest?
Peanuts typically take about 120-150 days to mature. A good indicator that your peanuts are ready to harvest is when the foliage starts to turn yellow and the lower leaves begin to drop. You can also dig up a few plants to check the peanuts. The peanut shells should be well-formed and the kernels inside should be plump and fully developed. If the shells are still thin and the kernels are small, the peanuts are not yet ready to harvest.
How do I harvest peanuts from a foam box?
To harvest peanuts, carefully dig up the entire plant, being careful not to damage the peanuts. Gently shake off any excess soil and hang the plants upside down in a dry, well-ventilated area for about 2-3 weeks to cure. Curing allows the peanuts to dry out and develop their characteristic flavor. Once the peanuts are cured, you can remove them from the plants and store them in a cool, dry place.
Are there any common pests or diseases that affect peanut plants in foam boxes?
Peanut plants can be susceptible to various pests and diseases, including aphids, spider mites, leaf spot, and root rot. To prevent pests and diseases, choose disease-resistant peanut varieties, provide good air circulation, and avoid overwatering. You can also use organic pest control methods, such as insecticidal soap or neem oil, to control pests. If you notice any signs of disease, remove the affected leaves or plants immediately to prevent the spread of the disease.
Can I reuse the soil from my foam box for future peanut crops?
It’s generally not recommended to reuse the soil from your foam box for future peanut crops, as it may contain disease pathogens or pests that could affect the new plants. However, if you choose to reuse the soil, you should sterilize it first by baking it in the oven at 180 degrees Fahrenheit for 30 minutes. You can also amend the soil with compost and other organic matter to replenish nutrients.
What are some other uses for foam boxes in gardening?
Foam boxes are versatile containers that can be used for growing a variety of vegetables, herbs, and flowers. They are particularly well-suited for growing plants that require well-draining soil, such as tomatoes, peppers, and cucumbers. You can also use foam boxes to create raised garden beds or to start seeds indoors. Their lightweight nature makes them easy to move around, allowing you to take advantage of sunlight and protect plants from harsh weather conditions.
Leave a Comment