
Grow Asparagus in Backyard: Imagine stepping into your garden and harvesting fresh, tender asparagus spears, ready to be steamed, grilled, or tossed into a vibrant spring salad. Sounds dreamy, right? Well, it doesn’t have to be just a dream! For centuries, asparagus has been prized for its delicate flavor and nutritional benefits, gracing the tables of royalty and commoners alike. From ancient Rome, where it was considered a delicacy, to modern-day kitchens, asparagus has stood the test of time.
But let’s be honest, the thought of cultivating this perennial vegetable can seem a bit daunting. Many gardeners believe it requires vast amounts of space or specialized knowledge. That’s where this DIY guide comes in! I’m here to show you that you absolutely can grow asparagus in your backyard, even if you have limited space or are a beginner gardener. We’ll break down the process into easy-to-follow steps, revealing simple tricks and hacks that will have you harvesting your own delicious asparagus for years to come.
Why is this so important? Because fresh, homegrown asparagus tastes infinitely better than anything you can buy at the store. Plus, you’ll know exactly where your food is coming from and how it was grown. So, ditch the store-bought spears and let’s embark on this exciting gardening adventure together! Get ready to transform your backyard into an asparagus haven!
Spargel im eigenen Garten anbauen: Eine Schritt-für-Schritt-Anleitung
Hallo Gartenfreunde! Habt ihr euch jemals gefragt, wie es wäre, frischen, knackigen Spargel direkt aus dem eigenen Garten zu ernten? Ich kann euch sagen, es ist ein unglaublich lohnendes Gefühl! Spargel anzubauen mag anfangs etwas einschüchternd wirken, aber mit der richtigen Vorbereitung und etwas Geduld könnt ihr schon bald euren eigenen Spargel genießen. In diesem Artikel zeige ich euch, wie ihr das Projekt erfolgreich angeht. Los geht’s!
Die Grundlagen: Was ihr für den Spargelanbau braucht
Bevor wir loslegen, hier eine Liste der Dinge, die ihr benötigt:
* Spargelpflanzen (auch Spargelsprossen oder “Crowns” genannt): Am besten sind einjährige Pflanzen.
* Gut durchlässiger Boden: Spargel hasst Staunässe.
* Kompost oder gut verrotteter Mist: Für die Bodenverbesserung.
* Gartengeräte: Spaten, Harke, Gießkanne.
* Geduld: Spargel braucht Zeit, um zu wachsen!
Die richtige Sorte wählen
Es gibt verschiedene Spargelsorten, die sich in Geschmack, Ertrag und Krankheitsresistenz unterscheiden. Einige beliebte Sorten sind:
* ‘Mary Washington’: Eine klassische Sorte, die robust und ertragreich ist.
* ‘Jersey Knight’: Eine männliche Sorte, die weniger Samen produziert und dadurch mehr Energie in die Sprossen steckt.
* ‘Purple Passion’: Eine Sorte mit violetten Sprossen, die einen milderen Geschmack hat.
Informiert euch am besten in eurer Gärtnerei, welche Sorte für eure Region am besten geeignet ist.
Schritt-für-Schritt-Anleitung: Spargel pflanzen
Jetzt geht es ans Eingemachte! Hier ist eine detaillierte Anleitung, wie ihr euren Spargel richtig pflanzt:
1. Den Standort vorbereiten: Spargel braucht einen sonnigen Standort mit mindestens sechs Stunden Sonne pro Tag. Der Boden sollte gut durchlässig und locker sein. Entfernt Unkraut, Steine und andere Hindernisse.
2. Den Boden verbessern: Spargel liebt nährstoffreichen Boden. Grabt den Boden großzügig um und mischt reichlich Kompost oder gut verrotteten Mist unter. Das verbessert die Bodenstruktur und versorgt die Pflanzen mit wichtigen Nährstoffen. Ich empfehle, den Boden bis zu einer Tiefe von etwa 30-40 cm zu bearbeiten.
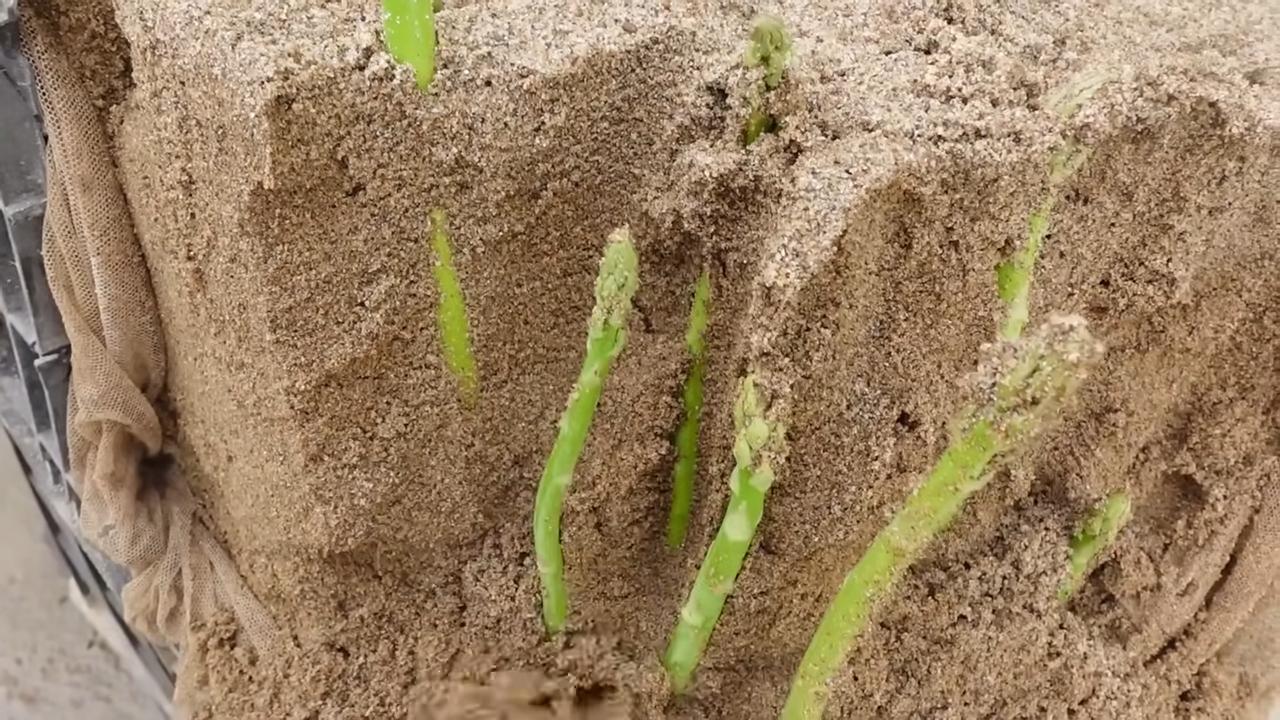
3. Gräben ausheben: Grabt Gräben, die etwa 20-25 cm tief und 30 cm breit sind. Der Abstand zwischen den Gräben sollte etwa 1,20 bis 1,50 Meter betragen. Das gibt den Pflanzen genügend Platz, um sich auszubreiten.
4. Die Spargelpflanzen setzen: Legt die Spargelpflanzen in die Gräben, wobei die Wurzeln nach unten zeigen. Verteilt die Wurzeln vorsichtig und achtet darauf, dass sie nicht geknickt werden. Der Abstand zwischen den Pflanzen sollte etwa 30-45 cm betragen.
5. Die Gräben auffüllen: Füllt die Gräben zunächst nur mit etwa 5-8 cm Erde auf. Gießt die Pflanzen gründlich an.
6. Nach und nach auffüllen: In den nächsten Wochen, wenn die Spargelpflanzen zu wachsen beginnen, füllt ihr die Gräben nach und nach mit Erde auf, bis sie vollständig gefüllt sind. Das fördert die Bildung neuer Triebe und Wurzeln.
7. Mulchen: Bedeckt den Boden um die Spargelpflanzen mit einer Schicht Mulch, z.B. Stroh oder Holzhackschnitzel. Das hilft, die Feuchtigkeit im Boden zu halten, Unkraut zu unterdrücken und den Boden vor Erosion zu schützen.
Die ersten Jahre: Geduld ist gefragt
Spargel braucht Zeit, um sich zu etablieren. Im ersten Jahr solltet ihr keine Sprossen ernten. Lasst die Pflanzen wachsen und sich entwickeln. Im zweiten Jahr könnt ihr vorsichtig einige wenige Sprossen ernten, aber nicht zu viele. Ab dem dritten Jahr könnt ihr dann richtig loslegen und eine reichhaltige Ernte genießen.
Pflege des Spargelbeets
Ein Spargelbeet braucht regelmäßige Pflege, um gesund und ertragreich zu bleiben. Hier sind einige wichtige Punkte:
* Gießen: Spargel braucht ausreichend Wasser, besonders in trockenen Perioden. Gießt die Pflanzen regelmäßig, aber vermeidet Staunässe.
* Düngen: Düngt die Spargelpflanzen im Frühjahr mit einem organischen Dünger, z.B. Kompost oder Hornspäne. Das versorgt die Pflanzen mit wichtigen Nährstoffen für ein kräftiges Wachstum.
* Unkraut jäten: Haltet das Spargelbeet frei von Unkraut. Unkraut konkurriert mit den Spargelpflanzen um Wasser und Nährstoffe.
* Mulchen: Erneuert die Mulchschicht regelmäßig, um die Feuchtigkeit im Boden zu halten und Unkraut zu unterdrücken.
* Krankheiten und Schädlinge: Achtet auf Anzeichen von Krankheiten oder Schädlingen. Bei Bedarf könnt ihr biologische Pflanzenschutzmittel einsetzen.
Die Ernte: Der Lohn der Mühe
Nach ein paar Jahren harter Arbeit ist es endlich soweit: Die Spargelernte beginnt! Hier sind einige Tipps für eine erfolgreiche Ernte:
1. Der richtige Zeitpunkt: Spargel wird im Frühjahr geerntet, sobald die Sprossen etwa 15-20 cm aus dem Boden ragen. Die Erntezeit dauert in der Regel etwa 6-8 Wochen.
2. Die richtige Technik: Stecht die Spargelstangen mit einem speziellen Spargelstecher oder einem scharfen Messer etwa 2-5 cm unter der Erdoberfläche ab. Achtet darauf, die umliegenden Pflanzen nicht zu beschädigen.
3. Regelmäßige Ernte: Erntet die Spargelstangen regelmäßig, etwa alle zwei bis drei Tage. Das fördert die Bildung neuer Sprossen.
4. Das Ende der Ernte: Beendet die Ernte, wenn die Sprossen dünner werden oder die Pflanzen zu blühen beginnen. Lasst die Pflanzen dann in Ruhe wachsen und sich für das nächste Jahr stärken.
Spargel richtig lagern
Frisch geernteter Spargel ist am besten, aber er kann auch einige Tage im Kühlschrank gelagert werden. Wickelt die Spargelstangen in ein feuchtes Tuch oder stellt sie in ein Glas mit Wasser. So bleiben sie länger frisch und knackig.
Häufige Fehler vermeiden
Hier sind einige häufige Fehler, die beim Spargelanbau gemacht werden und wie ihr sie vermeiden könnt:
* Falscher Standort: Spargel braucht Sonne und gut durchlässigen Boden.
* Zu wenig Bodenverbesserung: Spargel liebt nährstoffreichen Boden.
* Zu frühe Ernte: Gebt den Pflanzen Zeit, sich zu etablieren.
* Vernachlässigung der Pflege: Spargel braucht regelmäßige Pflege, um gesund und ertragreich zu bleiben.
Zusätzliche Tipps und Tricks
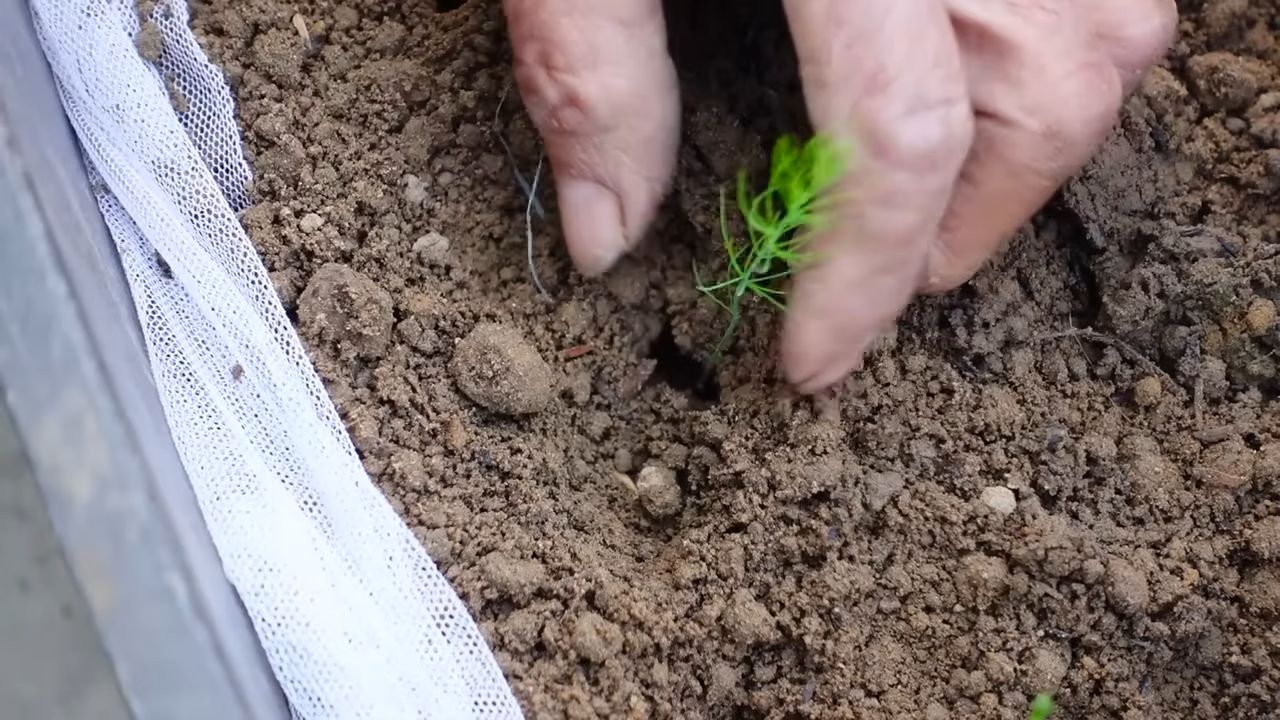
* Gründüngung: Vor der Pflanzung von Spargel kann eine Gründüngung mit Pflanzen wie Phacelia oder Klee den Boden verbessern.
* Spargel als Mischkultur: Spargel verträgt sich gut mit Kräutern wie Petersilie oder Ringelblumen.
* Spargel im Topf: Spargel kann auch im Topf angebaut werden, wenn der Topf groß genug ist und eine gute Drainage hat.
Ich hoffe, diese Anleitung hat euch Mut gemacht, euren eigenen Spargel anzubauen. Es ist ein lohnendes Projekt, das euch mit frischem, köstlichem Spargel belohnt. Viel Erfolg und guten Appetit!
Conclusion
So, there you have it! Growing asparagus in your backyard isn’t just a gardening project; it’s an investment in years of delicious, healthy harvests. Forget those flimsy, imported spears at the grocery store. Imagine stepping outside your back door and snipping plump, vibrant asparagus, bursting with fresh flavor, ready to be steamed, grilled, or roasted to perfection. This DIY trick transforms your garden into a sustainable source of culinary delight.
Why is this a must-try? Because it’s more than just growing vegetables; it’s about connecting with your food, understanding its journey from seed (or crown) to plate, and enjoying the unparalleled satisfaction of nurturing something from the earth. Plus, asparagus is a nutritional powerhouse, packed with vitamins, minerals, and antioxidants. You’ll be feeding your body as well as your soul.
But the benefits don’t stop there. Asparagus is a perennial, meaning once established, it will produce for 15 to 20 years or even longer! Think of it as a long-term investment in your garden and your health. It requires minimal maintenance once established, freeing you up to focus on other gardening endeavors.
Ready to take your asparagus game to the next level? Consider these variations:
* Companion Planting: Plant basil, parsley, or tomatoes near your asparagus to deter pests and improve growth. Marigolds are also excellent companions for their pest-repelling properties.
* Soil Amendments: While asparagus thrives in well-drained soil, adding compost or aged manure annually will provide essential nutrients and improve soil structure. Consider testing your soil pH and amending with lime if it’s too acidic.
* Variety Selection: Experiment with different asparagus varieties to find your favorite flavor and texture. ‘Jersey Knight’ is a popular choice for its high yield and disease resistance, while ‘Purple Passion’ offers a unique color and sweeter taste.
* Raised Beds: If your soil is heavy clay or poorly drained, consider growing asparagus in raised beds. This will improve drainage and prevent root rot.
* Succession Planting: Plant new asparagus crowns every few years to ensure a continuous supply of fresh spears.
Don’t be intimidated by the initial setup. With a little planning and effort, you can create a thriving asparagus patch that will provide you with years of enjoyment. The key is patience, proper soil preparation, and consistent care.
We wholeheartedly encourage you to try this DIY trick and experience the joy of growing your own asparagus. It’s a rewarding and sustainable way to enhance your garden and your diet.
Once you’ve embarked on your asparagus-growing adventure, we want to hear from you! Share your experiences, tips, and photos in the comments below. What variety did you choose? What challenges did you face, and how did you overcome them? Your insights will help other aspiring asparagus growers succeed. Let’s build a community of passionate gardeners, sharing our knowledge and celebrating the bounty of our backyards. So, grab your gardening gloves, prepare your soil, and get ready to enjoy the delicious rewards of growing asparagus in your backyard!
Frequently Asked Questions (FAQ)
What is the best time of year to plant asparagus?
The best time to plant asparagus is typically in the spring, after the last frost, or in the fall, about six to eight weeks before the ground freezes. Spring planting allows the crowns to establish themselves during the growing season, while fall planting gives them a head start before winter dormancy. The specific timing will depend on your local climate and growing zone. Check your local agricultural extension office for recommendations specific to your area.
How much space does asparagus need?
Asparagus plants need plenty of space to spread out and develop their extensive root systems. A general rule of thumb is to space asparagus crowns about 12 to 18 inches apart in rows that are 3 to 4 feet apart. This spacing allows for adequate air circulation and sunlight penetration, which are essential for healthy growth. If you’re planting in a raised bed, you can slightly reduce the spacing, but be sure to provide enough room for the plants to mature.
How long does it take for asparagus to produce spears?
Patience is key when growing asparagus. It typically takes two to three years for asparagus plants to mature and produce a significant harvest. During the first year, focus on establishing the plants and allowing them to develop strong root systems. In the second year, you can harvest a few spears, but limit the harvest to a week or two. By the third year, you can enjoy a more substantial harvest that lasts for several weeks. Remember, the longer you wait to harvest, the stronger and more productive your asparagus patch will become.
What kind of soil is best for asparagus?
Asparagus thrives in well-drained, fertile soil with a pH between 6.5 and 7.5. Before planting, amend the soil with plenty of organic matter, such as compost or aged manure, to improve drainage and fertility. Asparagus prefers sandy loam soil, but it can also tolerate clay soil if it is properly amended. Avoid planting asparagus in heavy, compacted soil, as this can lead to root rot. Consider raised beds if your soil is poorly drained.
How do I fertilize asparagus?
Asparagus plants benefit from regular fertilization to support their growth and productivity. In the spring, after the first spears emerge, fertilize with a balanced fertilizer, such as 10-10-10, or an organic fertilizer, such as compost or aged manure. Apply the fertilizer according to the package directions. You can also side-dress the plants with compost or manure throughout the growing season. Avoid over-fertilizing, as this can lead to excessive foliage growth and reduced spear production.
How do I control weeds in my asparagus patch?
Weeds can compete with asparagus plants for nutrients and water, so it’s important to control them effectively. Hand-pulling weeds is the best option, especially when the asparagus plants are young. Mulching with organic materials, such as straw or wood chips, can also help suppress weed growth. Avoid using herbicides, as they can damage the asparagus plants. Be diligent about removing weeds regularly to keep your asparagus patch healthy and productive.
What are some common pests and diseases that affect asparagus?
Asparagus beetles are a common pest that can damage asparagus spears and foliage. Hand-picking the beetles or using insecticidal soap can help control them. Asparagus rust is a fungal disease that can cause orange or brown pustules on the spears and foliage. Planting rust-resistant varieties and ensuring good air circulation can help prevent this disease. Other potential pests and diseases include aphids, spider mites, and crown rot. Monitor your plants regularly and take action promptly if you notice any signs of problems.
How do I harvest asparagus?
Harvest asparagus spears when they are about 6 to 8 inches tall and the tips are still tightly closed. Use a sharp knife or asparagus knife to cut the spears at ground level. Avoid cutting spears that are too thin, as they may not be fully mature. Harvest asparagus spears every day or two during the peak harvest season. As the harvest season progresses, the spears will become thinner and less tender. Stop harvesting when the spears become consistently thin or when the plants begin to fern out.
How do I care for asparagus after the harvest?
After the harvest season, allow the asparagus plants to fern out and develop their foliage. This foliage will provide the plants with energy for the following year’s growth. Fertilize the plants after the harvest to replenish nutrients. Water the plants regularly, especially during dry periods. Remove any dead or diseased foliage in the fall. Mulch the plants with organic materials to protect them from winter cold. With proper care, your asparagus patch will continue to produce delicious spears for many years to come.
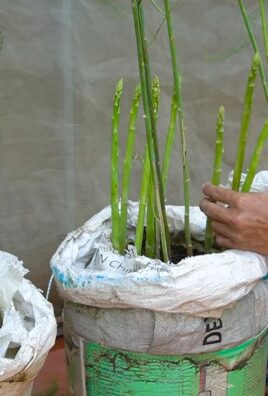
Can I grow asparagus in containers?
Yes, you can grow asparagus in containers, but it requires a large container and careful attention to watering and fertilization. Choose a container that is at least 18 inches deep and wide. Fill the container with well-drained potting mix. Plant one or two asparagus crowns per container. Water the plants regularly and fertilize them every few weeks. Container-grown asparagus may not produce as many spears as plants grown in the ground, but it can still be a rewarding experience.
Leave a Comment