
Grow Hibiscus Sabdariffa Easily and unlock a world of vibrant color and tangy flavor right in your own backyard! Have you ever dreamed of sipping homemade hibiscus tea, knowing you nurtured the plant from seed to cup? This isn’t just a gardening project; it’s a journey into a tradition cherished for centuries across cultures. From ancient Egypt, where it adorned royal gardens, to West Africa, where it’s a staple ingredient in refreshing drinks, Hibiscus Sabdariffa, also known as Roselle, boasts a rich history.
But why should you bother to grow Hibiscus Sabdariffa easily? Well, beyond its stunning beauty and historical significance, this plant offers a wealth of benefits. Imagine having a readily available source of vitamin C-rich calyces for teas, jams, and even natural food coloring! Plus, it’s surprisingly low-maintenance once you know the secrets. Many people struggle with getting their Roselle plants to thrive, often facing issues like poor flowering or pest infestations. That’s where this DIY guide comes in. I’m going to share my tried-and-true tips and tricks to ensure you have a bountiful harvest, even if you’re a complete beginner. Get ready to transform your garden and your kitchen with this amazing plant!
Hibiskus Sabdariffa Anbau: So gelingt’s dir ganz einfach!
Hallo Gartenfreunde! Ich liebe Hibiskus Sabdariffa, auch bekannt als Roselle oder Afrikanische Malve. Nicht nur wegen ihrer wunderschönen Blüten, sondern auch wegen der leckeren und gesunden Früchte, aus denen man köstlichen Tee, Marmelade oder sogar Sirup machen kann. Und das Beste: Der Anbau ist gar nicht so schwer, wie man vielleicht denkt! Ich zeige dir, wie du deinen eigenen Hibiskus Sabdariffa erfolgreich anbauen kannst.
Was du für den Hibiskus Sabdariffa Anbau brauchst:
* Samen: Am besten kaufst du hochwertiges Saatgut von einem vertrauenswürdigen Anbieter. Achte darauf, dass es sich um Hibiskus Sabdariffa handelt, da es viele verschiedene Hibiskusarten gibt.
* Anzuchttöpfe oder -schalen: Kleine Töpfe oder Schalen sind ideal für die Voranzucht.
* Anzuchterde: Diese Erde ist besonders nährstoffarm und locker, was das Keimen der Samen erleichtert.
* Blumenerde: Für das spätere Umpflanzen in größere Töpfe oder ins Freiland.
* Gießkanne oder Sprühflasche: Zum Bewässern der Pflanzen.
* Standort: Ein sonniger und warmer Platz ist ideal.
* Dünger: Ein organischer Dünger oder ein spezieller Hibiskusdünger.
* Geduld: Hibiskus Sabdariffa braucht etwas Zeit, um zu wachsen und zu blühen.
Die Vorbereitung: Samen keimen lassen
Die Voranzucht ist der Schlüssel zum Erfolg. Ich beginne meistens im März oder April mit der Aussaat, damit die Pflanzen genügend Zeit haben, bis zum Sommer kräftig zu werden.
1. Samen vorbereiten: Um die Keimung zu beschleunigen, kannst du die Samen für 24 Stunden in lauwarmem Wasser einweichen. Das macht die Samenschale weicher und erleichtert das Keimen.
2. Anzuchttöpfe befüllen: Fülle die Anzuchttöpfe oder -schalen mit Anzuchterde. Drücke die Erde leicht an.
3. Samen aussäen: Lege pro Topf oder Schale 2-3 Samen auf die Erde. Bedecke die Samen mit einer dünnen Schicht Anzuchterde (ca. 0,5 cm).
4. Bewässern: Befeuchte die Erde vorsichtig mit einer Sprühflasche. Die Erde sollte feucht, aber nicht nass sein.
5. Warm stellen: Stelle die Anzuchttöpfe an einen warmen und hellen Ort. Eine Temperatur von 22-25°C ist ideal. Du kannst die Töpfe auch mit einer durchsichtigen Folie oder einem Deckel abdecken, um die Luftfeuchtigkeit zu erhöhen. Achte aber darauf, regelmäßig zu lüften, um Schimmelbildung zu vermeiden.
6. Geduld haben: Die Keimung dauert in der Regel 1-3 Wochen. Halte die Erde während dieser Zeit feucht.
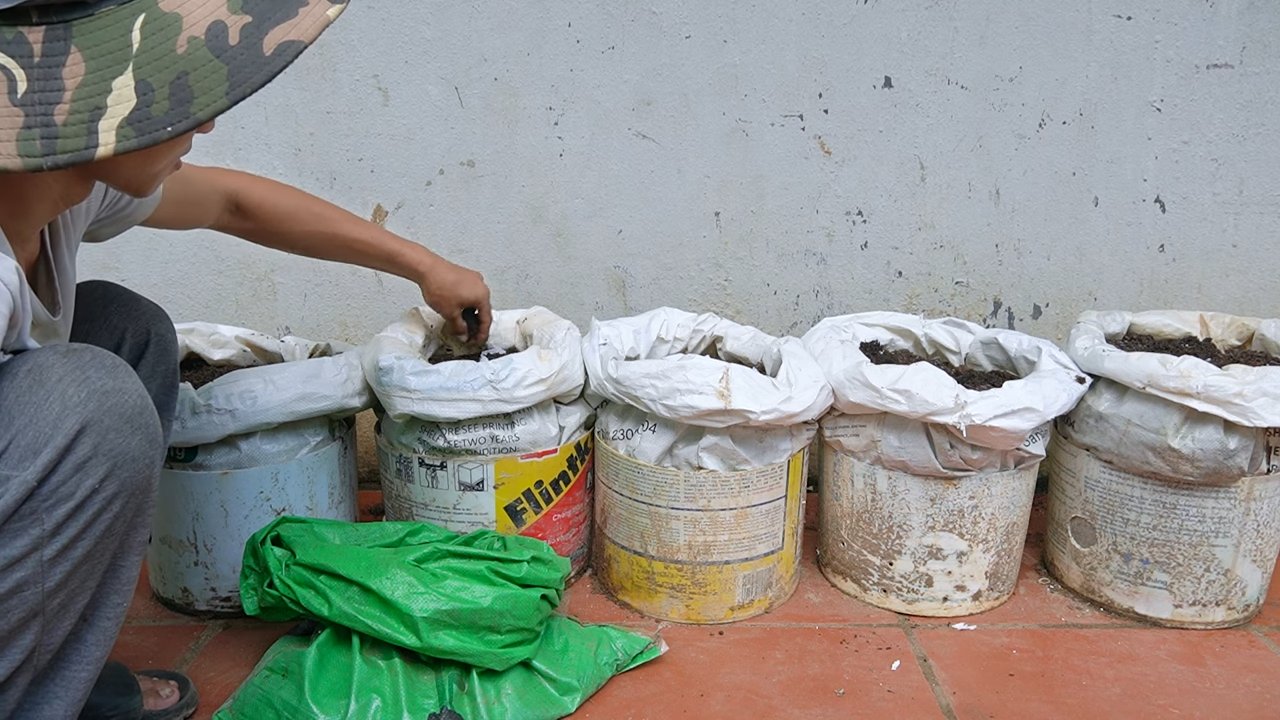
Umpflanzen: Den kleinen Pflanzen mehr Platz geben
Sobald die Sämlinge ein paar Blätter entwickelt haben, ist es Zeit, sie in größere Töpfe umzupflanzen.
1. Größere Töpfe vorbereiten: Wähle Töpfe mit einem Durchmesser von mindestens 10 cm. Fülle die Töpfe mit Blumenerde.
2. Sämlinge vorsichtig ausheben: Löse die Sämlinge vorsichtig aus den Anzuchttöpfen. Achte darauf, die Wurzeln nicht zu beschädigen. Wenn du mehrere Samen in einem Topf ausgesät hast, kannst du die kräftigsten Sämlinge auswählen und die schwächeren entfernen.
3. Einpflanzen: Setze die Sämlinge in die größeren Töpfe. Die Wurzeln sollten vollständig mit Erde bedeckt sein.
4. Bewässern: Gieße die Pflanzen nach dem Umpflanzen gründlich.
5. Standort: Stelle die Töpfe an einen hellen und warmen Ort. Vermeide direkte Sonneneinstrahlung in den ersten Tagen nach dem Umpflanzen.
Auswahl des richtigen Standorts
Der richtige Standort ist entscheidend für das Wachstum und die Blütenbildung des Hibiskus Sabdariffa.
* Sonne: Hibiskus Sabdariffa liebt die Sonne! Je mehr Sonne, desto besser. Ein Standort mit mindestens 6 Stunden direkter Sonneneinstrahlung pro Tag ist ideal.
* Wärme: Die Pflanze ist wärmeliebend und verträgt keine Temperaturen unter 10°C.
* Windschutz: Ein windgeschützter Standort ist von Vorteil, da starke Winde die Pflanzen beschädigen können.
* Boden: Der Boden sollte locker, durchlässig und nährstoffreich sein. Staunässe sollte vermieden werden.
Pflanzung im Freiland (optional)
Wenn du in einer Region mit milden Sommern wohnst, kannst du den Hibiskus Sabdariffa auch ins Freiland pflanzen.
1. Zeitpunkt: Warte, bis keine Frostgefahr mehr besteht (in der Regel ab Mitte Mai).
2. Boden vorbereiten: Lockere den Boden gründlich auf und reicher ihn mit Kompost oder anderem organischen Material an.
3. Pflanzloch ausheben: Hebe ein Pflanzloch aus, das doppelt so groß ist wie der Wurzelballen.
4. Einpflanzen: Setze die Pflanze in das Pflanzloch. Die Oberseite des Wurzelballens sollte mit der Erdoberfläche abschließen.
5. Bewässern: Gieße die Pflanze nach dem Einpflanzen gründlich.
6. Mulchen: Bedecke den Boden um die Pflanze mit einer Schicht Mulch (z.B. Rindenmulch oder Stroh), um die Feuchtigkeit zu halten und Unkrautwachstum zu unterdrücken.
Pflege: So bleibt dein Hibiskus Sabdariffa gesund und vital
Die richtige Pflege ist wichtig, damit dein Hibiskus Sabdariffa prächtig gedeiht.
* Bewässerung: Gieße die Pflanzen regelmäßig, besonders während der heißen Sommermonate. Die Erde sollte immer leicht feucht sein, aber nicht nass. Vermeide Staunässe.
* Düngung: Dünge die Pflanzen regelmäßig mit einem organischen Dünger oder einem speziellen Hibiskusdünger. Beginne mit der Düngung etwa 4 Wochen nach dem Umpflanzen und wiederhole sie alle 2-3 Wochen.
* Schnitt: Ein regelmäßiger Schnitt fördert die Blütenbildung und hält die Pflanzen kompakt. Du kannst die Pflanzen im Frühjahr oder nach der Ernte der Früchte zurückschneiden. Entferne dabei abgestorbene oder kranke Triebe.
* Schädlinge und Krankheiten: Hibiskus Sabdariffa ist relativ resistent gegen Schädlinge und Krankheiten. Gelegentlich können Blattläuse oder Spinnmilben auftreten. Diese kannst du mit natürlichen Mitteln bekämpfen, z.B. mit einer Seifenlauge oder einem Neemöl-Spray. Achte auf eine gute Belüftung, um Pilzkrankheiten vorzubeugen.
* Überwinterung: Hibiskus Sabdariffa ist nicht winterhart. Wenn du die Pflanzen im Freiland angebaut hast, musst du sie vor dem ersten Frost ausgraben und in Töpfe umpflanzen. Stelle die Töpfe an einen hellen und kühlen Ort (ca. 10-15°C). Gieße die Pflanzen während der Überwinterung nur sparsam. Im Frühjahr, wenn keine Frostgefahr mehr besteht, kannst du die Pflanzen wieder ins Freiland pflanzen oder in größere Töpfe umtopfen.
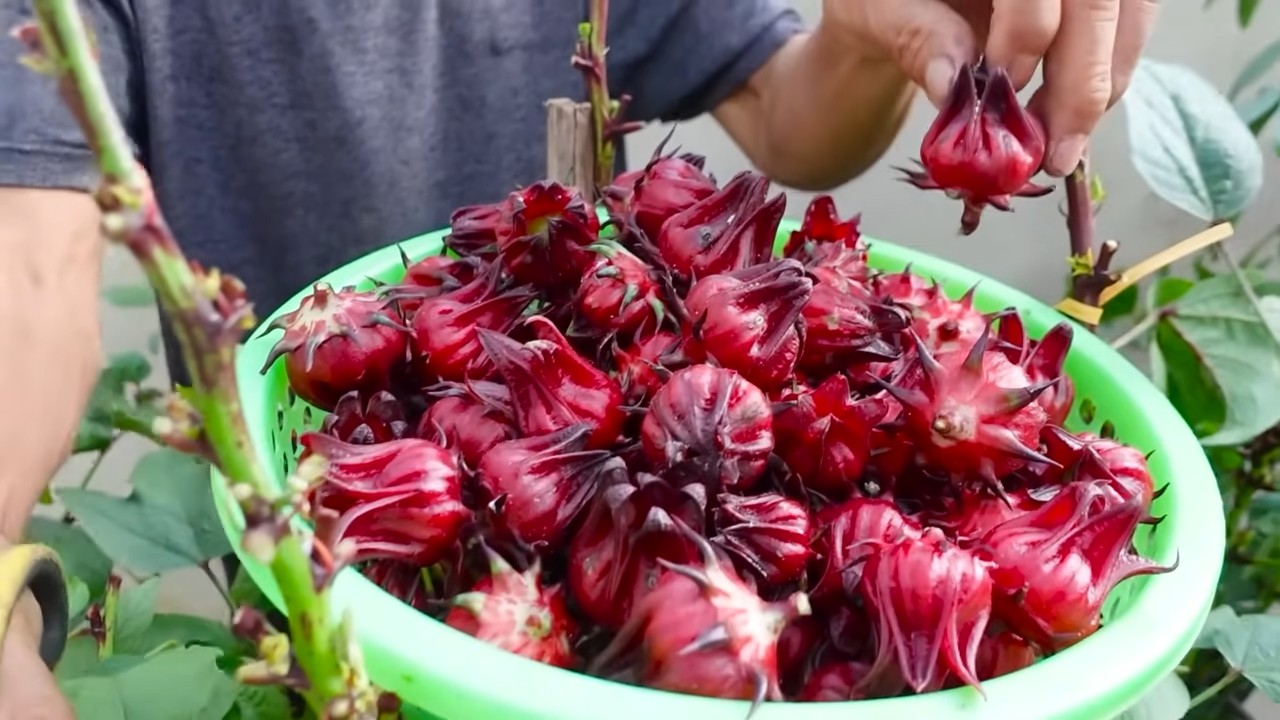
Ernte: Die Früchte des Erfolgs
Die Erntezeit des Hibiskus Sabdariffa ist in der Regel im Herbst, etwa 6-8 Monate nach der Aussaat.
1. Erntezeitpunkt: Die Früchte sind reif, wenn die Kelchblätter (die roten Blätter um die Samenkapsel) prall und saftig sind.
2. Ernte: Schneide die Früchte mit einer Schere oder einem Messer ab.
3. Verarbeitung: Die Kelchblätter können frisch verwendet oder getrocknet werden. Sie eignen sich hervorragend zur Herstellung von Tee, Marmelade, Sirup oder Likör. Die
Conclusion
So, there you have it! Growing your own Hibiscus Sabdariffa, also known as Roselle, is not only achievable but also incredibly rewarding. From the vibrant crimson calyces that promise a tart and refreshing tea to the sheer joy of nurturing a plant from seed to harvest, this DIY project is a must-try for any gardening enthusiast, health-conscious individual, or anyone simply looking to add a touch of exotic beauty to their backyard.
Why is this a must-try? Because you’re not just growing a plant; you’re cultivating a powerhouse of health benefits. Think of the endless possibilities: homemade hibiscus tea, jams, jellies, sauces, and even natural food coloring. You’re controlling the quality of your ingredients, ensuring they are free from harmful pesticides and chemicals. Plus, the satisfaction of using something you’ve grown yourself is simply unparalleled.
But the benefits extend beyond the culinary realm. Hibiscus Sabdariffa is a stunning plant, adding a splash of color and visual interest to any garden. Its unique foliage and vibrant flowers are sure to attract attention and spark conversation. It’s a conversation starter, a natural remedy, and a beautiful addition to your life, all rolled into one.
Looking for variations? Absolutely! Experiment with different growing mediums. While well-draining soil is key, try incorporating compost or aged manure for added nutrients. Consider growing your Hibiscus Sabdariffa in containers if you have limited space or want to move them indoors during colder months. You can also explore different varieties of Hibiscus Sabdariffa, each with its own unique characteristics and flavor profiles. Some varieties are more compact, while others produce larger calyces. Don’t be afraid to experiment and find what works best for you and your local climate.
Furthermore, think about companion planting. Basil, marigolds, and other herbs can help deter pests and attract beneficial insects, creating a healthier and more vibrant growing environment for your Hibiscus Sabdariffa.
And finally, consider the drying process. Experiment with different drying methods to find the one that best preserves the color and flavor of your calyces. Some prefer air-drying, while others opt for using a dehydrator. Each method yields slightly different results, so it’s worth exploring to find your preferred technique.
We wholeheartedly encourage you to embark on this exciting gardening adventure. Growing your own Hibiscus Sabdariffa is easier than you might think, and the rewards are well worth the effort. Don’t be intimidated by the process; start small, be patient, and learn as you go.
We’re eager to hear about your experiences! Share your tips, tricks, and photos with us in the comments below. Let’s create a community of Hibiscus Sabdariffa enthusiasts and learn from each other. What challenges did you face? What successes did you achieve? What unique ways are you using your homegrown hibiscus? Your insights could inspire others to take the plunge and discover the joys of growing their own. So, get your hands dirty, plant those seeds, and let the magic of Hibiscus Sabdariffa unfold before your eyes. Happy growing!
Frequently Asked Questions (FAQ)
What is the best time of year to plant Hibiscus Sabdariffa?
The ideal time to plant Hibiscus Sabdariffa is in the spring, after the last frost. This ensures that the seedlings have warm temperatures and plenty of sunlight to thrive. If you live in a region with a long growing season, you can also start seeds indoors a few weeks before the last frost and transplant them outdoors once the weather warms up. In tropical climates, you can plant year-round.
How much sunlight does Hibiscus Sabdariffa need?
Hibiscus Sabdariffa thrives in full sun, requiring at least 6-8 hours of direct sunlight per day. Insufficient sunlight can lead to leggy growth, reduced flowering, and smaller calyces. Choose a location in your garden that receives ample sunlight throughout the day. If you’re growing your hibiscus in a container, you can easily move it to a sunnier spot as needed.
What type of soil is best for growing Hibiscus Sabdariffa?
Well-draining soil is crucial for growing healthy Hibiscus Sabdariffa plants. The soil should be rich in organic matter and have a slightly acidic pH (around 6.0-6.5). Amend your soil with compost, aged manure, or other organic materials to improve drainage and fertility. Avoid heavy clay soils, as they can retain too much moisture and lead to root rot.
How often should I water my Hibiscus Sabdariffa plant?
Water your Hibiscus Sabdariffa plant regularly, especially during hot and dry weather. The soil should be kept consistently moist but not waterlogged. Check the soil moisture by sticking your finger about an inch deep. If the soil feels dry, it’s time to water. Reduce watering during cooler months or when rainfall is abundant. Container-grown plants may require more frequent watering than those grown in the ground.
How do I fertilize my Hibiscus Sabdariffa plant?
Fertilize your Hibiscus Sabdariffa plant every 4-6 weeks during the growing season with a balanced fertilizer. Look for a fertilizer that is rich in phosphorus and potassium, as these nutrients promote flowering and calyx development. Avoid over-fertilizing, as this can lead to excessive foliage growth at the expense of flowers. You can also use organic fertilizers, such as compost tea or fish emulsion.
What are some common pests and diseases that affect Hibiscus Sabdariffa?
Common pests that can affect Hibiscus Sabdariffa include aphids, spider mites, and whiteflies. These pests can be controlled with insecticidal soap, neem oil, or by introducing beneficial insects like ladybugs. Diseases that can affect Hibiscus Sabdariffa include root rot, leaf spot, and powdery mildew. Prevent these diseases by ensuring proper drainage, providing good air circulation, and avoiding overhead watering.
When is the best time to harvest Hibiscus Sabdariffa calyces?
The best time to harvest Hibiscus Sabdariffa calyces is about 2-3 weeks after the flowers have faded and the calyces have fully developed. The calyces should be plump, firm, and a deep crimson color. Use sharp scissors or pruning shears to cut the calyces from the plant. Harvest regularly to encourage continued production.
How do I dry Hibiscus Sabdariffa calyces?
There are several ways to dry Hibiscus Sabdariffa calyces. One method is to air-dry them by spreading them out on a screen or tray in a well-ventilated area. Another method is to use a dehydrator, which will dry the calyces more quickly. You can also dry them in a low-temperature oven. Once the calyces are completely dry, store them in an airtight container in a cool, dark place.
Can I grow Hibiscus Sabdariffa indoors?
Yes, you can grow Hibiscus Sabdariffa indoors, but it requires a bright, sunny location and careful attention to watering and fertilization. Choose a large pot with good drainage and use a well-draining potting mix. Provide at least 6-8 hours of direct sunlight per day, or supplement with grow lights. Water regularly, allowing the soil to dry slightly between waterings. Fertilize every 4-6 weeks during the growing season.
Is Hibiscus Sabdariffa safe for pets?
While generally considered non-toxic, it’s always best to exercise caution when introducing new plants into a home with pets. Some animals may experience mild gastrointestinal upset if they ingest large quantities of Hibiscus Sabdariffa. If you have pets that are prone to nibbling on plants, consider keeping your hibiscus out of their reach.

Leave a Comment