
Grow Snake Gourd at Home and unlock a world of culinary possibilities right in your backyard! Have you ever dreamt of harvesting your own exotic vegetables, impressing your friends with unique dishes, and knowing exactly where your food comes from? Well, dream no more! This DIY guide is your passport to cultivating these fascinating, serpentine gourds with ease.
Snake gourds, also known as Chichinda in some cultures, have a rich history, particularly in Asian cuisines where they’ve been enjoyed for centuries. They’re not just delicious; they’re also packed with nutrients! But let’s be honest, finding fresh, high-quality snake gourds at your local grocery store can be a challenge. That’s where this DIY trick comes in.
I’m going to show you how to grow snake gourd at home, even if you’re a complete beginner. Imagine the satisfaction of nurturing a tiny seed into a thriving vine, laden with these intriguing vegetables. Not only will you have a steady supply of fresh, organic snake gourds, but you’ll also gain a deeper connection to nature and a newfound appreciation for the magic of gardening. Plus, it’s a fantastic way to reduce your carbon footprint and save money on groceries. So, grab your gardening gloves, and let’s get started on this exciting adventure!
Schlangenhaargurke zu Hause anbauen: Ein umfassender DIY-Leitfaden
Hallo Pflanzenfreunde! Habt ihr schon mal von der Schlangenhaargurke (Trichosanthes cucumerina) gehört? Sie ist nicht nur eine faszinierende Pflanze mit ihren langen, gewundenen Früchten, sondern auch eine köstliche und vielseitige Zutat in der Küche. Ich zeige euch, wie ihr diese exotische Schönheit ganz einfach zu Hause anbauen könnt. Keine Sorge, es ist einfacher als ihr denkt!
Was ihr für den Anbau von Schlangenhaargurken benötigt
Bevor wir loslegen, hier eine Liste der Dinge, die ihr braucht:
* Samen der Schlangenhaargurke: Diese bekommt ihr in gut sortierten Gartencentern oder online. Achtet auf qualitativ hochwertige Samen.
* Anzuchttöpfe oder -schalen: Für die Voranzucht der Samen.
* Anzuchterde: Eine leichte, nährstoffarme Erde, die speziell für die Anzucht geeignet ist.
* Gartenerde: Eine gute, nährstoffreiche Gartenerde für das Auspflanzen.
* Kompost oder organischer Dünger: Um den Boden anzureichern und die Pflanzen zu versorgen.
* Ein sonniger Standort: Schlangenhaargurken lieben die Sonne!
* Ein Rankgerüst oder eine andere Kletterhilfe: Die Pflanzen brauchen etwas, an dem sie hochklettern können.
* Gießkanne oder Gartenschlauch: Zum regelmäßigen Gießen.
* Gartengeräte: Spaten, Schaufel, Harke.
* Geduld: Pflanzen brauchen Zeit zum Wachsen!
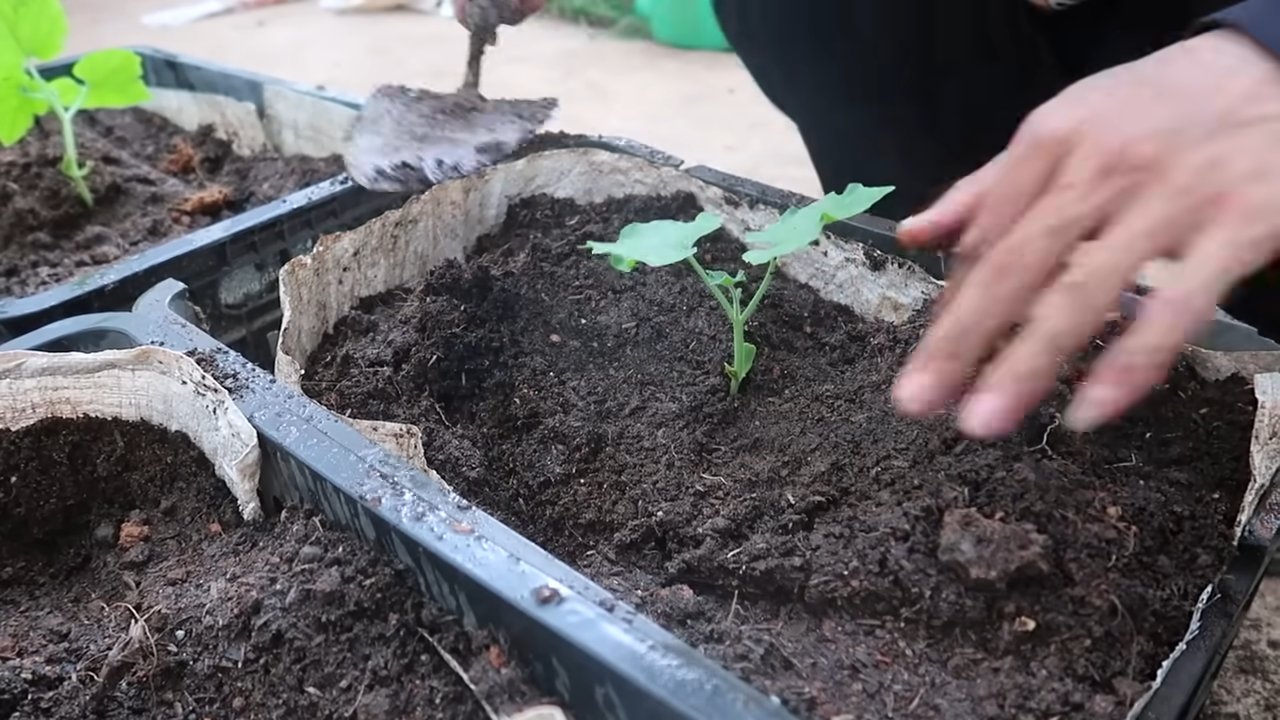
Die Vorbereitung: Samen vorziehen
Die Voranzucht der Samen ist ein wichtiger Schritt, besonders wenn ihr in einer Region mit kürzeren Sommern wohnt. So gebt ihr den Pflanzen einen Vorsprung.
1. Samen vorbereiten: Um die Keimung zu beschleunigen, könnt ihr die Samen vor dem Einpflanzen für 24 Stunden in lauwarmem Wasser einweichen. Das hilft, die harte Samenschale aufzuweichen.
2. Anzuchttöpfe befüllen: Füllt eure Anzuchttöpfe oder -schalen mit Anzuchterde. Drückt die Erde leicht an.
3. Samen aussäen: Legt in jeden Topf ein bis zwei Samen, etwa 1-2 cm tief. Bedeckt die Samen mit Erde und gießt sie vorsichtig an.
4. Warm und feucht halten: Stellt die Töpfe an einen warmen, hellen Ort. Die ideale Keimtemperatur liegt zwischen 20 und 25 Grad Celsius. Haltet die Erde feucht, aber nicht nass. Ihr könnt die Töpfe mit Frischhaltefolie abdecken, um die Luftfeuchtigkeit zu erhöhen. Vergesst aber nicht, die Folie regelmäßig zu lüften, um Schimmelbildung zu vermeiden.
5. Geduld haben: Die Keimung dauert in der Regel 1-2 Wochen. Sobald die ersten Keimlinge erscheinen, könnt ihr die Folie entfernen.
Das Auspflanzen: Den Pflanzen ein neues Zuhause geben
Sobald die Jungpflanzen kräftig genug sind (etwa 10-15 cm hoch) und keine Frostgefahr mehr besteht, können sie ins Freie gepflanzt werden.
1. Standort vorbereiten: Wählt einen sonnigen Standort mit gut durchlässigem Boden. Schlangenhaargurken brauchen mindestens 6 Stunden Sonne pro Tag.
2. Boden vorbereiten: Lockert den Boden gründlich auf und entfernt Unkraut. Mischt Kompost oder organischen Dünger unter die Erde, um sie anzureichern.
3. Rankgerüst installieren: Baut ein Rankgerüst oder eine andere Kletterhilfe auf. Die Pflanzen können bis zu 3-4 Meter hoch werden, also braucht ihr etwas Stabiles. Ich habe gute Erfahrungen mit einem einfachen Holzgerüst oder einem stabilen Maschendrahtzaun gemacht.
4. Pflanzen aussetzen: Grabt Löcher, die etwas größer sind als die Wurzelballen der Jungpflanzen. Setzt die Pflanzen vorsichtig ein und füllt die Löcher mit Erde. Drückt die Erde leicht an und gießt die Pflanzen gründlich an.
5. Abstand halten: Pflanzt die Schlangenhaargurken in einem Abstand von etwa 50-60 cm zueinander. So haben sie genügend Platz zum Wachsen.
Die Pflege: Damit eure Schlangenhaargurken prächtig gedeihen
Die richtige Pflege ist entscheidend für eine reiche Ernte.
1. Regelmäßiges Gießen: Schlangenhaargurken brauchen viel Wasser, besonders während der Blütezeit und Fruchtbildung. Gießt die Pflanzen regelmäßig, aber vermeidet Staunässe. Am besten gießt ihr früh morgens oder spät abends, um Verdunstung zu vermeiden.
2. Düngen: Düngt die Pflanzen alle 2-3 Wochen mit einem organischen Dünger oder Komposttee. Das versorgt sie mit den notwendigen Nährstoffen.
3. Rankhilfe nutzen: Helft den Pflanzen, an der Rankhilfe hochzuklettern. Bindet die Triebe vorsichtig fest, wenn nötig.
4. Unkraut entfernen: Haltet den Bereich um die Pflanzen herum unkrautfrei. Unkraut konkurriert mit den Schlangenhaargurken um Nährstoffe und Wasser.
5. Schädlinge und Krankheiten: Achtet auf Schädlinge wie Blattläuse oder Spinnmilben. Bei Bedarf könnt ihr biologische Schädlingsbekämpfungsmittel einsetzen. Auch Pilzkrankheiten können auftreten, besonders bei feuchtem Wetter. Sorgt für eine gute Belüftung und entfernt befallene Blätter.
Die Ernte: Endlich ernten!
Die Erntezeit beginnt in der Regel etwa 2-3 Monate nach dem Auspflanzen.
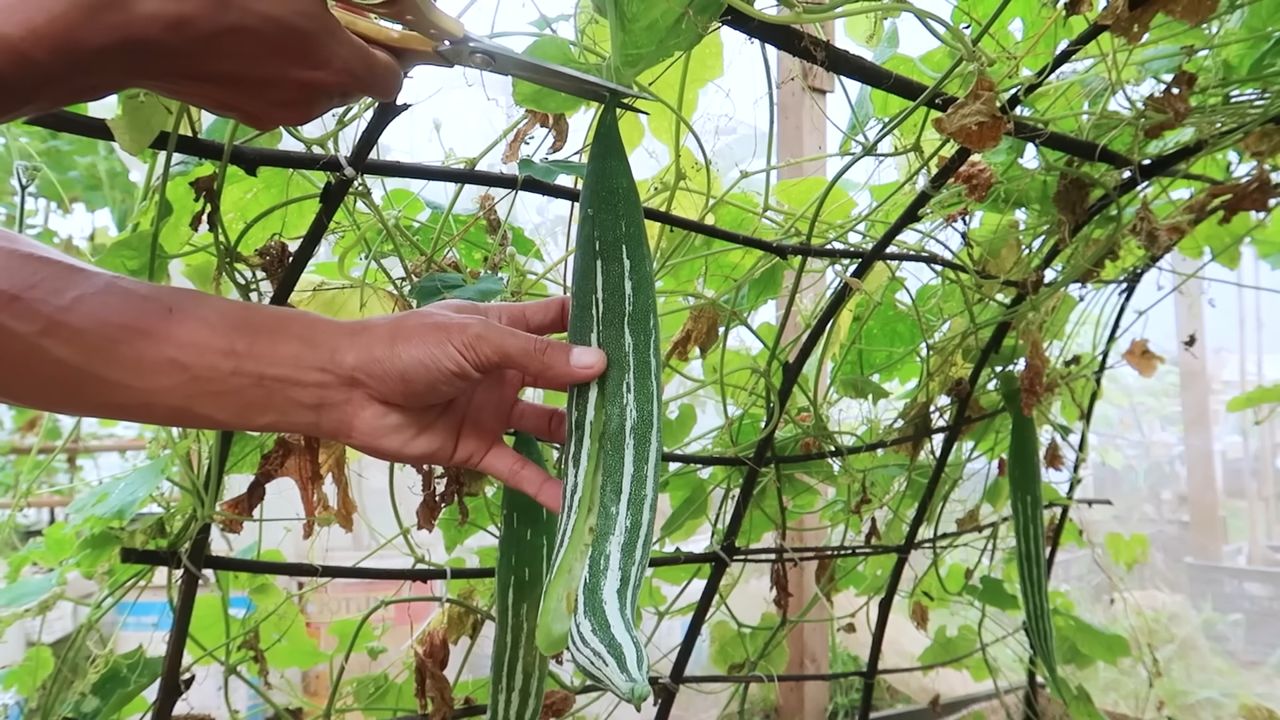
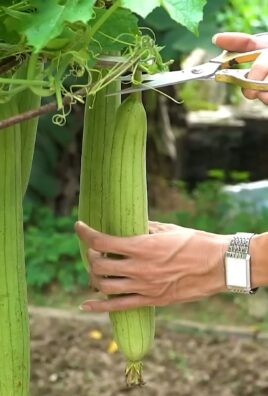
1. Erntezeitpunkt: Die Schlangenhaargurken sind erntereif, wenn sie etwa 30-40 cm lang sind und eine grüne Farbe haben. Sie sollten sich fest anfühlen.
2. Ernten: Schneidet die Früchte mit einem scharfen Messer oder einer Gartenschere ab. Achtet darauf, die Pflanze nicht zu beschädigen.
3. Regelmäßig ernten: Erntet die Früchte regelmäßig, um die Produktion neuer Früchte anzuregen.
4. Verwendung: Schlangenhaargurken können roh in Salaten gegessen oder gekocht, gebraten oder gedünstet werden. Sie sind eine vielseitige Zutat in der Küche.
Zusätzliche Tipps und Tricks
* Bestäubung: Schlangenhaargurken sind einhäusig, das heißt, sie haben männliche und weibliche Blüten auf derselben Pflanze. Die Bestäubung erfolgt in der Regel durch Insekten. Wenn ihr sichergehen wollt, könnt ihr die Blüten auch von Hand bestäuben. Nehmt dazu einen Pinsel und übertragt den Pollen von den männlichen auf die weiblichen Blüten.
* Mulchen: Mulcht den Boden um die Pflanzen herum mit Stroh oder Rasenschnitt. Das hält den Boden feucht, unterdrückt Unkraut und schützt die Pflanzen vor Bodenspritzern.
* Samen gewinnen: Wenn ihr im nächsten Jahr wieder Schlangenhaargurken anbauen wollt, könnt ihr die Samen aus den reifen Früchten gewinnen. Lasst die Früchte dazu an der Pflanze ausreifen, bis sie gelb werden. Entfernt die Samen und trocknet sie gut, bevor ihr sie lagert.
* Sortenwahl: Es gibt verschiedene Sorten von Schlangenhaargurken. Informiert euch vor dem Kauf über die Eigenschaften der einzelnen Sorten und wählt diejenige aus, die am besten zu euren Bedürfnissen passt.
Häufige Probleme und Lösungen
* Keine Früchte: Wenn eure Schlangenhaargurken blühen, aber keine Früchte bilden, kann das an mangelnder Bestäubung liegen. Helft mit der Handbestäubung nach.
* Gelbe Blätter: Gelbe Blätter können ein Zeichen für Nährstoffmangel oder Staunässe sein. Düngt die Pflanzen oder verbessert die Drainage.
* Schädlinge: Kontrolliert die Pflanzen regelmäßig auf Schädlinge und bekämpft sie bei Bedarf mit biologischen Mitteln.
Ich hoffe, dieser Leitfaden hilft euch dabei, eure eigenen Schlangenhaargurken zu Hause anzubauen. Es ist ein lohnendes Projekt, das euch mit köstlichen und ungewöhnlichen Früchten belohnt. Viel Spaß beim Gärtnern
Conclusion
So, there you have it! Growing snake gourd at home is not only achievable, but it’s also a deeply rewarding experience. Forget relying solely on grocery stores for this unique and nutritious vegetable. By embracing this DIY approach, you gain complete control over the growing process, ensuring you have access to fresh, organically grown snake gourd whenever you desire.
This method offers a significant advantage: you know exactly what goes into your food. No more worrying about harmful pesticides or unknown chemicals. You’re nurturing your own little ecosystem, contributing to a healthier lifestyle for yourself and your family. Plus, the satisfaction of harvesting something you’ve cultivated from seed is unparalleled. It’s a connection to nature that’s often missing in our modern lives.
But the benefits don’t stop there. Growing snake gourd at home is also a fantastic way to reduce your carbon footprint. Think about it: less transportation, less packaging, and a smaller reliance on industrial agriculture. You’re actively participating in a more sustainable food system.
And let’s not forget the sheer versatility of snake gourd in the kitchen! From savory curries and stir-fries to refreshing raitas and even pickles, the culinary possibilities are endless. Experiment with different spices and flavor combinations to create your own signature snake gourd dishes.
Consider these variations to personalize your snake gourd growing journey:
* Vertical Gardening: If you’re short on space, train your snake gourd vines to grow vertically on a trellis or fence. This maximizes your yield and adds a beautiful green element to your garden.
* Companion Planting: Plant basil, marigolds, or other beneficial herbs and flowers near your snake gourd to deter pests and attract pollinators.
* Seed Saving: Once your snake gourds mature, save the seeds for future plantings. This ensures a continuous supply of this delicious vegetable.
* Grafting: For advanced gardeners, consider grafting your snake gourd onto a more vigorous rootstock for increased yields and disease resistance.
Ultimately, the key to successful snake gourd cultivation lies in consistent care and attention. Provide your plants with ample sunlight, water, and nutrients, and you’ll be rewarded with a bountiful harvest.
We wholeheartedly encourage you to give this DIY trick a try. Don’t be intimidated if you’re a beginner gardener. Snake gourd is surprisingly resilient and forgiving. Start small, learn as you go, and most importantly, have fun!
Once you’ve harvested your first snake gourd, we’d love to hear about your experience. Share your photos, tips, and recipes with us in the comments below. Let’s create a community of passionate snake gourd growers and inspire others to embrace the joys of homegrown food. So, get your hands dirty and start growing your own delicious and nutritious snake gourd today! You’ll be amazed at what you can achieve.
Frequently Asked Questions (FAQ)
What is the best time of year to plant snake gourd seeds?
The ideal time to plant snake gourd seeds is during the late spring or early summer, after the last frost has passed and the soil has warmed up to at least 70°F (21°C). Snake gourd thrives in warm weather and requires a long growing season of at least 120 days. In regions with mild winters, you may be able to start seeds indoors a few weeks before the last frost and transplant them outdoors once the weather permits. However, in colder climates, it’s best to wait until the weather is consistently warm before planting.
How much sunlight does snake gourd need?
Snake gourd requires at least 6-8 hours of direct sunlight per day to thrive. Choose a planting location that receives ample sunlight throughout the day. If you’re growing snake gourd indoors, supplement with grow lights if necessary to ensure adequate light exposure. Insufficient sunlight can lead to stunted growth, reduced yields, and pale, underdeveloped fruits.
What type of soil is best for growing snake gourd?
Snake gourd prefers well-drained, fertile soil that is rich in organic matter. The ideal soil pH is between 6.0 and 7.0. Before planting, amend the soil with compost, aged manure, or other organic materials to improve drainage, fertility, and water retention. Avoid planting snake gourd in heavy clay soil, as this can lead to root rot. If your soil is compacted, consider adding sand or perlite to improve drainage.
How often should I water snake gourd plants?
Water snake gourd plants regularly, especially during hot, dry weather. Aim to keep the soil consistently moist but not waterlogged. Water deeply at the base of the plants, avoiding wetting the foliage, which can increase the risk of fungal diseases. Mulching around the plants can help retain moisture in the soil and suppress weed growth. During periods of heavy rainfall, reduce watering frequency to prevent overwatering.
What kind of fertilizer should I use for snake gourd?
Snake gourd benefits from regular fertilization throughout the growing season. Use a balanced fertilizer with equal amounts of nitrogen, phosphorus, and potassium (e.g., 10-10-10) or a fertilizer specifically formulated for vegetables. Apply fertilizer according to the package instructions, typically every 2-3 weeks. You can also supplement with organic fertilizers such as compost tea or fish emulsion. Avoid over-fertilizing, as this can lead to excessive vegetative growth and reduced fruit production.
How do I control pests and diseases in snake gourd?
Snake gourd can be susceptible to various pests and diseases, including aphids, spider mites, squash bugs, powdery mildew, and downy mildew. To prevent pest and disease problems, practice good garden hygiene, such as removing weeds and debris, providing adequate air circulation, and avoiding overhead watering. Inspect your plants regularly for signs of pests or diseases and take action promptly. Use organic pest control methods such as insecticidal soap, neem oil, or diatomaceous earth to control pests. For fungal diseases, apply a fungicide according to the package instructions.
How long does it take for snake gourd to mature?
Snake gourd typically takes 90-120 days to mature from seed to harvest. The exact time will depend on the variety, growing conditions, and climate. You can harvest snake gourd when the fruits are young and tender, typically when they are about 12-18 inches long. The skin should be smooth and green, and the flesh should be firm. Overripe snake gourd can become tough and bitter.
How do I store snake gourd after harvesting?
Store freshly harvested snake gourd in the refrigerator for up to a week. Wrap the gourds in plastic wrap or place them in a plastic bag to prevent them from drying out. You can also freeze snake gourd for longer storage. Blanch the gourds in boiling water for 2-3 minutes, then cool them in ice water before freezing. Frozen snake gourd can be stored for up to 6 months.
Can I eat the seeds of snake gourd?
Yes, the seeds of snake gourd are edible and nutritious. They are a good source of protein, fiber, and minerals. You can roast the seeds and eat them as a snack or grind them into a powder and use them as a spice. However, some people may find the seeds to be slightly bitter, so it’s best to try a small amount first.
Is snake gourd good for health?
Yes, snake gourd is a very healthy vegetable. It is low in calories and fat and high in fiber, vitamins, and minerals. It is a good source of vitamin C, vitamin B6, potassium, and magnesium. Snake gourd is also known for its medicinal properties. It is believed to have anti-inflammatory, antioxidant, and anti-diabetic effects. It is often used in traditional medicine to treat various ailments.


Leave a Comment