
Growing Hibiscus at Home doesn’t have to be a daunting task! Imagine your garden bursting with vibrant, tropical blooms, adding a splash of exotic color to your everyday life. That’s the magic of hibiscus, and I’m here to tell you it’s more achievable than you think, even if you don’t have a green thumb (yet!).
Hibiscus flowers have been cherished for centuries, not just for their beauty but also for their cultural significance. In some cultures, they symbolize delicate beauty, while in others, they represent hospitality and good fortune. Think of the iconic hibiscus flower adorning Hawaiian leis – a symbol of welcome and aloha. Now, you can bring that same welcoming spirit to your own home.
But why should you bother with growing hibiscus at home? Well, beyond the sheer aesthetic pleasure, hibiscus plants are surprisingly resilient and relatively easy to care for with the right knowledge. This DIY guide is packed with simple tricks and hacks that will help you cultivate thriving hibiscus plants, even if you’re a complete beginner. I’ll walk you through everything from choosing the right variety for your climate to mastering the art of pruning and fertilizing. Say goodbye to dull gardens and hello to a vibrant oasis – let’s get started!

Hibiskus zu Hause ziehen: Dein umfassender DIY-Leitfaden
Hallo Pflanzenfreunde! Ich liebe Hibiskusblüten – diese leuchtenden, tropischen Schönheiten bringen einfach Freude in jeden Garten oder jedes Zuhause. Und das Beste daran? Es ist gar nicht so schwer, sie selbst zu ziehen! In diesem Artikel zeige ich dir Schritt für Schritt, wie du deinen eigenen Hibiskus erfolgreich anpflanzen und pflegen kannst. Los geht’s!
Die Grundlagen: Was du für den Start brauchst
Bevor wir loslegen, lass uns sicherstellen, dass du alles Nötige zur Hand hast. Hier ist eine Liste der wichtigsten Dinge:
* Hibiskussamen oder Stecklinge: Du kannst entweder Samen kaufen oder Stecklinge von einem bestehenden Hibiskus schneiden. Stecklinge sind oft einfacher, da sie schneller wachsen.
* Anzuchterde: Verwende eine spezielle Anzuchterde, die leicht und gut durchlässig ist. Normale Blumenerde ist oft zu schwer für die Keimung.
* Kleine Töpfe oder Anzuchtschalen: Für die Aussaat oder das Bewurzeln der Stecklinge.
* Größere Töpfe: Sobald die Pflanzen größer werden, brauchst du größere Töpfe zum Umtopfen.
* Blumenerde: Eine gute Blumenerde mit guter Drainage ist wichtig für das Wachstum.
* Dünger: Ein spezieller Hibiskusdünger oder ein ausgewogener Blumendünger hilft, die Pflanzen mit den notwendigen Nährstoffen zu versorgen.
* Gießkanne oder Sprühflasche: Zum Bewässern der Pflanzen.
* Gartenschere oder Messer: Zum Schneiden der Stecklinge.
* Bewurzelungshormon (optional): Kann helfen, die Bewurzelung der Stecklinge zu beschleunigen.
* Standort: Ein sonniger Standort ist ideal für Hibiskus.
Hibiskus aus Samen ziehen: Schritt für Schritt
Wenn du dich für die Anzucht aus Samen entschieden hast, hier ist, wie es geht:
1. Samen vorbereiten: Die Hibiskussamen haben oft eine harte Schale. Um die Keimung zu beschleunigen, kannst du sie vor dem Einpflanzen für 24 Stunden in warmem Wasser einweichen. Das hilft, die Schale aufzuweichen.
2. Aussaat: Fülle deine Anzuchtschalen oder kleinen Töpfe mit Anzuchterde. Streue die Samen gleichmäßig auf die Erde und bedecke sie leicht mit einer dünnen Schicht Erde (ca. 0,5 cm).
3. Bewässerung: Befeuchte die Erde vorsichtig mit einer Sprühflasche. Die Erde sollte feucht, aber nicht nass sein.
4. Standort und Klima: Stelle die Anzuchtschalen an einen warmen, hellen Ort. Eine Temperatur zwischen 20 und 25 Grad Celsius ist ideal für die Keimung. Du kannst auch ein Mini-Gewächshaus verwenden, um die Luftfeuchtigkeit zu erhöhen.
5. Geduld: Die Keimung kann einige Wochen dauern. Halte die Erde feucht und warte geduldig.
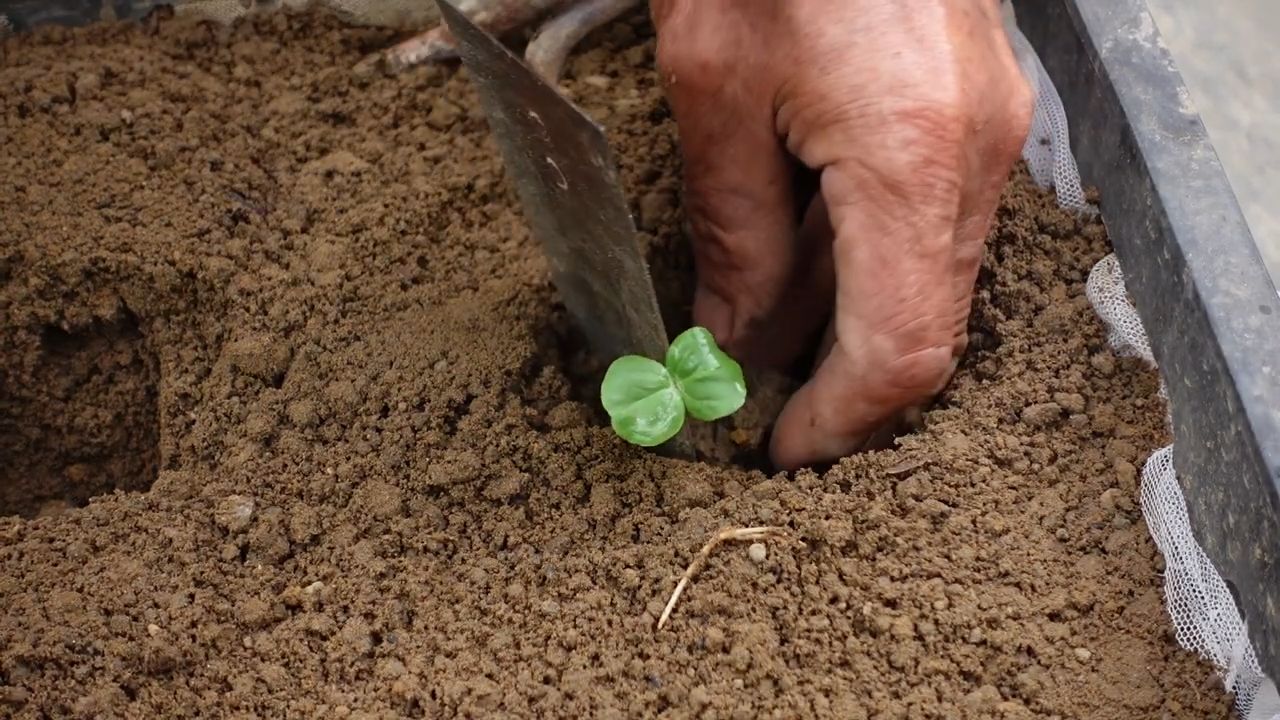
6. Pikieren: Sobald die Sämlinge groß genug sind (etwa 5-7 cm hoch), kannst du sie in größere Töpfe umpflanzen. Achte darauf, die Wurzeln nicht zu beschädigen.
Hibiskus durch Stecklinge vermehren: Eine einfache Methode
Die Vermehrung durch Stecklinge ist oft einfacher und schneller als die Anzucht aus Samen. So geht’s:
1. Stecklinge schneiden: Wähle gesunde, kräftige Triebe von einem bestehenden Hibiskus. Schneide etwa 10-15 cm lange Stecklinge direkt unterhalb eines Blattknotens. Entferne die unteren Blätter, damit der Steckling seine Energie auf die Bewurzelung konzentrieren kann.
2. Bewurzelungshormon (optional): Tauche das untere Ende des Stecklings in Bewurzelungshormon. Das fördert die Wurzelbildung.
3. Einpflanzen: Fülle kleine Töpfe mit Anzuchterde. Stecke die Stecklinge etwa 5 cm tief in die Erde.
4. Bewässerung und Klima: Befeuchte die Erde vorsichtig und stülpe eine Plastiktüte oder ein Mini-Gewächshaus über die Töpfe, um die Luftfeuchtigkeit zu erhöhen. Stelle die Töpfe an einen warmen, hellen Ort, aber vermeide direkte Sonneneinstrahlung.
5. Geduld: Die Bewurzelung kann einige Wochen dauern. Halte die Erde feucht und lüfte die Tüte oder das Gewächshaus regelmäßig, um Schimmelbildung zu vermeiden.
6. Umtopfen: Sobald die Stecklinge Wurzeln gebildet haben (du kannst vorsichtig daran ziehen, um zu prüfen), kannst du sie in größere Töpfe mit Blumenerde umpflanzen.
Die richtige Pflege: So bleibt dein Hibiskus glücklich
Sobald dein Hibiskus angewachsen ist, ist die richtige Pflege entscheidend für seine Gesundheit und Blütenpracht.
Standort
Hibiskus liebt die Sonne! Stelle ihn an einen sonnigen Standort, an dem er mindestens 6 Stunden direktes Sonnenlicht pro Tag bekommt. Wenn du ihn drinnen hältst, platziere ihn in der Nähe eines sonnigen Fensters.
Bewässerung
Hibiskus braucht regelmäßige Bewässerung, besonders während der Wachstumsperiode im Frühjahr und Sommer. Die Erde sollte immer leicht feucht sein, aber nicht nass. Vermeide Staunässe, da dies zu Wurzelfäule führen kann. Im Winter kannst du die Bewässerung reduzieren.
Düngung
Hibiskus ist ein Starkzehrer und braucht regelmäßige Düngung, um üppig zu blühen. Verwende einen speziellen Hibiskusdünger oder einen ausgewogenen Blumendünger. Dünge während der Wachstumsperiode alle 2-4 Wochen. Im Winter kannst du die Düngung einstellen.
Schnitt
Regelmäßiger Schnitt fördert die Blütenbildung und hält die Pflanze in Form. Schneide im Frühjahr abgestorbene oder beschädigte Triebe ab. Du kannst auch die Triebe leicht einkürzen, um die Verzweigung zu fördern.
Überwinterung
Hibiskus ist nicht winterhart und muss im Winter ins Haus geholt werden. Stelle ihn an einen hellen, kühlen Ort (ca. 10-15 Grad Celsius). Reduziere die Bewässerung und Dünung während der Winterruhe.
Schädlinge und Krankheiten
Hibiskus kann von verschiedenen Schädlingen befallen werden, wie z.B. Blattläusen, Spinnmilben oder Weißen Fliegen. Kontrolliere deine Pflanzen regelmäßig und behandle sie bei Bedarf mit einem geeigneten Insektizid. Achte auch auf Anzeichen von Krankheiten wie Wurzelfäule oder Pilzbefall.
Häufige Probleme und Lösungen
Auch bei guter Pflege können Probleme auftreten. Hier sind einige häufige Probleme und wie du sie lösen kannst:
* Gelbe Blätter: Können durch Überwässerung, Nährstoffmangel oder Schädlingsbefall verursacht werden. Überprüfe die Bewässerung, dünge die Pflanze und kontrolliere sie auf Schädlinge.
* Keine Blüten: Können durch zu wenig Sonnenlicht, Nährstoffmangel oder falsche Schnitt verursacht werden. Stelle die Pflanze an einen sonnigeren Standort, dünge sie regelmäßig und schneide sie richtig.
* Abfallende Knospen: Können durch Stress verursacht werden, z.B. durch plötzliche Temperaturänderungen, Zugluft oder zu trockene Luft. Vermeide Stressfaktoren und sorge für eine stabile Umgebung.
Zusätzliche Tipps für prächtige Hibiskusblüten
* Luftfeuchtigkeit erhöhen: Hibiskus liebt hohe Luftfeuchtigkeit. Du kannst die Luftfeuchtigkeit erhöhen, indem du die Pflanze regelmäßig mit Wasser besprühst oder sie in der Nähe eines Luftbefeuchters aufstellst.
* Regelmäßig umtopfen: Topfe deinen Hibiskus alle 1-2 Jahre in einen größeren Topf um. Verwende dabei frische Blumenerde.
* Auf die Sorte achten: Es gibt viele verschiedene Hibiskussorten mit unterschiedlichen Ansprüchen. Informiere dich über die spezifischen Bedürfnisse deiner Sorte.
Ich hoffe, dieser Leitfaden hilft dir dabei, deinen eigenen Hibiskus erfolgreich zu ziehen und zu pflegen. Mit etwas Geduld und Sorgfalt wirst du bald mit wunderschönen Blüten belohnt! Viel Spaß beim Gärt
Conclusion
So, there you have it! Growing hibiscus at home, while it might seem daunting at first, is entirely achievable with a little know-how and the right approach. We’ve walked you through the essential steps, from selecting the perfect variety for your climate to nurturing your plant with the right soil, sunlight, and care. But the real magic lies in the DIY tricks we’ve shared, particularly the one about creating your own hibiscus fertilizer.
Why is this DIY fertilizer trick a must-try? Because it puts you in complete control of what your hibiscus is consuming. Commercial fertilizers can be expensive and often contain ingredients you might not want to expose your plant to. Our homemade version is not only cost-effective but also allows you to tailor the nutrient blend to your hibiscus’s specific needs at different stages of its growth. Think of it as giving your hibiscus a personalized vitamin boost!
Beyond the basic recipe, feel free to experiment! For example, if you notice your hibiscus needs a boost in flower production, increase the amount of bone meal in your fertilizer mix. If the leaves are looking pale, a touch more Epsom salts can work wonders. The beauty of DIY is the flexibility it offers. You can also try composting kitchen scraps like banana peels and coffee grounds to add even more organic matter and nutrients to your fertilizer. Just remember to research the specific nutrient content of each ingredient and adjust accordingly.
Don’t be afraid to get your hands dirty and embrace the learning process. Growing hibiscus is a journey, and every plant is unique. What works for one might need tweaking for another. The key is to observe your hibiscus closely, pay attention to its signals, and adjust your care accordingly.
We are confident that by incorporating this DIY fertilizer trick into your hibiscus care routine, you’ll see a noticeable difference in the health, vigor, and blooming potential of your plant. Imagine vibrant, show-stopping blooms gracing your garden or patio, all thanks to your own homemade concoction!
Now, it’s your turn. We wholeheartedly encourage you to try this DIY trick and witness the transformation firsthand. Share your experiences with us! Let us know what variations you tried, what challenges you encountered, and what successes you celebrated. Your feedback will not only help us refine this guide but also inspire other hibiscus enthusiasts to embark on their own DIY adventures. Post your photos and stories in the comments section below – we can’t wait to see your flourishing hibiscus! Remember, the most rewarding part of gardening is sharing the joy and knowledge with others. Happy growing!
FAQ
What exactly are the benefits of using a DIY fertilizer for my hibiscus compared to store-bought options?
DIY fertilizers offer several key advantages. First, you have complete control over the ingredients, ensuring your hibiscus receives only what it needs without potentially harmful additives found in some commercial fertilizers. Second, it’s often more cost-effective, especially if you already have some of the ingredients on hand. Third, it’s environmentally friendly, reducing your reliance on manufactured products and potentially utilizing kitchen scraps that would otherwise go to waste. Finally, you can tailor the nutrient blend to your hibiscus’s specific needs at different growth stages, promoting optimal health and blooming.
How often should I apply this DIY hibiscus fertilizer?
The frequency of application depends on several factors, including the age of your plant, the size of the pot (if applicable), and the time of year. As a general guideline, fertilize your hibiscus every 2-4 weeks during the active growing season (spring and summer). Reduce the frequency to every 6-8 weeks during the dormant season (fall and winter). Always err on the side of caution and avoid over-fertilizing, which can damage your plant. Observe your hibiscus closely for signs of nutrient deficiency or toxicity and adjust the frequency accordingly.
Can I use this DIY fertilizer on other plants besides hibiscus?
While this DIY fertilizer is specifically formulated for hibiscus, it can potentially benefit other flowering plants that prefer slightly acidic soil and require similar nutrients. However, it’s crucial to research the specific needs of each plant before applying the fertilizer. Some plants may require different nutrient ratios or have sensitivities to certain ingredients. It’s always best to test the fertilizer on a small area of the plant first to ensure it doesn’t cause any adverse reactions.
What are some signs that my hibiscus is suffering from nutrient deficiency or toxicity?
Signs of nutrient deficiency can include yellowing leaves (chlorosis), stunted growth, poor blooming, and leaf drop. The specific symptoms will vary depending on which nutrient is lacking. For example, a nitrogen deficiency often manifests as yellowing of older leaves, while an iron deficiency typically causes yellowing between the veins of younger leaves. Signs of nutrient toxicity can include leaf burn (browning edges), wilting, and the accumulation of salts on the soil surface. If you suspect a nutrient imbalance, it’s essential to identify the specific problem and adjust your fertilization practices accordingly.
What if I don’t have all the ingredients listed in the DIY fertilizer recipe? Can I substitute anything?
While it’s best to use all the recommended ingredients for optimal results, some substitutions are possible. For example, if you don’t have bone meal, you can use rock phosphate as an alternative source of phosphorus. If you don’t have Epsom salts, you can skip it, although it’s a valuable source of magnesium. If you’re missing fish emulsion, you can use another liquid fertilizer that’s high in nitrogen. However, be sure to adjust the amounts accordingly to maintain the proper nutrient balance. When in doubt, it’s always better to err on the side of caution and use less rather than more.
My hibiscus isn’t blooming, even though I’m using the DIY fertilizer. What could be the problem?
Lack of blooming can be caused by several factors, not just nutrient deficiency. Other potential causes include insufficient sunlight, improper watering, temperature stress, and pest infestations. Hibiscus needs at least 6 hours of direct sunlight per day to bloom properly. Overwatering or underwatering can also inhibit flowering. Extreme temperatures can stress the plant and prevent it from blooming. Finally, pests like aphids and spider mites can weaken the plant and reduce its blooming potential. Make sure you’re addressing all these factors in addition to using the DIY fertilizer.
How do I store the leftover DIY fertilizer?
Store any leftover DIY fertilizer in an airtight container in a cool, dark place. This will help prevent the ingredients from degrading and maintain their effectiveness. Properly stored fertilizer can last for several months. Be sure to label the container clearly with the date and contents. Before using the stored fertilizer, give it a good shake to ensure the ingredients are evenly distributed.
Is it possible to over-fertilize my hibiscus with this DIY mixture? What are the risks?
Yes, it is absolutely possible to over-fertilize your hibiscus, even with a DIY mixture. Over-fertilizing can lead to a buildup of salts in the soil, which can damage the roots and prevent the plant from absorbing water and nutrients. This can result in leaf burn, wilting, and even death. To avoid over-fertilizing, always follow the recommended application rates and frequency. Observe your hibiscus closely for signs of nutrient toxicity and adjust your fertilization practices accordingly. It’s always better to err on the side of caution and use less rather than more. Regularly flushing the soil with water can also help prevent salt buildup.
Leave a Comment