
Growing bell peppers creatively doesn’t have to be a daunting task! Imagine biting into a crisp, juicy bell pepper, bursting with flavor, that you nurtured from a tiny seed right in your own backyard. Sounds rewarding, right? For centuries, bell peppers have been a staple in cuisines around the world, adding vibrant color and essential nutrients to our diets. From the stuffed peppers of Mediterranean cultures to the spicy salsas of Latin America, this versatile vegetable has a rich and delicious history.
But let’s be honest, sometimes gardening can feel a little…intimidating. That’s where these DIY tricks and hacks come in! I’m here to show you that growing bell peppers creatively is not only achievable, but also incredibly fun and satisfying, even if you have limited space or experience. We’ll explore clever container gardening ideas, learn how to maximize your yield with simple techniques, and discover how to protect your precious peppers from pests and diseases.
Why do you need these DIY tricks? Because everyone deserves to enjoy the taste of homegrown goodness! Store-bought bell peppers simply can’t compare to the flavor and freshness of those you’ve grown yourself. Plus, gardening is a fantastic way to relieve stress, connect with nature, and add a touch of beauty to your surroundings. So, grab your gardening gloves, and let’s dive into the world of creative bell pepper cultivation!
Kreativer Paprikaanbau: Mehr als nur ein Topf!
Hallo liebe Gartenfreunde! Ich liebe Paprika, und ich liebe es, kreativ zu sein. Deshalb möchte ich euch heute zeigen, wie ihr Paprika auf eine Art und Weise anbauen könnt, die nicht nur effektiv ist, sondern auch richtig Spaß macht und euren Garten oder Balkon verschönert. Wir werden uns verschiedene Methoden ansehen, von der klassischen Topfkultur bis hin zu vertikalen Gärten und sogar hydroponischen Systemen. Lasst uns loslegen!
Paprika-Anbau im Topf: Der Klassiker, aber mit Pfiff
Der Anbau im Topf ist eine tolle Möglichkeit, wenn ihr wenig Platz habt oder eure Paprikapflanzen flexibel umstellen möchtet. Hier sind die wichtigsten Punkte, die ihr beachten solltet:
* Die richtige Topfgröße: Paprikapflanzen brauchen Platz! Wählt einen Topf mit einem Durchmesser von mindestens 30 cm und einem Volumen von mindestens 10 Litern. Größer ist immer besser, besonders wenn ihr mehrere Pflanzen in einem Topf anbauen möchtet.
* Die richtige Erde: Paprika liebt nährstoffreiche, gut durchlässige Erde. Eine Mischung aus Gartenerde, Kompost und Sand ist ideal. Ihr könnt auch spezielle Gemüseerde im Gartencenter kaufen.
* Der richtige Standort: Paprika braucht Sonne, Sonne, Sonne! Mindestens 6 Stunden direkte Sonneneinstrahlung pro Tag sind Pflicht. Ein sonniger Balkon oder eine Terrasse sind perfekt.
* Die richtige Bewässerung: Paprika mag es feucht, aber nicht nass. Gießt regelmäßig, aber vermeidet Staunässe. Lasst die oberste Erdschicht zwischen den Wassergaben leicht antrocknen.
* Die richtige Düngung: Paprika ist ein Starkzehrer und braucht regelmäßig Dünger. Beginnt etwa 2 Wochen nach dem Einpflanzen mit dem Düngen und wiederholt dies alle 2-3 Wochen. Verwendet einen speziellen Gemüsedünger oder einen organischen Dünger wie Hornspäne oder Komposttee.
Schritt-für-Schritt-Anleitung für den Paprika-Anbau im Topf:
1. Topf vorbereiten: Wählt einen Topf mit Abzugslöchern, um Staunässe zu vermeiden. Legt eine Schicht Tonscherben oder Kies auf den Boden des Topfes, um die Drainage zu verbessern.
2. Erde einfüllen: Füllt den Topf mit der vorbereiteten Erde. Lasst etwa 5 cm Platz bis zum Rand.
3. Pflanze einsetzen: Grabt ein Loch in die Erde, das groß genug für den Wurzelballen der Paprikapflanze ist. Setzt die Pflanze vorsichtig ein und füllt das Loch mit Erde auf. Drückt die Erde leicht an.
4. Angießen: Gießt die Paprikapflanze gründlich an.
5. Standort wählen: Stellt den Topf an einen sonnigen Standort.
6. Pflege: Gießt und düngt die Paprikapflanze regelmäßig. Entfernt regelmäßig Seitentriebe, um die Fruchtbildung zu fördern. Stützt die Pflanze bei Bedarf mit einem Stab, um zu verhindern, dass sie umknickt.
Vertikaler Paprika-Garten: Platzsparend und dekorativ
Wenn ihr wenig Platz habt, aber trotzdem viele Paprikapflanzen anbauen möchtet, ist ein vertikaler Garten die perfekte Lösung. Es gibt viele verschiedene Möglichkeiten, einen vertikalen Garten zu gestalten. Hier sind einige Ideen:
* Hängende Töpfe: Hängt Töpfe mit Paprikapflanzen an einer Wand oder einem Geländer auf.
* Paletten-Garten: Verwandelt eine alte Palette in einen vertikalen Garten, indem ihr Töpfe oder Pflanzsäcke in die Zwischenräume einsetzt.
* Pflanzsäcke: Verwendet Pflanzsäcke, die an einer Wand oder einem Zaun befestigt werden können.
* Regal-Garten: Stellt ein Regal auf und platziert Töpfe mit Paprikapflanzen auf den verschiedenen Ebenen.
Schritt-für-Schritt-Anleitung für einen vertikalen Paprika-Garten mit Pflanzsäcken:
1. Pflanzsäcke auswählen: Wählt Pflanzsäcke aus, die für den Anbau von Gemüse geeignet sind. Achtet darauf, dass sie ausreichend groß sind und über Abzugslöcher verfügen.
2. Standort wählen: Wählt einen sonnigen Standort für euren vertikalen Garten.
3. Pflanzsäcke befestigen: Befestigt die Pflanzsäcke an einer Wand oder einem Zaun. Achtet darauf, dass sie stabil und sicher befestigt sind.
4. Erde einfüllen: Füllt die Pflanzsäcke mit der vorbereiteten Erde.
5. Pflanzen einsetzen: Setzt die Paprikapflanzen in die Pflanzsäcke ein.
6. Angießen: Gießt die Paprikapflanzen gründlich an.
7. Pflege: Gießt und düngt die Paprikapflanzen regelmäßig. Achtet darauf, dass die Erde in den Pflanzsäcken nicht austrocknet.
Hydroponischer Paprika-Anbau: High-Tech für den Hausgebrauch
Der hydroponische Anbau ist eine moderne Methode, bei der Pflanzen ohne Erde in einer Nährlösung angebaut werden. Das klingt kompliziert, ist aber auch für Anfänger machbar. Es gibt verschiedene hydroponische Systeme, die ihr zu Hause verwenden könnt. Hier sind einige Beispiele:
* Deep Water Culture (DWC): Die Wurzeln der Paprikapflanzen hängen in einer Nährlösung, die mit einer Luftpumpe mit Sauerstoff angereichert wird.
* Nutrient Film Technique (NFT): Eine dünne Schicht Nährlösung fließt kontinuierlich über die Wurzeln der Paprikapflanzen.
* Ebb and Flow (Ebbe und Flut): Die Paprikapflanzen werden in einem Behälter mit Nährlösung geflutet und anschließend wieder entwässert.
Schritt-für-Schritt-Anleitung für den hydroponischen Paprika-Anbau mit DWC:
1. Behälter vorbereiten: Wählt einen Behälter, der groß genug für die Paprikapflanzen ist. Bohrt Löcher in den Deckel des Behälters, in die die Netztöpfe passen.
2. Netztöpfe vorbereiten: Füllt die Netztöpfe mit einem Substrat wie Blähton oder Steinwolle.
3. Nährlösung vorbereiten: Mischt die Nährlösung gemäß den Anweisungen des Herstellers.
4. Behälter befüllen: Füllt den Behälter mit der Nährlösung.
5. Luftpumpe installieren: Installiert eine Luftpumpe mit einem Ausströmerstein im Behälter, um die Nährlösung mit Sauerstoff anzureichern.
6. Pflanzen einsetzen: Setzt die Paprikapflanzen in die Netztöpfe ein. Achtet darauf, dass die Wurzeln die Nährlösung berühren.
7. Standort wählen: Stellt den Behälter an einen sonnigen Standort oder verwendet eine Pflanzenlampe.
8. Pflege: Kontrolliert regelmäßig den pH-Wert und die Nährstoffkonzentration der Nährlösung und passt sie bei Bedarf an. Wechselt die Nährlösung alle 1-2 Wochen.
Kreative Extras: Paprika-Sorten und Begleitpflanzen
Um euren Paprika-Anbau noch kreativer zu gestalten, könnt ihr verschiedene Paprika-Sorten anbauen und Begleitpflanzen hinzufügen.
* Paprika-Sorten: Es gibt unzählige Paprika-Sorten in verschiedenen Farben, Formen und Schärfegraden. Probiert verschiedene Sorten aus, um eure Lieblingssorte zu finden. Beliebte Sorten sind z.B. “California Wonder” (rot), “Yolo Wonder” (grün), “Sweet Banana” (gelb) und “Jalapeño” (scharf).
* Begleitpflanzen: Begleitpflanzen können helfen, Schädlinge abzuwehren und das Wachstum der Paprikapflanzen zu fördern. Gute Begleitpflanzen für Paprika sind z.B. Basilikum, Ringelblume, Knoblauch und Zwiebeln.
Ich hoffe, diese Tipps und Anleitungen helfen euch dabei, euren Paprika-Anbau kreativ und erfolgreich
Conclusion
So, there you have it! Growing bell peppers creatively doesn’t have to be a daunting task reserved for seasoned gardeners. By embracing these simple yet effective DIY tricks, you can unlock a bountiful harvest of vibrant, flavorful bell peppers, even if you’re working with limited space or resources. We’ve explored everything from optimizing your soil composition with homemade compost to crafting ingenious support systems that encourage healthy growth and prevent fruit from touching the ground.
The beauty of these methods lies in their adaptability. Feel free to experiment with different container sizes, companion plants, and even the specific varieties of bell peppers you choose to cultivate. Perhaps you’ll discover that interplanting basil not only repels pests but also enhances the flavor of your peppers. Or maybe you’ll find that using recycled plastic bottles as mini-greenhouses gives your seedlings an extra boost during those early, vulnerable stages. The possibilities are truly endless!
Remember, the key to successful gardening is observation and adaptation. Pay close attention to your plants, noting their growth patterns, leaf color, and overall health. Don’t be afraid to adjust your watering schedule, fertilizer application, or even the location of your containers based on what you observe. Gardening is a journey of continuous learning, and every season brings new opportunities to refine your techniques and deepen your connection with nature.
But why is this DIY approach a must-try? Because it empowers you to take control of your food source, reduce your reliance on commercially grown produce, and experience the unparalleled satisfaction of harvesting your own delicious bell peppers. It’s a sustainable, cost-effective, and incredibly rewarding way to connect with the earth and nourish your body. Plus, imagine the bragging rights you’ll earn when you serve up a dish featuring peppers you grew yourself!
We encourage you to embrace your inner gardener and give these DIY tricks a try. Whether you’re a seasoned pro or a complete beginner, we’re confident that you’ll find success and enjoyment in growing your own bell peppers creatively. And most importantly, we want to hear about your experiences! Share your tips, triumphs, and even your occasional gardening mishaps in the comments below. Let’s create a community of passionate pepper growers who inspire and support each other on this exciting journey. So grab your gardening gloves, get your hands dirty, and prepare to be amazed by the abundance that awaits you!
Frequently Asked Questions (FAQ)
What are the best bell pepper varieties to grow using these DIY methods?
The beauty of these DIY methods is that they are adaptable to a wide range of bell pepper varieties. However, some varieties tend to thrive particularly well in container gardens or smaller spaces. Consider opting for compact or bush-type varieties like ‘Patio Bell’, ‘Mini Bell’, or ‘Lunchbox’. These varieties are bred to produce smaller plants with a high yield of peppers, making them ideal for container gardening. Larger varieties like ‘California Wonder’ or ‘Jupiter’ can also be grown, but they may require larger containers and more support. Ultimately, the best variety for you will depend on your personal preferences and the specific growing conditions in your area. Research different varieties and choose those that are known for their disease resistance, flavor, and suitability for container gardening.
How often should I water my bell pepper plants grown using these methods?
Watering frequency is crucial for healthy bell pepper growth, but it’s not a one-size-fits-all answer. Several factors influence how often you need to water, including the size of your container, the type of soil you’re using, the weather conditions, and the stage of growth of your plants. As a general rule, aim to keep the soil consistently moist but not waterlogged. Overwatering can lead to root rot, while underwatering can stunt growth and reduce fruit production. Check the soil moisture level regularly by sticking your finger about an inch or two into the soil. If it feels dry to the touch, it’s time to water. During hot, dry weather, you may need to water daily, while during cooler, wetter periods, you may only need to water every few days. When watering, water deeply and thoroughly, ensuring that the entire root zone is moistened. Avoid watering the foliage, as this can increase the risk of fungal diseases.
What type of fertilizer should I use for my bell pepper plants?
Bell peppers are heavy feeders and require a steady supply of nutrients to thrive. A balanced fertilizer with an NPK ratio (nitrogen, phosphorus, potassium) of around 5-10-10 or 10-10-10 is a good starting point. Nitrogen promotes leafy growth, phosphorus supports root development and flowering, and potassium enhances fruit production and overall plant health. You can use either a granular or liquid fertilizer, but be sure to follow the instructions on the label carefully. For container-grown peppers, liquid fertilizers are often preferred because they are easier to apply and distribute evenly. Start fertilizing your plants a few weeks after transplanting them into their final containers and continue fertilizing every 2-3 weeks throughout the growing season. You can also supplement with organic fertilizers like compost tea or fish emulsion to provide additional nutrients and beneficial microbes to the soil.
How can I protect my bell pepper plants from pests and diseases?
Pests and diseases can be a major challenge for bell pepper growers, but there are several preventative measures you can take to minimize the risk. Start by choosing disease-resistant varieties whenever possible. Ensure that your plants have adequate spacing to allow for good air circulation, which helps to prevent fungal diseases. Regularly inspect your plants for signs of pests or diseases, such as aphids, whiteflies, or leaf spots. If you spot any problems, take action immediately. For minor infestations, you can often remove pests by hand or spray them with a strong stream of water. For more serious infestations, you may need to use insecticidal soap or neem oil. To prevent fungal diseases, avoid overhead watering and ensure that your plants have good drainage. You can also apply a copper-based fungicide as a preventative measure. Companion planting can also help to deter pests. For example, planting basil near your bell peppers can help to repel aphids and other insects.
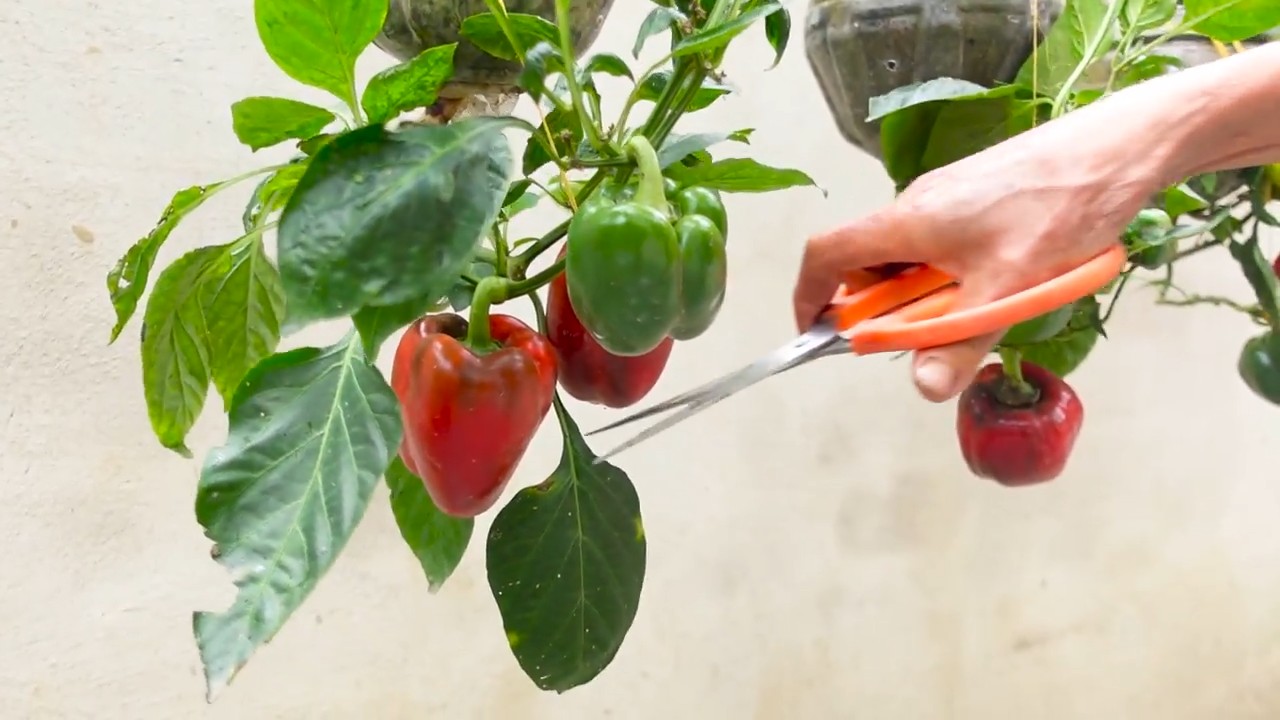
How do I know when my bell peppers are ready to harvest?
The timing of harvest depends on the variety of bell pepper and your personal preferences. Generally, bell peppers are ready to harvest when they have reached their mature size and color. Green bell peppers can be harvested when they are firm and have reached a good size, even if they are still green. However, if you want to harvest red, yellow, or orange bell peppers, you will need to wait until they have fully ripened and changed color. Ripe bell peppers will be slightly softer to the touch and will have a glossy sheen. Use a sharp knife or pruning shears to cut the peppers from the plant, leaving a short stem attached. Harvesting peppers regularly will encourage the plant to produce more fruit.


Leave a Comment