
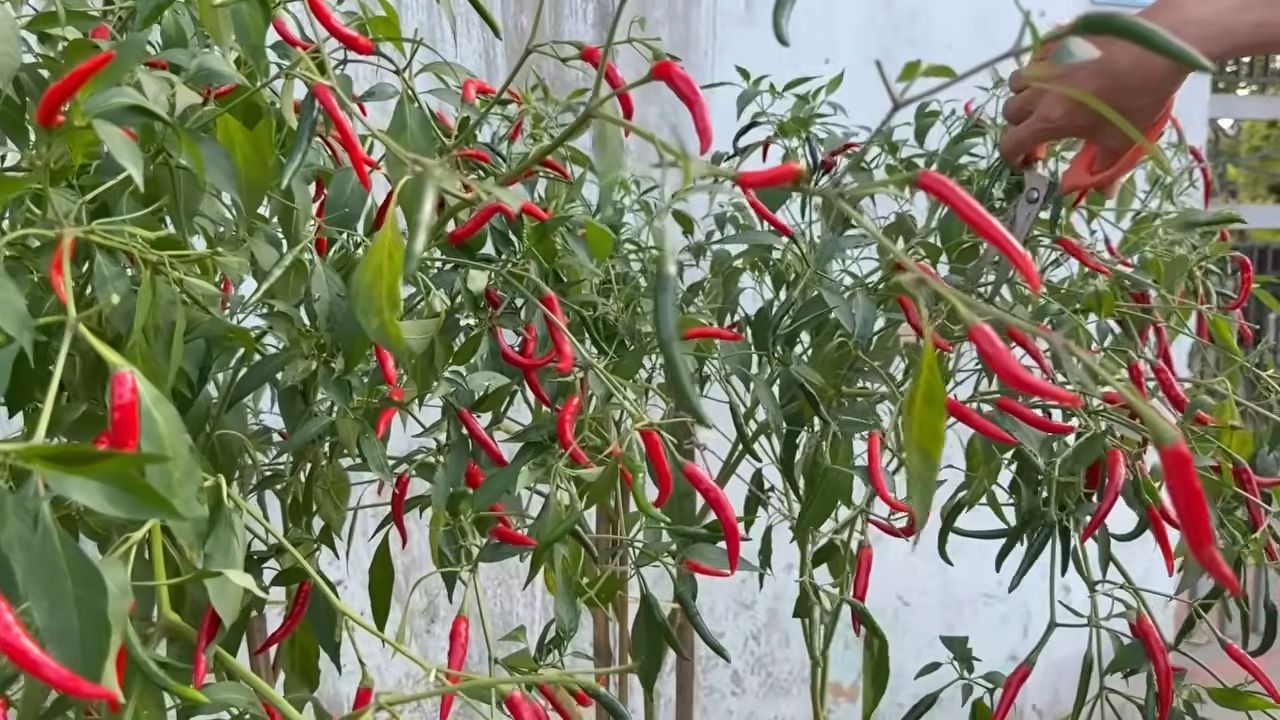
Growing chili from seed can seem daunting, but trust me, it’s one of the most rewarding experiences a home gardener can have! Imagine the satisfaction of harvesting fiery peppers you nurtured from tiny specks into vibrant, fruit-bearing plants. Forget those bland, store-bought chilies – with a little know-how, you can cultivate a rainbow of flavors and heat levels right in your own backyard (or even on your windowsill!).
Chili peppers have a rich history, dating back thousands of years to South America, where they were prized not only for their culinary uses but also for their medicinal properties. From ancient Aztec rituals to modern-day spicy food challenges, chilies have always held a special place in human culture.
But why should you bother growing chili from seed? Well, for starters, it gives you complete control over the variety you grow. You’re no longer limited to what’s available at the grocery store. Plus, it’s incredibly cost-effective! A single packet of chili seeds can yield dozens of plants, saving you a bundle compared to buying mature plants or peppers. And let’s be honest, there’s nothing quite like the bragging rights that come with saying, “I grew these myself!” In this article, I’m going to share my favorite DIY tricks and hacks to ensure your chili-growing journey is a success, from seed to salsa!
Chili Anzucht: Dein Weg zur eigenen Chili-Ernte!
Hey Chili-Liebhaber! Du träumst von einer reichen Chili-Ernte aus dem eigenen Garten oder vom Balkon? Dann bist du hier genau richtig! Ich zeige dir, wie du deine eigenen Chili-Pflanzen aus Samen ziehst – ganz einfach und mit Gelinggarantie! Keine Angst, es ist wirklich nicht schwerer als Tomaten anzuziehen, versprochen!
Was du für die Chili-Anzucht brauchst:
* Chili-Samen: Wähle deine Lieblingssorten! Ob mild oder feurig scharf, die Auswahl ist riesig. Achte auf frische Samen für eine gute Keimrate.
* Anzuchterde: Diese ist nährstoffarm und locker, ideal für die empfindlichen Keimlinge. Normale Blumenerde ist zu reichhaltig.
* Anzuchtgefäße: Kleine Töpfe, Anzuchtschalen oder Torfquelltöpfe sind perfekt. Ich persönlich mag kleine Plastiktöpfe, weil sie wiederverwendbar sind.
* Mini-Gewächshaus oder Frischhaltefolie: Für ein feuchtwarmes Klima, das die Keimung fördert. Ein Mini-Gewächshaus ist natürlich superpraktisch, aber Frischhaltefolie tut’s auch.
* Sprühflasche: Zum Befeuchten der Erde.
* Warmes Plätzchen: Chilis lieben es warm! Eine Fensterbank über der Heizung oder ein beheiztes Zimmer sind ideal.
* Pikierstab oder Bleistift: Zum Vereinzeln der Keimlinge.
* Etiketten und Stift: Damit du den Überblick behältst, welche Sorte wo wächst.
* Geduld: Die Chili-Anzucht braucht etwas Zeit. Aber das Warten lohnt sich!
Der perfekte Zeitpunkt für die Chili-Anzucht:
Am besten startest du mit der Chili-Anzucht zwischen Ende Januar und Anfang März. So haben die Pflanzen genügend Zeit, um bis zum Auspflanzen nach den Eisheiligen (Mitte Mai) kräftig zu wachsen.
Schritt-für-Schritt-Anleitung zur Chili-Anzucht:
1. Vorbereitung der Anzuchtgefäße:
* Fülle die Anzuchtgefäße mit Anzuchterde. Drücke die Erde leicht an, aber nicht zu fest.
* Befeuchte die Erde mit der Sprühflasche. Sie sollte feucht, aber nicht nass sein.
2. Aussaat der Chili-Samen:
* Lege pro Topf oder Zelle 1-2 Chili-Samen auf die Erde.
* Bedecke die Samen mit einer dünnen Schicht Anzuchterde (ca. 0,5 cm). Chilis sind Dunkelkeimer, brauchen also etwas Erde über sich.
* Befeuchte die Erde erneut mit der Sprühflasche.
3. Schaffen eines feuchtwarmen Klimas:
* Stelle die Anzuchtgefäße in ein Mini-Gewächshaus oder bedecke sie mit Frischhaltefolie.
* Achte darauf, dass die Folie nicht direkt auf der Erde aufliegt. Du kannst z.B. kleine Stäbchen unter die Folie legen.
* Lüfte das Gewächshaus oder die Folie täglich kurz, um Schimmelbildung zu vermeiden.
4. Der richtige Standort:
* Stelle das Mini-Gewächshaus oder die abgedeckten Anzuchtgefäße an einen warmen Ort. Die ideale Keimtemperatur liegt zwischen 22 und 28 Grad Celsius.
* Vermeide direkte Sonneneinstrahlung, da die Erde sonst zu schnell austrocknen kann.
5. Geduld ist gefragt:
* Die Keimung kann je nach Chilisorte und Temperatur 1-3 Wochen dauern.
* Halte die Erde während dieser Zeit feucht, aber nicht nass.
* Kontrolliere regelmäßig, ob sich Schimmel bildet.
6. Die ersten Keimlinge:
* Sobald die ersten Keimlinge aus der Erde spitzen, entferne die Folie oder das Mini-Gewächshaus.
* Stelle die Anzuchtgefäße an einen hellen Ort, aber vermeide weiterhin direkte Sonneneinstrahlung.
7. Pikieren der Chili-Pflanzen:
* Sobald die Chili-Pflanzen ihre ersten richtigen Blätter (nach den Keimblättern) gebildet haben, ist es Zeit zum Pikieren. Das bedeutet, dass du die einzelnen Pflanzen in größere Töpfe umpflanzt.
* Fülle größere Töpfe (ca. 8-10 cm Durchmesser) mit Anzuchterde.
* Lockere die Erde um die Chili-Pflanzen vorsichtig mit einem Pikierstab oder Bleistift.
* Hebe die Pflanzen vorsichtig aus der Erde und setze sie in die neuen Töpfe.
* Achte darauf, dass die Wurzeln nicht beschädigt werden.
* Fülle die Töpfe mit Erde auf und drücke sie leicht an.
* Gieße die Pflanzen vorsichtig an.
8. Pflege der Chili-Pflanzen:
* Stelle die pikierten Chili-Pflanzen an einen hellen und warmen Ort.
* Gieße die Pflanzen regelmäßig, aber vermeide Staunässe.
* Dünge die Pflanzen alle 2-3 Wochen mit einem speziellen Chili-Dünger oder einem Tomatendünger.
* Drehe die Töpfe regelmäßig, damit die Pflanzen gleichmäßig wachsen.
9. Abhärten der Chili-Pflanzen:
* Bevor du die Chili-Pflanzen nach den Eisheiligen ins Freie pflanzt, solltest du sie abhärten. Das bedeutet, dass du sie langsam an die Bedingungen im Freien gewöhnst.
* Stelle die Pflanzen tagsüber für einige Stunden ins Freie, an einen geschützten Ort.
* Verlängere die Zeit im Freien jeden Tag um ein paar Stunden.
* Achte darauf, dass die Pflanzen nicht der direkten Sonneneinstrahlung ausgesetzt sind.
10. Auspflanzen der Chili-Pflanzen:
* Nach den Eisheiligen (Mitte Mai) kannst du die Chili-Pflanzen ins Freie pflanzen.
* Wähle einen sonnigen und warmen Standort.
* Der Boden sollte locker und durchlässig sein.
* Pflanze die Chili-Pflanzen in einem Abstand von ca. 40-50 cm.
* Gieße die Pflanzen nach dem Pflanzen gut an.
Zusätzliche Tipps für eine erfolgreiche Chili-Anzucht:
* Verwende frische Samen: Je frischer die Samen, desto höher die Keimrate.
* Achte auf die richtige Temperatur: Chilis lieben es warm! Die ideale Keimtemperatur liegt zwischen 22 und 28 Grad Celsius.
* Vermeide Staunässe: Staunässe kann zu Wurzelfäule führen.
* Dünge regelmäßig: Chilis sind Starkzehrer und brauchen ausreichend Nährstoffe.
* Schütze die Pflanzen vor Schädlingen: Achte auf Blattläuse, Spinnmilben und andere Schädlinge.
* Sei geduldig: Die Chili-Anzucht braucht etwas Zeit. Aber das Warten lohnt sich!
Häufige Fehler bei der Chili-Anzucht und wie du sie vermeidest:
* Falsche Erde: Verwende unbedingt Anzuchterde, keine normale Blumenerde.
* Zu viel Wasser: Staunässe vermeiden! Die Erde sollte feucht, aber nicht nass sein.
* Zu wenig Licht: Nach der Keimung brauchen die Pflanzen viel Licht.
* Zu niedrige Temperatur: Chilis lieben es warm!
* Ungeduld: Die Keimung kann etwas dauern. Gib nicht auf!
Chili-Sorten für Anfänger:
Wenn du neu in der Chili-Anzucht bist, empfehle ich dir, mit milderen Sorten zu beginnen. Diese sind in der Regel robuster und einfacher zu ziehen. Hier ein paar Beispiele:
* Jalapeño: Ein Klassiker mit milder Schärfe.
* Pimiento de Padrón: Spanische Chili, von mild bis leicht sch
Conclusion
So, there you have it! Growing chili from seed might seem daunting at first, but with a little patience and these simple steps, you’ll be harvesting your own fiery peppers in no time. This DIY trick isn’t just about saving money; it’s about connecting with the food you eat, understanding the growing process, and experiencing the immense satisfaction of nurturing a plant from a tiny seed to a bountiful producer.
Why is this a must-try? Because store-bought chilies, while convenient, often lack the vibrant flavor and intense heat that homegrown varieties possess. Plus, you have complete control over the type of chili you grow. Fancy a scorching Scotch Bonnet? Or perhaps a milder Poblano? The choice is entirely yours! You can even experiment with heirloom varieties that are rarely found in supermarkets.
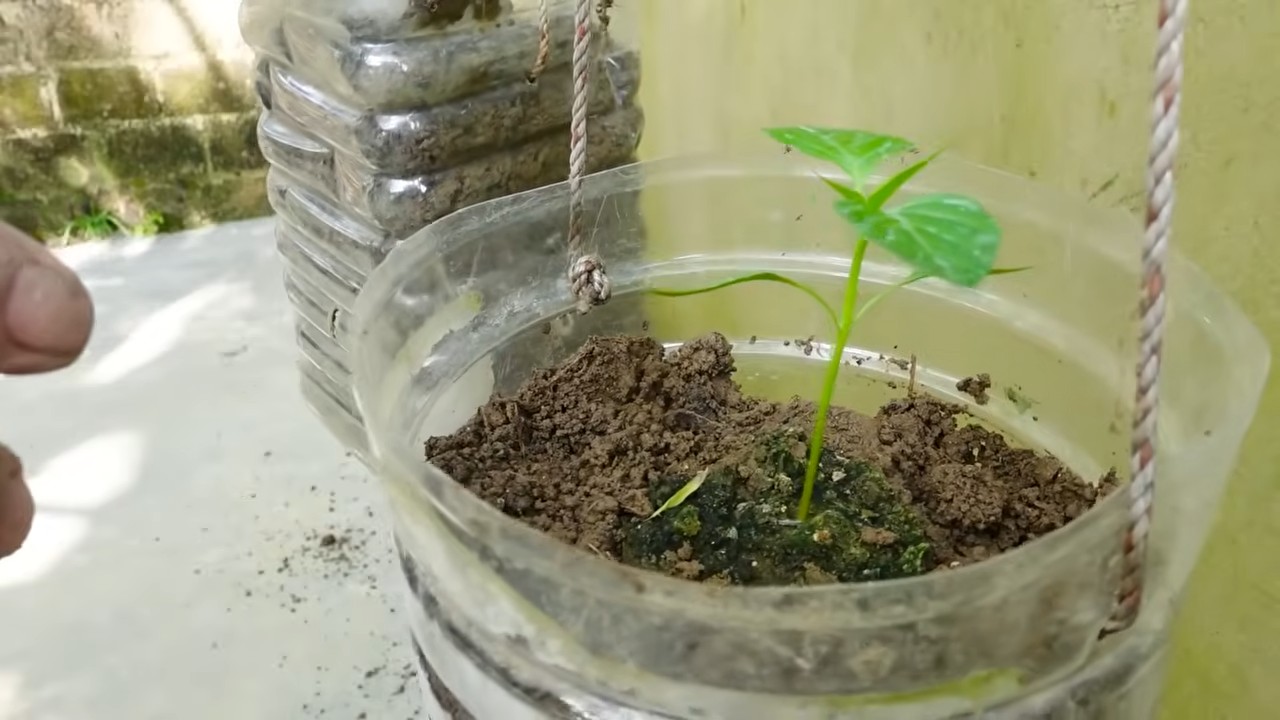
Beyond the basic method outlined, there are countless variations you can explore. Try using different types of seed starting mixes to see which one works best for your climate and growing conditions. Experiment with different lighting setups – from natural sunlight to grow lights – to optimize seedling development. And don’t be afraid to get creative with your containers! Upcycled yogurt cups, egg cartons, or even repurposed plastic bottles can all make excellent seed starting vessels.
Consider these variations to tailor your chili growing experience:
* **Hydroponic Chili Growing:** For a more advanced approach, explore hydroponic systems. This soilless method can lead to faster growth and higher yields.
* **Container Gardening:** If you’re short on space, container gardening is your best friend. Choose appropriately sized pots and ensure proper drainage.
* **Companion Planting:** Plant basil, carrots, or onions near your chili plants to deter pests and improve growth.
* **Fermenting Your Harvest:** Once you’ve harvested your chilies, consider fermenting them to create delicious hot sauces or chili pastes.
Growing chili from seed is a rewarding experience that connects you to the natural world. It’s a chance to learn, experiment, and ultimately, enjoy the fruits (or rather, the chilies!) of your labor.
We wholeheartedly encourage you to give this DIY trick a try. It’s easier than you think, and the rewards are well worth the effort. Don’t be afraid to experiment, adapt the techniques to your specific environment, and most importantly, have fun!
Once you’ve embarked on your chili-growing adventure, we’d love to hear about your experiences. Share your successes, your challenges, and any tips or tricks you’ve discovered along the way. Let’s create a community of chili enthusiasts who are passionate about growing their own fiery delights! Post pictures of your seedlings, share your favorite chili recipes, and let us know what varieties you’re growing. Together, we can all become better chili growers. So, grab some seeds, get your hands dirty, and prepare to spice up your life with the incredible flavor of homegrown chilies! Remember, the key to successful **growing chili from seed** is patience, observation, and a willingness to learn. Happy growing!
Frequently Asked Questions (FAQ)
What is the best time of year to start growing chili from seed?
The ideal time to start growing chili from seed depends on your climate. In general, you should aim to start your seeds indoors 6-8 weeks before the last expected frost. This allows the seedlings to develop a strong root system before being transplanted outdoors. If you live in a warmer climate with a longer growing season, you can start your seeds later in the spring. Check your local frost dates to determine the best time to start your seeds.
What type of soil is best for growing chili from seed?
Chili seeds need a well-draining, nutrient-rich soil to germinate and thrive. A seed starting mix is ideal, as it is specifically formulated to provide the right balance of moisture and nutrients for young seedlings. You can also make your own seed starting mix by combining equal parts peat moss, perlite, and vermiculite. Avoid using garden soil, as it can be too heavy and may contain pests or diseases.
How often should I water my chili seedlings?
Keep the soil consistently moist, but not waterlogged. Water your chili seedlings when the top inch of soil feels dry to the touch. Avoid overwatering, as this can lead to root rot. Use a gentle watering can or spray bottle to avoid disturbing the delicate seedlings.
How much light do chili seedlings need?
Chili seedlings need plenty of light to grow strong and healthy. If you’re starting your seeds indoors, provide them with at least 12-14 hours of light per day. A sunny windowsill can work, but grow lights are often necessary to provide adequate light, especially during the winter months. Position the grow lights a few inches above the seedlings and adjust the height as they grow.
When should I transplant my chili seedlings outdoors?
Transplant your chili seedlings outdoors after the last expected frost and when the soil has warmed up to at least 60°F (15°C). Before transplanting, harden off the seedlings by gradually exposing them to outdoor conditions for a week or two. Start by placing them in a sheltered location for a few hours each day, gradually increasing the amount of time they spend outdoors.
What are some common pests and diseases that affect chili plants?
Common pests that affect chili plants include aphids, spider mites, and whiteflies. Diseases include fungal infections like powdery mildew and blossom end rot. Regularly inspect your plants for signs of pests or diseases and take appropriate action. Insecticidal soap, neem oil, and copper fungicides can be used to control pests and diseases.
How often should I fertilize my chili plants?
Fertilize your chili plants every 2-3 weeks with a balanced fertilizer. Look for a fertilizer that is specifically formulated for vegetables or tomatoes. Avoid over-fertilizing, as this can lead to excessive foliage growth and reduced fruit production.
How long does it take for chili plants to produce fruit?
It typically takes 60-90 days for chili plants to produce fruit, depending on the variety. Some varieties may mature faster than others. Be patient and continue to provide your plants with proper care.
How do I know when my chilies are ripe?
The color of the chili will change as it ripens. Most chilies start out green and then turn red, yellow, orange, or brown, depending on the variety. The chili should also feel firm to the touch.
Can I grow chili plants indoors year-round?
Yes, you can grow chili plants indoors year-round, provided you provide them with adequate light, warmth, and humidity. Use grow lights to supplement natural light and maintain a consistent temperature of 70-80°F (21-27°C). You may also need to increase the humidity around the plants by using a humidifier or misting them regularly.
Leave a Comment