
Rooftop Kale Gardening: Imagine stepping onto your roof and harvesting fresh, vibrant kale, ready to be transformed into a delicious and healthy meal. Sounds like a dream, right? Well, it doesn’t have to be! This DIY guide will unlock the secrets to successful rooftop kale gardening, even if you’re a complete beginner.
Kale, a nutritional powerhouse, has a rich history dating back to ancient Greece and Rome, where it was a staple food. Over the centuries, it has spread across the globe, becoming a beloved ingredient in countless cuisines. But beyond its culinary appeal, growing your own kale offers a unique connection to nature and a sense of self-sufficiency.
Why rooftop kale gardening, you ask? In today’s world, where space is often a premium, especially in urban environments, rooftops offer an untapped potential for creating thriving gardens. Plus, growing your own food allows you to control what goes into it, ensuring it’s free from harmful pesticides and chemicals. I know, I know, it sounds intimidating, but trust me, with a few simple tricks and hacks, you can transform your rooftop into a flourishing kale oasis. This article will provide you with the knowledge and confidence to embark on your own rooftop kale gardening adventure. Let’s get started!
Dein eigener Dachgarten mit Grünkohl: Eine Schritt-für-Schritt Anleitung
Hey Gartenfreunde! Habt ihr auch Lust, eure eigenen frischen, gesunden Grünkohl direkt vom Dach zu ernten? Ich zeige euch, wie ihr einen fantastischen Dachgarten mit Grünkohl anlegen könnt – auch wenn ihr wenig Platz habt! Es ist einfacher, als ihr denkt, und das Ergebnis ist einfach unschlagbar. Los geht’s!
Was du für deinen Dachgarten mit Grünkohl brauchst
Bevor wir loslegen, hier eine Liste mit allen Materialien und Werkzeugen, die du benötigst. So hast du alles griffbereit und kannst ohne Unterbrechung durchstarten.
* **Behälter:** Wähle leichte, aber robuste Behälter. Pflanzkästen aus Kunststoff, Stofftöpfe oder sogar recycelte Behälter (mit Abflusslöchern!) sind super geeignet. Achte darauf, dass sie groß genug sind (mindestens 30 cm tief und breit), damit der Grünkohl genügend Platz zum Wachsen hat.
* **Erde:** Verwende eine hochwertige, gut durchlässige Blumenerde. Spezielle Gemüseerde ist ideal, da sie die richtigen Nährstoffe für dein Gemüse enthält. Vermeide Gartenerde, da diese oft zu schwer ist und nicht gut entwässert.
* **Grünkohl-Samen oder Jungpflanzen:** Du kannst entweder Grünkohl-Samen aussäen oder direkt Jungpflanzen kaufen. Jungpflanzen sind einfacher, da sie bereits einen Wachstumsvorsprung haben.
* **Dünger:** Ein organischer Dünger, wie Kompost oder Hornspäne, ist perfekt, um deinen Grünkohl mit den nötigen Nährstoffen zu versorgen.
* **Gießkanne oder Gartenschlauch:** Zum regelmäßigen Gießen deiner Pflanzen.
* **Schaufel oder Kelle:** Zum Befüllen der Behälter mit Erde und zum Einpflanzen der Grünkohl-Pflanzen.
* **Handschuhe:** Um deine Hände sauber zu halten.
* **(Optional) Rankhilfe:** Je nach Grünkohl-Sorte kann eine Rankhilfe sinnvoll sein, um die Pflanzen zu stützen.
* **(Optional) Schneckenschutz:** Schnecken lieben Grünkohl! Ein Schneckenzaun oder Schneckenkorn kann helfen, deine Pflanzen zu schützen.
Die Vorbereitung: Der Schlüssel zum Erfolg
Bevor wir mit dem Bepflanzen loslegen, ist eine gute Vorbereitung das A und O. Hier sind die wichtigsten Schritte:
1. **Dachprüfung:** Bevor du deinen Dachgarten anlegst, solltest du sicherstellen, dass dein Dach das Gewicht der Behälter und der Erde tragen kann. Im Zweifelsfall solltest du einen Statiker konsultieren.
2. **Reinigung:** Reinige die Dachfläche gründlich, um Schmutz und Ablagerungen zu entfernen.
3. **Abdichtung:** Überprüfe die Dachabdichtung und repariere eventuelle Schäden, um Wasserschäden zu vermeiden.
4. **Sonneneinstrahlung:** Beobachte, wie viel Sonne dein Dach bekommt. Grünkohl benötigt mindestens 6 Stunden Sonne pro Tag, um optimal zu wachsen. Wähle den Standort deiner Behälter entsprechend aus.
5. **Windschutz:** Dächer sind oft windig. Stelle sicher, dass deine Behälter stabil stehen und nicht umfallen können. Ein Windschutz kann ebenfalls hilfreich sein.
6. **Wasseranschluss:** Stelle sicher, dass du einen Wasseranschluss in der Nähe hast, um deine Pflanzen bequem gießen zu können.
Grünkohl säen oder pflanzen: So geht’s!
Jetzt kommt der spannende Teil: das Säen oder Pflanzen deines Grünkohls!
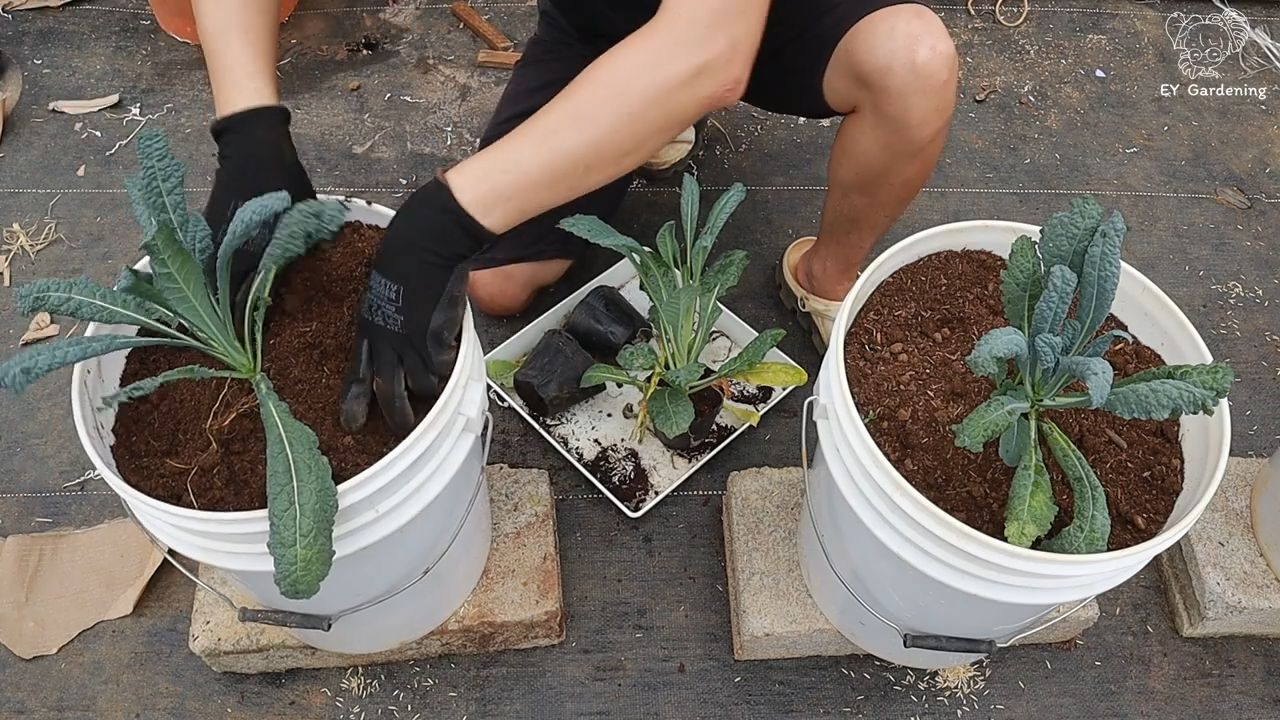
1. **Behälter vorbereiten:** Fülle deine Behälter mit der Blumenerde. Lasse etwa 5 cm Platz bis zum Rand.
2. **Säen (optional):** Wenn du Grünkohl-Samen verwendest, säe sie etwa 1 cm tief in die Erde. Halte einen Abstand von etwa 5 cm zwischen den Samen ein. Gieße die Erde vorsichtig an.
3. **Pflanzen:** Wenn du Jungpflanzen verwendest, grabe ein kleines Loch in die Erde, das groß genug ist, um den Wurzelballen aufzunehmen. Setze die Pflanze ein und fülle das Loch mit Erde auf. Drücke die Erde leicht an.
4. **Gießen:** Gieße die Pflanzen gründlich an, bis die Erde gut durchfeuchtet ist.
5. **Düngen:** Gib den Pflanzen direkt nach dem Einpflanzen eine erste Düngergabe.
Die Pflege: Damit dein Grünkohl prächtig gedeiht
Damit dein Grünkohl prächtig gedeiht, ist regelmäßige Pflege wichtig. Hier sind die wichtigsten Tipps:
1. **Gießen:** Gieße deine Grünkohl-Pflanzen regelmäßig, besonders an heißen Tagen. Die Erde sollte immer leicht feucht sein, aber nicht nass. Vermeide Staunässe, da dies zu Wurzelfäule führen kann.
2. **Düngen:** Dünge deine Grünkohl-Pflanzen alle 2-3 Wochen mit einem organischen Dünger.
3. **Schneiden:** Entferne regelmäßig gelbe oder beschädigte Blätter, um die Gesundheit der Pflanze zu fördern. Du kannst auch die unteren Blätter ernten, sobald sie groß genug sind.
4. **Schädlingsbekämpfung:** Kontrolliere deine Pflanzen regelmäßig auf Schädlinge wie Blattläuse oder Raupen. Bei Bedarf kannst du biologische Schädlingsbekämpfungsmittel einsetzen.
5. **Unkraut entfernen:** Entferne regelmäßig Unkraut, das in den Behältern wächst.
6. **Überwintern:** Grünkohl ist winterhart und kann auch bei Frost im Freien bleiben. Schütze die Pflanzen bei starkem Frost mit einem Vlies.
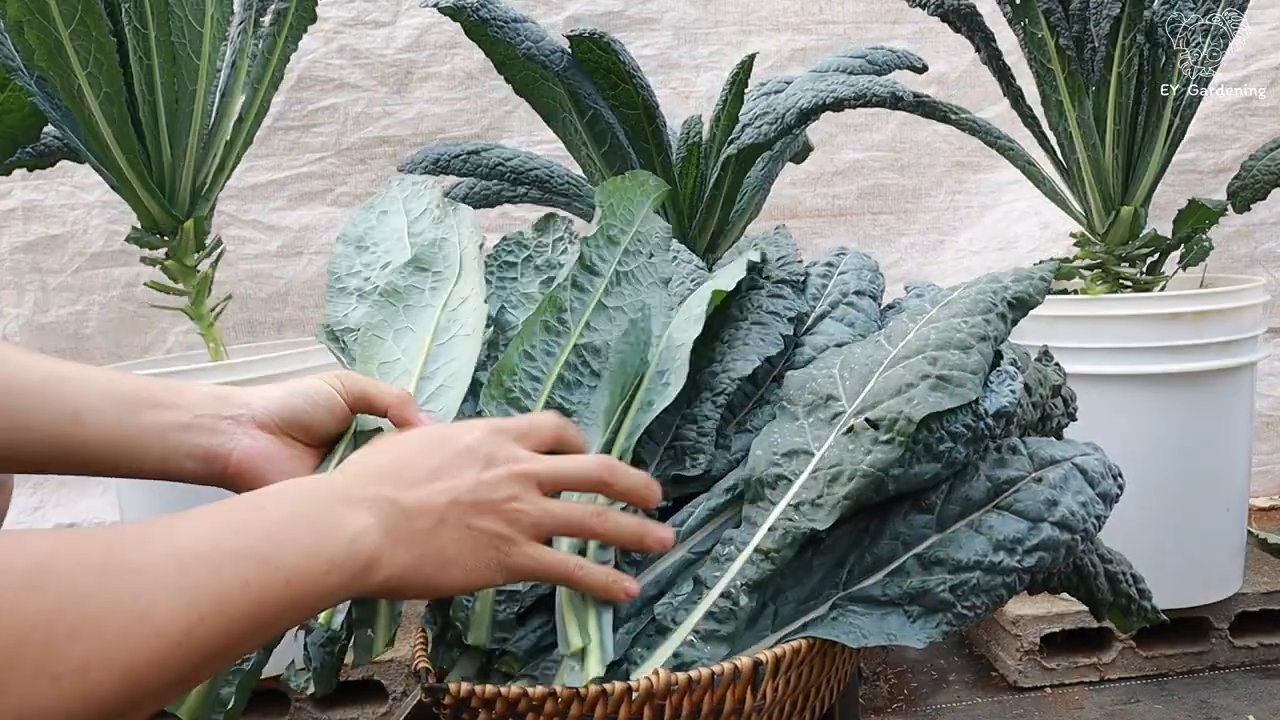
Die Ernte: Frischer Grünkohl direkt vom Dach
Nach einigen Wochen kannst du deinen ersten Grünkohl ernten!
1. **Erntezeitpunkt:** Du kannst Grünkohl ernten, sobald die Blätter groß genug sind. Die unteren Blätter sind in der Regel zuerst reif.
2. **Erntetechnik:** Schneide die Blätter mit einem scharfen Messer oder einer Schere ab. Lasse die inneren Blätter stehen, damit die Pflanze weiterwachsen kann.
3. **Lagerung:** Frischer Grünkohl ist im Kühlschrank etwa eine Woche haltbar. Du kannst ihn auch einfrieren, um ihn länger aufzubewahren.
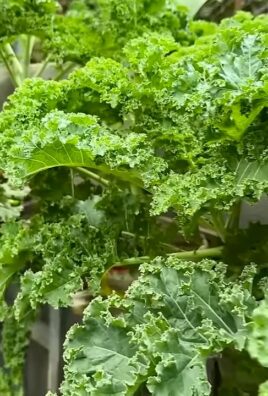
Sortenempfehlungen: Welcher Grünkohl ist der richtige für dich?
Es gibt viele verschiedene Grünkohl-Sorten, die sich in Geschmack, Aussehen und Wuchshöhe unterscheiden. Hier sind einige meiner Favoriten:
* **’Nero di Toscana’ (Palmkohl):** Eine italienische Sorte mit langen, schmalen, dunkelgrünen Blättern. Schmeckt mild und leicht süßlich.
* **’Halbhoher Grüner Krauser’:** Eine klassische deutsche Sorte mit krausen, grünen Blättern. Schmeckt kräftig und würzig.
* **’Red Russian’:** Eine dekorative Sorte mit rot-grünen, gefiederten Blättern. Schmeckt leicht süßlich und nussig.
* **’Lacinato’ (Cavolo Nero):** Ähnlich wie ‘Nero di Toscana’, aber mit etwas breiteren Blättern.
Häufige Probleme und Lösungen
Auch beim Grünkohl-Anbau auf dem Dach können Probleme auftreten. Hier sind einige häufige Probleme und wie du sie lösen kannst:
* **Gelbe Blätter:** Gelbe Blätter können ein Zeichen für Nährstoffmangel sein. Dünge deine Pflanzen mit einem organischen Dünger.
* **Blattläuse:** Blattläuse können mit einem Wasserstrahl oder mit biologischen Schädlingsbekämpfungsmitteln bekämpft werden.
* **Raupen:** Raupen fressen gerne Grünkohlblätter. Sammle sie ab oder verwende biologische Schädlingsbekämpfungsmittel.
* **Wurzelfäule:** Wurzelfäule entsteht durch Staunässe. Achte darauf, dass die Erde gut durchlässig ist und vermeide Überwässerung.
* **Schnecken:** Schnecken lieben Grünkohl! Verwende einen Schneckenzaun oder Schneckenkorn, um deine Pflanzen zu schützen.
Zusätzliche Tipps und Tricks
* **Mischkultur:** Pflanze Grünkohl zusammen mit anderen Gemüsesorten, wie z.B. Salat, Radieschen oder Karotten. Dies kann helfen, Schädlinge abzuwehren und den Boden zu verbessern.
* **Mulchen:** Bedecke die Erde um deine Grünkohl-Pflanzen mit Mulch, wie z.B. Stro
Conclusion
So, there you have it! Transforming your rooftop into a thriving kale garden isn’t just a whimsical dream; it’s an achievable reality that brings fresh, nutritious greens right to your doorstep. We’ve explored the essential steps, from assessing your rooftop’s suitability and building the right containers to selecting the perfect kale varieties and providing optimal care. But why is this DIY trick a must-try?
Firstly, consider the unparalleled freshness and flavor. Store-bought kale simply can’t compare to the vibrant taste of kale harvested moments before it graces your plate. Imagine the satisfaction of snipping off a few leaves for your morning smoothie or adding a handful to your evening stir-fry, knowing exactly where it came from and how it was grown.
Secondly, rooftop kale gardening is an incredibly sustainable practice. You’re reducing your carbon footprint by minimizing transportation needs and packaging waste. Plus, you’re contributing to a greener urban environment, attracting beneficial insects, and potentially even helping to mitigate the urban heat island effect.
Thirdly, it’s a fantastic way to connect with nature, even in the heart of the city. The act of nurturing plants, observing their growth, and harvesting your own food is deeply rewarding and can be a powerful stress reliever. It’s a chance to slow down, appreciate the simple things, and reconnect with the natural world.
But the benefits don’t stop there. Rooftop kale gardening can also be a surprisingly cost-effective way to supplement your grocery bill. Kale is a nutrient-dense superfood, and growing your own means you can enjoy its health benefits without breaking the bank.
Ready to take your rooftop kale gardening to the next level? Consider these variations:
* **Vertical Gardening:** If space is limited, explore vertical gardening techniques using stacked planters or wall-mounted containers. This maximizes your growing area and adds a visually stunning element to your rooftop.
* **Companion Planting:** Plant kale alongside other beneficial herbs and vegetables, such as marigolds (to deter pests) or dill (to attract pollinators).
* **Succession Planting:** Plant new kale seedlings every few weeks to ensure a continuous harvest throughout the growing season.
* **Experiment with Varieties:** Don’t be afraid to try different kale varieties, such as Lacinato (dinosaur kale), Red Russian, or Curly kale, to discover your favorites. Each variety offers a unique flavor and texture.
* **Hydroponics:** For a more advanced approach, consider exploring hydroponic kale gardening. This soilless method can be highly efficient and productive.
We’re confident that with a little planning and effort, you can create a flourishing rooftop kale garden that provides you with fresh, healthy greens for months to come. So, grab your gardening gloves, gather your supplies, and get ready to transform your rooftop into a kale oasis!
We encourage you to try this DIY trick and share your experiences with us. What challenges did you encounter? What successes did you celebrate? What tips and tricks did you discover along the way? Share your photos, stories, and insights in the comments below. Let’s build a community of rooftop kale gardeners and inspire others to embrace this rewarding and sustainable practice. Happy gardening!
Frequently Asked Questions (FAQ)
1. Is my rooftop strong enough to support a kale garden?
This is the most crucial question to address before starting any rooftop gardening project. You need to assess the load-bearing capacity of your roof. Consult with a qualified structural engineer or building inspector to determine if your roof can safely handle the added weight of soil, containers, plants, and water. A general rule of thumb is that a saturated container garden can weigh between 10 and 15 pounds per square foot, but this can vary significantly depending on the depth of the soil and the materials used for the containers. It’s always better to err on the side of caution and get a professional opinion. If your rooftop isn’t strong enough, you might consider lighter options like hydroponics or using lightweight growing mediums.
2. What kind of containers should I use for rooftop kale gardening?
The best containers for rooftop kale gardening are durable, lightweight, and provide adequate drainage. Plastic containers are a popular choice because they are relatively inexpensive and easy to move. However, they can heat up quickly in direct sunlight, so consider using light-colored containers or lining them with reflective material to help regulate soil temperature. Fabric pots are another excellent option. They are lightweight, breathable, and allow for excellent drainage. Wood planters are aesthetically pleasing but can be heavy and may require a liner to prevent the wood from rotting. Regardless of the material you choose, ensure that your containers have drainage holes to prevent waterlogging, which can lead to root rot. The size of the container will depend on the variety of kale you are growing, but a minimum depth of 12 inches is generally recommended.
3. What type of soil is best for growing kale on a rooftop?
A well-draining, nutrient-rich soil is essential for successful kale gardening. Avoid using garden soil directly in containers, as it can become compacted and poorly drained. Instead, opt for a high-quality potting mix specifically formulated for container gardening. You can also create your own custom soil mix by combining equal parts of compost, peat moss (or coconut coir), and perlite. Compost provides essential nutrients, peat moss (or coconut coir) helps retain moisture, and perlite improves drainage. Consider adding slow-release fertilizer to your soil mix to provide a steady supply of nutrients throughout the growing season. Regularly amend your soil with compost or other organic matter to maintain its fertility.
4. How much sunlight does kale need to grow on a rooftop?
Kale thrives in full sun, which means at least 6 hours of direct sunlight per day. However, it can tolerate partial shade, especially in hotter climates. If your rooftop receives less than 6 hours of sunlight, you may need to supplement with grow lights. Monitor your kale plants closely and adjust their position as needed to ensure they are receiving adequate sunlight. If the leaves are pale or leggy, it’s a sign that they are not getting enough light.
5. How often should I water my rooftop kale garden?
Watering frequency will depend on several factors, including the weather, the type of container you are using, and the size of your plants. In general, you should water your kale plants whenever the top inch of soil feels dry to the touch. Avoid overwatering, as this can lead to root rot. During hot, dry weather, you may need to water daily. Use a watering can or a hose with a gentle spray nozzle to avoid damaging the leaves. Consider installing a drip irrigation system to provide consistent and efficient watering.
6. What are some common pests and diseases that affect kale, and how can I prevent them?
Common pests that affect kale include aphids, cabbage worms, flea beetles, and slugs. To prevent pest infestations, inspect your plants regularly and remove any pests you find by hand. You can also use organic pest control methods, such as insecticidal soap, neem oil, or diatomaceous earth. Row covers can also be used to protect your plants from pests. Common diseases that affect kale include black rot, clubroot, and downy mildew. To prevent diseases, ensure that your plants have good air circulation and avoid overwatering. Rotate your crops regularly to prevent the buildup of soilborne pathogens. If you notice any signs of disease, remove the affected leaves immediately and treat the plants with an appropriate fungicide.
7. How do I harvest kale from my rooftop garden?
You can begin harvesting kale leaves when they are about 6-8 inches long. Harvest the outer leaves first, leaving the inner leaves to continue growing. Avoid harvesting more than one-third of the plant at a time. You can harvest kale throughout the growing season, even after a light frost. In fact, some people believe that kale tastes even better after a frost. To harvest, simply snip off the leaves with a pair of scissors or pruning shears.
8. Can I grow kale on my rooftop during the winter?
Yes, you can grow kale on your rooftop during the winter, especially in milder climates. Kale is a cold-hardy vegetable that can tolerate temperatures as low as 20°F. To protect your plants from frost and snow, you can cover them with row covers, blankets, or plastic sheeting. You can also move your containers to a sheltered location, such as a greenhouse or a garage. Even if the leaves freeze, they will often thaw out and continue to grow.
9. How can I fertilize my rooftop kale garden organically?
There are several ways to fertilize your rooftop kale garden organically. You can amend your soil with compost or other organic matter, such as aged manure or worm castings. You can also use organic fertilizers, such as fish emulsion, kelp meal, or bone meal. Apply fertilizer according to the package directions. Avoid using synthetic fertilizers, as they can harm beneficial soil microorganisms and pollute the environment.
10. What are some creative ways to use kale from my rooftop garden?
Kale is a versatile vegetable that can be used in a variety of dishes. You can add it to smoothies, salads, soups, stews, stir-fries, and omelets. You can also bake it into kale chips or use it as a garnish. Kale is a good source of vitamins A, C, and K, as well as fiber and antioxidants. Experiment with different recipes and find your favorite ways to enjoy your homegrown kale.

Leave a Comment