
Hanging sweet potato growing – it’s not just a gardening trend; it’s a revolution in how we think about growing our own food! Forget sprawling vines taking over your garden; imagine vibrant, cascading greenery adorned with edible treasures, all suspended gracefully in the air. Intrigued? I bet you are!
For centuries, sweet potatoes have been a staple crop, deeply woven into the culinary traditions of cultures around the globe. From the indigenous peoples of South America, where they originated, to their widespread adoption in Asia and beyond, sweet potatoes represent sustenance, resilience, and the simple joy of homegrown goodness. But who says you need acres of land to partake in this rich history?
That’s where the magic of hanging sweet potato growing comes in. In today’s world, where space is often a premium, and the desire for fresh, organic produce is stronger than ever, this DIY trick is a game-changer. I’m going to show you how to cultivate these nutritious and delicious tubers in a way that’s both space-saving and visually stunning. Think of it: fresh sweet potatoes right outside your door, adding a touch of rustic charm to your balcony, patio, or even your kitchen window.
This isn’t just about aesthetics, though. Growing your own sweet potatoes, especially using this method, allows you to control exactly what goes into your food, avoiding harmful pesticides and embracing a more sustainable lifestyle. Plus, let’s be honest, there’s something incredibly satisfying about harvesting food you’ve nurtured from a tiny slip to a bountiful harvest. So, are you ready to ditch the traditional garden bed and embrace the vertical world of hanging sweet potato growing? Let’s get started!
DIY Hängende Süßkartoffel-Pflanzgefäße: Ein Leitfaden für üppige Ranken und reiche Ernte
Hallo liebe Gartenfreunde! Habt ihr schon mal darüber nachgedacht, Süßkartoffeln anzubauen, aber keinen Platz im Garten? Oder wollt ihr einfach mal etwas Neues und Dekoratives ausprobieren? Dann habe ich genau das Richtige für euch: Hängende Süßkartoffel-Pflanzgefäße! Diese Methode ist nicht nur platzsparend, sondern auch unglaublich dekorativ und ermöglicht es euch, die wunderschönen Ranken der Süßkartoffelpflanze zu bewundern, während sie wachsen. Und das Beste daran: Am Ende der Saison könnt ihr euch über eine reiche Ernte freuen!
In diesem Artikel zeige ich euch Schritt für Schritt, wie ihr eure eigenen hängenden Süßkartoffel-Pflanzgefäße baut. Keine Sorge, es ist einfacher als es klingt und macht richtig Spaß!
Was ihr für eure hängenden Süßkartoffel-Pflanzgefäße benötigt:
* Süßkartoffeln: Am besten Bio-Süßkartoffeln, da diese nicht mit Wachstumsinhibitoren behandelt wurden. Ihr könnt aber auch Süßkartoffeln aus dem Supermarkt verwenden.
* Gefäße: Hängekörbe, Eimer, Töpfe oder sogar alte Plastikflaschen (mit Löchern für die Drainage) – eurer Kreativität sind keine Grenzen gesetzt! Achtet nur darauf, dass die Gefäße groß genug sind (mindestens 10 Liter Volumen) und über Löcher für die Drainage verfügen.
* Erde: Hochwertige Blumenerde oder eine Mischung aus Gartenerde, Kompost und Sand.
* Wasser: Zum Befeuchten der Erde und zum Gießen der Pflanzen.
* Messer oder Schere: Zum Schneiden der Süßkartoffeln (optional).
* Zahnstocher oder Schaschlikspieße: Zum Aufhängen der Süßkartoffeln über Wasser (optional).
* Draht, Kordel oder Ketten: Zum Aufhängen der Gefäße.
* Dünger: Flüssigdünger für Gemüse (optional).
Phase 1: Die Süßkartoffeln zum Austreiben bringen
Bevor wir die Süßkartoffeln in die Gefäße pflanzen können, müssen wir sie zum Austreiben bringen. Das ist der wichtigste Schritt, denn aus den Trieben werden später die Ranken und die neuen Süßkartoffeln wachsen. Es gibt zwei Methoden, die ich euch vorstellen möchte:
Methode 1: Die Wasserbad-Methode
Diese Methode ist sehr einfach und erfordert nur wenige Materialien.
1. Süßkartoffel vorbereiten: Wascht die Süßkartoffel gründlich ab, um Erde und Schmutz zu entfernen.
2. Zahnstocher anbringen: Steckt vier Zahnstocher oder Schaschlikspieße in die Mitte der Süßkartoffel, sodass sie sich gegenseitig gegenüberliegen. Diese dienen dazu, die Süßkartoffel über dem Wasser zu halten.
3. Wasserglas vorbereiten: Füllt ein Glas oder eine Schüssel mit Wasser.
4. Süßkartoffel aufhängen: Platziert die Süßkartoffel mit den Zahnstochern auf dem Rand des Glases, sodass die untere Hälfte der Süßkartoffel im Wasser hängt. Achtet darauf, dass die Süßkartoffel stabil ist und nicht ins Wasser fällt.
5. Standort wählen: Stellt das Glas an einen warmen und hellen Ort, aber nicht in die direkte Sonne.
6. Wasserstand kontrollieren: Überprüft regelmäßig den Wasserstand und füllt bei Bedarf Wasser nach.
7. Warten: Nach einigen Wochen (in der Regel 2-4 Wochen) sollten sich an der Süßkartoffel Triebe und Wurzeln bilden.
Methode 2: Die Erd-Methode
Diese Methode ist etwas aufwendiger, aber sie kann zu kräftigeren Trieben führen.
1. Gefäß vorbereiten: Füllt einen Topf oder eine Schale mit feuchter Blumenerde.
2. Süßkartoffel einpflanzen: Legt die Süßkartoffel horizontal auf die Erde und bedeckt sie mit einer dünnen Schicht Erde (ca. 2-3 cm).
3. Gießen: Gießt die Erde vorsichtig an, sodass sie feucht, aber nicht nass ist.
4. Standort wählen: Stellt den Topf an einen warmen und hellen Ort, aber nicht in die direkte Sonne.
5. Feuchtigkeit kontrollieren: Überprüft regelmäßig die Feuchtigkeit der Erde und gießt bei Bedarf nach.
6. Warten: Nach einigen Wochen sollten sich Triebe bilden, die aus der Erde sprießen.
Phase 2: Die Pflanzgefäße vorbereiten
Während die Süßkartoffeln austreiben, können wir die Pflanzgefäße vorbereiten.
1. Gefäße reinigen: Reinigt die Gefäße gründlich mit Wasser und Seife, um eventuelle Krankheitserreger zu entfernen.
2. Drainagelöcher überprüfen: Stellt sicher, dass die Gefäße ausreichend Drainagelöcher haben, damit überschüssiges Wasser ablaufen kann. Wenn nicht, bohrt zusätzliche Löcher.
3. Erde einfüllen: Füllt die Gefäße mit hochwertiger Blumenerde oder einer Mischung aus Gartenerde, Kompost und Sand. Lasst oben einen Rand von ca. 5 cm frei.
4. Aufhängung vorbereiten: Befestigt Draht, Kordel oder Ketten an den Gefäßen, um sie aufzuhängen. Achtet darauf, dass die Aufhängung stabil ist und das Gewicht der Gefäße tragen kann.
Phase 3: Die Süßkartoffeln einpflanzen
Sobald die Süßkartoffeln ausreichend Triebe und Wurzeln gebildet haben, können wir sie in die vorbereiteten Pflanzgefäße einpflanzen.
1. Triebe vorsichtig entfernen: Wenn ihr die Wasserbad-Methode verwendet habt, brecht oder schneidet die Triebe vorsichtig von der Süßkartoffel ab. Achtet darauf, die Wurzeln nicht zu beschädigen.
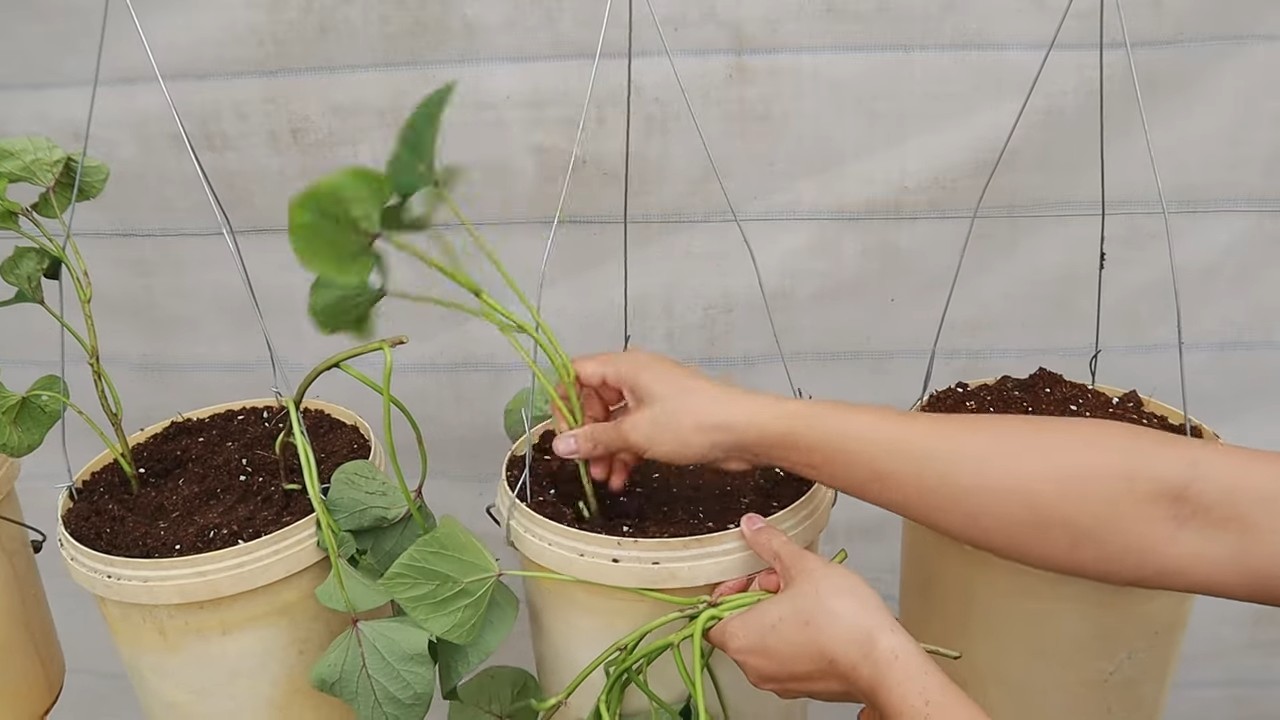
2. Pflanzlöcher graben: Grabt in der Erde der Pflanzgefäße kleine Löcher, die groß genug sind, um die Wurzeln der Triebe aufzunehmen.
3. Triebe einpflanzen: Setzt die Triebe vorsichtig in die Löcher und bedeckt die Wurzeln mit Erde. Drückt die Erde leicht an.
4. Gießen: Gießt die Erde vorsichtig an, sodass sie feucht, aber nicht nass ist.
5. Standort wählen: Hängt die Pflanzgefäße an einen sonnigen und warmen Ort. Süßkartoffeln benötigen mindestens 6 Stunden Sonne pro Tag.
Phase 4: Pflege der hängenden Süßkartoffel-Pflanzgefäße
Die Pflege der hängenden Süßkartoffel-Pflanzgefäße ist relativ einfach, aber es gibt ein paar Dinge, die ihr beachten solltet.
1. Gießen: Gießt die Pflanzen regelmäßig, besonders an heißen Tagen. Die Erde sollte immer feucht, aber nicht nass sein. Achtet darauf, dass das Wasser gut ablaufen kann, um Staunässe zu vermeiden.
2. Düngen: Düngt die Pflanzen alle 2-3 Wochen mit einem Flüssigdünger für Gemüse. Befolgt dabei die Anweisungen auf der Verpackung.
3. Schneiden: Schneidet lange Ranken zurück, um die Pflanzen buschiger zu machen und die Bildung von Süßkartoffeln zu fördern. Ihr könnt die abgeschnittenen Ranken auch verwenden, um neue Pflanzen zu vermehren.
4. Schädlinge und Krankheiten: Achtet auf Schädlinge und Krankheiten. Blattläuse und Spinnmilben können gelegentlich auftreten. Bekämpft sie mit natürlichen Mitteln wie Neemöl oder Schmierseife.
5. Drehen: Dreht die Pflanzgefäße regelmäßig, damit alle Seiten der Pflanzen ausreichend Sonne bekommen.
Phase 5: Die Ernte
Die Erntezeit für Süßkartoffeln ist in der Regel im Herbst, kurz vor dem ersten Frost.
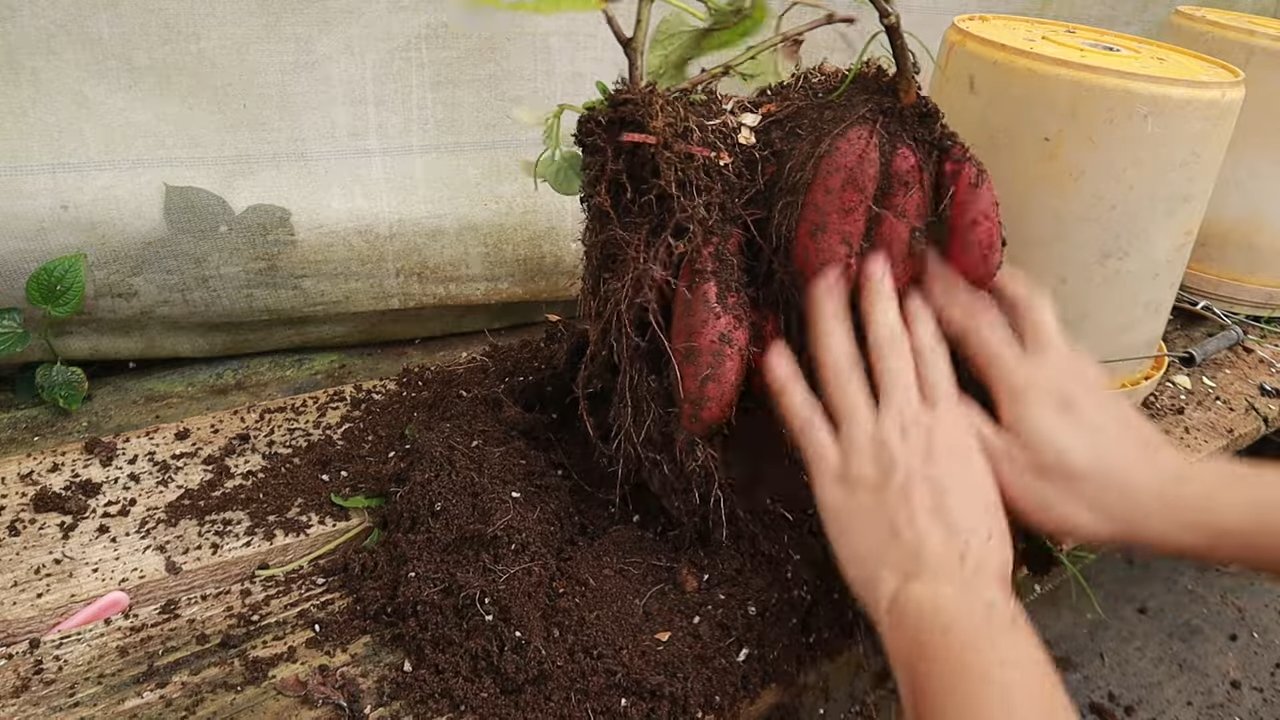
1. Erntezeitpunkt bestimmen: Die Blätter der Pflanzen werden gelb und beginnen abzusterben. Das ist ein Zeichen dafür, dass die Süßkartoffeln reif sind.
2. Ernte vorbereiten: Gießt die Pflanzen einige Tage vor der Ernte nicht
Conclusion
So, there you have it! Transforming a humble sweet potato into a cascading curtain of vibrant greenery and eventually, delicious tubers, is not just a gardening project; it’s an experience. This DIY hanging sweet potato growing method is a must-try for several compelling reasons. First, it’s incredibly space-efficient. If you’re short on garden space, or even just have a sunny balcony or patio, this method allows you to enjoy the benefits of fresh, homegrown produce without sacrificing precious square footage. Second, it’s visually stunning. The trailing vines create a living sculpture, adding a touch of natural beauty to any environment. Imagine the envy of your neighbors as they admire your unique and thriving hanging garden! Third, it’s a fantastic conversation starter. Prepare to answer questions and share your newfound knowledge with friends and family who are captivated by your innovative approach to gardening.
But beyond the aesthetics and space-saving benefits, this DIY project offers a deeper connection to the food you eat. There’s something incredibly rewarding about nurturing a plant from start to finish, watching it grow, and ultimately harvesting your own sweet potatoes. It’s a tangible reminder of the power of nature and the simple pleasures of life.
Ready to take your hanging sweet potato growing to the next level? Consider these variations:
* Ornamental Sweet Potatoes: While this article focuses on growing edible sweet potatoes, don’t underestimate the beauty of ornamental varieties. These cultivars are bred for their vibrant foliage, offering a range of colors from deep purple to bright chartreuse. They’re perfect for adding a splash of color to your hanging baskets.
* Vertical Trellis Support: While the hanging method allows for natural trailing, you can also train the vines to grow upwards along a trellis attached to your hanging basket. This creates a denser, more compact display.
* Companion Planting: Enhance your hanging sweet potato garden by incorporating companion plants. Herbs like basil and rosemary can deter pests and attract beneficial insects. Marigolds are another excellent choice for pest control and adding a pop of color.
* Different Container Types: Experiment with different types of containers. While a standard hanging basket works well, you can also use repurposed buckets, woven baskets, or even old tires. Just make sure the container has adequate drainage.
We’re confident that you’ll find this DIY hanging sweet potato growing project to be both enjoyable and rewarding. It’s a fantastic way to connect with nature, grow your own food, and add a touch of beauty to your surroundings. So, grab a sweet potato, gather your supplies, and get ready to embark on a gardening adventure!
Don’t forget to share your experiences with us! We’d love to see photos of your hanging sweet potato gardens and hear about any tips or tricks you’ve discovered along the way. Share your success stories and inspire others to try this amazing DIY project. Happy growing!
Frequently Asked Questions (FAQ)
What kind of sweet potato should I use for growing?
You can use any sweet potato you find at the grocery store! However, organic sweet potatoes are often recommended as they are less likely to be treated with sprout inhibitors. Look for sweet potatoes that are firm and free from blemishes. You can also use slips (sprouts) from a previous sweet potato harvest. Beauregard, Jewel, and Garnet varieties are popular choices for their flavor and ease of growing. Ornamental sweet potato varieties are also an option if you are more interested in the foliage.
How long does it take for a sweet potato to sprout?
Sprouting time can vary depending on the temperature and humidity. Generally, it takes about 2-4 weeks for sprouts to emerge. Keep the sweet potato in a warm, bright location to encourage sprouting. Maintaining consistent moisture is also crucial.
How often should I water my hanging sweet potato plant?
Watering frequency depends on the climate and the type of container you’re using. In general, water when the top inch of soil feels dry to the touch. During hot, dry weather, you may need to water daily. Ensure the container has good drainage to prevent waterlogging, which can lead to root rot. Overwatering is a common mistake, so err on the side of slightly drier soil.
What kind of soil should I use?
Use a well-draining potting mix that is rich in organic matter. A mix of compost, peat moss, and perlite is a good option. Avoid using garden soil, as it can be too heavy and may not drain well in a container. The ideal pH for sweet potatoes is between 5.5 and 6.5.
How much sunlight does a hanging sweet potato plant need?
Sweet potatoes need at least 6-8 hours of direct sunlight per day to thrive. Choose a location that receives plenty of sunlight throughout the day. If you live in a particularly hot climate, some afternoon shade can be beneficial to prevent the leaves from scorching.
When is the best time to plant sweet potatoes?
The best time to plant sweet potatoes is in the late spring or early summer, after the last frost. The soil temperature should be at least 65°F (18°C). Sweet potatoes are sensitive to cold temperatures, so it’s important to wait until the weather has warmed up before planting.
How do I harvest sweet potatoes from a hanging basket?
Harvesting sweet potatoes from a hanging basket is relatively easy. Gently tip the basket over and carefully remove the soil and tubers. The sweet potatoes are ready to harvest when the vines start to turn yellow and die back, typically about 90-120 days after planting. Be careful not to damage the tubers during harvesting.
Are there any pests or diseases that affect sweet potatoes?
Sweet potatoes are generally resistant to pests and diseases, but they can be susceptible to certain problems. Common pests include sweet potato weevils, aphids, and spider mites. Diseases include fungal infections like stem rot and black rot. Regularly inspect your plants for signs of pests or diseases and take appropriate action if necessary. Organic pest control methods, such as neem oil or insecticidal soap, can be effective.
Can I grow sweet potatoes indoors?
While it’s possible to start sweet potatoes indoors, they need a lot of sunlight to thrive. If you don’t have a sunny window or grow lights, it may be difficult to grow them successfully indoors. However, you can certainly start the sprouting process indoors and then move the plant outdoors once the weather warms up.
How do I store harvested sweet potatoes?
After harvesting, cure the sweet potatoes by placing them in a warm, humid place (80-85°F and 85-90% humidity) for about a week. This helps to heal any cuts or bruises and improves their storage life. After curing, store the sweet potatoes in a cool, dry, and dark place (55-60°F). Avoid storing them in the refrigerator, as this can cause them to develop a hard core. Properly cured and stored sweet potatoes can last for several months.


Leave a Comment