
Grow potatoes at home, even if you think you don’t have the space! Imagine harvesting your own creamy, flavorful potatoes, fresh from your backyard (or even your balcony!). It’s easier than you think, and this guide is packed with simple, DIY tricks to help you succeed.
For centuries, potatoes have been a staple food around the world, originating in the Andes Mountains of South America. They’ve nourished civilizations and fueled culinary innovation. Now, you can connect with that history by cultivating your own spuds!
Let’s face it, store-bought potatoes can sometimes be bland and lack that fresh-from-the-earth taste. Plus, knowing exactly where your food comes from is incredibly satisfying. That’s why learning how to grow potatoes at home is so rewarding. Whether you’re a seasoned gardener or a complete beginner, these DIY hacks will empower you to create a thriving potato patch, no matter how small your space. I’m excited to share these tips and tricks with you, so let’s get digging!
Kartoffeln zu Hause anbauen: Dein umfassender DIY-Leitfaden
Hey Gartenfreunde! Habt ihr jemals davon geträumt, eure eigenen Kartoffeln anzubauen? Es ist einfacher als ihr denkt und unglaublich befriedigend, eure selbst gezogenen Erdäpfel zu ernten. In diesem Artikel zeige ich euch Schritt für Schritt, wie ihr das ganz einfach zu Hause machen könnt, egal ob ihr einen großen Garten oder nur einen kleinen Balkon habt. Los geht’s!
Was du brauchst: Die richtige Vorbereitung
Bevor wir loslegen, brauchen wir natürlich die richtigen Materialien und Werkzeuge. Hier ist eine Liste, damit ihr alles griffbereit habt:
* Saatkartoffeln: Das sind spezielle Kartoffeln, die für den Anbau gezüchtet wurden. Ihr bekommt sie in Gartencentern oder online. Vermeidet Speisekartoffeln aus dem Supermarkt, da diese oft behandelt wurden und nicht keimen.
* Geeignete Pflanzgefäße: Ihr könnt Töpfe, Kübel, Säcke oder sogar alte Autoreifen verwenden. Wichtig ist, dass sie groß genug sind (mindestens 30 cm Durchmesser und Tiefe) und Drainagelöcher haben.
* Hochwertige Pflanzerde: Kartoffeln brauchen lockere, nährstoffreiche Erde. Eine Mischung aus Gartenerde, Kompost und Sand ist ideal.
* Kompost oder organischer Dünger: Für eine gute Nährstoffversorgung.
* Gießkanne oder Schlauch: Zum Bewässern.
* Schaufel oder Spaten: Zum Pflanzen und Anhäufeln.
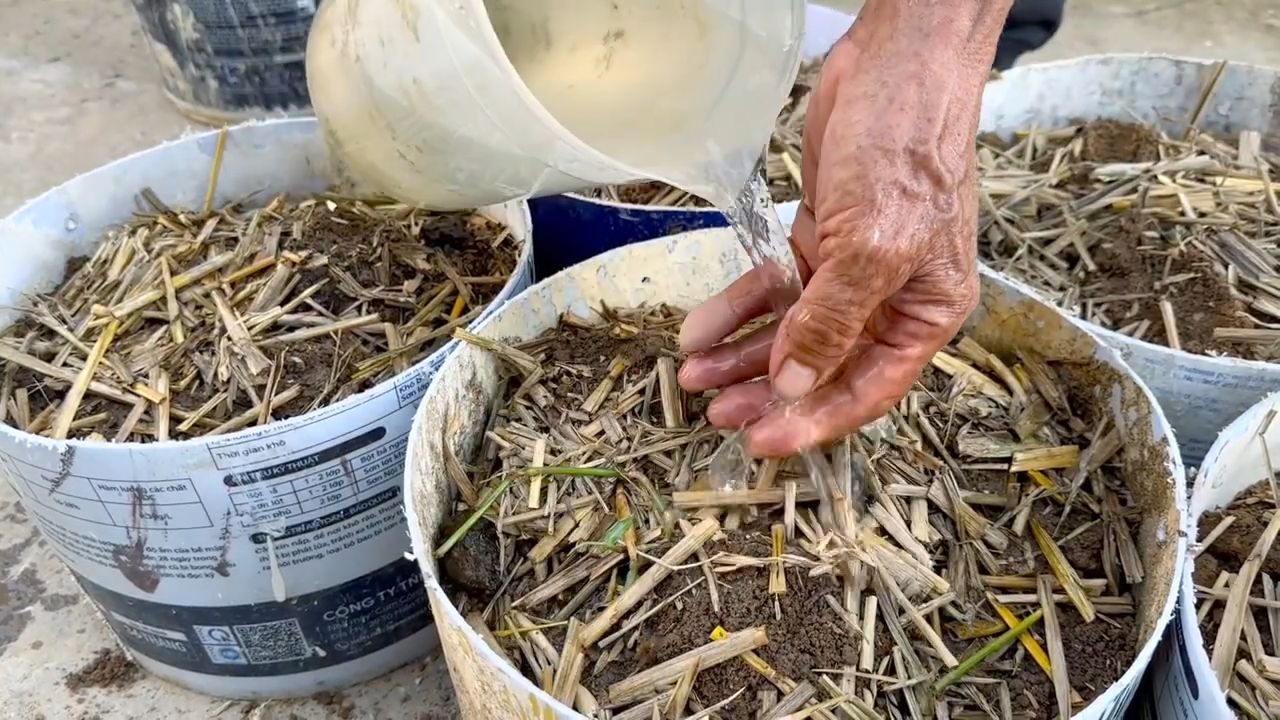
* Mulchmaterial (optional): Stroh, Heu oder Rasenschnitt, um die Feuchtigkeit im Boden zu halten und Unkraut zu unterdrücken.
Schritt-für-Schritt-Anleitung: So pflanzt du deine Kartoffeln
Jetzt geht’s ans Eingemachte! Hier ist eine detaillierte Anleitung, wie ihr eure Kartoffeln erfolgreich pflanzt:
1. Saatkartoffeln vorbereiten:
* Vorkeimen (optional, aber empfohlen): Legt die Saatkartoffeln etwa 4-6 Wochen vor dem Pflanzen an einen hellen, kühlen Ort (ca. 10-15°C). Dadurch bilden sie kurze, kräftige Triebe (sogenannte “Augen”). Das beschleunigt das Wachstum nach dem Pflanzen.
* Kartoffeln schneiden (optional): Wenn eure Saatkartoffeln sehr groß sind, könnt ihr sie in Stücke schneiden. Achtet darauf, dass jedes Stück mindestens 2-3 Augen hat. Lasst die Schnittflächen vor dem Pflanzen 1-2 Tage antrocknen, um Fäulnis zu vermeiden.
2. Pflanzgefäße vorbereiten:
* Füllt eure Pflanzgefäße mit einer Schicht Pflanzerde (ca. 10-15 cm hoch).
* Achtet darauf, dass die Erde locker und gut durchlässig ist.
3. Kartoffeln pflanzen:
* Legt die Saatkartoffeln (oder die Kartoffelstücke) mit den Augen nach oben auf die Erde.
* Achtet darauf, dass zwischen den Kartoffeln genügend Platz ist (ca. 20-30 cm).
* Bedeckt die Kartoffeln mit einer weiteren Schicht Erde (ca. 5-10 cm hoch).
4. Angießen:
* Gießt die Erde vorsichtig an, sodass sie gut durchfeuchtet ist. Vermeidet Staunässe.
5. Standort wählen:
* Stellt die Pflanzgefäße an einen sonnigen Standort. Kartoffeln brauchen mindestens 6 Stunden Sonne pro Tag.
6. Pflege:
* Gießen: Haltet die Erde feucht, aber nicht nass. Gießt regelmäßig, besonders bei trockenem Wetter.
* Düngen: Düngt die Kartoffeln etwa alle 2-3 Wochen mit Kompost oder organischem Dünger.
* Anhäufeln: Sobald die Kartoffelpflanzen etwa 20-30 cm hoch sind, häufelt ihr Erde um die Stängel an. Dadurch werden die Knollenbildung angeregt und die Kartoffeln vor Sonnenlicht geschützt (was sie grün und ungenießbar machen würde). Wiederholt das Anhäufeln mehrmals im Laufe der Saison.
* Unkraut entfernen: Entfernt regelmäßig Unkraut, das um die Kartoffelpflanzen wächst.
* Schutz vor Schädlingen und Krankheiten: Achtet auf Schädlinge wie Kartoffelkäfer oder Krankheiten wie Krautfäule. Bei Bedarf könnt ihr biologische Schädlingsbekämpfungsmittel oder Fungizide einsetzen.
Spezialtipp: Kartoffeln im Sack anbauen
Eine besonders platzsparende und effektive Methode ist der Anbau von Kartoffeln im Sack. So geht’s:
1. Sack vorbereiten:
* Nehmt einen großen, stabilen Sack (z.B. einen Jutesack oder einen stabilen Plastiksack).
* Rollt den oberen Rand des Sacks nach unten, sodass er etwa 20-30 cm hoch ist.
2. Erde einfüllen:
* Füllt den Sack mit einer Schicht Pflanzerde (ca. 10-15 cm hoch).
3. Kartoffeln pflanzen:
* Legt 3-4 Saatkartoffeln auf die Erde.
* Bedeckt sie mit einer weiteren Schicht Erde (ca. 5-10 cm hoch).
4. Angießen:
* Gießt die Erde vorsichtig an.
5. Pflege:
* Wenn die Kartoffelpflanzen wachsen, rollt ihr den Sack nach und nach weiter auf und füllt immer wieder Erde nach, sodass nur noch die obersten Blätter herausschauen. Dadurch werden die Knollenbildung angeregt und ihr erhaltet eine reiche Ernte.
* Gießt und düngt die Kartoffeln regelmäßig.
Erntezeit: Wann sind die Kartoffeln reif?
Die Erntezeit hängt von der Kartoffelsorte und den Witterungsbedingungen ab. In der Regel sind Kartoffeln etwa 3-4 Monate nach dem Pflanzen reif.
* Anzeichen für Reife: Die Blätter der Kartoffelpflanzen werden gelb und welken.
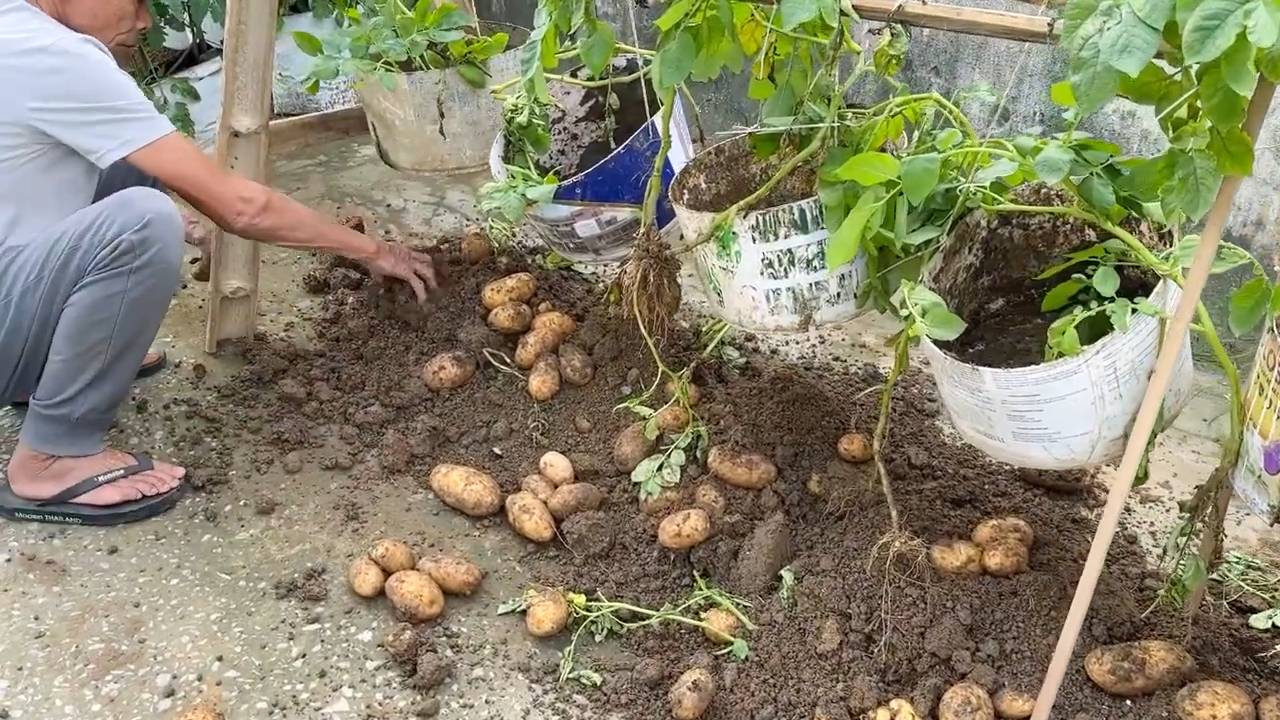
* Ernte: Grabt die Kartoffeln vorsichtig aus der Erde. Bei der Sackmethode könnt ihr den Sack einfach umkippen und die Kartoffeln herausschütteln.
* Lagerung: Lagert die Kartoffeln an einem kühlen, dunklen und trockenen Ort.
Häufige Probleme und Lösungen
Auch beim Kartoffelanbau können Probleme auftreten. Hier sind einige häufige Probleme und wie ihr sie lösen könnt:
* Kartoffelkäfer: Sammelt die Käfer und Larven ab oder verwendet biologische Schädlingsbekämpfungsmittel.
* Krautfäule: Entfernt befallene Blätter und verwendet ein Fungizid. Achtet auf eine gute Belüftung der Pflanzen.
* Schnecken: Sammelt die Schnecken ab oder verwendet Schneckenkorn.
* Grüne Kartoffeln: Vermeidet, dass die Kartoffeln Sonnenlicht ausgesetzt sind. Häufelt die Erde regelmäßig an.
Zusätzliche Tipps für eine reiche Ernte
* Fruchtfolge beachten: Baut Kartoffeln nicht jedes Jahr am selben Standort an, um Krankheiten und Schädlingen vorzubeugen.
* Boden verbessern: Mischt Kompost oder organischen Dünger in die Erde, um die Nährstoffversorgung zu verbessern.
* Regelmäßig gießen: Kartoffeln brauchen ausreichend Wasser, besonders während der Knollenbildung.
* Mulchen: Mulcht die Erde um die Kartoffelpflanzen, um die Feuchtigkeit zu halten und Unkraut zu unterdrücken.
Ich hoffe, dieser Leitfaden hilft euch dabei, eure eigenen Kartoffeln erfolgreich anzubauen. Viel Spaß beim Gärtnern und eine reiche Ernte!
Conclusion
So, there you have it! Growing potatoes at home, especially using the container method, is not just a gardening project; it’s a rewarding experience that connects you to your food in a profound way. It’s about more than just saving money at the grocery store; it’s about understanding the journey from seed (or in this case, a sprouted potato) to table. It’s about the satisfaction of nurturing something from the earth and reaping the delicious, earthy rewards.
Why is this DIY potato growing trick a must-try? Because it’s accessible, even if you have limited space. Apartment dwellers with balconies, suburban families with small patios, and even those with sprawling gardens can all participate in the joy of homegrown potatoes. It’s also incredibly educational, especially for children. They can witness the entire life cycle of a plant, from the initial sprouting to the final harvest. This hands-on learning experience fosters a deeper appreciation for nature and where our food comes from.
Beyond the practical benefits, growing your own potatoes offers a level of control over the quality of your food that you simply can’t achieve with store-bought varieties. You know exactly what goes into your potatoes – no harmful pesticides or herbicides, just good old-fashioned soil, water, and sunshine. This translates to healthier, more flavorful potatoes that you can feel good about feeding to your family.
Looking for variations? Absolutely! Experiment with different potato varieties. Russets are great for baking and frying, Yukon Golds are perfect for mashing, and red potatoes are ideal for boiling and salads. You can also try different container sizes and materials. Fabric pots are excellent for drainage and aeration, while plastic containers are more durable and retain moisture better. Consider adding companion plants to your potato containers, such as marigolds to deter pests or basil to improve flavor.
Don’t be afraid to get creative with your potato-growing setup. You can even try vertical potato towers to maximize space and yield. The possibilities are endless!
We wholeheartedly encourage you to give this DIY potato growing trick a try. It’s a fun, educational, and rewarding experience that will bring you closer to nature and provide you with delicious, homegrown potatoes. And most importantly, we want to hear about your experience! Share your photos, tips, and stories with us in the comments below. Let’s build a community of home gardeners and inspire others to discover the joy of growing their own food. Happy growing!
Frequently Asked Questions (FAQ)
What kind of potatoes should I use to start growing?
You can use any type of potato you like, but certified seed potatoes are recommended. These are specifically grown to be disease-free and produce a good yield. If you’re using potatoes from the grocery store, choose organic ones to avoid any sprout inhibitors. Look for potatoes that have already started to sprout “eyes.” These are the points from which new plants will grow. If your potatoes haven’t sprouted, you can encourage them to do so by placing them in a bright, warm location for a few days.
What size container do I need for growing potatoes?
The ideal container size depends on the variety of potato you’re growing, but a good rule of thumb is to use a container that is at least 15 gallons in size. This will provide enough space for the potato plants to develop a healthy root system and produce a decent yield. The container should also have drainage holes to prevent waterlogging. Larger containers are always better, as they provide more room for the potatoes to grow and reduce the need for frequent watering.
What kind of soil should I use for growing potatoes?
Potatoes prefer well-draining, slightly acidic soil. A good potting mix specifically designed for vegetables is ideal. You can also create your own mix by combining equal parts of compost, peat moss (or coconut coir), and perlite or vermiculite. Avoid using garden soil, as it can be too heavy and compact, which can hinder root growth. The soil should be loose and airy to allow for proper drainage and aeration.
How often should I water my potato plants?
Water your potato plants regularly, especially during hot, dry weather. The soil should be kept consistently moist, but not waterlogged. Check the soil moisture by sticking your finger about an inch into the soil. If it feels dry, it’s time to water. Avoid overwatering, as this can lead to root rot. As the plants mature and the potatoes begin to form, you may need to water more frequently.
How much sunlight do potato plants need?
Potato plants need at least six hours of sunlight per day to thrive. Choose a location that receives plenty of direct sunlight. If you’re growing potatoes indoors, you may need to supplement with grow lights. Insufficient sunlight can result in weak, leggy plants and a reduced yield.
How do I know when my potatoes are ready to harvest?
The timing of the harvest depends on the variety of potato you’re growing. Generally, potatoes are ready to harvest when the foliage begins to turn yellow and die back. You can also gently dig around the base of the plant to check the size of the potatoes. If they are the size you desire, you can harvest them. For “new potatoes,” you can harvest them earlier, when they are smaller and more tender.
What are common pests and diseases that affect potato plants?
Common pests that affect potato plants include aphids, potato beetles, and flea beetles. Diseases include early blight, late blight, and potato scab. You can prevent pests and diseases by using disease-resistant varieties, practicing crop rotation, and keeping the plants healthy and well-watered. Organic pest control methods, such as neem oil and insecticidal soap, can also be effective.
Can I grow potatoes in the same container year after year?
It’s generally not recommended to grow potatoes in the same container year after year, as this can deplete the soil of nutrients and increase the risk of disease. It’s best to rotate your crops or replenish the soil with fresh compost and nutrients each year. You can also use a soil test kit to determine the nutrient levels in your soil and amend it accordingly.
How do I store my harvested potatoes?
Store your harvested potatoes in a cool, dark, and dry place. A root cellar is ideal, but a basement or garage can also work. Avoid storing potatoes in the refrigerator, as this can cause them to develop a sweet taste. Potatoes should be stored away from apples and bananas, as these fruits release ethylene gas, which can cause potatoes to sprout prematurely. Properly stored potatoes can last for several months.
Can I grow potatoes from store-bought potatoes that have sprouted?
Yes, you can grow potatoes from store-bought potatoes that have sprouted, but there are a few things to keep in mind. First, choose organic potatoes to avoid any sprout inhibitors. Second, make sure the potatoes are firm and healthy, with well-developed sprouts. Third, cut the potatoes into pieces, making sure each piece has at least one sprout. Let the cut pieces dry for a day or two before planting to prevent rot. While this method can work, using certified seed potatoes is generally recommended for the best results.

Leave a Comment