
Grow peanuts indoors? Absolutely! Forget the sprawling fields and sunny southern climates you might associate with this beloved snack. I’m here to tell you that cultivating your own peanut patch is entirely possible, even within the cozy confines of your home.
For centuries, peanuts have been a staple food in various cultures, particularly in South America, where they originated. Evidence suggests peanut cultivation dates back over 7,600 years! From ancient Incan offerings to modern-day peanut butter sandwiches, this legume has a rich and fascinating history. But who knew you could bring that history to life right on your windowsill?
Why should you try this DIY project? Well, imagine the satisfaction of harvesting your own fresh, homegrown peanuts. Think of the bragging rights! Plus, it’s a fantastic way to connect with nature, learn about plant life cycles, and enjoy a delicious, healthy treat. Many people think they need a large garden to grow their own food, but I’m here to show you that’s simply not true. This DIY guide will provide you with simple, step-by-step instructions to grow peanuts indoors, regardless of your experience level. So, ditch the store-bought peanuts and get ready to embark on a fun and rewarding gardening adventure!
Erdnüsse im Haus anbauen: Dein DIY-Leitfaden für eine erfolgreiche Ernte
Hey Pflanzenfreunde! Habt ihr schon mal darüber nachgedacht, Erdnüsse im Haus anzubauen? Klingt verrückt, oder? Aber es ist tatsächlich einfacher als man denkt und macht super viel Spaß! Ich zeige euch, wie ihr eure eigenen kleinen Erdnusspflanzen ziehen und hoffentlich sogar eine leckere Ernte einfahren könnt. Los geht’s!
Was du brauchst: Die Zutaten für deinen Erdnuss-Erfolg
Bevor wir loslegen, brauchen wir natürlich die richtigen Materialien. Hier ist eine Liste von Dingen, die du bereithalten solltest:
* Ungesalzene, rohe Erdnüsse: Das ist das A und O! Achte darauf, dass sie roh und ungesalzen sind, am besten Bio-Qualität. Geröstete oder gesalzene Erdnüsse keimen nicht.
* Töpfe: Wähle Töpfe mit einem Durchmesser von mindestens 20 cm. Erdnüsse brauchen Platz für ihre Wurzeln.
* Hochwertige Blumenerde: Eine gut durchlässige Blumenerde ist wichtig. Du kannst auch spezielle Anzuchterde verwenden.
* Wasser: Klares Wasser zum Gießen.
* Sprühflasche: Zum Befeuchten der Erde.
* Sonnenlicht: Ein sonniger Platz am Fenster ist ideal.
* Optional: Anzuchtkasten oder Mini-Gewächshaus (hilfreich für die Keimung).
* Optional: Pflanzenetiketten und Stift (um den Überblick zu behalten).
Schritt-für-Schritt-Anleitung: So ziehst du deine eigenen Erdnüsse
Jetzt geht’s ans Eingemachte! Hier ist eine detaillierte Anleitung, wie du deine Erdnüsse erfolgreich im Haus anbauen kannst:
Phase 1: Die Vorbereitung – Erdnüsse zum Keimen bringen
1. Erdnüsse auswählen: Suche dir die prallsten und gesündesten Erdnüsse aus. Je besser die Qualität, desto höher die Wahrscheinlichkeit, dass sie keimen.
2. Erdnüsse einweichen: Lege die Erdnüsse für 24 Stunden in lauwarmes Wasser. Das hilft, die Schale aufzuweichen und den Keimprozess zu beschleunigen.
3. Optional: Vorkeimen: Du kannst die Erdnüsse auch vorkeimen lassen. Wickle sie dazu in ein feuchtes Papiertuch und lege sie in einen Gefrierbeutel. Stelle den Beutel an einen warmen Ort (z.B. auf die Heizung) und kontrolliere regelmäßig, ob das Papiertuch noch feucht ist. Nach ein paar Tagen sollten die Erdnüsse keimen.
Phase 2: Das Einpflanzen – Erdnüsse in die Erde bringen
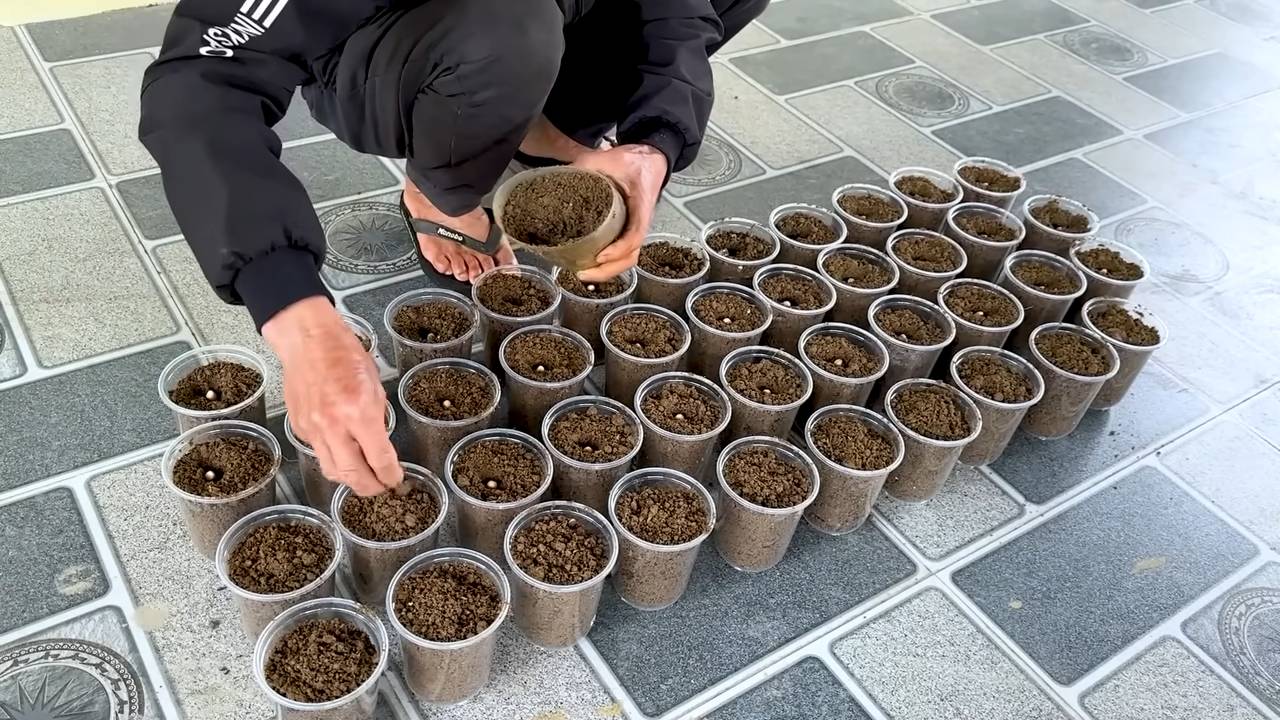
1. Töpfe vorbereiten: Fülle die Töpfe mit Blumenerde. Lasse etwa 2-3 cm Platz bis zum Rand.
2. Erdnüsse pflanzen: Drücke die Erdnüsse etwa 2-3 cm tief in die Erde. Wenn du sie vorgekeimt hast, achte darauf, dass der Keim nach oben zeigt.
3. Angießen: Gieße die Erde vorsichtig an, sodass sie gut durchfeuchtet ist. Vermeide Staunässe.
4. Standort wählen: Stelle die Töpfe an einen warmen und sonnigen Platz. Ein Fensterbrett mit Südausrichtung ist ideal.
Phase 3: Die Pflege – Erdnüsse zum Wachsen bringen
1. Gießen: Halte die Erde feucht, aber nicht nass. Gieße regelmäßig, aber vermeide Staunässe. Die Erde sollte sich leicht feucht anfühlen, wenn du sie berührst.
2. Düngen: Nach etwa 4-6 Wochen kannst du mit dem Düngen beginnen. Verwende einen organischen Flüssigdünger für Gemüsepflanzen und halte dich an die Anweisungen auf der Verpackung.
3. Sonnenlicht: Erdnüsse lieben Sonne! Stelle sicher, dass sie mindestens 6-8 Stunden Sonnenlicht pro Tag bekommen. Wenn das nicht möglich ist, kannst du eine Pflanzenlampe verwenden.
4. Temperatur: Die ideale Temperatur für Erdnüsse liegt zwischen 20 und 30 Grad Celsius.
5. Umpflanzen (optional): Wenn die Pflanzen zu groß für die Töpfe werden, kannst du sie in größere Töpfe umpflanzen. Achte darauf, die Wurzeln nicht zu beschädigen.
6. Blütenbildung: Nach einigen Wochen werden die Erdnusspflanzen blühen. Die Blüten sind klein und gelb.
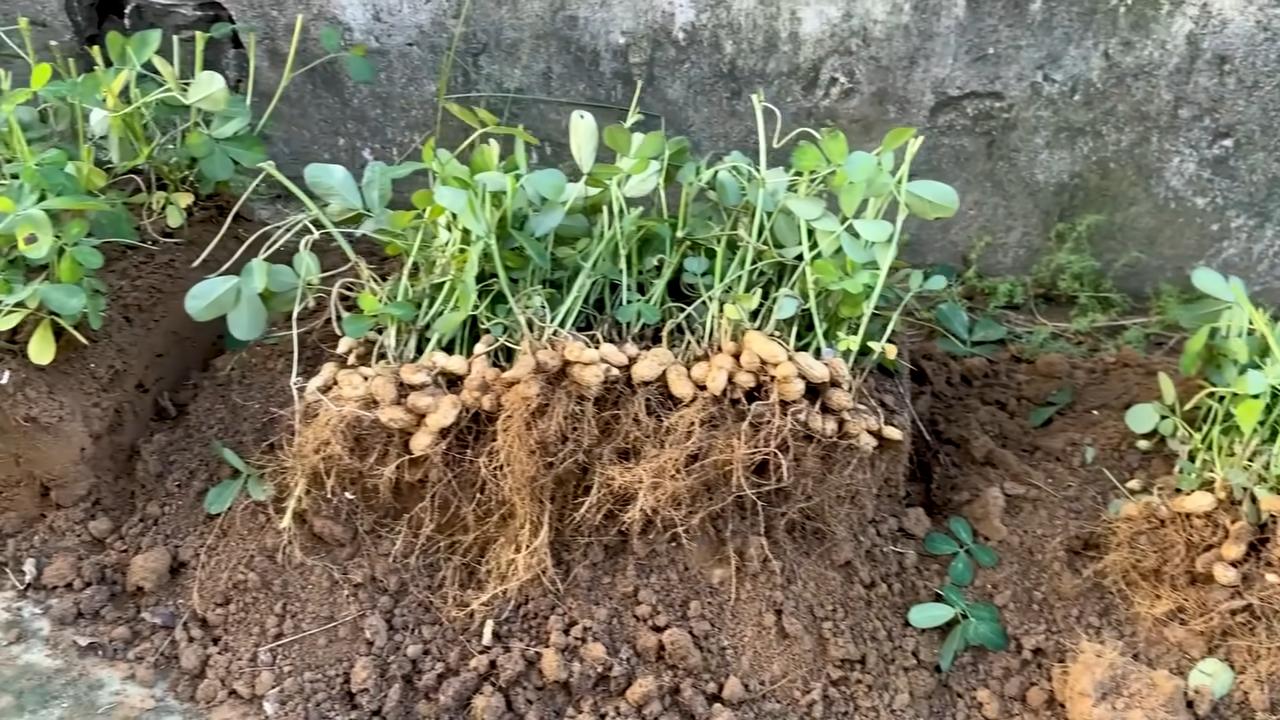
7. Erdnüsse bilden sich: Nach der Blüte bilden sich die Erdnüsse unter der Erde. Die Blütenstiele biegen sich nach unten und dringen in die Erde ein. Dort entwickeln sich die Erdnüsse.
Phase 4: Die Ernte – Erdnüsse aus der Erde holen
1. Wartezeit: Die Erntezeit hängt von der Sorte und den Anbaubedingungen ab. In der Regel dauert es etwa 4-5 Monate, bis die Erdnüsse reif sind.
2. Erntezeitpunkt erkennen: Die Blätter der Pflanze werden gelb und trocken. Das ist ein Zeichen dafür, dass die Erdnüsse reif sind.
3. Ernten: Ziehe die gesamte Pflanze vorsichtig aus der Erde. Schüttle die Erde ab und sammle die Erdnüsse ein.
4. Trocknen: Lege die Erdnüsse zum Trocknen an einen warmen und trockenen Ort. Das kann ein paar Tage dauern.
5. Genießen: Jetzt kannst du deine selbst angebauten Erdnüsse genießen! Du kannst sie roh essen, rösten oder zu Erdnussbutter verarbeiten.
Zusätzliche Tipps und Tricks für eine erfolgreiche Erdnussernte
* Schädlinge: Achte auf Schädlinge wie Blattläuse oder Spinnmilben. Bei Befall kannst du natürliche Schädlingsbekämpfungsmittel verwenden.
* Krankheiten: Erdnüsse können von Pilzkrankheiten befallen werden. Achte auf eine gute Belüftung und vermeide Staunässe.
* Sortenwahl: Es gibt verschiedene Erdnusssorten. Informiere dich, welche Sorte am besten für den Anbau im Haus geeignet ist.
* Geduld: Erdnüsse brauchen Zeit zum Wachsen. Sei geduldig und gib nicht auf, wenn es nicht sofort klappt.
* Dokumentation: Mache Fotos von deinen Pflanzen und notiere dir, wann du sie gepflanzt, gegossen und gedüngt hast. So kannst du deine Erfahrungen für die nächste Ernte nutzen.
* Kinder einbeziehen: Der Anbau von Erdnüssen ist ein tolles Projekt für Kinder. Sie lernen dabei viel über Pflanzen und die Natur.
Häufige Probleme und Lösungen
* Erdnüsse keimen nicht: Überprüfe, ob die Erdnüsse frisch und ungesalzen sind. Stelle sicher, dass sie ausreichend Feuchtigkeit und Wärme haben.
* Pflanzen wachsen langsam: Stelle sicher, dass die Pflanzen genügend Sonnenlicht bekommen. Dünge sie regelmäßig und achte auf eine gute Belüftung.
* Blätter werden gelb: Das kann ein Zeichen für Nährstoffmangel sein. Dünge die Pflanzen mit einem geeigneten Dünger.
* Schädlinge: Bekämpfe Schädlinge frühzeitig mit natürlichen Schädlingsbekämpfungsmitteln.
Warum Erdnüsse im Haus anbauen? Die Vorteile auf einen Blick
* Nachhaltigkeit: Du weißt genau, wo deine Erdnüsse herkommen und wie sie angebaut wurden.
* Frische: Du kannst deine Erdnüsse direkt nach der Ernte genießen.
* Spaß: Der Anbau von Erdnüssen ist ein tolles Hobby und macht super viel Spaß.
* Lernen: Du lernst viel über Pflanzen und die Natur.
* Gesundheit: Selbst angebaute Erdnüsse sind oft gesünder als gekaufte.
Ich hoffe, dieser Leitfaden hat dir geholfen und dich inspiriert, deine eigenen Erdnüsse im Haus anzubauen. Es ist ein spannendes und lohnendes Projekt, das dir viel Freude bereiten wird. Viel Erfolg und eine reiche Ernte!
Conclusion
So, there you have it! Growing peanuts indoors is not only possible, but it’s also a surprisingly rewarding experience. Forget the store-bought, often bland, peanuts – imagine the satisfaction of harvesting your own homegrown, flavorful peanuts right from your living room. This DIY project is a must-try for several reasons. First, it offers a unique connection to your food, allowing you to witness the entire life cycle of a plant from seed to harvest. Second, it’s a fantastic educational opportunity, especially for children, teaching them about botany, patience, and the wonders of nature. Third, and perhaps most importantly, the taste of freshly harvested, homegrown peanuts is simply unparalleled.
But the benefits don’t stop there. Growing peanuts indoors allows you to control the growing environment, protecting your plants from pests and diseases that might plague outdoor crops. You can also extend the growing season, enjoying fresh peanuts even during the colder months.
Ready to take your peanut growing to the next level? Consider experimenting with different peanut varieties. Virginia peanuts are known for their large size and delicious flavor, while Spanish peanuts are smaller and sweeter. Runner peanuts are a popular choice for peanut butter, so if you’re a peanut butter enthusiast, this might be the variety for you. You can also try adding different amendments to your soil to see how they affect the growth and flavor of your peanuts. Some gardeners swear by adding gypsum to the soil to improve calcium levels, which is essential for healthy peanut development. Others recommend using a mycorrhizal inoculant to help the roots absorb nutrients more efficiently.
Don’t be afraid to get creative with your peanut growing setup. While a simple pot will suffice, you can also use a raised bed or even a hydroponic system. Just remember that peanuts need plenty of space to spread their roots and develop their pods.
The key to successful indoor peanut cultivation is patience and attention to detail. Keep a close eye on your plants, water them regularly, and provide them with plenty of sunlight. Don’t be discouraged if you encounter challenges along the way. Growing peanuts indoors is a learning process, and every mistake is an opportunity to improve your skills.
We are confident that you’ll find growing peanuts indoors to be a fun, educational, and ultimately delicious experience. So, grab some peanut seeds, prepare your soil, and get ready to embark on this exciting gardening adventure. We encourage you to try this DIY trick and share your experiences with us. Let us know what varieties you tried, what challenges you faced, and what successes you celebrated. Your feedback will help other gardeners learn and grow, and together, we can create a community of indoor peanut enthusiasts. Happy growing!
FAQ
What kind of container do I need to grow peanuts indoors?
The most important factor is size. Peanuts need room for their roots to spread and for the pegs (the structures that develop into peanut pods) to penetrate the soil. A container that is at least 12 inches deep and 12 inches wide is a good starting point. Larger is generally better. You can use a plastic pot, a terracotta pot, or even a large bucket. Make sure the container has drainage holes to prevent waterlogging. Fabric pots are also a good option as they allow for good aeration and drainage.
What kind of soil is best for growing peanuts indoors?
Peanuts prefer well-draining, sandy loam soil. Avoid heavy clay soils, as they can become compacted and prevent the pegs from penetrating the soil. You can purchase a pre-made potting mix specifically designed for vegetables, or you can create your own mix by combining equal parts of potting soil, sand, and compost. Adding some perlite or vermiculite to the mix will further improve drainage. The ideal pH for peanut growth is between 6.0 and 6.5.
How much sunlight do peanuts need indoors?
Peanuts need at least 6-8 hours of direct sunlight per day. If you don’t have a sunny window, you can supplement with grow lights. LED grow lights are a good option as they are energy-efficient and provide the full spectrum of light that plants need. Position the grow lights about 6-12 inches above the plants. Rotate the plants regularly to ensure that all sides receive adequate light.
How often should I water my peanut plants?
Water your peanut plants regularly, keeping the soil consistently moist but not waterlogged. Water deeply whenever the top inch of soil feels dry to the touch. Avoid overhead watering, as this can promote fungal diseases. Instead, water at the base of the plant. During hot weather, you may need to water more frequently. Reduce watering during the cooler months.
How long does it take to grow peanuts indoors?
It typically takes about 120-150 days from planting to harvest. The exact time will depend on the variety of peanut, the growing conditions, and the climate. You’ll know your peanuts are ready to harvest when the leaves start to turn yellow and the plants begin to die back.
How do I harvest peanuts indoors?
Carefully dig up the entire plant, being careful not to damage the peanut pods. Gently shake off any excess soil. You can then either dry the entire plant or remove the peanuts from the plant and dry them separately. To dry the entire plant, hang it upside down in a well-ventilated area for several weeks. To dry the peanuts separately, spread them out on a screen or tray and let them air dry for several weeks.
What are some common problems when growing peanuts indoors?
Some common problems include pests, diseases, and nutrient deficiencies. Pests such as aphids and spider mites can be controlled with insecticidal soap or neem oil. Fungal diseases can be prevented by providing good air circulation and avoiding overhead watering. Nutrient deficiencies can be corrected by fertilizing with a balanced fertilizer.
Can I grow peanuts indoors year-round?
Yes, you can grow peanuts indoors year-round, provided you have adequate light and temperature control. Peanuts prefer temperatures between 70 and 80 degrees Fahrenheit. You may need to use a space heater or a cooling system to maintain these temperatures.
Do I need to fertilize my peanut plants?
Yes, peanuts benefit from regular fertilization. Use a balanced fertilizer with a ratio of 10-10-10 or 5-10-10. Fertilize every 2-3 weeks during the growing season. Avoid over-fertilizing, as this can lead to excessive vegetative growth and reduced peanut production.
How do I know if my peanuts are ready to eat?
After drying, roast a few peanuts to test for doneness. They should have a nutty flavor and a slightly crunchy texture. If they are still soft or taste raw, they need to dry for a longer period. Once they are properly dried, you can store them in an airtight container in a cool, dry place for several months. Enjoy your homegrown peanuts!
Leave a Comment