
Stone Based Celery Growing: Ever dreamt of having crisp, fresh celery right at your fingertips, without the hassle of a full-blown garden? I know I have! Forget battling pests and unpredictable weather; there’s a surprisingly simple and incredibly rewarding way to cultivate this crunchy veggie using something you probably already have lying around: stones!
Celery, with its refreshing taste and numerous health benefits, has been enjoyed for centuries. Originating in the Mediterranean, it was initially valued for its medicinal properties before becoming a culinary staple. Now, you can tap into that rich history and bring a piece of it to your own home, regardless of your gardening experience.
Why should you try this stone-based celery growing method? Well, for starters, it’s a fantastic way to recycle celery scraps and reduce food waste. Plus, it’s a low-maintenance project that’s perfect for beginners or anyone with limited space. Imagine the satisfaction of regrowing celery from a discarded base, watching it flourish with minimal effort. This DIY trick not only saves you money at the grocery store but also connects you with nature in a unique and fulfilling way. So, let’s dive in and discover the secrets to successful stone based celery growing!

Verwandle Steine in ein Celery-Paradies: Eine DIY-Anleitung
Hey Gartenfreunde! Habt ihr auch genug davon, dass euer Staudensellerie im Supermarkt immer so schnell welk wird? Oder wollt ihr einfach mal etwas Neues im Garten ausprobieren? Dann habe ich heute genau das Richtige für euch: Wir bauen ein kleines, aber feines Staudensellerie-Beet mit Steinen! Klingt verrückt? Ist es vielleicht ein bisschen, aber es macht Spaß und sieht super aus. Und das Beste: Es ist einfacher, als ihr denkt!
Was wir brauchen: Die Materialliste
Bevor wir loslegen, schnappen wir uns erstmal alles, was wir brauchen. Keine Sorge, die meisten Sachen habt ihr wahrscheinlich schon zu Hause oder im Garten herumliegen.
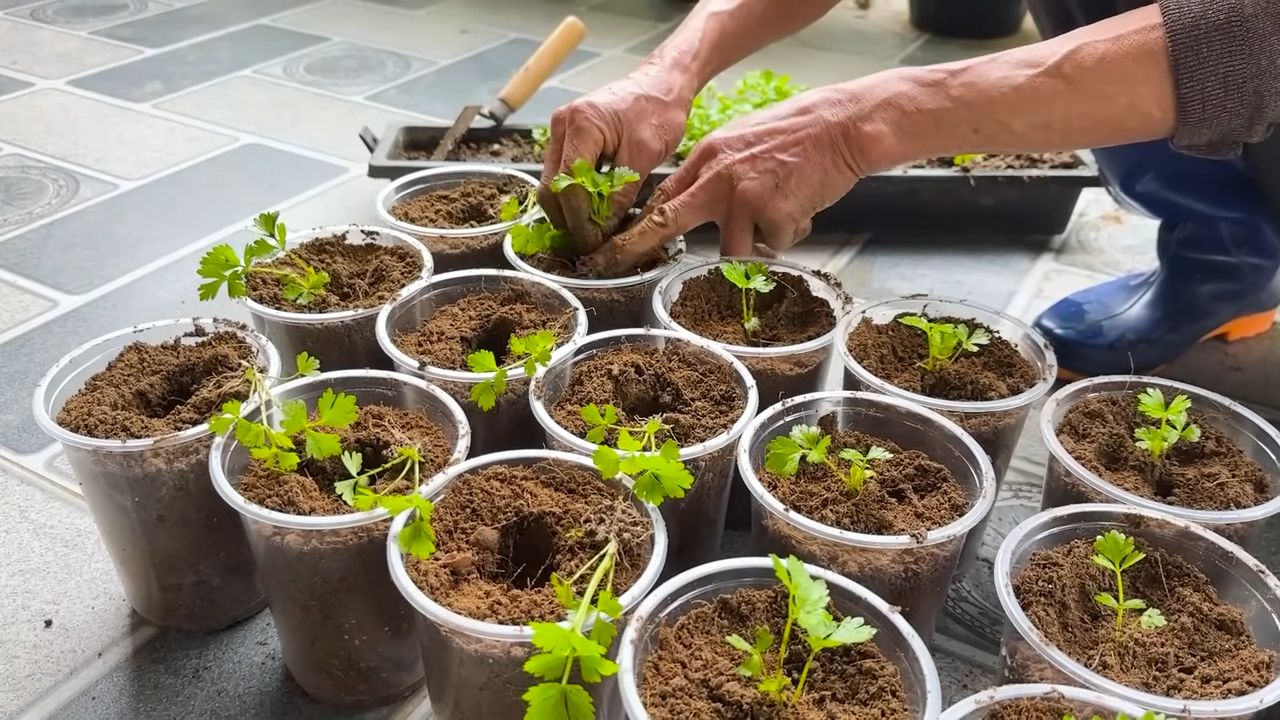
* Staudensellerie-Strunk: Am besten einen frischen, knackigen Strunk vom Supermarkt. Achtet darauf, dass er unten noch Wurzelansätze hat.
* Steine: Hier könnt ihr eurer Kreativität freien Lauf lassen! Sucht euch Steine in verschiedenen Größen und Formen. Wichtig ist nur, dass sie stabil sind und sich gut stapeln lassen. Ich habe Flusssteine verwendet, weil sie eine schöne, natürliche Optik haben.
* Erde: Normale Blumenerde oder Gartenerde ist perfekt.
* Wasser: Zum Gießen, logisch!
* Messer: Zum Zuschneiden des Selleriestrunks.
* Gefäß: Ein Teller, eine Schale oder ein kleiner Topf, in dem wir den Sellerie anziehen können.
* Geduld: Das Wichtigste überhaupt!
Schritt-für-Schritt-Anleitung: So geht’s!
Okay, jetzt geht’s ans Eingemachte! Folgt einfach diesen Schritten, und schon bald könnt ihr euren eigenen Staudensellerie ernten.
Phase 1: Den Sellerie vorbereiten
1. Strunk zuschneiden: Nehmt euer Messer und schneidet den Staudensellerie-Strunk etwa 5-7 cm vom unteren Ende ab. Achtet darauf, dass ihr die Wurzelansätze nicht beschädigt. Die äußeren, welken Blätter könnt ihr entfernen.
2. In Wasser stellen: Gebt etwas Wasser in euer Gefäß und stellt den Selleriestrunk mit der Schnittfläche nach unten hinein. Das Wasser sollte etwa 2-3 cm hoch stehen.
3. Abwarten und beobachten: Stellt das Gefäß an einen hellen, aber nicht direkt sonnigen Ort. Wechselt das Wasser alle 1-2 Tage. Nach ein paar Tagen solltet ihr sehen, wie neue Blätter aus der Mitte des Strunks sprießen und sich neue Wurzeln bilden. Das ist ein gutes Zeichen!
Phase 2: Das Steinbeet bauen
1. Standort wählen: Sucht euch einen geeigneten Platz für euer Steinbeet. Er sollte halbschattig bis sonnig sein und einen guten Wasserabzug haben.
2. Steine stapeln: Jetzt kommt der kreative Teil! Stapelt die Steine so, dass eine Art kleine Mauer oder ein Beet entsteht. Lasst dabei Lücken und Spalten, in die wir später die Erde füllen können. Achtet darauf, dass die Steine stabil liegen und nicht wackeln. Ich habe meine Steine so angeordnet, dass sie eine Art kleine Terrasse bilden.
3. Erde einfüllen: Füllt die Lücken und Spalten zwischen den Steinen mit Erde. Drückt die Erde leicht an, damit sie nicht gleich wieder herausfällt. Lasst aber noch genug Platz für den Sellerie.
Phase 3: Den Sellerie einpflanzen
1. Sellerie vorbereiten: Wenn der Selleriestrunk genügend neue Blätter und Wurzeln gebildet hat (das kann 1-2 Wochen dauern), ist er bereit zum Einpflanzen.
2. Pflanzloch graben: Grabt in der Erde zwischen den Steinen ein kleines Loch, das groß genug für den Selleriestrunk ist.
3. Sellerie einsetzen: Setzt den Selleriestrunk vorsichtig in das Loch und füllt es mit Erde auf. Drückt die Erde leicht an.
4. Angießen: Gießt den Sellerie gut an.
Phase 4: Pflege und Ernte
1. Gießen: Gießt den Sellerie regelmäßig, besonders in trockenen Perioden. Die Erde sollte immer leicht feucht sein, aber nicht nass.
2. Düngen: Gelegentlich könnt ihr den Sellerie mit etwas organischem Dünger düngen.
3. Beobachten: Achtet auf Schädlinge und Krankheiten. Bei Bedarf könnt ihr natürliche Pflanzenschutzmittel verwenden.
4. Ernten: Wenn der Sellerie groß genug ist, könnt ihr die äußeren Stangen ernten. Schneidet sie einfach mit einem Messer ab. Der Sellerie wird weiterwachsen und neue Stangen bilden.
Zusätzliche Tipps und Tricks
* Steinauswahl: Achtet darauf, dass die Steine nicht zu scharfkantig sind, damit ihr euch nicht verletzt.
* Erde: Ihr könnt auch eine Mischung aus Blumenerde und Kompost verwenden. Das gibt dem Sellerie noch mehr Nährstoffe.
* Standort: Wenn ihr keinen Garten habt, könnt ihr das Steinbeet auch auf dem Balkon oder der Terrasse aufstellen.
* Winterhart: Staudensellerie ist nicht winterhart. Wenn es kalt wird, solltet ihr ihn ins Haus holen oder mit Vlies abdecken.
* Sortenvielfalt: Es gibt verschiedene Staudensellerie-Sorten. Probiert einfach aus, welche euch am besten schmeckt.
* Kreativität: Seid kreativ beim Bau eures Steinbeets! Ihr könnt verschiedene Steine, Pflanzen und Dekorationen verwenden.
* Drainage: Stelle sicher, dass das Wasser gut abfließen kann, um Staunässe zu vermeiden. Eine Schicht Kies am Boden des Steinbeets kann helfen.
* Schnecken: Sellerie ist bei Schnecken sehr beliebt. Schütze deine Pflanze mit Schneckenkorn oder anderen natürlichen Methoden.
* Regelmäßiges Ernten: Durch das regelmäßige Ernten der äußeren Stangen förderst du das Wachstum der Pflanze.
Warum dieses DIY-Projekt so toll ist
* Nachhaltig: Ihr recycelt einen Staudensellerie-Strunk und gebt ihm ein neues Leben.
* Dekorativ: Das Steinbeet ist ein echter Hingucker im Garten oder auf dem Balkon.
* Lecker: Ihr habt immer frischen Staudensellerie zur Hand.
* Einfach: Das Projekt ist auch für Anfänger geeignet.
* Individuell: Ihr könnt das Steinbeet ganz nach euren eigenen Vorstellungen gestalten.
Häufig gestellte Fragen (FAQ)
* Wie lange dauert es, bis der Sellerie wächst? Das hängt von den Bedingungen ab, aber in der Regel dauert es 2-3 Monate, bis ihr die ersten Stangen ernten könnt.
* Kann ich auch andere Pflanzen in das Steinbeet pflanzen? Ja, ihr könnt auch andere Kräuter oder kleine Blumen in das Steinbeet pflanzen. Achtet aber darauf, dass sie ähnliche Ansprüche an den Standort und die Pflege haben wie der Sellerie.
* Was mache ich, wenn der Sellerie nicht wächst? Überprüft, ob er genügend Wasser und Licht bekommt. Düngt ihn gegebenenfalls. Achtet auch auf Schädlinge und Krankheiten.
* Kann ich den Sellerie auch im Winter anbauen? Ja, ihr könnt den Sellerie auch im Winter im Haus anbauen. Stellt ihn an einen hellen Ort und gießt ihn regelmäßig.
Ich hoffe, diese Anleitung hat euch gefallen und inspiriert! Viel Spaß beim Nachmachen und guten Appetit mit eurem selbst angebauten Staudensellerie! Lasst mich wissen, wie es bei euch geklappt hat! Ich freue mich auf eure Kommentare und Fotos!
Conclusion
So, there you have it! Transforming celery scraps into vibrant, homegrown stalks using the stone-based method is not just a fun experiment; it’s a sustainable and rewarding way to enjoy fresh produce right from your kitchen. This simple DIY trick offers a multitude of benefits, from reducing food waste and saving money to experiencing the satisfaction of nurturing new life from something you would have otherwise discarded.
Why is this a must-try? Because it’s incredibly easy, requires minimal effort and resources, and yields tangible results. Imagine the pride you’ll feel serving a salad made with celery you grew yourself, or adding a crisp, flavorful crunch to your soups and stews, all thanks to a few stones and some water. Plus, it’s a fantastic educational activity for kids, teaching them about plant life cycles and the importance of sustainability.
But the beauty of this method lies in its adaptability. Feel free to experiment with different types of stones. River rocks, pebbles, or even broken pieces of terracotta pots can work just as well. The key is to provide a stable base that allows the celery base to remain partially submerged in water without completely drowning it.
Consider adding a diluted liquid fertilizer to the water every couple of weeks to give your celery an extra boost. A balanced fertilizer will provide the necessary nutrients for optimal growth, resulting in thicker, more flavorful stalks. You can also try different locations within your home to find the spot that provides the best light conditions for your celery. A sunny windowsill is ideal, but if you don’t have one, a grow light can be a great alternative.
Don’t be afraid to get creative with your celery growing setup. Use a decorative bowl or container to add a touch of style to your kitchen. You can even create a mini indoor garden by growing other herbs and vegetables alongside your celery. The possibilities are endless!
This stone-based celery growing method is more than just a gardening hack; it’s a gateway to a more sustainable and fulfilling lifestyle. It’s a reminder that even the smallest actions can have a big impact on our environment and our well-being.
We wholeheartedly encourage you to give this DIY trick a try. It’s a simple, affordable, and incredibly rewarding way to enjoy fresh, homegrown celery. And once you’ve experienced the joy of growing your own food, we’re confident you’ll be hooked!
We’d love to hear about your experiences with the stone-based celery growing method. Share your photos, tips, and stories in the comments below. Let’s create a community of celery enthusiasts and inspire others to embrace the joys of sustainable gardening. What kind of stones did you use? How long did it take for your celery to start growing? What are your favorite ways to use your homegrown celery? We can’t wait to hear from you!
Frequently Asked Questions (FAQ)
What exactly is the stone-based celery growing method?
The stone-based celery growing method is a simple technique for regrowing celery from the base of a stalk that you would normally discard. Instead of throwing away the bottom portion, you place it in a shallow dish with stones and water, allowing it to sprout new growth. The stones provide support and help keep the base partially submerged, promoting root development and ultimately, new celery stalks. It’s a form of vegetative propagation, essentially cloning the original celery plant.
What kind of celery works best for this method?
Any commercially available celery stalk will work for this method. Look for celery with a firm, healthy base that hasn’t started to rot or dry out. The fresher the base, the better the chances of successful regrowth. Organic celery is a great option, but conventional celery will also work just fine. The key is to choose a stalk that looks vibrant and has a solid base.
What types of stones are suitable for this method?
Almost any type of small, smooth stone will work. River rocks, pebbles, aquarium gravel, or even broken pieces of terracotta pots are all excellent choices. Avoid using sharp or jagged stones that could damage the celery base. The stones should be clean and free of any debris or contaminants. The primary function of the stones is to provide support and keep the celery base partially submerged in water, so choose stones that are appropriately sized for your container.
How much water should I use?
The water level should be just high enough to cover the bottom inch or two of the celery base. You don’t want to completely submerge the base, as this can lead to rot. The stones will help keep the base elevated slightly, ensuring that only the roots are in contact with the water. Change the water every one to two days to prevent bacterial growth and keep the water fresh.
How long does it take for the celery to start growing?
You should start to see new growth within a week or two. Small, pale green shoots will emerge from the center of the celery base. The speed of growth will depend on factors such as temperature, light, and the overall health of the celery base. Be patient, and continue to provide fresh water and adequate light.
What kind of light does the celery need?
Celery needs bright, indirect light to thrive. A sunny windowsill is an ideal location, but avoid direct sunlight, which can scorch the leaves. If you don’t have a sunny windowsill, you can use a grow light to provide supplemental lighting. Aim for at least six hours of light per day.
Can I transplant the celery to soil?
Yes, once the celery has developed a good root system and several inches of new growth, you can transplant it to a pot filled with well-draining potting soil. Gently remove the celery from the water and stones, being careful not to damage the roots. Plant the celery in the pot, burying the base up to the point where the new growth begins. Water thoroughly and place the pot in a sunny location.
How do I care for the celery after transplanting it to soil?
Water the celery regularly, keeping the soil moist but not waterlogged. Fertilize every two to three weeks with a balanced liquid fertilizer. Monitor the plant for pests and diseases, and take appropriate action if necessary. You can harvest the celery stalks as needed, cutting them off at the base of the plant.
Will the regrown celery taste the same as store-bought celery?
The taste of the regrown celery may vary slightly depending on the growing conditions and the variety of celery. However, it should still have a similar flavor and texture to store-bought celery. Many people find that homegrown celery has a more intense and flavorful taste.
Can I grow celery indoors year-round using this method?
Yes, you can grow celery indoors year-round using the stone-based method. As long as you provide adequate light, water, and nutrients, your celery should continue to grow and produce new stalks. This is a great way to enjoy fresh celery even during the winter months.
What if my celery base starts to rot?
If you notice any signs of rot, such as a slimy texture or a foul odor, remove the affected parts immediately. Change the water more frequently and ensure that the celery base is not completely submerged. If the rot persists, it may be necessary to discard the celery base and start with a fresh one.
Can I use this method to grow other vegetables?
While the stone-based method is particularly well-suited for celery, it can also be used to regrow other vegetables, such as lettuce, bok choy, and green onions. The principles are the same: provide a stable base, keep the base partially submerged in water, and provide adequate light. Experiment with different vegetables and see what works best for you.
Is this method truly sustainable?
Yes, the stone-based celery growing method is a sustainable practice because it reduces food waste and allows you to grow your own food without relying on commercial agriculture. By regrowing celery from scraps, you are minimizing your environmental impact and contributing to a more sustainable food system. It’s a small but meaningful step towards a more eco-friendly lifestyle.

Leave a Comment