
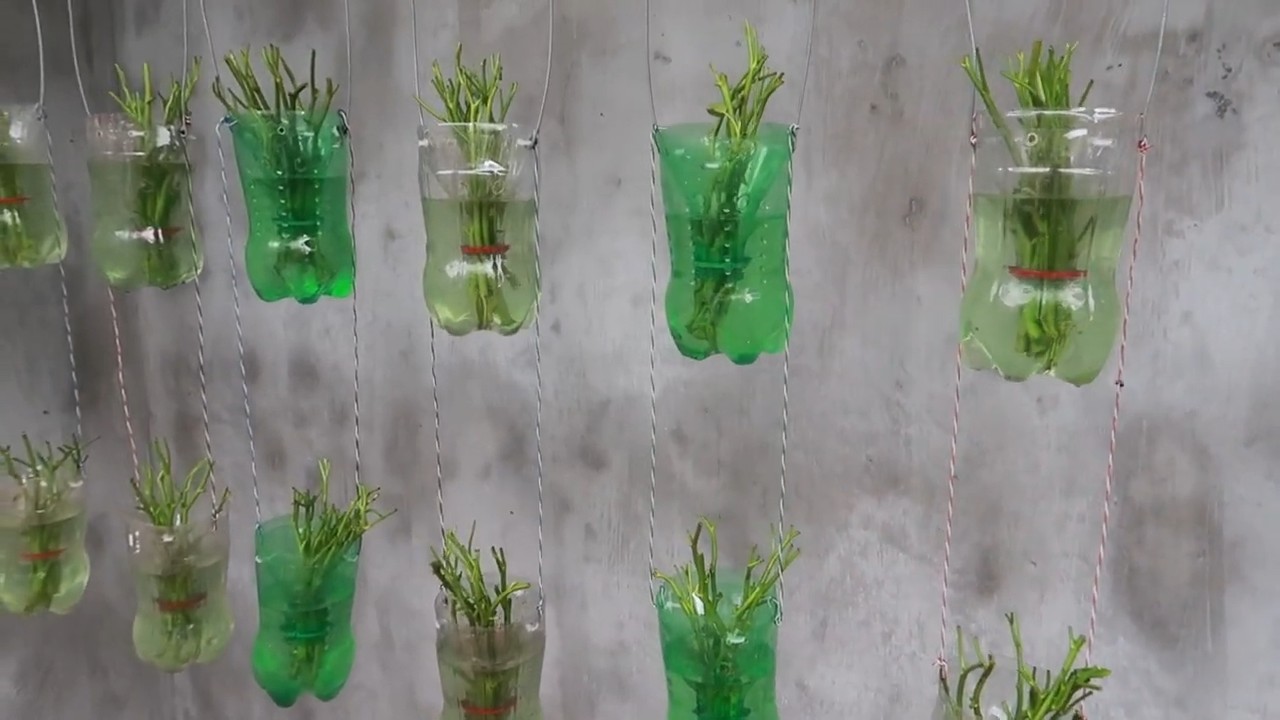
Recycled bottle spinach garden: Ever dream of fresh, vibrant spinach gracing your table, grown right outside your door, without breaking the bank? I know I have! Forget sprawling gardens and expensive setups. This DIY project is all about transforming humble plastic bottles into thriving havens for your leafy greens.
The beauty of repurposing isn’t just a modern trend; it echoes centuries of resourceful gardening practices. Think victory gardens during wartime, or ancient civilizations utilizing every available resource. Today, we’re channeling that same spirit of ingenuity to create something beautiful and beneficial.
Why a recycled bottle spinach garden, you ask? Well, for starters, it’s incredibly space-saving, perfect for balconies, patios, or even sunny windowsills. It’s also a fantastic way to reduce plastic waste, giving those bottles a new lease on life. Plus, growing your own spinach means you control the quality, ensuring it’s free from harmful pesticides and bursting with flavor. Imagine the satisfaction of harvesting your own organic spinach for salads, smoothies, or delicious side dishes! This guide will walk you through each step, making it easy and fun to create your own miniature spinach paradise. Let’s get started!

Verwandle Plastikflaschen in einen vertikalen Spinatgarten: Eine DIY-Anleitung
Hallo liebe Gartenfreunde! Habt ihr euch jemals gefragt, was ihr mit all den leeren Plastikflaschen anfangen sollt, die sich so ansammeln? Anstatt sie wegzuwerfen, lasst uns sie in etwas Nützliches und Schönes verwandeln: einen vertikalen Spinatgarten! Das ist nicht nur eine tolle Möglichkeit, Spinat auf kleinem Raum anzubauen, sondern auch ein super Projekt, um die Umwelt zu schonen und euren grünen Daumen zu beweisen. Ich zeige euch, wie es geht!
Was ihr für euren vertikalen Spinatgarten braucht:
* Leere Plastikflaschen: Je mehr, desto besser! Am besten eignen sich 1,5-Liter- oder 2-Liter-Flaschen. Achtet darauf, dass sie sauber und trocken sind.
* Ein scharfes Messer oder eine Schere: Zum Schneiden der Flaschen. Seid vorsichtig!
* Ein Bohrer oder ein Nagel und Hammer: Zum Anbringen von Löchern für die Aufhängung und Drainage.
* Starke Schnur, Draht oder Kabelbinder: Zum Aufhängen der Flaschen.
* Gartenerde: Hochwertige Erde ist wichtig für gesundes Spinatwachstum.
* Spinatsamen oder Jungpflanzen: Je nachdem, was ihr bevorzugt.
* Gießkanne oder Sprühflasche: Zum Bewässern eures Spinats.
* Optional: Sprühfarbe (für die Flaschen), Handschuhe, Markierstift.
Schritt-für-Schritt-Anleitung: So baut ihr euren vertikalen Spinatgarten
Phase 1: Vorbereitung der Flaschen
1. Reinigung der Flaschen: Zuerst müsst ihr sicherstellen, dass alle Flaschen sauber sind. Entfernt alle Etiketten und spült die Flaschen gründlich mit Wasser und Seife aus. Lasst sie vollständig trocknen, bevor ihr weitermacht. Das ist wichtig, damit keine Rückstände das Wachstum eures Spinats beeinträchtigen.
2. Schneiden der Flaschen: Jetzt kommt der etwas knifflige Teil. Nehmt euer Messer oder eure Schere und schneidet ein rechteckiges Loch in die Seite jeder Flasche. Dieses Loch wird als Pflanzöffnung dienen. Die Größe des Lochs hängt davon ab, wie viele Spinatpflanzen ihr pro Flasche pflanzen möchtet. Ich empfehle, mit einem Loch von etwa 10 cm x 15 cm zu beginnen. Achtet darauf, dass ihr die Kanten glättet, damit ihr euch später nicht daran schneidet.
3. Drainagelöcher bohren: Damit euer Spinat nicht in Staunässe ertrinkt, müsst ihr Drainagelöcher in den Boden jeder Flasche bohren. Nehmt euren Bohrer oder Nagel und Hammer und macht 3-4 kleine Löcher in den Boden jeder Flasche. Diese Löcher sorgen dafür, dass überschüssiges Wasser abfließen kann.
4. Optional: Bemalen der Flaschen: Wenn ihr euren vertikalen Garten etwas aufpeppen möchtet, könnt ihr die Flaschen jetzt mit Sprühfarbe bemalen. Wählt Farben, die euch gefallen und die zu eurem Garten passen. Lasst die Farbe vollständig trocknen, bevor ihr mit dem nächsten Schritt fortfahrt. Ich persönlich mag natürliche Farben wie Grün oder Braun, aber eurer Kreativität sind keine Grenzen gesetzt!
Phase 2: Vorbereitung der Aufhängung
1. Löcher für die Aufhängung bohren: Jetzt müsst ihr Löcher bohren, durch die ihr die Schnur oder den Draht zum Aufhängen der Flaschen ziehen könnt. Bohrt zwei Löcher in den oberen Teil jeder Flasche, jeweils auf gegenüberliegenden Seiten. Achtet darauf, dass die Löcher groß genug sind, um eure Schnur oder euren Draht hindurchzufädeln.
2. Befestigung der Schnur oder des Drahts: Fädelt die Schnur, den Draht oder die Kabelbinder durch die Löcher und verknotet sie fest. Achtet darauf, dass die Schnur lang genug ist, um die Flaschen in der gewünschten Höhe aufzuhängen. Ihr könnt die Länge der Schnur variieren, um einen interessanten visuellen Effekt zu erzielen.
3. Testen der Stabilität: Bevor ihr die Flaschen mit Erde und Spinat befüllt, solltet ihr die Stabilität der Aufhängung testen. Hängt eine leere Flasche auf und zieht daran, um sicherzustellen, dass die Schnur oder der Draht hält.
Phase 3: Bepflanzung des Spinats
1. Befüllen der Flaschen mit Erde: Jetzt kommt der spaßige Teil! Füllt jede Flasche mit hochwertiger Gartenerde. Achtet darauf, dass die Erde locker und gut durchlässig ist. Lasst etwa 2-3 cm Platz bis zum Rand der Flasche.
2. Pflanzen der Spinatsamen oder Jungpflanzen: Wenn ihr Spinatsamen verwendet, streut sie gleichmäßig über die Erde und bedeckt sie leicht mit einer dünnen Schicht Erde. Wenn ihr Jungpflanzen verwendet, macht ein kleines Loch in die Erde und setzt die Pflanze vorsichtig hinein. Drückt die Erde um die Pflanze herum fest.
3. Bewässern des Spinats: Gießt den Spinat vorsichtig mit einer Gießkanne oder Sprühflasche. Achtet darauf, dass die Erde feucht, aber nicht durchnässt ist.
4. Platzierung des vertikalen Gartens: Sucht einen sonnigen Standort für euren vertikalen Spinatgarten. Spinat benötigt mindestens 4-6 Stunden Sonnenlicht pro Tag. Ein Balkon, eine Terrasse oder ein Fensterbrett sind ideale Standorte.
Phase 4: Pflege eures Spinatgartens
1. Regelmäßiges Gießen: Überprüft die Erde regelmäßig und gießt den Spinat, wenn sie sich trocken anfühlt. Achtet darauf, dass ihr nicht zu viel gießt, da dies zu Wurzelfäule führen kann.
2. Düngung: Düngt euren Spinat alle paar Wochen mit einem organischen Dünger. Dies hilft, das Wachstum zu fördern und den Spinat gesund zu halten.
3. Schutz vor Schädlingen: Überprüft euren Spinat regelmäßig auf Schädlinge wie Blattläuse oder Schnecken. Wenn ihr Schädlinge entdeckt, behandelt sie mit einem natürlichen Schädlingsbekämpfungsmittel.
4. Ernte: Ihr könnt euren Spinat ernten, sobald die Blätter groß genug sind. Schneidet die äußeren Blätter ab und lasst die inneren Blätter weiterwachsen. So könnt ihr über einen längeren Zeitraum frischen Spinat ernten.
Zusätzliche Tipps und Tricks:
* Verwendet verschiedene Flaschengrößen: Um euren vertikalen Garten optisch interessanter zu gestalten, könnt ihr verschiedene Flaschengrößen verwenden.
* Kombiniert Spinat mit anderen Kräutern: Ihr könnt euren vertikalen Garten auch mit anderen Kräutern wie Petersilie, Schnittlauch oder Basilikum bepflanzen.
* Verwendet recycelte Erde: Wenn ihr alte Blumenerde habt, könnt ihr sie mit frischer Erde mischen und für euren vertikalen Garten verwenden.
* Achtet auf die Temperatur: Spinat bevorzugt kühle Temperaturen. Wenn es zu heiß wird, kann er in Blüte gehen und bitter schmecken.
* Habt Geduld: Es kann einige Wochen dauern, bis euer Spinat erntereif ist. Habt Geduld und genießt den Prozess!
Ich hoffe, diese Anleitung hilft euch dabei, euren eigenen vertikalen Spinatgarten zu bauen. Es ist ein tolles Projekt, um die Umwelt zu schonen, frischen Spinat anzubauen und euren grünen Daumen zu beweisen. Viel Spaß beim Gärtnern!
Conclusion
So, there you have it! Transforming discarded plastic bottles into a thriving spinach garden is not just a clever upcycling project; it’s a sustainable, space-saving, and incredibly rewarding way to enjoy fresh, homegrown greens. We’ve walked you through the simple steps, highlighting the ease and accessibility of this DIY endeavor. But why is this particular project a must-try?
Firstly, it’s an environmentally conscious choice. By repurposing plastic bottles, you’re actively reducing waste and contributing to a more sustainable lifestyle. In a world grappling with plastic pollution, every little bit helps, and this project offers a tangible way to make a difference.
Secondly, it’s incredibly practical. Whether you have a sprawling backyard or a tiny balcony, this vertical garden solution maximizes space, allowing you to cultivate a surprising amount of spinach in a compact area. This is especially beneficial for urban dwellers or anyone with limited gardening space.
Thirdly, it’s cost-effective. The primary material – plastic bottles – are often readily available and free. The other supplies, such as soil and seeds, are relatively inexpensive, making this a budget-friendly way to grow your own food.
But the benefits extend beyond practicality and sustainability. There’s a unique satisfaction that comes from nurturing something from seed to harvest, and this project offers a direct connection to the food you eat. Imagine the pride of serving a salad made with spinach you grew yourself, knowing that you played a part in every step of the process.
Now, let’s talk about variations. While we’ve focused on spinach, this method is easily adaptable to other leafy greens like lettuce, kale, or even herbs like basil and parsley. You can also experiment with different bottle sizes and configurations to create a garden that perfectly suits your space and aesthetic preferences. Consider painting the bottles to add a splash of color or using different types of soil to optimize growth. You could even create a tiered system for a more visually appealing and efficient vertical garden.
Another variation is to explore different watering methods. While we suggested manual watering, you could consider setting up a simple drip irrigation system using recycled materials to automate the process and ensure consistent moisture levels. This is particularly useful if you live in a hot climate or tend to forget to water your plants regularly.
The possibilities are truly endless, and that’s part of what makes this project so exciting. It’s an opportunity to get creative, experiment, and personalize your garden to reflect your own unique style and preferences.
We wholeheartedly encourage you to give this DIY recycled bottle spinach garden a try. It’s a fun, rewarding, and sustainable project that will bring fresh greens to your table and a sense of accomplishment to your heart. Don’t be afraid to experiment, adapt, and make it your own.
And most importantly, we want to hear about your experience! Share your photos, tips, and challenges with us. Let us know what worked for you, what didn’t, and any creative variations you came up with. Together, we can inspire others to embrace sustainable gardening practices and create a greener, healthier world. So, grab those plastic bottles, get your hands dirty, and let’s grow some spinach!
Frequently Asked Questions (FAQ)
1. What type of plastic bottles are best for this project?
Ideally, you should use PET (polyethylene terephthalate) plastic bottles, which are commonly used for water and soda. These bottles are durable, lightweight, and readily available. Avoid using bottles that have contained harsh chemicals or cleaning products, as these may contaminate the soil and affect the growth of your spinach. Thoroughly wash and rinse the bottles before using them to remove any residue. Also, consider the size of the bottle. Larger bottles will hold more soil and allow for more root growth, while smaller bottles are better suited for smaller spaces.
2. How do I ensure proper drainage in the bottles?
Proper drainage is crucial to prevent waterlogging and root rot. Before filling the bottles with soil, create drainage holes in the bottom. You can use a drill, a nail, or even a heated skewer to make several small holes. The number of holes will depend on the size of the bottle, but aim for at least 4-5 holes per bottle. You can also add a layer of gravel or small stones at the bottom of the bottle to further improve drainage. This will help to prevent the soil from becoming compacted and ensure that excess water can escape.
3. What type of soil should I use for growing spinach in plastic bottles?
A well-draining potting mix is ideal for growing spinach in plastic bottles. Avoid using garden soil, as it can be too heavy and compact, hindering root growth. Look for a potting mix that contains a blend of peat moss, perlite, and vermiculite. These ingredients provide good drainage, aeration, and water retention. You can also amend the potting mix with compost or other organic matter to provide additional nutrients for your spinach plants. A slightly acidic to neutral pH (around 6.0 to 7.0) is optimal for spinach growth.
4. How often should I water my spinach plants in the bottle garden?
The frequency of watering will depend on several factors, including the climate, the type of soil, and the size of the bottles. Generally, you should water your spinach plants when the top inch of soil feels dry to the touch. Avoid overwatering, as this can lead to root rot. Water thoroughly, ensuring that the water drains out of the drainage holes. During hot and dry weather, you may need to water more frequently. Check the soil moisture regularly and adjust your watering schedule accordingly.
5. How much sunlight does spinach need to grow in a bottle garden?
Spinach thrives in full sun to partial shade. Aim for at least 4-6 hours of direct sunlight per day. If you live in a hot climate, providing some afternoon shade can help to prevent the leaves from scorching. If you don’t have access to enough natural sunlight, you can supplement with grow lights. Position the grow lights about 6-12 inches above the plants and provide 12-14 hours of light per day.
6. How do I fertilize my spinach plants in the bottle garden?
Spinach is a relatively heavy feeder, so regular fertilization is important for optimal growth. You can use a balanced liquid fertilizer diluted to half strength. Apply the fertilizer every 2-3 weeks, following the instructions on the product label. Alternatively, you can amend the soil with compost or other organic matter to provide a slow-release source of nutrients. Avoid over-fertilizing, as this can lead to excessive leaf growth and reduced flavor.
7. How do I protect my spinach plants from pests and diseases?
Regularly inspect your spinach plants for signs of pests or diseases. Common pests that affect spinach include aphids, spider mites, and slugs. You can control these pests by handpicking them off the plants, spraying them with insecticidal soap, or using diatomaceous earth. To prevent diseases, ensure good air circulation around the plants and avoid overwatering. If you notice any signs of disease, such as yellowing leaves or spots, remove the affected leaves immediately.
8. When is the best time to harvest my spinach?
You can start harvesting spinach leaves when they are about 4-6 inches long. Harvest the outer leaves first, leaving the inner leaves to continue growing. This will allow you to harvest spinach continuously over a longer period. Use scissors or a knife to cut the leaves at the base of the stem. Harvest in the morning, when the leaves are crisp and cool.
9. Can I grow spinach indoors in a bottle garden?
Yes, you can grow spinach indoors in a bottle garden, provided you have adequate lighting. Place the bottle garden near a sunny window that receives at least 4-6 hours of direct sunlight per day. If you don’t have enough natural sunlight, you can supplement with grow lights. Ensure good air circulation around the plants and monitor the soil moisture regularly.
10. How long will my spinach plants last in the bottle garden?
Spinach is a cool-season crop that typically lasts for several weeks to a few months, depending on the climate and growing conditions. Once the weather gets too hot, the plants may bolt (flower), which will make the leaves bitter. To extend the growing season, you can plant spinach in the early spring or late summer. You can also provide shade during hot weather to prevent bolting.
Leave a Comment