
Growing sugarcane in recycled containers might sound like a tropical dream reserved for sprawling farms, but I’m here to tell you it’s totally achievable, even if you’re working with a small balcony or patio! Forget the image of vast fields; we’re bringing the sweet taste of homegrown sugarcane right to your doorstep, and in an eco-friendly way, no less!
Sugarcane has a rich history, deeply intertwined with cultures around the globe. From its origins in Southeast Asia to its spread across continents, it has been a vital source of sweetness and energy for centuries. Historically, sugarcane cultivation was a large-scale operation, but these days, we can adapt the process for our own personal use.
Why should you try growing sugarcane in recycled containers? Well, for starters, it’s incredibly rewarding to nurture a plant from a simple stalk to a thriving source of natural sweetness. Plus, it’s a fantastic way to reduce waste by giving those old buckets, tubs, and even large plastic bottles a new lease on life. Imagine the satisfaction of using your own homegrown sugarcane in your favorite recipes or even just enjoying a refreshing chew on a hot summer day. This DIY project is not only fun and educational but also a step towards a more sustainable lifestyle. Let’s dive into the simple steps and tricks to make your sugarcane dreams a reality!
Growing Sugarcane in Recycled Containers: A Sweet DIY Project
Hey there, fellow gardening enthusiasts! Ever dreamt of having your own homegrown sugarcane? It’s totally achievable, even without a sprawling farm. I’m going to walk you through how to grow sugarcane right in your backyard (or even on your balcony!) using recycled containers. It’s a fun, rewarding, and surprisingly easy project. Let’s get started!
Choosing Your Sugarcane Variety
Before we dive into the nitty-gritty, let’s talk sugarcane varieties. Not all sugarcane is created equal, especially when it comes to container gardening. You’ll want to look for varieties that are known for being relatively compact and adaptable.
* Consider the climate: Sugarcane thrives in warm climates, so make sure the variety you choose is suitable for your region. If you live in a cooler area, you might need to bring your containers indoors during the winter months.
* Look for dwarf varieties: Some sugarcane varieties are naturally smaller, making them perfect for container growing. These won’t grow as tall as commercial sugarcane, but they’ll still produce delicious stalks.
* Check local nurseries: Your local nursery is a great resource for finding sugarcane varieties that are well-suited to your area. They can also provide valuable advice on growing conditions and care.
Gathering Your Supplies
Okay, now for the fun part – gathering our supplies! Here’s what you’ll need to get started:
* Sugarcane stalks (seed canes): You can usually find these at nurseries or online. Look for healthy stalks with visible nodes (the little bumps where new shoots will emerge).
* Recycled containers: Think big! Sugarcane needs room to grow, so choose containers that are at least 15-20 gallons in size. Old trash cans, large buckets, or even repurposed plastic storage bins work great. Just make sure they have drainage holes.
* Potting mix: A well-draining potting mix is essential for healthy sugarcane growth. You can buy a pre-made mix or create your own by combining equal parts garden soil, compost, and perlite or vermiculite.
* Compost or aged manure: This will provide your sugarcane with the nutrients it needs to thrive.
* Water: Essential for, well, everything!
* Sharp knife or pruning shears: For cutting the sugarcane stalks.
* Gloves: To protect your hands.
* Optional: Fertilizer specifically formulated for sugarcane or grass.
Preparing Your Containers
This step is crucial for ensuring proper drainage and healthy root development.
1. Clean your containers: Thoroughly wash your recycled containers with soap and water to remove any dirt, debris, or residue.
2. Drill drainage holes: If your containers don’t already have them, drill several drainage holes in the bottom. This will prevent water from accumulating and rotting the roots.
3. Add a layer of gravel (optional): A layer of gravel at the bottom of the container can further improve drainage.
4. Fill with potting mix: Fill the containers with your chosen potting mix, leaving a few inches of space at the top.
Planting Your Sugarcane
Now for the exciting part – planting your sugarcane!
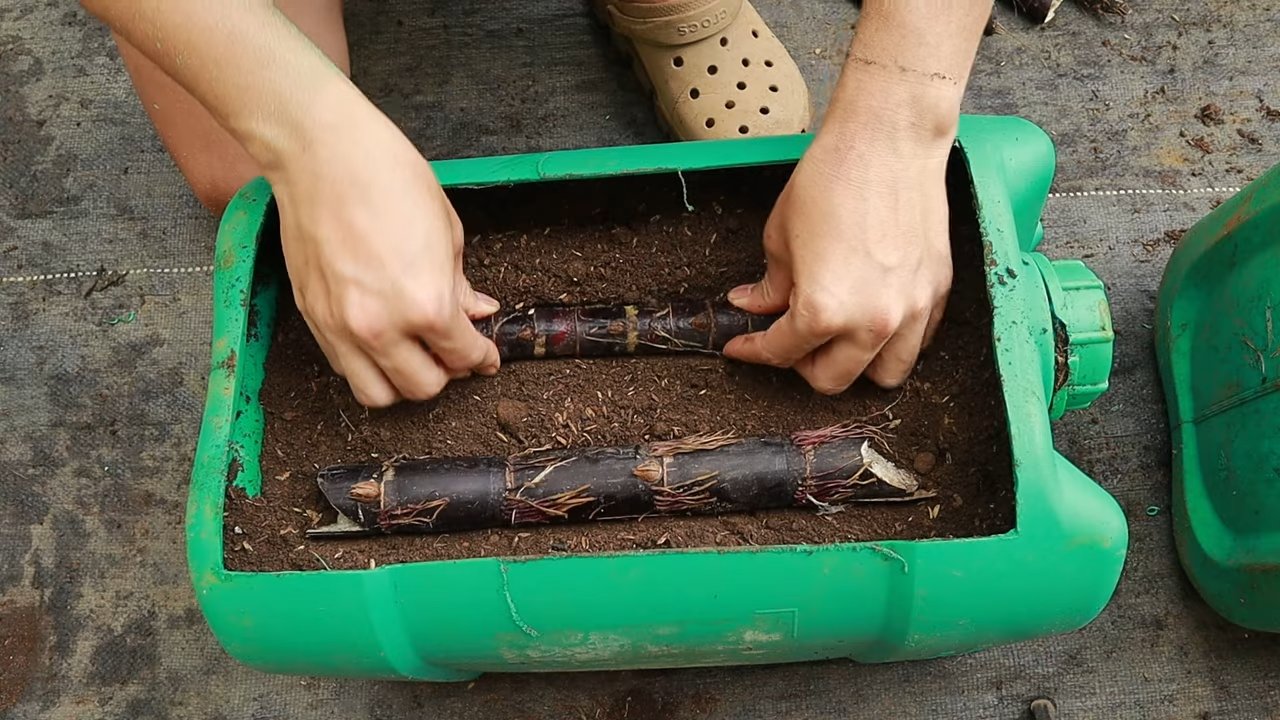
1. Prepare the sugarcane stalks: Using a sharp knife or pruning shears, cut the sugarcane stalks into sections, each containing at least two nodes. These nodes are where the new shoots will emerge.
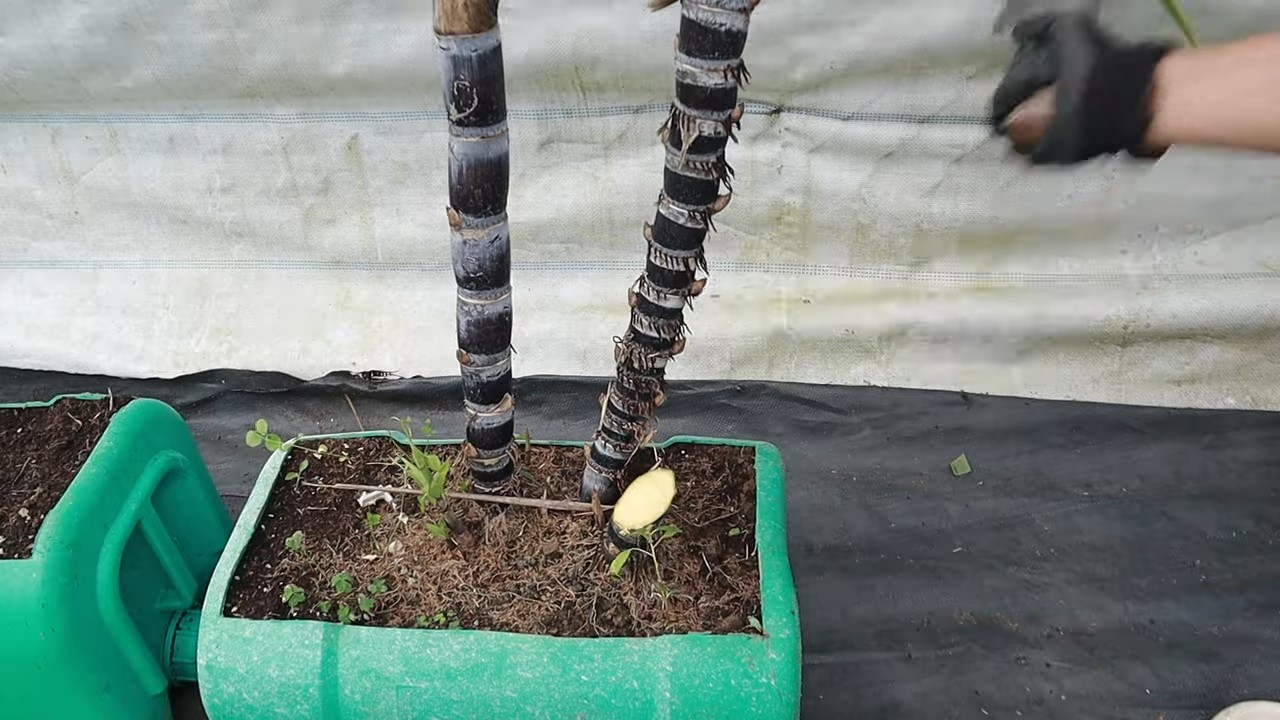
2. Lay the stalks horizontally: Lay the sugarcane stalk sections horizontally on top of the potting mix. This encourages multiple shoots to develop.
3. Cover with potting mix: Cover the sugarcane stalks with a layer of potting mix, about 2-3 inches deep.
4. Water thoroughly: Water the containers thoroughly until the water drains out of the drainage holes. This will help settle the soil and encourage root growth.
Caring for Your Sugarcane
Sugarcane is relatively low-maintenance, but it does need some TLC to thrive.
1. Watering: Sugarcane needs consistent moisture, especially during the growing season. Water deeply whenever the top inch of soil feels dry to the touch. Avoid overwatering, as this can lead to root rot.
2. Sunlight: Sugarcane loves sunlight! Place your containers in a location that receives at least 6-8 hours of direct sunlight per day.
3. Fertilizing: Feed your sugarcane regularly with a fertilizer specifically formulated for sugarcane or grass. Follow the instructions on the fertilizer package. You can also add compost or aged manure to the soil every few weeks to provide additional nutrients.
4. Weeding: Keep the containers free of weeds, as they can compete with the sugarcane for nutrients and water.
5. Pest control: Keep an eye out for pests such as aphids or spider mites. If you notice any infestations, treat them with an appropriate insecticide or insecticidal soap.
6. Support: As your sugarcane grows taller, it may need some support to prevent it from falling over. You can use stakes or trellises to provide support.
Harvesting Your Sugarcane
Harvesting time! This is where all your hard work pays off.
1. Maturity: Sugarcane typically takes 9-12 months to mature, depending on the variety and growing conditions. You’ll know it’s ready to harvest when the stalks are thick and juicy, and the leaves start to turn brown.
2. Cutting: Using a sharp knife or pruning shears, cut the sugarcane stalks at the base, close to the soil.
3. Processing: Now for the fun part – processing your sugarcane! You can chew on the stalks directly to extract the sweet juice, or you can use a sugarcane juicer to extract the juice for making drinks or other treats.
4. Replanting: You can replant the top portion of the cut stalks (containing the nodes) to grow new sugarcane plants.
Troubleshooting
Even with the best care, you might encounter some challenges along the way. Here are some common problems and how to address them:
* Yellowing leaves: This could be a sign of nutrient deficiency. Try fertilizing your sugarcane with a balanced fertilizer.
* Slow growth: This could be due to insufficient sunlight or water. Make sure your sugarcane is getting enough sunlight and water regularly.
* Pest infestations: Treat any pest infestations promptly with an appropriate insecticide or insecticidal soap.
* Root rot: This is usually caused by overwatering. Make sure your containers have adequate drainage and avoid overwatering.
Tips for Success
Here are a few extra tips to help you succeed with your sugarcane growing project:
* Start with healthy seed canes: The quality of your seed canes will have a big impact on the success of your project. Choose healthy stalks with visible nodes.
* Provide adequate drainage: Proper drainage is essential for preventing root rot. Make sure your containers have drainage holes and use a well-draining potting mix.
* Water regularly: Sugarcane needs consistent moisture, especially during the growing season.
* Fertilize regularly: Feed your sugarcane with a balanced fertilizer to provide it with the nutrients it needs to thrive.
* Be patient: Sugarcane takes time to mature, so don’t get discouraged if you don’t see results immediately.
Adapting to Different Climates
Growing sugarcane in containers opens up possibilities even in less-than-ideal climates. Here’s how to adapt:
* Cooler Climates: If you live in a region with cold winters, consider growing your sugarcane in containers that can be easily moved indoors. Bring them inside before the first frost and place them in a sunny location. You might need to supplement with grow lights.
* Hot, Dry Climates: In extremely hot and dry climates, provide extra shade during the hottest part of the day to prevent the leaves from scorching. Water more frequently to keep the soil consistently moist.
* High Humidity: Ensure good air circulation around your sugarcane plants to prevent fungal diseases. Space the containers adequately and avoid overcrowding.
Extending the Growing Season
Want to maximize your sugarcane harvest? Here are some techniques to extend the growing season:
* Starting Indoors: Begin the growing process indoors several weeks before the last expected frost. This gives your sugarcane a head start.
* Using a Greenhouse: If you have access to a greenhouse, it can provide a controlled environment for growing sugarcane year-round.
* Row Covers: Use row covers to protect your sugarcane from frost and extend the growing season in the fall.
Beyond the Stalk: Uses for Sugarcane
While the sweet juice is the primary reason for growing sugarcane, don’t overlook the other potential uses:
* Sugarcane Mulch: The dried leaves and stalks can be used as mulch in your garden to suppress weeds and retain moisture.
* Composting: Sugarcane waste can be added to your compost pile to
Conclusion
So, there you have it! Growing sugarcane in recycled containers isn’t just a quirky gardening project; it’s a rewarding and sustainable way to bring a touch of the tropics to your own backyard, balcony, or even sunny windowsill. We’ve walked you through the process, from selecting the right sugarcane stalks to nurturing them in their upcycled homes.
But why is this DIY trick a must-try? Beyond the sheer satisfaction of transforming waste into something beautiful and productive, growing your own sugarcane offers a unique connection to your food. You’ll witness the entire life cycle of this fascinating plant, from a humble cutting to a towering stalk brimming with sweet juice. Plus, you’ll have a readily available source of fresh sugarcane for juicing, adding to cocktails, or even just enjoying a sweet chew straight from the source.
The beauty of this method lies in its adaptability. Feel free to experiment with different types of recycled containers. Old buckets, large plastic planters, even repurposed laundry baskets can work wonders, as long as they offer adequate drainage. You can also explore different sugarcane varieties. While the common varieties are readily available, consider seeking out heirloom or specialty types for unique flavors and textures.
Don’t be afraid to get creative with your soil mix. While the recommended blend of potting soil, compost, and perlite works well, you can tailor it to your specific climate and soil conditions. If you live in a particularly dry area, consider adding water-retaining crystals to your mix. If your soil is heavy and clay-like, incorporate more perlite or sand to improve drainage.
And speaking of creativity, why not turn your sugarcane patch into a mini-ecosystem? Plant companion herbs like basil or mint around the base of your sugarcane to attract beneficial insects and deter pests. You can even add a small water feature to create a more humid environment, which sugarcane loves.
Remember, patience is key. Sugarcane takes time to mature, so don’t be discouraged if you don’t see results overnight. With consistent watering, fertilization, and plenty of sunshine, you’ll be rewarded with a bountiful harvest in due time.
We wholeheartedly encourage you to give this DIY sugarcane growing project a try. It’s a fun, educational, and ultimately delicious way to connect with nature and reduce your environmental footprint. And most importantly, it’s a fantastic way to enjoy the sweet taste of homegrown sugarcane.
Once you’ve embarked on your sugarcane growing adventure, we’d love to hear about your experiences! Share your photos, tips, and challenges in the comments section below. Let’s create a community of sugarcane enthusiasts and learn from each other’s successes and failures. Together, we can unlock the secrets to growing thriving sugarcane in recycled containers and enjoy the sweet rewards of our labor. So, grab your recycled containers, find some sugarcane stalks, and get growing! You won’t regret it.
Frequently Asked Questions (FAQ)
1. What kind of sugarcane should I use?
The best sugarcane to use for growing in containers is a variety that is readily available in your local area and known for its adaptability. Look for sugarcane stalks at nurseries, farmers’ markets, or even from friends or neighbors who grow it. Avoid sugarcane that has been treated with chemicals or pesticides. If possible, choose a variety that is known to be relatively compact, as this will be better suited for container growing. Some popular varieties include ‘Louisiana Red,’ ‘Florida Green,’ and ‘Purple Sugar Cane.’ Remember to research the specific needs of the variety you choose to ensure optimal growth.
2. How big of a container do I need?
The size of the container is crucial for successful sugarcane growth. Sugarcane has an extensive root system, so you’ll need a container that is at least 18-24 inches in diameter and depth. Larger is generally better, as it will provide more room for the roots to grow and access nutrients. Ensure the container has adequate drainage holes to prevent waterlogging, which can lead to root rot. Recycled containers like large buckets, plastic planters, or even repurposed laundry baskets can work well, as long as they meet the size and drainage requirements.
3. What kind of soil should I use?
Sugarcane thrives in well-draining, fertile soil. A good soil mix for container-grown sugarcane consists of equal parts potting soil, compost, and perlite. The potting soil provides a base for the roots to grow, the compost adds essential nutrients, and the perlite improves drainage and aeration. You can also add a slow-release fertilizer to the soil mix to provide a steady supply of nutrients throughout the growing season. Avoid using heavy clay soil, as it can become waterlogged and suffocate the roots.
4. How often should I water my sugarcane?
Sugarcane needs consistent watering, especially during hot and dry weather. Water deeply whenever the top inch of soil feels dry to the touch. Avoid overwatering, as this can lead to root rot. The frequency of watering will depend on the climate, the size of the container, and the type of soil you’re using. In general, you’ll need to water more frequently during the summer months and less frequently during the winter months. Check the soil moisture regularly and adjust your watering schedule accordingly.
5. How much sunlight does sugarcane need?
Sugarcane needs at least 6-8 hours of direct sunlight per day to thrive. Choose a location that receives plenty of sunshine throughout the day. If you’re growing sugarcane indoors, place it near a sunny window or supplement with grow lights. Insufficient sunlight can lead to stunted growth and reduced sugar content in the stalks. Rotate the container regularly to ensure that all sides of the plant receive adequate sunlight.
6. How do I fertilize my sugarcane?
Sugarcane is a heavy feeder and requires regular fertilization to produce healthy stalks. Use a balanced fertilizer with a ratio of 10-10-10 or 14-14-14. Apply the fertilizer according to the package instructions, typically every 4-6 weeks during the growing season. You can also supplement with organic fertilizers like compost tea or fish emulsion. Avoid over-fertilizing, as this can burn the roots and damage the plant.
7. How long does it take for sugarcane to mature?
Sugarcane typically takes 9-12 months to mature, depending on the variety and growing conditions. The stalks are ready to harvest when they are thick, juicy, and have a high sugar content. You can test the sugar content by chewing on a small piece of the stalk. If it tastes sweet and juicy, it’s likely ready to harvest. The leaves will also start to turn brown and dry out as the plant matures.
8. How do I harvest sugarcane?
To harvest sugarcane, use a sharp knife or machete to cut the stalks at the base of the plant. Remove the leaves and any dry or damaged portions of the stalk. You can then juice the sugarcane using a sugarcane juicer or chew on the stalks for a sweet treat. Store the harvested sugarcane in a cool, dry place.
9. Can I grow sugarcane indoors?
Yes, you can grow sugarcane indoors, but it requires a sunny location and consistent care. Place the container near a south-facing window or supplement with grow lights to provide adequate sunlight. Maintain a warm and humid environment by misting the plant regularly or using a humidifier. Water frequently and fertilize regularly. Be aware that indoor-grown sugarcane may not reach the same size as outdoor-grown sugarcane.
10. What are some common problems with growing sugarcane?
Some common problems with growing sugarcane include pests, diseases, and nutrient deficiencies. Pests like aphids, mealybugs, and sugarcane borers can damage the leaves and stalks. Diseases like rust and smut can also affect sugarcane. Nutrient deficiencies can lead to stunted growth and yellowing leaves. To prevent these problems, inspect your sugarcane regularly for signs of pests or diseases. Use organic pest control methods like neem oil or insecticidal soap to control pests. Ensure that your sugarcane receives adequate nutrients by fertilizing regularly.

Leave a Comment