
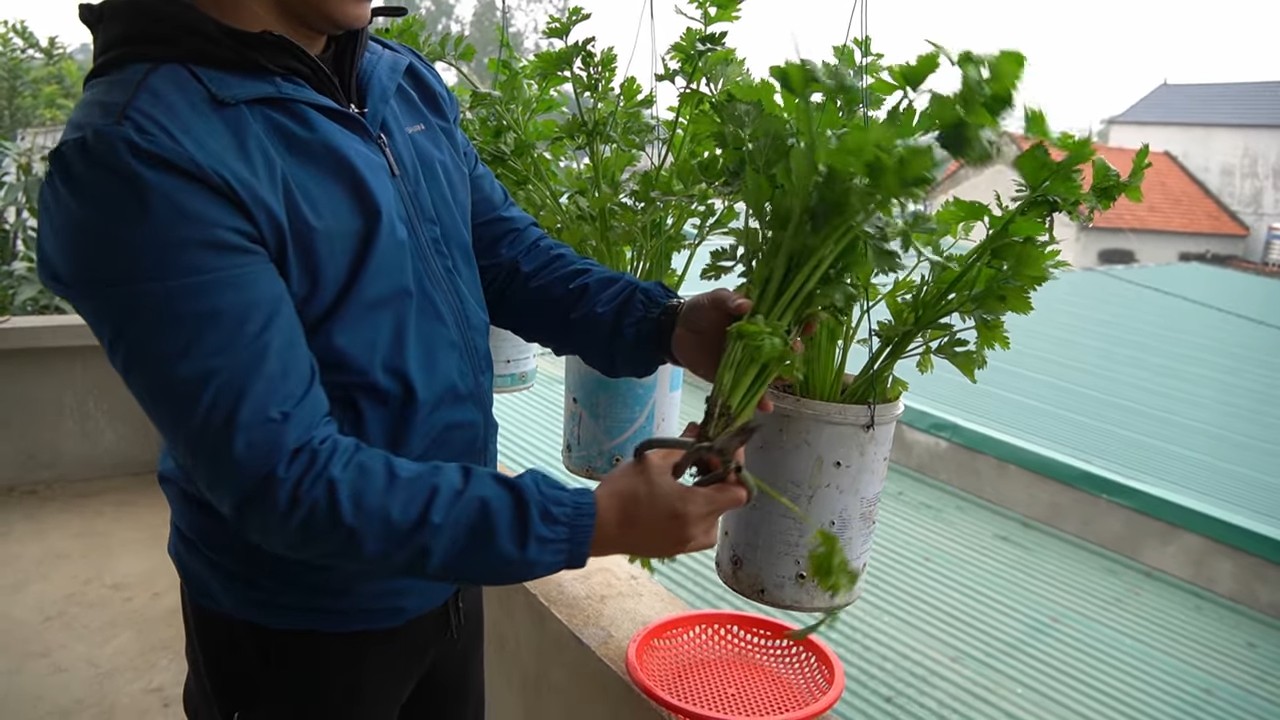
Harvesting celery at home can feel like a real accomplishment, transforming your garden from a simple patch of green into a personal grocery store! Have you ever dreamt of snipping fresh, crisp celery stalks right from your backyard, knowing exactly where they came from and how they were grown? This isn’t just a pipe dream; it’s an achievable reality with a few simple tricks and a little DIY spirit.
Celery, with its refreshing crunch and subtle flavor, has a rich history. Originating in the Mediterranean, it was initially valued more for its medicinal properties than its culinary uses. Over centuries, it evolved into the crisp, edible vegetable we know and love today. Imagine connecting with that history every time you harvest your own homegrown celery!
But why bother with the effort of harvesting celery at home? Well, for starters, store-bought celery often lacks the vibrant flavor and crispness of freshly picked produce. Plus, growing your own allows you to avoid harmful pesticides and herbicides, ensuring a healthier and more sustainable food source for you and your family. In this article, I’m going to share some easy-to-follow DIY tips and tricks that will empower you to successfully harvest your celery at the peak of freshness, maximizing its flavor and nutritional value. Get ready to enjoy the satisfaction of a truly homegrown harvest!
Sellerie selbst ernten: Dein DIY-Guide für eine reiche Ernte
Hallo liebe Gartenfreunde! Ich freue mich, euch heute zu zeigen, wie ihr euren eigenen Sellerie ernten könnt. Es ist wirklich befriedigend, Gemüse aus dem eigenen Garten zu essen, und Sellerie ist da keine Ausnahme. Mit dieser Anleitung wird es kinderleicht!
Wann ist der richtige Zeitpunkt für die Sellerieernte?
Der Zeitpunkt der Ernte ist entscheidend für den Geschmack und die Qualität eures Selleries. Hier sind ein paar Anzeichen, auf die ihr achten solltet:
* Größe: Die Knolle sollte eine angemessene Größe erreicht haben. Je nach Sorte kann das variieren, aber im Allgemeinen sollte sie mindestens 10-15 cm Durchmesser haben.
* Festigkeit: Die Knolle sollte sich fest anfühlen, wenn ihr sie leicht drückt. Eine weiche Knolle deutet auf Überreife oder Fäulnis hin.
* Blätter: Die äußeren Blätter können gelblich werden, aber die inneren Blätter sollten noch grün und knackig sein.
* Zeitpunkt im Jahr: Sellerie wird in der Regel im Spätsommer oder Herbst geerntet, bevor der erste Frost kommt.
Benötigte Werkzeuge und Materialien
Bevor wir loslegen, stellt sicher, dass ihr alles griffbereit habt:
* Grabegabel oder Spaten: Zum Ausheben der Sellerieknolle.
* Gartenhandschuhe: Zum Schutz eurer Hände.
* Messer oder Gartenschere: Zum Abschneiden der Blätter und Wurzeln.
* Eimer oder Korb: Zum Sammeln der geernteten Sellerieknollen.
* Gießkanne (optional): Um den Boden vor der Ernte zu befeuchten.
Schritt-für-Schritt-Anleitung zur Sellerieernte
Jetzt geht’s ans Eingemachte! Folgt diesen Schritten, um euren Sellerie erfolgreich zu ernten:
1. Vorbereitung des Bodens: Wenn der Boden sehr trocken ist, gießt ihn am Tag vor der Ernte leicht an. Das erleichtert das Ausheben der Knolle.
2. Ausheben der Sellerieknolle:
* Nehmt eure Grabegabel oder euren Spaten und stecht vorsichtig um die Selleriepflanze herum in den Boden. Achtet darauf, die Knolle nicht zu beschädigen.
* Hebt die Knolle vorsichtig aus dem Boden. Versucht, so viel Erde wie möglich an den Wurzeln zu lassen.
3. Entfernen der Erde:
* Schüttelt die überschüssige Erde von der Knolle ab. Ihr könnt auch eine Bürste verwenden, um hartnäckige Erde zu entfernen.
4. Abschneiden der Blätter:
* Nehmt euer Messer oder eure Gartenschere und schneidet die Blätter etwa 2-3 cm über der Knolle ab. Die Blätter könnt ihr übrigens auch verwenden! Sie eignen sich hervorragend für Suppen oder als aromatisches Grün.
5. Abschneiden der Wurzeln:
* Schneidet die Wurzeln so nah wie möglich an der Knolle ab.
6. Reinigung der Knolle:
* Spült die Knolle unter fließendem Wasser ab, um restliche Erde zu entfernen.
7. Trocknen der Knolle:
* Lasst die Knolle an einem kühlen, trockenen Ort trocknen, bevor ihr sie lagert.
Sellerieblätter verwerten: Zero Waste im Garten
Wie versprochen, hier ein paar Tipps, wie ihr die Sellerieblätter verwerten könnt:
* Suppen und Eintöpfe: Sellerieblätter sind eine tolle Ergänzung für Suppen und Eintöpfe. Sie verleihen einen würzigen Geschmack.
* Gemüsebrühe: Kocht die Blätter zusammen mit anderen Gemüseresten aus, um eine leckere Gemüsebrühe zu erhalten.
* Pesto: Ja, ihr könnt auch Pesto aus Sellerieblättern machen! Einfach mit Nüssen, Knoblauch, Käse und Öl pürieren.
* Trocknen: Trocknet die Blätter und verwendet sie als Gewürz.
* Smoothies: Gebt eine Handvoll Sellerieblätter in euren Smoothie für einen extra Vitamin-Kick.
Sellerie richtig lagern: So bleibt er lange frisch
Die richtige Lagerung ist entscheidend, damit euer geernteter Sellerie lange frisch bleibt. Hier sind ein paar Tipps:
* Kühlschrank: Wickelt die Sellerieknolle in ein feuchtes Tuch oder legt sie in einen perforierten Plastikbeutel und lagert sie im Gemüsefach des Kühlschranks. So hält sie sich bis zu zwei Wochen.
* Sandkiste: Wenn ihr einen kühlen Keller habt, könnt ihr die Sellerieknollen auch in einer Sandkiste lagern. Legt die Knollen nebeneinander in den Sand und bedeckt sie vollständig.
* Einfrieren: Sellerie kann auch eingefroren werden. Schneidet ihn dazu in Würfel und blanchiert ihn kurz in kochendem Wasser. Anschließend abkühlen lassen und in Gefrierbeuteln einfrieren.
Häufige Probleme bei der Sellerieernte und wie man sie vermeidet
Manchmal läuft nicht alles glatt. Hier sind ein paar häufige Probleme und wie ihr sie vermeiden könnt:
* Sellerieknolle ist zu klein: Das kann verschiedene Ursachen haben, z.B. zu wenig Dünger, zu wenig Wasser oder eine zu kurze Wachstumsperiode. Achtet auf eine gute Nährstoffversorgung und ausreichend Bewässerung.
* Sellerieknolle ist weich: Das deutet auf Überreife oder Fäulnis hin. Erntet den Sellerie rechtzeitig und achtet auf eine gute Drainage im Boden.
* Sellerieknolle ist hohl: Das kann durch unregelmäßige Bewässerung verursacht werden. Achtet auf eine gleichmäßige Wasserversorgung.
* Schädlinge und Krankheiten: Sellerie kann von verschiedenen Schädlingen und Krankheiten befallen werden. Achtet auf Anzeichen und behandelt sie gegebenenfalls mit geeigneten Mitteln.
Zusätzliche Tipps für eine erfolgreiche Sellerieernte
Hier noch ein paar zusätzliche Tipps, die euch helfen werden, eine reiche Sellerieernte zu erzielen:
* Wählt die richtige Sorte: Es gibt verschiedene Selleriesorten, die sich in Größe, Geschmack und Reifezeit unterscheiden. Wählt eine Sorte, die für euer Klima und eure Bedürfnisse geeignet ist.
* Achtet auf den Standort: Sellerie bevorzugt einen sonnigen Standort mit gut durchlässigem Boden.
* Düngt regelmäßig: Sellerie ist ein Starkzehrer und benötigt ausreichend Nährstoffe. Düngt regelmäßig mit einem organischen Dünger.
* Gießt ausreichend: Sellerie benötigt viel Wasser, besonders während der Wachstumsperiode. Achtet auf eine gleichmäßige Bewässerung.
* Schützt vor Frost: Sellerie ist frostempfindlich. Schützt die Pflanzen vor Frost, indem ihr sie mit Vlies abdeckt oder in einen geschützten Bereich verlegt.
Sellerie ernten: Eine Zusammenfassung
* Wann ernten? Wenn die Knolle fest und groß genug ist, die äußeren Blätter gelblich werden und es Spätsommer/Herbst ist.
* Wie ernten? Vorsichtig mit Grabegabel oder Spaten ausheben, Erde entfernen, Blätter und Wurzeln abschneiden, reinigen und trocknen.
* Was mit den Blättern? Suppen, Brühen, Pesto, Gewürz, Smoothies.
* Wie lagern? Im Kühlschrank in feuchtem Tuch, in Sandkiste im Keller oder eingefroren.
* Probleme vermeiden? Auf gute Nährstoffversorgung, Bewässerung und Drainage achten.
Ich hoffe, diese Anleitung hat euch geholfen, euren eigenen Sellerie erfolgreich zu ernten. Viel Spaß beim Gärtnern und guten Appetit!

Conclusion
So, there you have it! Harvesting celery at home isn’t just a way to save money; it’s a gateway to fresher, more flavorful meals and a deeper connection with the food you eat. Forget the wilted, often tasteless celery stalks from the grocery store. Imagine the vibrant crunch and intense celery flavor you can achieve by growing and harvesting your own. This simple DIY trick transforms your kitchen into a source of culinary inspiration.
But the benefits extend beyond just taste. You’re also reducing your environmental footprint by minimizing transportation and packaging waste. Plus, you have complete control over the growing process, ensuring your celery is free from harmful pesticides and chemicals. It’s a win-win for your taste buds and the planet!
Consider these variations to elevate your home-grown celery experience:
* **Experiment with different celery varieties:** From the classic Pascal celery to the more delicate Golden Self-Blanching variety, each offers a unique flavor profile and texture. Try growing a few different types to discover your favorite.
* **Use the celery leaves:** Don’t discard those flavorful leaves! They’re packed with nutrients and can be used in salads, soups, stews, or as a garnish. You can even dry them and grind them into a celery leaf powder for seasoning.
* **Blanch your celery:** For a milder flavor and more tender stalks, try blanching your celery a few weeks before harvesting. Simply mound soil around the base of the stalks to exclude light.
* **Celery Juice Boost:** Freshly harvested celery is perfect for juicing. The flavor is noticeably brighter and more refreshing than store-bought celery. Add a squeeze of lemon or a slice of ginger for an extra zing.
* **Root Regrowth:** Even after harvesting the stalks, you can often regrow celery from the base. Place the base in a shallow dish of water, and new growth will emerge. Transplant it into soil for a continuous supply.
We wholeheartedly encourage you to give this DIY trick a try. It’s easier than you might think, and the rewards are well worth the effort. Imagine the satisfaction of serving a dish made with celery you grew yourself.
Don’t be afraid to experiment and adapt the process to suit your own garden and preferences. The most important thing is to have fun and enjoy the process of growing your own food.
Once you’ve experienced the joy of harvesting celery at home, we’d love to hear about your experience! Share your tips, tricks, and photos in the comments below. Let’s build a community of home gardeners and inspire others to embrace the joys of growing their own food. What variety did you grow? What did you make with your fresh celery? Let us know!
Frequently Asked Questions (FAQ)
What is the best time to harvest celery?
The ideal time to harvest celery is when the stalks are at least 6-8 inches long and have reached a good size for your needs. Generally, this is about 75-85 days after transplanting seedlings. You can harvest individual stalks as needed, starting with the outer ones, or harvest the entire plant at once. The best indicator is the overall size and firmness of the stalks. They should be crisp and snap easily when bent. Avoid harvesting if the stalks are starting to yellow or become pithy, as this indicates they are past their prime.
How do I know if my celery is ready to harvest?
Several factors indicate that your celery is ready for harvesting. First, check the size of the stalks. They should be at least 6-8 inches long and relatively thick. Second, examine the color of the stalks. They should be a vibrant green, although some varieties may have a slightly yellowish hue. Third, feel the stalks. They should be firm and crisp to the touch. Finally, try bending a stalk. If it snaps easily, it’s ready to harvest. If it bends without breaking, it needs more time to mature.
Can I harvest celery multiple times from the same plant?
Yes, you can harvest celery multiple times from the same plant by selectively harvesting the outer stalks as they mature. This allows the inner stalks to continue growing and developing. To do this, simply cut the outer stalks at the base of the plant, leaving the inner stalks intact. Be sure to water and fertilize the plant regularly to encourage continued growth. This method allows for a prolonged harvest period, providing you with a steady supply of fresh celery.
What’s the best way to store freshly harvested celery?
To keep your freshly harvested celery crisp and fresh, wrap it loosely in a damp paper towel and store it in a plastic bag or container in the refrigerator. This will help prevent the celery from drying out and wilting. You can also store celery stalks upright in a container of water in the refrigerator, changing the water every few days. Properly stored celery can last for up to two weeks in the refrigerator.
Can I freeze celery?
Yes, you can freeze celery, but it’s important to blanch it first to preserve its flavor and texture. To blanch celery, cut it into small pieces and boil it for 2-3 minutes. Then, immediately transfer it to an ice bath to stop the cooking process. Drain the celery thoroughly and pack it into freezer bags or containers. Frozen celery is best used in cooked dishes, such as soups, stews, and sauces, as it may lose some of its crispness when thawed.
What are some common problems when growing celery, and how can I prevent them?
Some common problems when growing celery include pests like aphids and celery leaf miners, as well as diseases like celery blight and pink rot. To prevent these problems, choose disease-resistant varieties, practice crop rotation, and maintain good air circulation around your plants. Regularly inspect your plants for signs of pests or diseases and take action promptly if you notice any problems. You can use organic pest control methods, such as insecticidal soap or neem oil, to control pests. Proper watering and fertilization can also help keep your plants healthy and resistant to diseases.
Is harvesting celery at home organic?
Harvesting celery at home can absolutely be organic! By starting with organic seeds or seedlings and using organic growing practices, you can ensure that your celery is free from synthetic pesticides, herbicides, and fertilizers. This means using compost, manure, and other natural soil amendments to nourish your plants and relying on natural pest control methods to protect them from pests and diseases. Growing your own celery organically is a great way to enjoy fresh, healthy produce while minimizing your environmental impact.
What if my celery stalks are thin and stringy?
Thin and stringy celery stalks can be caused by several factors, including insufficient watering, poor soil fertility, and overcrowding. To prevent this, make sure to water your celery plants regularly, especially during hot, dry weather. Amend your soil with compost or other organic matter to improve its fertility. Thin out your plants to provide them with adequate space to grow. You can also try fertilizing your plants with a balanced fertilizer to promote healthy growth.
Can I grow celery in containers?
Yes, you can grow celery in containers, but you’ll need to choose a large container that is at least 12 inches deep and wide to accommodate the plant’s root system. Use a well-draining potting mix and water regularly. Container-grown celery may require more frequent fertilization than celery grown in the ground. Place the container in a sunny location that receives at least 6 hours of sunlight per day.
What are the nutritional benefits of harvesting celery at home?
Harvesting celery at home ensures you get the freshest, most nutrient-rich celery possible. Celery is low in calories and a good source of vitamins A, C, and K, as well as folate and potassium. It also contains antioxidants and phytonutrients that may have various health benefits. Freshly harvested celery is also more likely to retain its crispness and flavor, making it a more enjoyable and nutritious addition to your diet.

Leave a Comment