
Grow Radish Year Round? Absolutely! Imagine fresh, crisp radishes gracing your salads and snacks, no matter the season. Forget relying on grocery store produce that might be weeks old. With a few clever tricks and a little DIY spirit, you can enjoy the peppery goodness of homegrown radishes all year long.
Radishes have a surprisingly long and vibrant history. They were cultivated in ancient Egypt, Greece, and Rome, prized for their nutritional value and ease of growth. In some cultures, radishes even held symbolic significance, representing prosperity and good health. Today, they’re a staple in gardens worldwide, but often relegated to a spring or fall crop.
But why limit yourself? Many people struggle to maintain a consistent supply of fresh vegetables, especially during the colder months. This DIY guide is designed to empower you to grow radish year round, regardless of your climate or gardening experience. I’ll share simple, effective techniques for extending your radish season, from choosing the right varieties to utilizing protective structures. Get ready to unlock the secrets to a continuous radish harvest and elevate your home gardening game!
Growing Radishes Year-Round: My Foolproof DIY Guide
Hey there, fellow gardening enthusiasts! Ever crave that peppery crunch of a fresh radish, no matter the season? Well, I’m here to tell you it’s totally possible to grow radishes year-round, even if you don’t have a sprawling farm. I’ve been doing it for years, and I’m excited to share my secrets with you. This guide will walk you through everything you need to know, from choosing the right varieties to setting up your indoor growing space. Let’s get started!
Understanding Radishes and Their Needs
Before we dive into the how-to, let’s quickly cover the basics. Radishes are incredibly fast-growing, which is one of the reasons I love them. They typically mature in just 3-4 weeks, making them perfect for succession planting and year-round harvests. They prefer cool weather, but with a little planning, you can trick them into thriving even during the warmer months.
* Light: Radishes need at least 6 hours of sunlight per day. If you’re growing indoors, you’ll likely need supplemental lighting.
* Soil: Well-drained, loose soil is crucial. Compacted soil will result in small, misshapen radishes.
* Water: Consistent moisture is key. Radishes don’t like to dry out, but they also don’t want to sit in soggy soil.
* Temperature: The ideal temperature range for radishes is between 50°F and 65°F (10°C and 18°C).
Choosing the Right Radish Varieties
Not all radishes are created equal, especially when it comes to year-round growing. Some varieties are more heat-tolerant than others, while some are better suited for container gardening. Here are a few of my favorites:
* Cherry Belle: A classic, fast-maturing variety that’s great for beginners.
* French Breakfast: Mild and elongated, with a slightly sweet flavor.
* Easter Egg: A mix of colorful radishes (red, pink, purple, white) that adds a fun touch to your garden.
* Champion: A larger, round radish that’s known for its good flavor and heat tolerance.
* Sparkler: Another quick-growing variety that’s reliable and easy to grow.
* White Icicle: A longer, white radish with a crisp texture and mild flavor.
For year-round growing, I recommend choosing a mix of these varieties to see which ones perform best in your specific conditions.
Setting Up Your Indoor Growing Space
If you’re planning to grow radishes indoors, you’ll need to create a suitable environment. Here’s what I recommend:
* Containers: Choose containers that are at least 6 inches deep. Radishes don’t need a ton of space, but they do need enough room for their roots to develop. I like to use plastic pots or even repurposed containers like yogurt tubs or milk cartons. Just make sure they have drainage holes!
* Soil: Use a high-quality potting mix that’s well-draining. You can also amend your potting mix with compost or perlite to improve drainage and aeration.
* Lighting: If you don’t have a sunny windowsill, you’ll need to invest in grow lights. Fluorescent or LED grow lights work well. Position the lights a few inches above the seedlings and adjust as they grow. I use a simple shop light with LED bulbs, and it works wonders.
* Temperature: Keep the temperature in your growing area consistent. Avoid drafts and extreme temperature fluctuations. A basement or spare room can be ideal.
* Humidity: Radishes don’t need high humidity, but they do appreciate a little moisture in the air. You can increase humidity by placing a tray of water near your plants or using a humidifier.
Step-by-Step Guide to Growing Radishes
Okay, now for the fun part! Here’s my step-by-step guide to growing radishes year-round:
1. Preparing the Soil and Containers
* Fill your containers with potting mix. Leave about an inch of space at the top of the container.
* Water the soil thoroughly. Make sure the soil is evenly moist but not soggy.
* Let the soil drain for a few minutes. This will prevent the seeds from rotting.
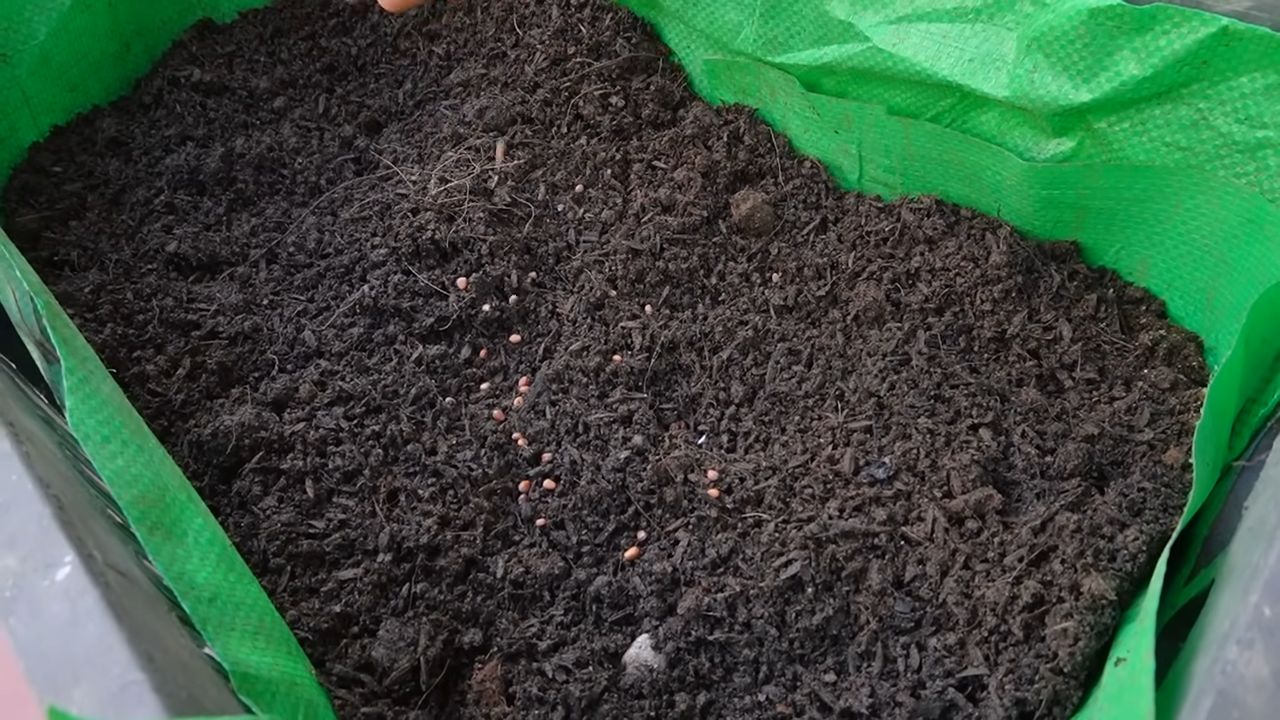
2. Sowing the Seeds
* Sow the seeds about ½ inch deep and 1 inch apart. You can sow them in rows or scatter them evenly across the surface of the soil.
* Cover the seeds with a thin layer of soil. Gently pat down the soil to ensure good contact with the seeds.
* Water the soil gently. Use a spray bottle or watering can with a gentle nozzle to avoid disturbing the seeds.
3. Providing Light and Warmth
* Place the containers in a sunny location or under grow lights. If using grow lights, keep them on for 12-14 hours per day.
* Maintain a consistent temperature of 50°F to 65°F (10°C to 18°C). You can use a heat mat to warm the soil if needed.
4. Watering and Fertilizing
* Keep the soil consistently moist but not soggy. Water when the top inch of soil feels dry to the touch.
* Fertilize the seedlings with a diluted liquid fertilizer every 2 weeks. Use a balanced fertilizer or one that’s specifically formulated for vegetables. I like to use fish emulsion, diluted to half strength.
5. Thinning the Seedlings
* Once the seedlings have their first true leaves, thin them to 2-3 inches apart. This will give them enough room to grow and prevent overcrowding.
* Gently pull out the extra seedlings. You can transplant them to another container or discard them.
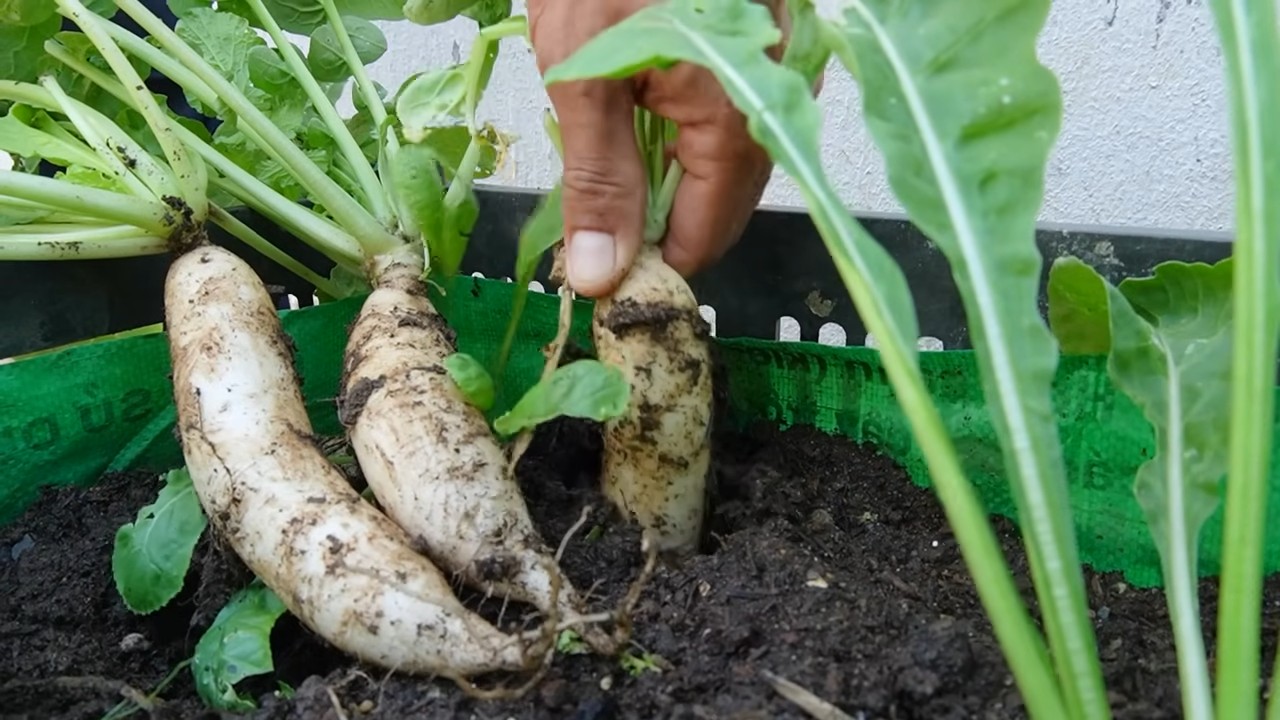
6. Harvesting Your Radishes
* Radishes are typically ready to harvest in 3-4 weeks. Check the seed packet for specific maturity times.
* Harvest the radishes when they reach the desired size. Gently pull them out of the soil.
* Wash the radishes and trim off the tops and roots. You can eat the radish greens too! They have a peppery flavor and are great in salads or stir-fries.
Succession Planting for Continuous Harvests
To enjoy a continuous supply of radishes, I practice succession planting. This means sowing a new batch of seeds every 1-2 weeks. This way, you’ll always have radishes ready to harvest.
* Start a new batch of seeds every 1-2 weeks.
* Use different containers or sections of your garden for each batch.
* Label each batch with the date you sowed the seeds. This will help you keep track of when they’ll be ready to harvest.
Troubleshooting Common Problems
Even with the best planning, you might encounter a few problems along the way. Here are some common issues and how to fix them:
* Radishes are small and misshapen: This is usually caused by compacted soil or overcrowding. Make sure your soil is loose and well-draining, and thin your seedlings properly.
* Radishes are bolting (going to seed): This is often caused by hot weather or inconsistent watering. Try to keep the temperature cool and water regularly.
* Radishes are splitting: This is usually caused by inconsistent watering. Make sure the soil is consistently moist but not soggy.
* Pests and diseases: Radishes are generally pest-resistant, but they can be susceptible to flea beetles and root maggots. Use row covers to protect your plants from pests, and practice good sanitation to prevent diseases.
Growing Radishes in Different Seasons
Growing radishes year-round requires adapting your techniques to the changing seasons. Here’s what I do:
* Spring and Fall: These are the ideal seasons for growing radishes. You can sow seeds directly in the garden or in containers.
* Summer: Radishes can bolt in hot weather, so choose heat-tolerant varieties and provide shade during the hottest part of the day. You can also try growing them in a cooler location, such as a basement or garage.
* Winter: Growing radishes indoors is the best option for winter. Provide plenty of light and warmth, and water regularly.
My Favorite Radish Recipes
Now that you’re growing your own radishes, you’ll need some delicious recipes to use them in! Here are a few of my favorites:
* Radish and Butter Sandwiches: A classic French snack. Simply spread butter on a slice of baguette and top with thinly sliced radishes and a sprinkle of sea salt.
* Radish Salad: Combine thinly sliced radishes, cucumbers, and red onions with a vinaigrette dressing.
* Roasted Radishes: Toss radishes with olive
Conclusion
So, there you have it! Growing radishes year-round is not only achievable but also incredibly rewarding. Forget relying solely on seasonal availability and embrace the satisfaction of harvesting crisp, peppery radishes whenever your culinary heart desires. This DIY approach empowers you to control the growing environment, ensuring optimal conditions for your radish crop, regardless of the weather outside.
Why is this a must-try? Because it unlocks a world of fresh, homegrown flavor at your fingertips. Imagine adding a vibrant crunch to your winter salads, a spicy kick to your spring tacos, or a refreshing bite to your summer sandwiches – all thanks to radishes you nurtured yourself. Beyond the deliciousness, this method promotes sustainable living, reduces your reliance on store-bought produce, and connects you more deeply with the food you eat.
But the beauty of this DIY adventure lies in its adaptability. Feel free to experiment with different radish varieties. Consider French Breakfast radishes for their mild flavor and elongated shape, or try Watermelon radishes for their stunning pink interior and slightly sweet taste. You can also play around with container sizes and growing mediums to find what works best for your space and resources.
For those with limited space, vertical gardening techniques can be a game-changer. Utilize stacked planters or hanging baskets to maximize your radish-growing potential. And if you’re feeling particularly ambitious, explore hydroponic or aquaponic systems for an even more controlled and efficient growing environment.
Don’t be afraid to get creative with companion planting. Radishes are known to deter certain pests, making them excellent companions for carrots, lettuce, and cucumbers. Experiment with different combinations to create a thriving and mutually beneficial garden ecosystem.
Ultimately, the key to successful year-round radish cultivation is observation and adaptation. Pay close attention to your plants’ needs, adjust your watering and lighting accordingly, and don’t be discouraged by occasional setbacks. Every challenge is an opportunity to learn and refine your growing techniques.
We wholeheartedly encourage you to embark on this DIY journey and discover the joy of growing radishes year-round. It’s a simple, satisfying, and delicious way to connect with nature and elevate your culinary creations.
Now, we want to hear from you! Have you tried growing radishes indoors or in a controlled environment? What tips and tricks have you discovered along the way? Share your experiences, successes, and challenges in the comments below. Let’s build a community of radish enthusiasts and inspire each other to cultivate a year-round harvest of these delightful root vegetables. Your insights could be invaluable to fellow gardeners and help them unlock the secrets to successful **grow radish year round** cultivation. Let’s get growing!
Frequently Asked Questions (FAQ)
What are the best radish varieties to grow indoors?
While many radish varieties can be grown indoors, some tend to perform better than others. Shorter, faster-maturing varieties are generally preferred. Cherry Belle radishes are a popular choice due to their quick growth and classic flavor. French Breakfast radishes are another excellent option, offering a milder taste and attractive elongated shape. Easter Egg radishes, a mix of colorful varieties, can add visual appeal to your indoor garden. Ultimately, the best variety depends on your personal preferences and growing conditions, so don’t be afraid to experiment and see what works best for you. Consider the size of your container and the available light when making your selection.
How much light do radishes need to grow indoors?
Radishes require a good amount of light to thrive, ideally 6-8 hours of direct sunlight per day. If you don’t have a sunny windowsill, you’ll need to supplement with artificial lighting. Grow lights, particularly LED grow lights, are an excellent option for indoor radish cultivation. Position the lights 6-12 inches above the plants and ensure they provide a full spectrum of light. Insufficient light can lead to leggy growth and poor bulb development. Observe your plants closely and adjust the lighting as needed to ensure they receive adequate illumination. A timer can be used to automate the lighting schedule.
What type of soil is best for growing radishes in containers?
Radishes prefer well-draining, loose soil that is rich in organic matter. A good potting mix specifically formulated for vegetables is an excellent choice. Avoid heavy clay soils, as they can hinder root development. You can also amend your potting mix with compost or other organic materials to improve drainage and fertility. Ensure the soil pH is slightly acidic to neutral, around 6.0 to 7.0. Before planting, moisten the soil thoroughly but avoid overwatering.
How often should I water my indoor radishes?
Radishes need consistent moisture to grow properly, but overwatering can lead to root rot. Water your radishes when the top inch of soil feels dry to the touch. Water deeply until the water drains out of the bottom of the container. Avoid letting the soil dry out completely, as this can stress the plants and affect their growth. Monitor the moisture levels regularly and adjust your watering schedule based on the environmental conditions and the size of your container.
How long does it take for radishes to mature indoors?
One of the great things about radishes is their quick maturation time. Most varieties mature in just 20-30 days. However, the exact time can vary depending on the variety, growing conditions, and temperature. Keep an eye on your radishes and harvest them when they reach the desired size. Overripe radishes can become woody and bitter. Regular harvesting encourages continued production.
What are some common pests and diseases that affect radishes, and how can I prevent them?
While radishes are relatively pest-resistant, they can be susceptible to certain pests and diseases, especially when grown indoors. Common pests include aphids, flea beetles, and root maggots. To prevent pest infestations, inspect your plants regularly and remove any affected leaves or insects. You can also use insecticidal soap or neem oil to control pests. To prevent diseases, ensure good air circulation and avoid overwatering. If you notice any signs of disease, such as yellowing leaves or spots, remove the affected plants immediately. Using sterile potting mix can also help prevent soilborne diseases.
Can I grow radishes in a hydroponic system?
Yes, radishes can be successfully grown in a hydroponic system. Hydroponics offers several advantages, including faster growth rates and reduced risk of soilborne diseases. Deep water culture (DWC) and nutrient film technique (NFT) are two popular hydroponic methods for growing radishes. Ensure the nutrient solution is properly balanced and that the plants receive adequate light and oxygen. Monitor the pH and EC levels regularly to maintain optimal growing conditions.
How do I know when my radishes are ready to harvest?
Radishes are typically ready to harvest when the roots reach about 1 inch in diameter, although this can vary depending on the variety. Gently brush away the soil around the base of the plant to check the size of the root. If the root is the desired size, gently pull the radish from the soil. Harvest radishes promptly to prevent them from becoming overgrown and bitter.
Can I eat the radish greens?
Yes, radish greens are edible and nutritious! They have a peppery flavor similar to the roots. You can add them to salads, soups, or stir-fries. Harvest the greens when they are young and tender. Avoid eating greens from radishes that have been treated with pesticides.
What are some creative ways to use my homegrown radishes?
Beyond the classic salad addition, there are countless ways to enjoy your homegrown radishes. Try roasting them with olive oil and herbs for a sweet and savory side dish. Pickle them for a tangy and crunchy condiment. Add them to tacos or sandwiches for a spicy kick. Blend them into a refreshing radish and cucumber soup. Or simply enjoy them raw with a sprinkle of salt and pepper. The possibilities are endless!

Leave a Comment