
Grow Winged Beans at Home and unlock a world of culinary possibilities right in your backyard! Have you ever dreamt of harvesting your own exotic, nutrient-packed vegetables? Well, dream no more! This DIY guide will walk you through the surprisingly simple steps to cultivate these fascinating legumes, also known as the “four-angled bean,” right in your own garden.
Winged beans, with their intriguing history rooted in Southeast Asia and Papua New Guinea, have been a staple food source for centuries. They’re not just delicious; they’re a nutritional powerhouse, boasting high protein content and a wealth of vitamins and minerals. Traditionally, every part of the plant – from the beans and pods to the leaves and tubers – has been utilized in various cuisines and even traditional medicine.
But why should you bother to grow winged beans at home? In today’s world, where access to fresh, healthy produce can sometimes be a challenge, having your own garden is a game-changer. Plus, winged beans are incredibly versatile in the kitchen. You can enjoy them steamed, stir-fried, added to soups, or even pickled! This DIY project isn’t just about gardening; it’s about embracing a sustainable lifestyle, connecting with nature, and enjoying the satisfaction of harvesting your own food. Let’s get started and transform your garden into a winged bean haven!

Grow Your Own Winged Beans: A Comprehensive DIY Guide
Hey there, fellow gardening enthusiasts! Ever heard of winged beans? They’re these amazing, versatile legumes that are not only delicious but also incredibly nutritious. The entire plant is edible – beans, pods, leaves, flowers, and even the tubers! I’ve been growing them for a few seasons now, and I’m excited to share my experience and guide you through the process of growing your own winged beans at home.
What are Winged Beans?
Winged beans (Psophocarpus tetragonolobus), also known as Goa beans or asparagus peas, are a tropical legume native to Southeast Asia. They get their name from the four distinctive “wings” that run along the length of the pod. They are a climbing vine, so they need support to grow properly. They are a great source of protein, vitamins, and minerals, making them a fantastic addition to any garden and diet.
Why Grow Winged Beans?
* Nutritional Powerhouse: Winged beans are packed with protein, fiber, vitamins (especially vitamin C and folate), and minerals like iron and calcium.
* Versatile Crop: You can eat almost every part of the plant! The young pods are delicious steamed, stir-fried, or added to salads. The leaves can be eaten like spinach, the flowers can be used in salads, and the mature beans can be cooked like soybeans. The tubers are also edible, tasting similar to potatoes.
* Nitrogen Fixer: Like other legumes, winged beans have the ability to fix nitrogen from the air into the soil, enriching it for other plants.
* Beautiful and Ornamental: The plants themselves are quite attractive, with their climbing vines, delicate flowers, and unique winged pods. They can add a touch of the exotic to your garden.
* Relatively Easy to Grow: Once you understand their needs, winged beans are relatively easy to grow, especially in warm climates.
Getting Started: What You’ll Need
Before we dive into the step-by-step instructions, let’s gather everything you’ll need:
* Winged Bean Seeds: You can find these online or at specialty seed stores. Make sure to choose a variety that’s suitable for your climate.
* Well-Draining Soil: Winged beans prefer well-draining soil that’s rich in organic matter.
* Compost or Aged Manure: To enrich the soil and provide essential nutrients.
* Trellis or Support Structure: Winged beans are climbing vines and need something to climb on. A trellis, fence, or even a sturdy pole will work.
* Watering Can or Hose: For regular watering.
* Gardening Gloves: To protect your hands.
* Optional:
* Seed starting trays and potting mix (if you’re starting seeds indoors).
* Nitrogen-fixing inoculant (to boost nitrogen fixation).
* Mulch (to retain moisture and suppress weeds).
Step-by-Step Guide to Growing Winged Beans
Okay, let’s get our hands dirty! Here’s a detailed guide to growing winged beans from seed:
1. Seed Starting (Optional but Recommended)
Starting seeds indoors gives your winged beans a head start, especially if you live in an area with a shorter growing season.
1. Soak the Seeds: Before planting, soak the winged bean seeds in warm water for 12-24 hours. This helps to soften the seed coat and improve germination rates. I usually put them in a small bowl and cover them with water.
2. Prepare Seed Starting Trays: Fill seed starting trays or small pots with a good quality seed starting mix. Make sure the mix is moist but not soggy.
3. Plant the Seeds: Plant the soaked seeds about 1 inch deep in the seed starting mix. Gently cover them with soil.
4. Water Gently: Water the trays gently to avoid disturbing the seeds.
5. Provide Warmth and Light: Place the trays in a warm location (around 70-80°F) with plenty of light. A sunny windowsill or a grow light works well.
6. Keep the Soil Moist: Keep the soil consistently moist but not waterlogged.
7. Transplant Seedlings: Once the seedlings have developed a few sets of true leaves (usually after 4-6 weeks), they’re ready to be transplanted outdoors.
2. Preparing the Planting Site
Winged beans thrive in warm, sunny locations with well-draining soil.
1. Choose a Sunny Location: Select a spot in your garden that receives at least 6-8 hours of direct sunlight per day.
2. Prepare the Soil: Winged beans prefer well-draining soil that’s rich in organic matter. Amend the soil with compost or aged manure to improve its fertility and drainage. I usually dig in a generous amount of compost before planting.
3. Install the Trellis: Before planting, install a trellis or other support structure for the winged beans to climb on. Make sure the trellis is sturdy enough to support the weight of the mature vines. I’ve used everything from bamboo poles to repurposed fencing.
4. Consider Soil pH: Winged beans prefer a slightly acidic to neutral soil pH (around 6.0-7.0). You can test your soil pH using a soil testing kit and amend it accordingly.
3. Planting Winged Bean Seedlings or Direct Sowing
Whether you started seeds indoors or are direct sowing, the planting process is similar.
1. Harden Off Seedlings (If Applicable): If you started seeds indoors, gradually acclimate the seedlings to outdoor conditions before transplanting them. This process, called “hardening off,” involves exposing the seedlings to increasing amounts of sunlight and wind over a period of 1-2 weeks.
2. Plant Seedlings or Sow Seeds: Plant the seedlings or sow the seeds about 1-2 inches deep and 12-18 inches apart. If you’re direct sowing, plant 2-3 seeds per hole and thin them to the strongest seedling once they emerge.
3. Water Thoroughly: After planting, water the seedlings or seeds thoroughly.
4. Mulch (Optional): Apply a layer of mulch around the plants to help retain moisture, suppress weeds, and regulate soil temperature. Straw, wood chips, or shredded leaves work well.
4. Caring for Your Winged Bean Plants
Once your winged bean plants are established, they’re relatively easy to care for.
1. Water Regularly: Water the plants regularly, especially during dry periods. Winged beans prefer consistently moist soil, but avoid overwatering, which can lead to root rot. I usually water deeply once or twice a week, depending on the weather.
2. Fertilize (Optional): Winged beans are legumes and can fix nitrogen from the air, so they don’t require heavy fertilization. However, you can give them a boost with a light application of a balanced fertilizer or compost tea every few weeks.
3. Provide Support: As the vines grow, train them to climb the trellis or support structure. You may need to gently tie the vines to the trellis to get them started.
4. Weed Regularly: Keep the area around the plants free of weeds, which can compete for nutrients and water.
5. Pest and Disease Control: Winged beans are generally resistant to pests and diseases, but keep an eye out for common garden pests like aphids and spider mites. If you notice any problems, treat them with an appropriate organic insecticide or fungicide.
6. Pruning: Pruning isn’t strictly necessary, but you can prune the vines to encourage bushier growth and more pod production. I usually trim back any overly long or unruly vines.
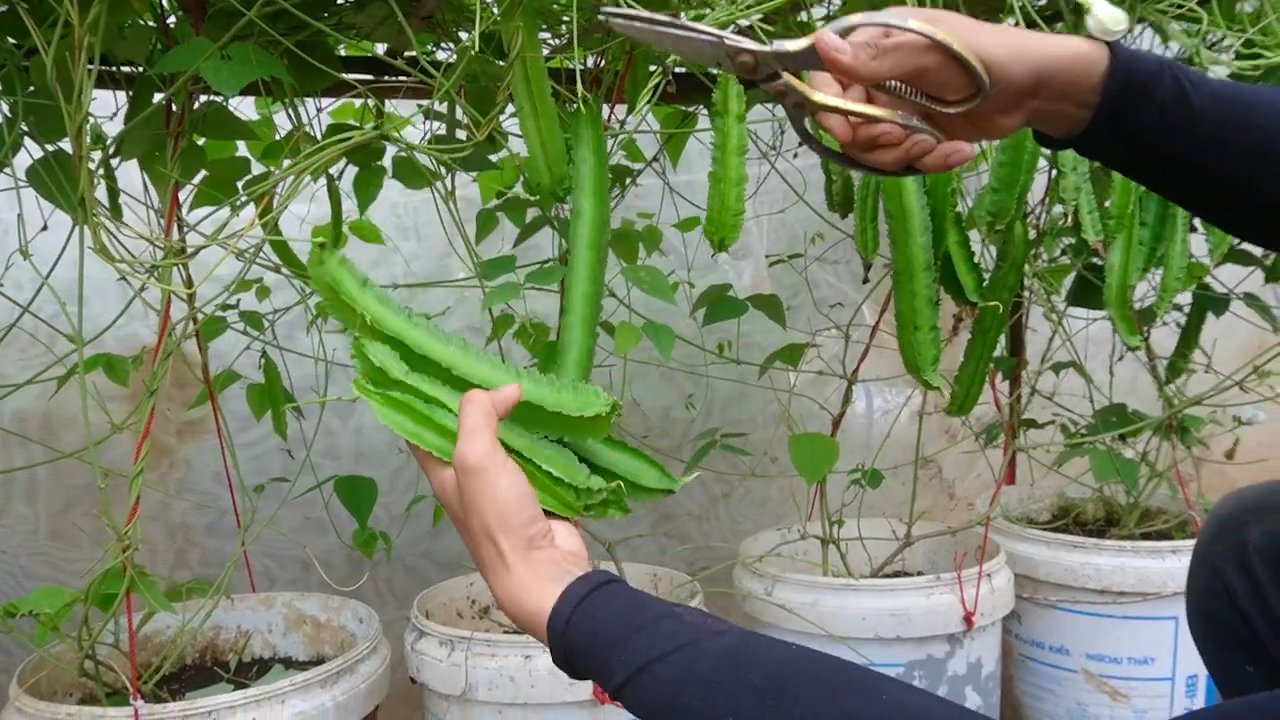
5. Harvesting Winged Beans
The best part! Harvesting your delicious winged beans.
1. Harvest Young Pods: The young pods are the most commonly eaten part of the winged bean plant. Harvest them when they’re about 4-6 inches long and still tender. You can harvest them every few days as they mature.
2. Harvest Mature Beans: If you want to harvest the mature beans, let the pods mature on the vine until they turn brown and dry. Then, shell the beans and cook them like soybeans.
3. Harvest Leaves and Flowers: The leaves and flowers can be harvested at any time. Use them fresh in salads or cooked like spinach.
4. Harvest Tubers: The tubers can be harvested in the fall, after the plant has finished producing pods. Dig them up and cook them like potatoes.
Troubleshooting Common Problems
Even with the best care, you might encounter some challenges when growing winged beans. Here are a few common problems and how to address them:
* Poor Germination: If your seeds aren’t germinating, make sure they’re fresh and haven’t dried out. Soaking the seeds before planting can also improve germination rates.
*
Conclusion
So, there you have it! Growing winged beans at home is not just a gardening project; it’s an adventure in flavor, sustainability, and self-sufficiency. We’ve explored the simple steps to cultivate this remarkable legume, from selecting the right seeds to providing the necessary support for its vigorous growth. But why should you embark on this journey?
First and foremost, the taste! Forget bland, store-bought vegetables. Homegrown winged beans offer a unique, slightly nutty flavor that elevates any dish. Whether you’re stir-frying them, adding them to salads, or simply enjoying them steamed with a touch of butter, the freshness and quality are unmatched. Plus, you have complete control over the growing process, ensuring they’re free from harmful pesticides and chemicals.
Beyond the culinary delights, growing winged beans is an incredibly rewarding experience. Watching these plants climb and flourish, producing an abundance of pods, is a testament to the power of nature. It’s a tangible connection to your food source and a reminder of the simple joys of gardening.
But the benefits don’t stop there. Winged beans are a nutritional powerhouse, packed with protein, vitamins, and minerals. By growing your own, you’re ensuring a readily available source of these essential nutrients for you and your family. You’re also contributing to a more sustainable food system by reducing your reliance on commercially grown produce.
Consider these variations to personalize your winged bean growing experience:
* Vertical Gardening: If you’re short on space, embrace vertical gardening techniques. Train your winged beans to climb up trellises, fences, or even balconies. This not only maximizes space but also adds a beautiful green element to your surroundings.
* Companion Planting: Experiment with companion planting to enhance the growth and flavor of your winged beans. Marigolds, basil, and nasturtiums are excellent choices for deterring pests and attracting beneficial insects.
* Seed Saving: Once your winged beans have matured, save some of the seeds for future planting. This ensures a continuous supply of seeds and allows you to adapt the plants to your specific growing conditions over time.
* Different Varieties: Explore the different varieties of winged beans available. Some varieties have longer pods, while others have different colors or flavors. Experiment to find the ones that best suit your taste and growing conditions.
We’ve provided you with the knowledge and inspiration to get started. Now, it’s your turn to put these tips into practice. Don’t be afraid to experiment, learn from your mistakes, and most importantly, have fun!
We are confident that you will find growing winged beans at home to be a fulfilling and delicious experience. So, grab your seeds, prepare your garden, and get ready to enjoy the bounty of your own homegrown winged beans.
We encourage you to share your experiences with us! Post photos of your winged bean plants, share your favorite recipes, and let us know what you’ve learned along the way. Together, we can create a community of winged bean enthusiasts and inspire others to embrace the joys of homegrown food. Happy gardening!
Frequently Asked Questions (FAQ)
What exactly are winged beans, and why should I grow them?
Winged beans (Psophocarpus tetragonolobus) are a tropical legume known for their unique four-sided pods, which are edible along with the leaves, flowers, and roots. They are a nutritional powerhouse, rich in protein, vitamins, and minerals. Growing them at home allows you to enjoy fresh, flavorful, and pesticide-free produce while contributing to a more sustainable food system. Plus, they are a beautiful and interesting addition to any garden.
How much space do I need to grow winged beans?
Winged beans are vigorous climbers and require ample vertical space. Ideally, provide them with a trellis, fence, or other support structure that is at least 6-8 feet tall. The horizontal space needed will depend on how many plants you intend to grow, but allow at least 1-2 feet between plants. You can also grow them in large containers with a trellis system.
When is the best time to plant winged beans?
Winged beans thrive in warm weather and require a long growing season. Plant them after the last frost when the soil temperature has warmed to at least 65°F (18°C). In cooler climates, you can start seeds indoors 4-6 weeks before the last frost and transplant them outdoors once the weather is suitable.
What kind of soil do winged beans need?
Winged beans prefer well-drained soil that is rich in organic matter. Amend your soil with compost or other organic materials before planting to improve drainage and fertility. They can tolerate a slightly acidic to neutral soil pH (6.0-7.0).
How often should I water winged beans?
Winged beans need consistent moisture, especially during hot weather. Water them deeply and regularly, ensuring that the soil remains moist but not waterlogged. Mulching around the plants can help retain moisture and suppress weeds.
Do winged beans need fertilizer?
Winged beans are nitrogen-fixing plants, meaning they can convert atmospheric nitrogen into a form that plants can use. Therefore, they generally don’t require heavy fertilization. However, you can apply a balanced fertilizer at planting time and again during the growing season to promote healthy growth and pod production. Avoid over-fertilizing with nitrogen, as this can inhibit pod formation.
What are some common pests and diseases that affect winged beans?
Winged beans are generally resistant to pests and diseases, but they can be susceptible to aphids, spider mites, and fungal diseases like powdery mildew. Monitor your plants regularly and take action promptly if you notice any signs of infestation or disease. Use organic pest control methods like insecticidal soap or neem oil to control pests. Ensure good air circulation around the plants to prevent fungal diseases.
How long does it take for winged beans to produce pods?
Winged beans typically take 90-120 days to mature and produce pods. The exact time will depend on the variety, growing conditions, and climate. You can start harvesting pods when they are young and tender, typically 6-8 inches long.
How do I harvest winged beans?
Harvest winged bean pods when they are young and tender, before the beans inside become too large and tough. Use scissors or pruning shears to cut the pods from the plant. Regular harvesting will encourage the plant to produce more pods.
Can I eat the leaves and flowers of winged beans?
Yes, the leaves and flowers of winged beans are also edible. The leaves can be eaten raw in salads or cooked like spinach. The flowers can be added to salads or used as a garnish.
How do I store winged beans?
Freshly harvested winged bean pods can be stored in the refrigerator for up to a week. You can also freeze them for longer storage. To freeze, blanch the pods in boiling water for 2-3 minutes, then transfer them to an ice bath to stop the cooking process. Drain well and store in freezer bags or containers.
Can I grow winged beans in containers?
Yes, you can grow winged beans in containers, but you will need to use a large container (at least 10-15 gallons) and provide a sturdy trellis for the plants to climb on. Ensure that the container has good drainage and use a high-quality potting mix.
Are winged beans perennial or annual?
Winged beans are perennial in tropical climates, but they are typically grown as annuals in temperate climates. They are sensitive to frost and will die back in cold weather.
Where can I buy winged bean seeds?
Winged bean seeds can be purchased from online seed suppliers, specialty nurseries, and some garden centers. Look for reputable suppliers that offer high-quality seeds.
How do I save winged bean seeds for next year?
To save winged bean seeds, allow some of the pods to mature fully on the plant. Once the pods are dry and brown, harvest them and extract the seeds. Dry the seeds thoroughly and store them in an airtight container in a cool, dark, and dry place.

Leave a Comment