
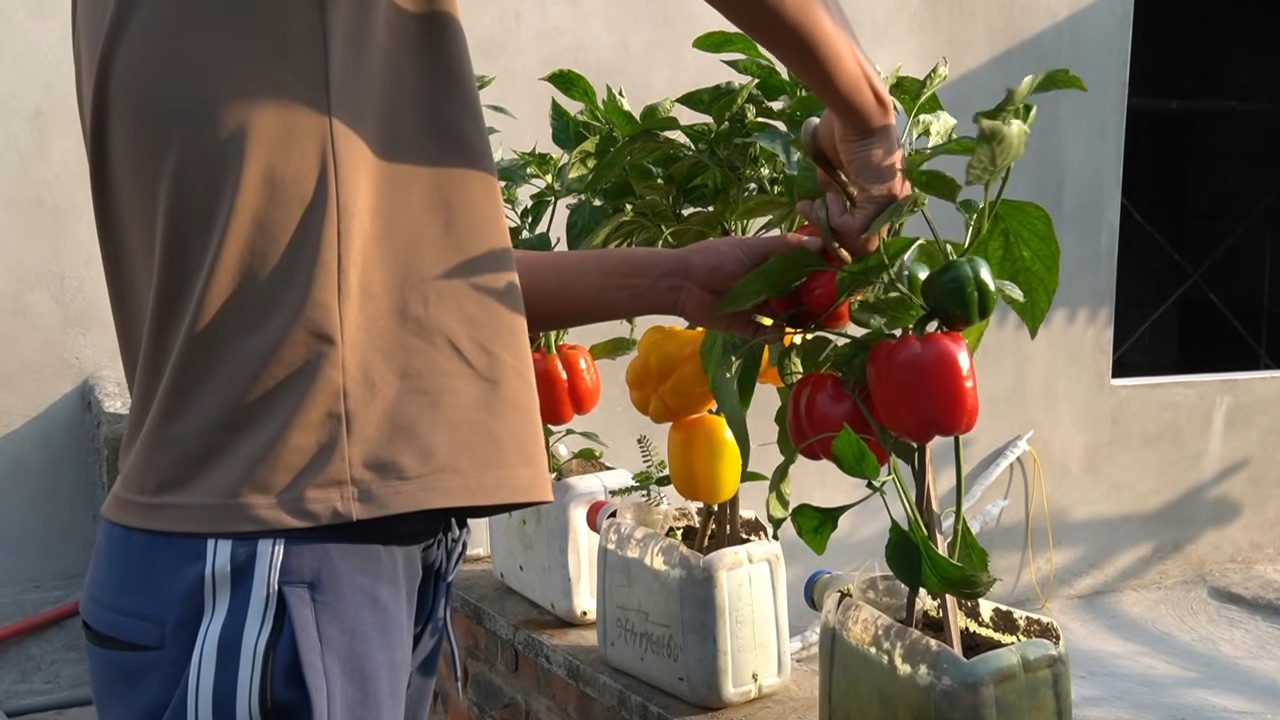
Balcony Bell Pepper Bottle Garden: Dreaming of fresh, vibrant bell peppers but short on space? You’re not alone! Many of us city dwellers crave the joy of gardening but are limited by apartment living. But what if I told you that you could cultivate your own thriving bell pepper patch right on your balcony, using something as simple as recycled plastic bottles?
For centuries, humans have found ingenious ways to grow food in limited spaces. From the hanging gardens of Babylon to the modern-day vertical farms, the desire to connect with nature and cultivate our own sustenance has always been a driving force. This DIY project taps into that same resourceful spirit, offering a sustainable and space-saving solution for urban gardeners.
Why a balcony bell pepper bottle garden? Well, store-bought bell peppers can be expensive and often lack the fresh, vibrant flavor of homegrown produce. Plus, knowing exactly where your food comes from and how it’s grown is incredibly rewarding. This DIY project is not only budget-friendly and eco-conscious, but it also allows you to enjoy the satisfaction of nurturing your own delicious bell peppers, adding a splash of color and flavor to your meals. So, let’s dive in and transform your balcony into a mini-farm!
DIY Balcony Bell Pepper Bottle Garden: Grow Your Own Peppers in Style!
Hey there, fellow gardening enthusiasts! Dreaming of fresh, juicy bell peppers right outside your door? Well, you’ve come to the right place! I’m going to walk you through creating your very own bell pepper bottle garden, perfect for even the smallest balcony. It’s a fun, eco-friendly project that’s surprisingly easy and rewarding. Let’s get started!
What You’ll Need: The Essential Supplies
Before we dive in, let’s gather our supplies. This is a pretty low-cost project, which is always a win!
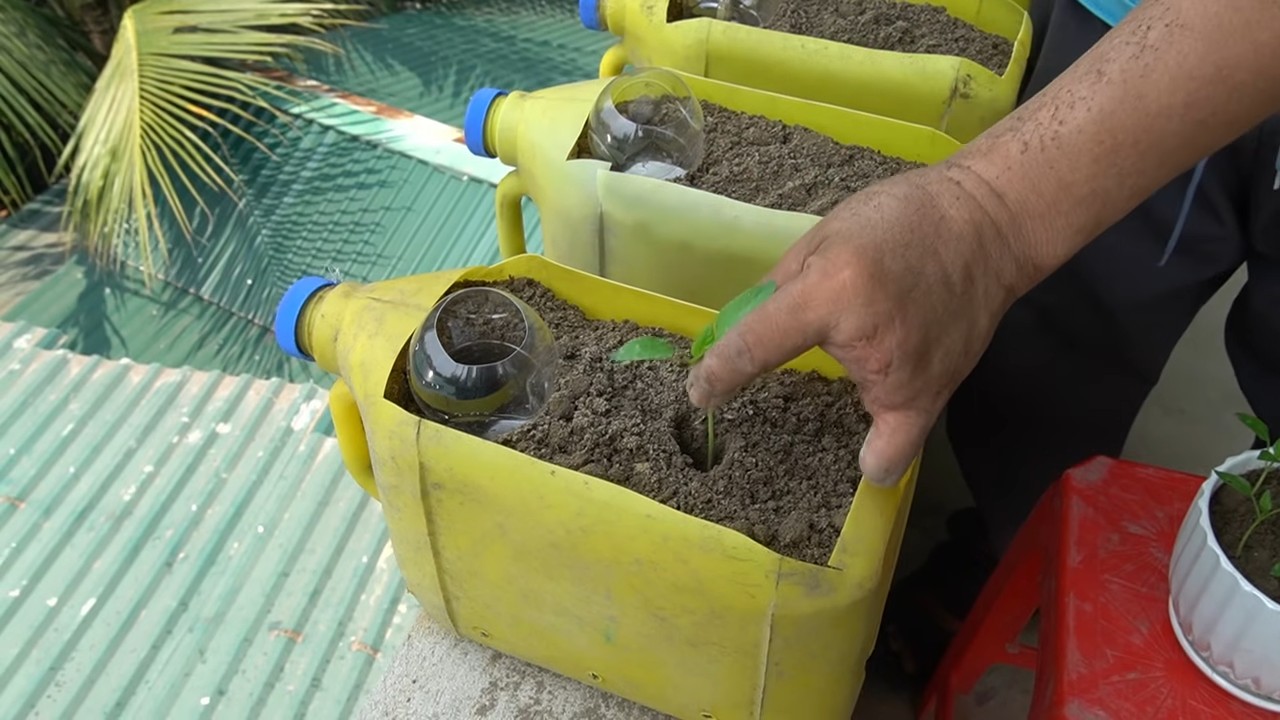
* Plastic Bottles: This is the star of the show! You’ll need several large plastic bottles (2-liter soda bottles or similar work great). The number depends on how many pepper plants you want to grow. I usually aim for one bottle per plant.
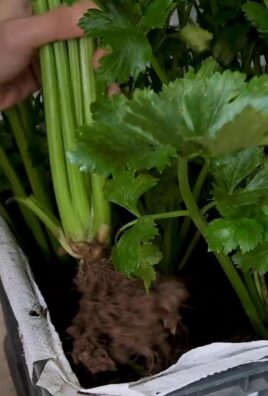
* Bell Pepper Seedlings: You can start from seeds, but for this project, I recommend buying seedlings from your local garden center. It’s faster and easier, especially if you’re a beginner. Choose healthy-looking seedlings with vibrant green leaves.
* Potting Soil: Don’t skimp on the soil! Use a good quality potting mix that’s well-draining. This is crucial for healthy pepper plants.
* Scissors or Utility Knife: For cutting the plastic bottles. Be careful!
* Drill or Nail and Hammer: To create drainage holes.
* Twine or Rope: For hanging the bottles. Choose something strong and weather-resistant.
* Measuring Tape or Ruler: To ensure even spacing.
* Watering Can or Hose: For watering your plants.
* Optional: Spray Paint: To decorate your bottles and make them look more appealing.
* Optional: Landscape Fabric or Coffee Filters: To prevent soil from washing out of the drainage holes.
Preparing the Bottles: The Foundation of Your Garden
This is where the magic begins! We’re going to transform those ordinary plastic bottles into stylish planters.
1. Clean the Bottles: Thoroughly wash the plastic bottles with soap and water to remove any residue. Rinse them well and let them dry completely. This is important to prevent any contamination that could harm your plants.
2. Cut the Bottles: This is where you’ll need your scissors or utility knife. Decide how deep you want your planters to be. I usually cut the bottles about two-thirds of the way up. You can cut them straight across or at an angle for a more decorative look. Be very careful when using sharp tools! If you’re using a utility knife, make sure to use a cutting board and keep your fingers away from the blade.
3. Create Drainage Holes: Drainage is essential for healthy pepper plants. Use a drill or a nail and hammer to create several drainage holes in the bottom of each bottle. I usually make about 4-5 holes, spaced evenly apart. If you’re using a nail and hammer, place the bottle on a piece of wood to protect your work surface.
4. (Optional) Add Landscape Fabric or Coffee Filters: To prevent soil from washing out of the drainage holes, you can line the bottom of each bottle with a piece of landscape fabric or a coffee filter. This will help retain moisture and nutrients in the soil.
5. (Optional) Decorate the Bottles: This is where you can get creative! If you want to add some personality to your bottle garden, you can spray paint the bottles in your favorite colors. Use outdoor-rated spray paint to ensure it lasts. You can also add stencils, stickers, or other decorations. Let the paint dry completely before moving on to the next step.
Planting the Seedlings: Giving Your Garden Life
Now for the fun part – planting your bell pepper seedlings!
1. Fill the Bottles with Potting Soil: Carefully fill each bottle with potting soil, leaving about an inch of space at the top. Gently pat the soil down to remove any air pockets.
2. Prepare the Seedlings: Gently remove the bell pepper seedlings from their containers. Loosen the roots slightly with your fingers. This will help them establish themselves in their new home.
3. Plant the Seedlings: Make a small hole in the center of the soil in each bottle. Carefully place the seedling in the hole and gently cover the roots with soil. Make sure the top of the root ball is level with the surrounding soil.
4. Water the Seedlings: Water the seedlings thoroughly after planting. This will help settle the soil and encourage root growth.
Hanging the Bottles: Creating Your Vertical Garden
Time to transform your balcony into a pepper paradise!
1. Measure and Cut the Twine or Rope: Measure the distance between where you want to hang your bottles and the top of the bottles. Add a few extra inches for tying knots. Cut the twine or rope into equal lengths. You’ll need two pieces of twine or rope per bottle.
2. Attach the Twine or Rope: Thread one piece of twine or rope through two drainage holes on opposite sides of the bottle. Tie a secure knot on the inside of the bottle. Repeat with the other piece of twine or rope on the other two drainage holes. Make sure the knots are strong and won’t come undone.
3. Hang the Bottles: Hang the bottles from your balcony railing, hooks, or any other suitable support. Make sure the bottles are spaced evenly apart and that they receive plenty of sunlight.
Caring for Your Bell Pepper Plants: Keeping Them Happy and Healthy
Now that your bottle garden is complete, it’s important to provide proper care to ensure your bell pepper plants thrive.
1. Watering: Water your bell pepper plants regularly, especially during hot weather. Check the soil moisture by sticking your finger into the soil. If the top inch of soil feels dry, it’s time to water. Water deeply, until water drains out of the drainage holes. Avoid overwatering, as this can lead to root rot.
2. Sunlight: Bell pepper plants need at least 6-8 hours of sunlight per day. Make sure your bottle garden is located in a sunny spot on your balcony. If you don’t have enough sunlight, you can supplement with grow lights.
3. Fertilizing: Feed your bell pepper plants with a balanced fertilizer every 2-3 weeks. Follow the instructions on the fertilizer package. You can also use organic fertilizers, such as compost tea or fish emulsion.
4. Pruning: Prune your bell pepper plants regularly to encourage bushier growth and more fruit production. Remove any yellow or brown leaves. You can also pinch off the tips of the branches to encourage branching.
5. Pest Control: Keep an eye out for pests, such as aphids, whiteflies, and spider mites. If you notice any pests, treat them with an insecticidal soap or neem oil. You can also try attracting beneficial insects, such as ladybugs, to your garden.
6. Support: As your bell pepper plants grow, they may need support to prevent them from falling over. You can use stakes or cages to support the plants.
Harvesting Your Bell Peppers: The Sweet Reward
After a few months of care, your bell pepper plants will start producing beautiful, colorful peppers.
1. Harvesting Time: Bell peppers are ready to harvest when they are fully colored and firm to the touch. The color will depend on the variety you’re growing (green, red, yellow, orange, etc.).
2. Harvesting Technique: Use a sharp knife or scissors to cut the peppers from the plant. Leave a small stem attached to the pepper.
3. Enjoy Your Harvest: Enjoy your fresh, homegrown bell peppers in salads, stir-fries, or any other dish you like. You can also freeze or can your bell peppers for later use.
And there you have it! Your very own balcony bell pepper bottle garden. With a little bit of effort and care, you can enjoy fresh, delicious bell peppers all season long. Happy gardening!
Conclusion
Transforming your balcony into a vibrant, productive garden with this bell pepper bottle garden DIY trick is more than just a fun project; it’s a sustainable and space-saving solution for fresh, homegrown produce. We’ve explored a method that’s not only budget-friendly but also incredibly rewarding, allowing you to enjoy the taste of garden-fresh bell peppers even with limited outdoor space. This isn’t just about growing food; it’s about connecting with nature, reducing your carbon footprint, and adding a touch of green to your urban environment.
The beauty of this DIY project lies in its adaptability. Feel free to experiment with different varieties of bell peppers – from the classic green to the vibrant red, yellow, and orange. Consider adding companion plants like basil or marigolds to your bottle garden to deter pests and enhance the flavor of your peppers. You can also adjust the size of the bottles to accommodate different growth stages or even try growing other vegetables like cherry tomatoes or herbs alongside your bell peppers. The possibilities are truly endless.
This method of creating a balcony bell pepper bottle garden is a game-changer for urban gardeners. It addresses common challenges like limited space, soil quality, and pest control in a simple and effective way. The self-watering system minimizes the need for constant attention, making it ideal for busy individuals. Plus, the vertical arrangement maximizes sunlight exposure, ensuring healthy and productive plants.
We understand that embarking on a new DIY project can sometimes feel daunting, but we assure you that this one is incredibly straightforward and beginner-friendly. The steps are easy to follow, and the materials are readily available. The satisfaction of harvesting your own bell peppers, knowing that you nurtured them from seed to fruit, is an experience that’s truly priceless.
So, what are you waiting for? Gather your empty bottles, potting mix, and bell pepper seeds, and get ready to transform your balcony into a thriving oasis. We’re confident that you’ll be amazed by the results. Don’t forget to document your progress and share your experiences with us! We’d love to see your balcony bell pepper bottle gardens in full bloom. Share your photos and tips on social media using #BalconyBottleGarden and inspire others to embrace sustainable urban gardening. Let’s create a community of green thumbs, one bottle garden at a time!
Frequently Asked Questions (FAQ)
What type of bottles are best for this project?
The ideal bottles for your balcony bell pepper bottle garden are sturdy plastic bottles, such as those used for water, soda, or juice. Two-liter bottles are a good starting point, but you can also use larger bottles for more mature plants. Make sure the bottles are clean and free of any residue before you start. Avoid using bottles that have contained harsh chemicals, as these could contaminate the soil and harm your plants. Clear or translucent bottles are preferable, as they allow you to monitor the water level in the reservoir.
How often do I need to water my bell pepper bottle garden?
The frequency of watering depends on several factors, including the weather, the size of the bottle, and the growth stage of your bell pepper plants. Generally, you’ll need to refill the water reservoir every few days to once a week. Check the soil moisture regularly by sticking your finger into the top layer of soil. If it feels dry, it’s time to add more water. During hot and sunny periods, you may need to water more frequently. Avoid overwatering, as this can lead to root rot. The self-watering system helps to regulate the moisture level, but it’s still important to monitor your plants and adjust your watering schedule accordingly.
What kind of soil should I use for my bell pepper bottle garden?
The best soil for your bell pepper bottle garden is a well-draining potting mix that’s rich in organic matter. Avoid using garden soil, as it can be too heavy and compact, hindering drainage and root growth. Look for a potting mix that contains ingredients like peat moss, perlite, and vermiculite. These materials help to retain moisture while also providing good aeration. You can also amend your potting mix with compost or other organic matter to improve its fertility. A slightly acidic to neutral pH (around 6.0 to 7.0) is ideal for bell peppers.
How much sunlight do bell peppers need in a bottle garden?
Bell peppers thrive in full sun, meaning they need at least 6-8 hours of direct sunlight per day. Place your balcony bell pepper bottle garden in a location that receives ample sunlight throughout the day. If your balcony doesn’t get enough direct sunlight, you may need to supplement with artificial lighting, such as grow lights. Rotate the bottles regularly to ensure that all sides of the plants receive equal exposure to sunlight. Insufficient sunlight can lead to leggy growth, reduced flowering, and smaller peppers.
How do I fertilize my bell pepper plants in a bottle garden?
Bell peppers are heavy feeders and require regular fertilization to produce abundant fruit. Start fertilizing your plants a few weeks after transplanting them into the bottle garden. Use a balanced liquid fertilizer that’s specifically formulated for vegetables. Follow the instructions on the fertilizer label for dosage and frequency. You can also use slow-release fertilizer granules, which will gradually release nutrients into the soil over time. Avoid over-fertilizing, as this can burn the roots and harm your plants. Organic fertilizers, such as compost tea or fish emulsion, are also excellent options for feeding your bell pepper plants.
How do I protect my bell pepper plants from pests and diseases in a bottle garden?
While bottle gardens can help to minimize pest and disease problems, it’s still important to take preventative measures. Regularly inspect your plants for signs of pests, such as aphids, whiteflies, or spider mites. If you spot any pests, treat them promptly with insecticidal soap or neem oil. You can also attract beneficial insects, such as ladybugs and lacewings, to your garden to help control pests naturally. To prevent diseases, ensure good air circulation around your plants and avoid overwatering. Remove any diseased leaves or stems immediately. You can also use organic fungicides to protect your plants from fungal diseases.
Can I grow other vegetables or herbs in a bottle garden alongside bell peppers?
Yes, you can definitely grow other vegetables or herbs alongside bell peppers in your bottle garden. Companion planting can be beneficial for bell peppers, as certain plants can help to deter pests, attract pollinators, or improve the flavor of the peppers. Good companion plants for bell peppers include basil, marigolds, onions, garlic, and carrots. Avoid planting bell peppers near fennel or brassicas (such as cabbage or broccoli), as these plants can inhibit their growth. When choosing companion plants, consider their size and growth habits to ensure that they don’t overcrowd the bell peppers.
How long does it take to grow bell peppers in a bottle garden?
The time it takes to grow bell peppers in a bottle garden depends on the variety of pepper, the growing conditions, and the size of the plant. Generally, it takes about 60-90 days from transplanting to harvest. Start your seeds indoors 6-8 weeks before the last expected frost. Once the seedlings have developed several sets of true leaves, they can be transplanted into the bottle garden. Be patient and provide your plants with the proper care, and you’ll be rewarded with a bountiful harvest of delicious bell peppers.
What if my bell pepper plants aren’t producing fruit?
There are several reasons why your bell pepper plants might not be producing fruit. Common causes include insufficient sunlight, lack of pollination, nutrient deficiencies, and temperature stress. Make sure your plants are receiving at least 6-8 hours of direct sunlight per day. Bell peppers are self-pollinating, but they may need a little help from you. Gently shake the plants or use a small paintbrush to transfer pollen from one flower to another. Fertilize your plants regularly with a balanced fertilizer. Avoid exposing your plants to extreme temperatures, as this can inhibit fruit production.
Can I overwinter my bell pepper plants in a bottle garden?
In some climates, you can overwinter your bell pepper plants in a bottle garden. Before the first frost, bring your plants indoors and place them in a sunny location. Reduce watering and fertilization during the winter months. Prune back the plants to encourage new growth in the spring. With proper care, your bell pepper plants can survive the winter and produce fruit again the following year. However, keep in mind that bell peppers are perennials in tropical climates, but are typically grown as annuals in temperate regions.
Leave a Comment