
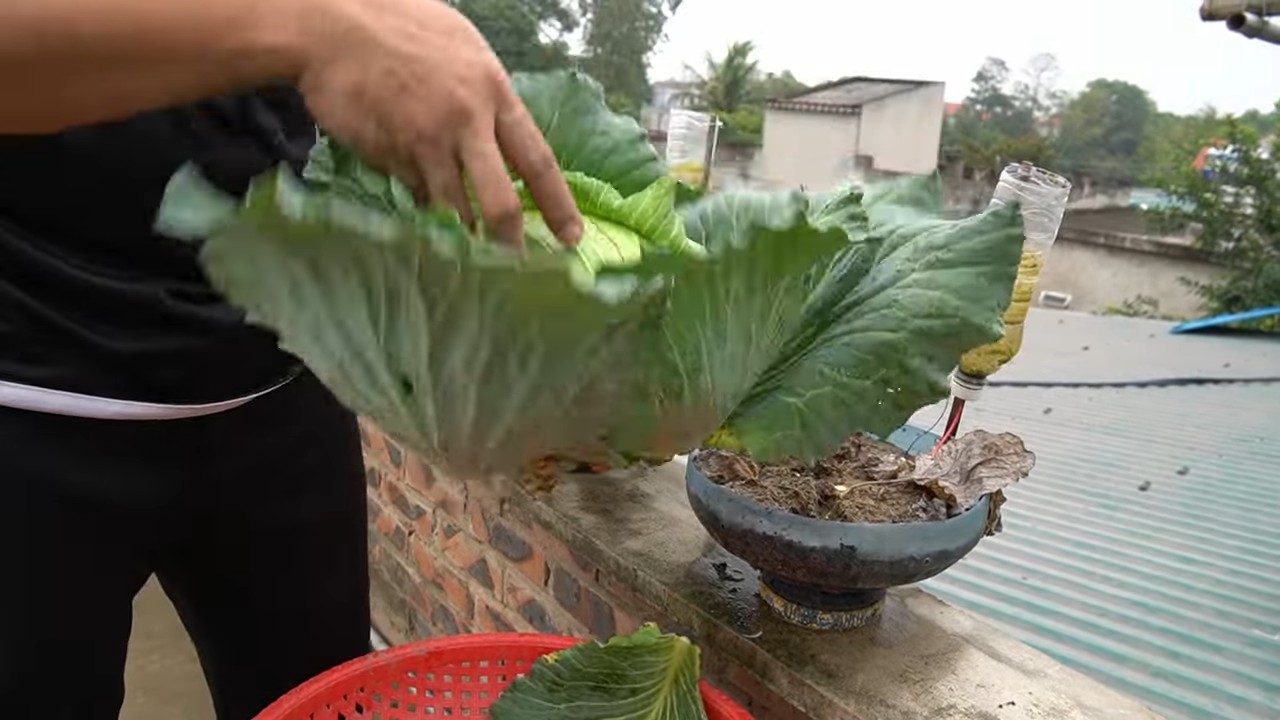
Balcony Cabbage Urban Gardening: Dreaming of fresh, homegrown cabbage but think you lack the space? Think again! I’m here to tell you that even the smallest balcony can become a thriving cabbage patch with a little know-how and some DIY spirit. Forget those bland, store-bought heads – imagine crisp, flavorful cabbage grown right outside your door!
For centuries, resourceful gardeners have found ways to cultivate food in limited spaces. From the hanging gardens of Babylon to the rooftop farms of modern cities, the desire to connect with nature and grow our own food has always persisted. This tradition continues today, and balcony cabbage urban gardening is a fantastic way to participate, no matter how small your outdoor area.
Why should you embrace this DIY adventure? Well, for starters, you’ll have access to incredibly fresh, organic cabbage, free from pesticides and packed with nutrients. Plus, it’s a fantastic way to reduce your carbon footprint and connect with nature in an urban environment. But perhaps the biggest reason is the sheer satisfaction of nurturing a plant from seed to harvest, knowing you created something delicious and healthy with your own two hands. So, let’s dive into some simple yet effective DIY tricks and hacks that will transform your balcony into a cabbage-growing haven!
Balkonkohl: Dein eigener kleiner Gemüsegarten auf dem Balkon
Hallo ihr Lieben! Habt ihr auch Lust, euren Balkon in eine kleine, grüne Oase zu verwandeln und dabei noch frisches Gemüse zu ernten? Dann seid ihr hier genau richtig! Ich zeige euch, wie ihr ganz einfach Kohl auf eurem Balkon anbauen könnt. Es ist einfacher als ihr denkt und macht super viel Spaß!
Was du für deinen Balkonkohl brauchst
Bevor wir loslegen, hier eine Liste mit allem, was du brauchst:
* Kohlsaat oder Jungpflanzen: Je nachdem, wie schnell du ernten möchtest. Jungpflanzen sind natürlich schneller. Beliebte Sorten für den Balkon sind Rosenkohl, Grünkohl, Palmkohl oder Zwerg-Blumenkohl.
* Pflanzgefäße: Töpfe, Kübel oder Balkonkästen mit ausreichend Volumen (mindestens 10 Liter pro Pflanze, besser mehr).
* Hochwertige Pflanzerde: Am besten spezielle Gemüseerde oder eine Mischung aus Blumenerde und Kompost.
* Dünger: Organischer Dünger wie Hornspäne oder Flüssigdünger für Gemüse.
* Gießkanne oder Schlauch: Zum regelmäßigen Gießen.
* Schere oder Messer: Zum Ernten.
* Eventuell: Schneckenschutz (Schneckenkorn oder Schneckenkragen), Pflanzstäbe (für hohe Sorten wie Palmkohl).
Die richtige Vorbereitung ist alles
Bevor wir mit dem Pflanzen loslegen, müssen wir ein paar Vorbereitungen treffen. Das ist wichtig, damit sich dein Kohl später richtig wohlfühlt.
1. Wahl des Standorts: Kohl braucht viel Sonne! Such dir einen Platz auf deinem Balkon, der mindestens 6 Stunden Sonne am Tag bekommt. Je mehr Sonne, desto besser!
2. Auswahl der Pflanzgefäße: Achte darauf, dass deine Töpfe oder Kübel ausreichend groß sind. Kohl braucht Platz für seine Wurzeln. Außerdem sollten die Gefäße Abzugslöcher haben, damit überschüssiges Wasser ablaufen kann und keine Staunässe entsteht.
3. Vorbereitung der Erde: Fülle deine Pflanzgefäße mit der vorbereiteten Erde. Achte darauf, dass die Erde locker und luftig ist. Du kannst auch etwas Kompost untermischen, um die Erde mit Nährstoffen anzureichern.
Kohl pflanzen: Schritt für Schritt
Jetzt geht’s ans Eingemachte! Hier zeige ich dir, wie du deine Kohlpflanzen richtig einpflanzt.
1. Saatgut aussäen (optional): Wenn du Kohl aus Samen ziehen möchtest, beginne am besten im Frühjahr (März/April) mit der Aussaat in kleinen Anzuchttöpfen. Fülle die Töpfe mit Anzuchterde und säe die Samen etwa 1 cm tief ein. Halte die Erde feucht und stelle die Töpfe an einen hellen, warmen Ort. Sobald die Jungpflanzen groß genug sind (ca. 10 cm), kannst du sie in größere Töpfe oder direkt in die Balkonkästen umpflanzen.
2. Jungpflanzen einpflanzen: Wenn du Jungpflanzen gekauft hast, kannst du diesen Schritt überspringen. Grabe ein Loch in die Erde, das etwas größer ist als der Wurzelballen der Pflanze. Setze die Pflanze vorsichtig in das Loch und fülle es mit Erde auf. Drücke die Erde leicht an. Achte darauf, dass der Wurzelballen vollständig mit Erde bedeckt ist.
3. Gießen: Gieße die Pflanzen nach dem Einpflanzen gründlich an. Das hilft ihnen, sich an ihren neuen Standort zu gewöhnen.
4. Abstand beachten: Achte beim Einpflanzen darauf, dass du genügend Abstand zwischen den Pflanzen lässt. Je nach Sorte solltest du etwa 30-50 cm Abstand einplanen. So haben die Pflanzen genügend Platz zum Wachsen und bekommen ausreichend Licht.
Pflege deines Balkonkohls: So bleibt er fit und gesund
Damit dein Balkonkohl prächtig gedeiht, braucht er regelmäßige Pflege. Hier sind ein paar Tipps, die du beachten solltest:
1. Gießen: Kohl braucht viel Wasser, besonders an heißen Tagen. Gieße regelmäßig, aber vermeide Staunässe. Am besten gießt du morgens oder abends, wenn die Sonne nicht so stark scheint.
2. Düngen: Kohl ist ein Starkzehrer und braucht viele Nährstoffe. Dünge deine Pflanzen regelmäßig mit organischem Dünger oder Flüssigdünger für Gemüse. Beginne etwa 2-3 Wochen nach dem Einpflanzen mit dem Düngen und wiederhole es alle 2-3 Wochen.
3. Schädlinge bekämpfen: Kohl kann von verschiedenen Schädlingen befallen werden, wie z.B. Kohlweißlingen, Blattläusen oder Schnecken. Kontrolliere deine Pflanzen regelmäßig auf Schädlinge und bekämpfe sie bei Bedarf mit geeigneten Mitteln. Gegen Schnecken helfen Schneckenkorn oder Schneckenkragen. Gegen Kohlweißlinge kannst du ein Netz über die Pflanzen spannen.
4. Unkraut entfernen: Entferne regelmäßig Unkraut aus den Pflanzgefäßen. Unkraut entzieht den Pflanzen Nährstoffe und Wasser.
5. Stützen: Hohe Kohlsorten wie Palmkohl können bei starkem Wind umknicken. Stütze sie bei Bedarf mit Pflanzstäben.
Erntezeit: Endlich frischer Kohl vom Balkon!
Nach ein paar Wochen oder Monaten (je nach Sorte) ist es endlich soweit: Du kannst deinen eigenen Kohl ernten!
1. Erntezeitpunkt: Der Erntezeitpunkt hängt von der Kohlsorte ab. Rosenkohl ist erntereif, wenn die Röschen fest und geschlossen sind. Grünkohl kann geerntet werden, sobald die Blätter groß genug sind. Palmkohl kann laufend von unten nach oben geerntet werden. Zwerg-Blumenkohl ist erntereif, wenn der Kopf die gewünschte Größe erreicht hat.
2. Ernten: Schneide die Röschen, Blätter oder Köpfe mit einem scharfen Messer oder einer Schere ab. Achte darauf, dass du die Pflanze nicht beschädigst.
3. Lagerung: Frischer Kohl ist nicht lange haltbar. Am besten verarbeitest du ihn sofort. Im Kühlschrank hält er sich ein paar Tage. Du kannst Kohl auch einfrieren, um ihn länger haltbar zu machen.
Spezielle Tipps für verschiedene Kohlsorten
Jede Kohlsorte hat ihre eigenen Besonderheiten. Hier sind ein paar spezielle Tipps für die beliebtesten Sorten für den Balkon:
Rosenkohl
* Rosenkohl braucht viel Sonne und einen nährstoffreichen Boden.
* Entferne die unteren Blätter, um die Röschenbildung zu fördern.
* Ernte die Röschen von unten nach oben, sobald sie fest und geschlossen sind.
Grünkohl
* Grünkohl ist sehr robust und verträgt auch Frost.
* Ernte die Blätter von unten nach oben, sobald sie groß genug sind.
* Grünkohl schmeckt am besten nach dem ersten Frost.
Palmkohl (Cavolo Nero)
* Palmkohl ist eine dekorative Kohlsorte mit langen, schmalen Blättern.
* Ernte die Blätter von unten nach oben, sobald sie groß genug sind.
* Palmkohl ist sehr vielseitig und kann in vielen Gerichten verwendet werden.
Zwerg-Blumenkohl
* Zwerg-Blumenkohl ist eine kompakte Sorte, die sich gut für den Balkon eignet.
* Achte auf eine gleichmäßige Wasserversorgung.
* Ernte den Kopf, sobald er die gewünschte Größe erreicht hat.
Häufige Fehler vermeiden
Damit dein Balkonkohlprojekt ein Erfolg wird, solltest du diese häufigen Fehler vermeiden:
* Zu wenig Sonne: Kohl braucht viel Sonne, um gut zu wachsen.
* Zu kleine Pflanzgefäße: Kohl braucht Platz für seine Wurzeln.
* Staunässe: Staunässe führt zu Wurzelfäule.
* Zu wenig Dünger: Kohl ist ein Starkzehrer und braucht viele Nährstoffe.
* Vernachlässigung der Schädlingsbekämpfung: Schädlinge können den Kohl stark schädigen.
Fazit: Balkonkohl ist ein tolles Projekt für jeden Balkongärtner!
Ich hoffe, ich konnte dich mit diesem Artikel inspirieren, deinen eigenen Balkonkohl anzubauen. Es ist ein tolles Projekt, das nicht nur Spaß macht

Conclusion
So, there you have it! Transforming your balcony into a thriving cabbage patch is not only achievable, but also incredibly rewarding. We’ve walked you through the simple steps to cultivate your own fresh, crisp cabbage, right in the heart of your urban dwelling. Forget those bland, mass-produced cabbages from the supermarket; imagine the vibrant flavor and satisfying crunch of a cabbage you nurtured from seedling to harvest, all within arm’s reach.
This DIY balcony cabbage gardening trick isn’t just about saving money (though that’s certainly a perk!). It’s about connecting with nature, fostering a sense of accomplishment, and enjoying the unparalleled taste of homegrown produce. It’s about knowing exactly where your food comes from and reducing your environmental footprint. It’s about adding a touch of green to your concrete jungle and creating a beautiful, edible oasis.
But the best part? It’s incredibly versatile! Feel free to experiment with different varieties of cabbage. Red cabbage adds a splash of color and a slightly sweeter flavor, while Savoy cabbage offers a more delicate texture. Why not try growing some companion plants alongside your cabbage? Marigolds can help deter pests, while dill can attract beneficial insects. Consider adding some low-growing herbs like thyme or oregano around the base of your cabbage plants to create a fragrant and visually appealing arrangement.
If you’re short on space, consider growing smaller cabbage varieties like ‘Baby Savoy’ or ‘Golden Acre’. You can also utilize vertical gardening techniques, such as hanging planters or stacked containers, to maximize your growing area. For those in colder climates, choose cold-hardy cabbage varieties and provide extra protection during the winter months, such as covering your plants with horticultural fleece or moving them to a sheltered location.
Don’t be intimidated if you’re a beginner gardener. Cabbage is a relatively easy vegetable to grow, and with a little care and attention, you’ll be harvesting your own delicious heads in no time. The key is to provide your plants with plenty of sunlight, well-draining soil, and consistent watering. And don’t forget to protect them from pests like cabbage worms and aphids.
We wholeheartedly encourage you to give this DIY balcony cabbage gardening trick a try. It’s a fun, fulfilling, and delicious way to bring the bounty of the garden to your urban home. Once you taste the difference between homegrown cabbage and store-bought, you’ll never go back!
We’re eager to hear about your experiences! Share your photos, tips, and triumphs in the comments below. Let’s create a community of urban gardeners, sharing our knowledge and inspiring each other to grow our own food, one cabbage at a time. What are you waiting for? Get your hands dirty and start growing your own balcony cabbage today!
Frequently Asked Questions (FAQ)
What kind of container is best for growing cabbage on a balcony?
The ideal container for growing cabbage on a balcony should be large enough to accommodate the plant’s root system and provide adequate drainage. A container that is at least 12 inches in diameter and 12 inches deep is generally recommended. You can use plastic pots, terracotta pots, or even repurposed containers like buckets or tubs. Just make sure the container has drainage holes to prevent waterlogging, which can lead to root rot. Consider the weight of the container when filled with soil, especially if you have weight restrictions on your balcony. Lightweight containers or using a lighter potting mix can help alleviate this concern.
How much sunlight does cabbage need when grown on a balcony?
Cabbage requires at least 6 hours of direct sunlight per day to thrive. Choose a location on your balcony that receives ample sunlight throughout the day. If your balcony doesn’t receive enough direct sunlight, you may need to supplement with artificial lighting, such as grow lights. Position the grow lights about 6-12 inches above the plants and provide them with 14-16 hours of light per day. Rotate your cabbage plants regularly to ensure even exposure to sunlight.
What type of soil is best for growing cabbage in containers?
Cabbage prefers well-draining, fertile soil that is rich in organic matter. A good potting mix for cabbage should consist of a combination of peat moss, perlite, and compost. You can also add some slow-release fertilizer to the potting mix to provide your plants with a steady supply of nutrients. Avoid using garden soil in containers, as it can become compacted and poorly drained. Consider adding some aged manure or worm castings to the potting mix to further enrich the soil.
How often should I water my cabbage plants on a balcony?
Water your cabbage plants regularly, especially during hot, dry weather. The soil should be kept consistently moist, but not waterlogged. Check the soil moisture by sticking your finger about an inch into the soil. If the soil feels dry, it’s time to water. Water deeply, until water drains out of the drainage holes. Avoid watering the foliage, as this can promote fungal diseases. Water in the morning to allow the foliage to dry before nightfall.
How do I protect my cabbage plants from pests and diseases on a balcony?
Cabbage plants are susceptible to a variety of pests and diseases, including cabbage worms, aphids, and clubroot. To protect your plants, inspect them regularly for signs of pests or diseases. Handpick any cabbage worms or aphids that you find. You can also use insecticidal soap or neem oil to control these pests. To prevent clubroot, make sure your soil is well-draining and avoid planting cabbage in the same container year after year. Consider using companion planting to deter pests. For example, planting marigolds near your cabbage can help repel cabbage moths.
When is the best time to harvest my balcony cabbage?
Cabbage is typically ready to harvest 60-100 days after planting, depending on the variety. The head should be firm and compact. To harvest, cut the head off at the base of the plant with a sharp knife. Leave the roots in the container, as they may produce new shoots. Harvest your cabbage before it splits or cracks, as this can indicate that it is overripe.
Can I grow cabbage on a balcony in the winter?
Yes, you can grow cabbage on a balcony in the winter, especially in milder climates. Choose cold-hardy cabbage varieties and provide extra protection during the winter months. Cover your plants with horticultural fleece or move them to a sheltered location, such as a greenhouse or sunroom. Water your plants less frequently during the winter, as they will not need as much moisture.
What are some good companion plants for cabbage grown on a balcony?
Good companion plants for cabbage include marigolds, dill, thyme, oregano, and rosemary. Marigolds help deter pests, while dill attracts beneficial insects. Thyme, oregano, and rosemary can help improve the flavor of your cabbage. Avoid planting cabbage near members of the nightshade family, such as tomatoes, peppers, and eggplants, as they can compete for nutrients.
How do I fertilize my cabbage plants on a balcony?
Cabbage plants are heavy feeders and require regular fertilization. Fertilize your plants every 2-3 weeks with a balanced fertilizer, such as 10-10-10. You can also use a liquid fertilizer or a slow-release fertilizer. Follow the instructions on the fertilizer package for application rates. Avoid over-fertilizing, as this can lead to excessive foliage growth and reduced head formation.
What if my cabbage head doesn’t form properly?
Several factors can contribute to a cabbage head not forming properly, including insufficient sunlight, poor soil, inadequate watering, and pest infestations. Ensure your plants are receiving at least 6 hours of direct sunlight per day, are planted in well-draining, fertile soil, are watered regularly, and are protected from pests. If your cabbage head is still not forming properly, try fertilizing your plants with a fertilizer that is high in phosphorus, which promotes head formation.


Leave a Comment