
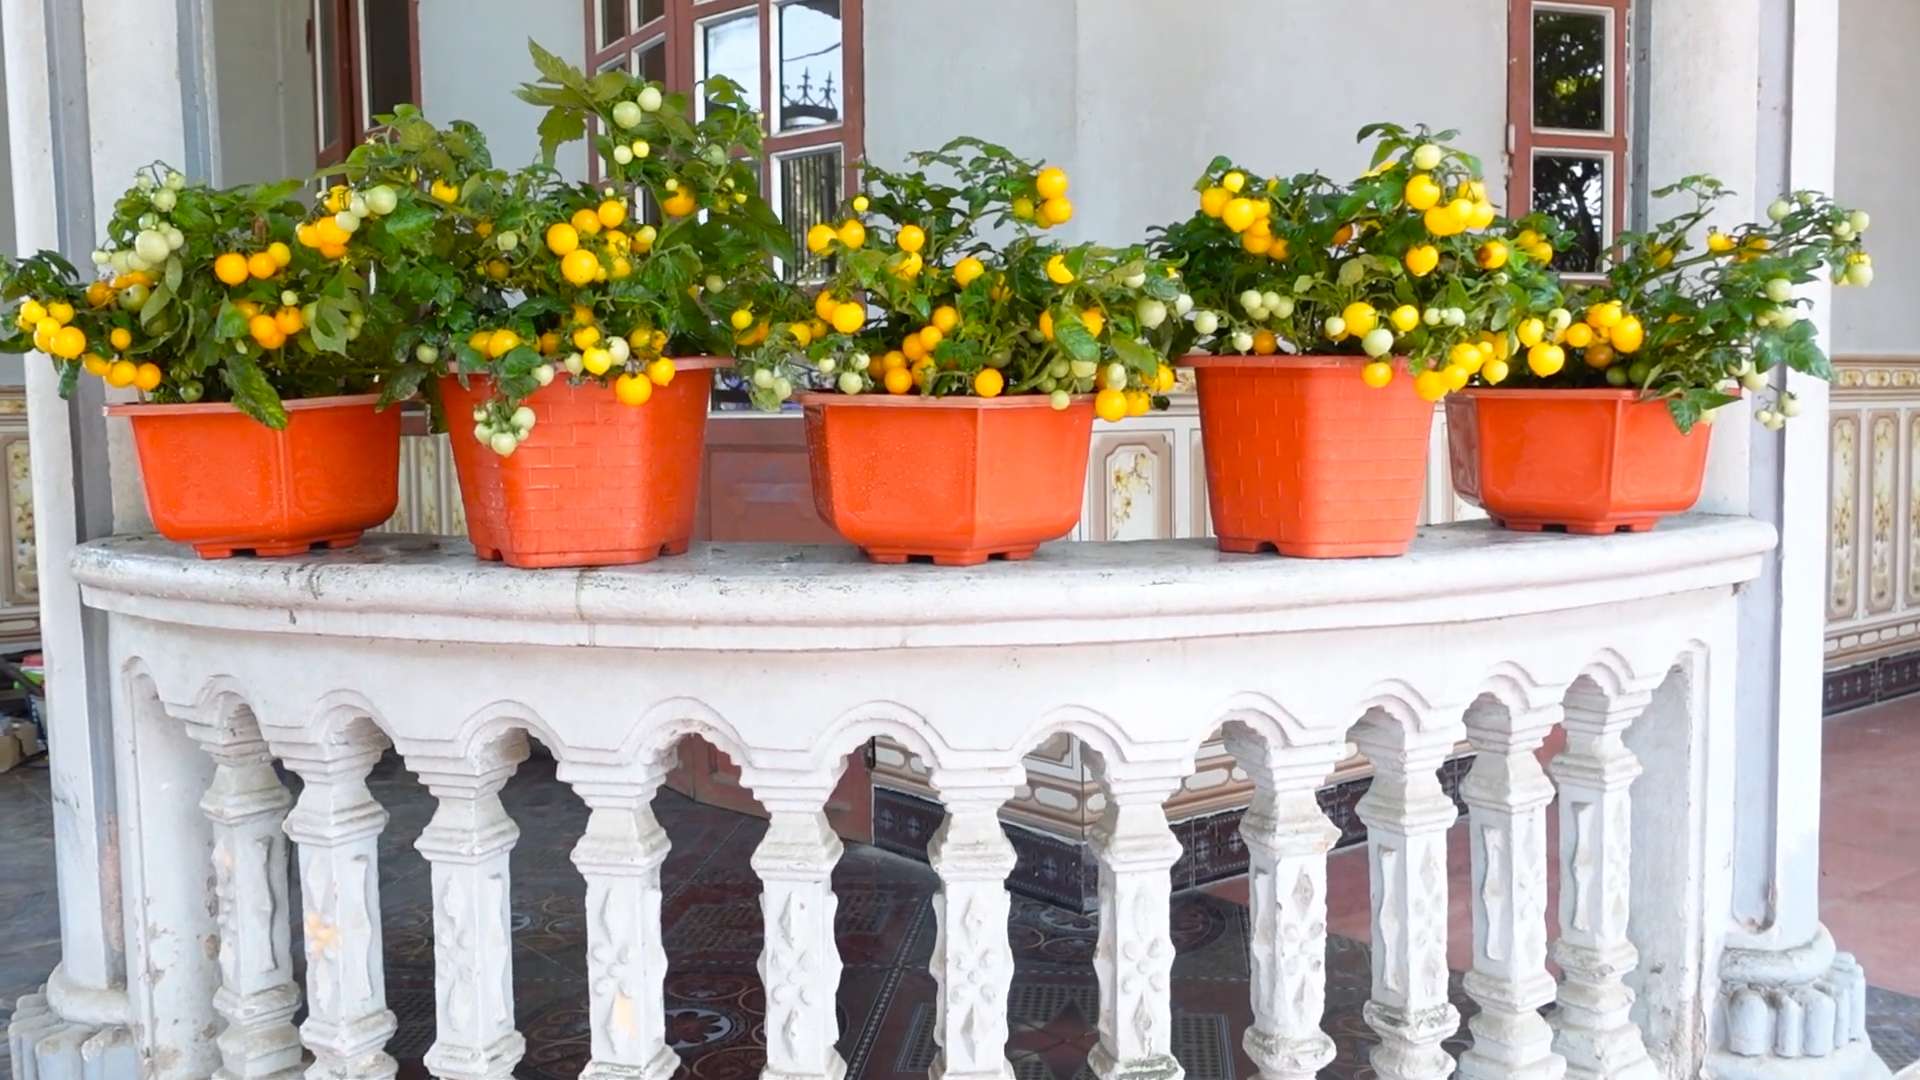
Balcony Tomato Growing Tips: Dreaming of vine-ripened, juicy tomatoes bursting with flavor, but only have a balcony to work with? You’re not alone! For centuries, even in bustling cities, people have found ways to cultivate their own little Edens. From ancient Roman rooftop gardens to modern-day urban farms, the desire to connect with nature and grow our own food is deeply ingrained.
But let’s be honest, squeezing a thriving tomato garden onto a small balcony can feel daunting. That’s where these DIY tricks and hacks come in! I’m here to share my tried-and-true balcony tomato growing tips that will transform your limited space into a tomato-producing powerhouse. Forget those bland, store-bought tomatoes – imagine plucking sun-warmed, flavorful fruits right from your own balcony oasis.
This article is your ultimate guide to overcoming common balcony gardening challenges. We’ll cover everything from choosing the right varieties and containers to mastering watering and pest control. So, whether you’re a seasoned gardener or a complete beginner, get ready to unlock the secrets to a bountiful balcony tomato harvest! Let’s get growing!
Balcony Tomato Bonanza: Your Guide to Growing Delicious Tomatoes in Limited Space
Okay, so you’re dreaming of vine-ripened tomatoes bursting with flavor, but your only gardening space is a balcony? Don’t worry, friend! I’m here to tell you that a balcony tomato garden is totally achievable. I’ve done it, and you can too! It just takes a little planning, the right supplies, and a whole lot of tomato love. Let’s dive in!
Choosing the Right Tomato Variety
This is crucial! Not all tomatoes are created equal, especially when it comes to container gardening. You need to think small(ish).
* Determinate vs. Indeterminate: This is the big one.
* Determinate tomatoes grow to a certain size and then produce all their fruit at once. They’re bushier and more compact, making them ideal for containers. Think Roma, Celebrity, or Patio tomatoes.
* Indeterminate tomatoes keep growing and producing fruit throughout the season. They need staking or caging and can get HUGE. While you *can* grow them on a balcony, you’ll need a very large container and be prepared for some serious pruning. Cherry tomatoes and many heirloom varieties are indeterminate.
* Size Matters: Consider the size of the fruit. Cherry tomatoes, grape tomatoes, and other smaller varieties are generally easier to manage in containers.
* Disease Resistance: Look for varieties labeled with disease resistance codes (like V, F, N, T, A). This will save you a lot of headaches later on.
* My Recommendations: I’ve had great success with ‘Patio’ tomatoes, ‘Roma’ tomatoes, and various cherry tomato varieties like ‘Sweet Million’ or ‘Sungold’. They’re reliable and produce tons of delicious fruit.
Gathering Your Supplies
Alright, time to get your hands dirty (well, almost!). Here’s what you’ll need:
* Containers:
* Size: This is super important. For determinate varieties, aim for at least a 15-gallon container. For indeterminate varieties, go even bigger – 20 gallons or more. The bigger, the better, honestly.
* Material: Plastic, terracotta, or fabric pots all work. Fabric pots are great because they allow for better drainage and aeration.
* Drainage: Make sure your containers have drainage holes! Tomatoes hate sitting in soggy soil.
* Potting Mix:
* Don’t use garden soil! It’s too heavy and compacts easily, which will suffocate your tomato roots.
* Use a high-quality potting mix specifically designed for containers. I like to add some compost to mine for extra nutrients.
* Tomato Cages or Stakes:
* Even determinate varieties can benefit from some support, especially when they’re loaded with fruit. Indeterminate varieties absolutely need it.
* Choose sturdy cages or stakes that can handle the weight of the plant.
* Fertilizer:
* Tomatoes are heavy feeders, so you’ll need to fertilize regularly.
* Use a balanced fertilizer specifically formulated for tomatoes. Look for one with a higher phosphorus content (the middle number) to encourage fruit production.
* Watering Can or Hose:
* You’ll need a way to water your plants regularly.
* Hand Trowel or Shovel:
* For planting and transplanting.
* Pruning Shears or Scissors:
* For pruning suckers (more on that later!).
* Optional:
* Mulch (straw, wood chips, or even plastic) to help retain moisture and suppress weeds.
* Tomato tone or other organic fertilizer amendments.
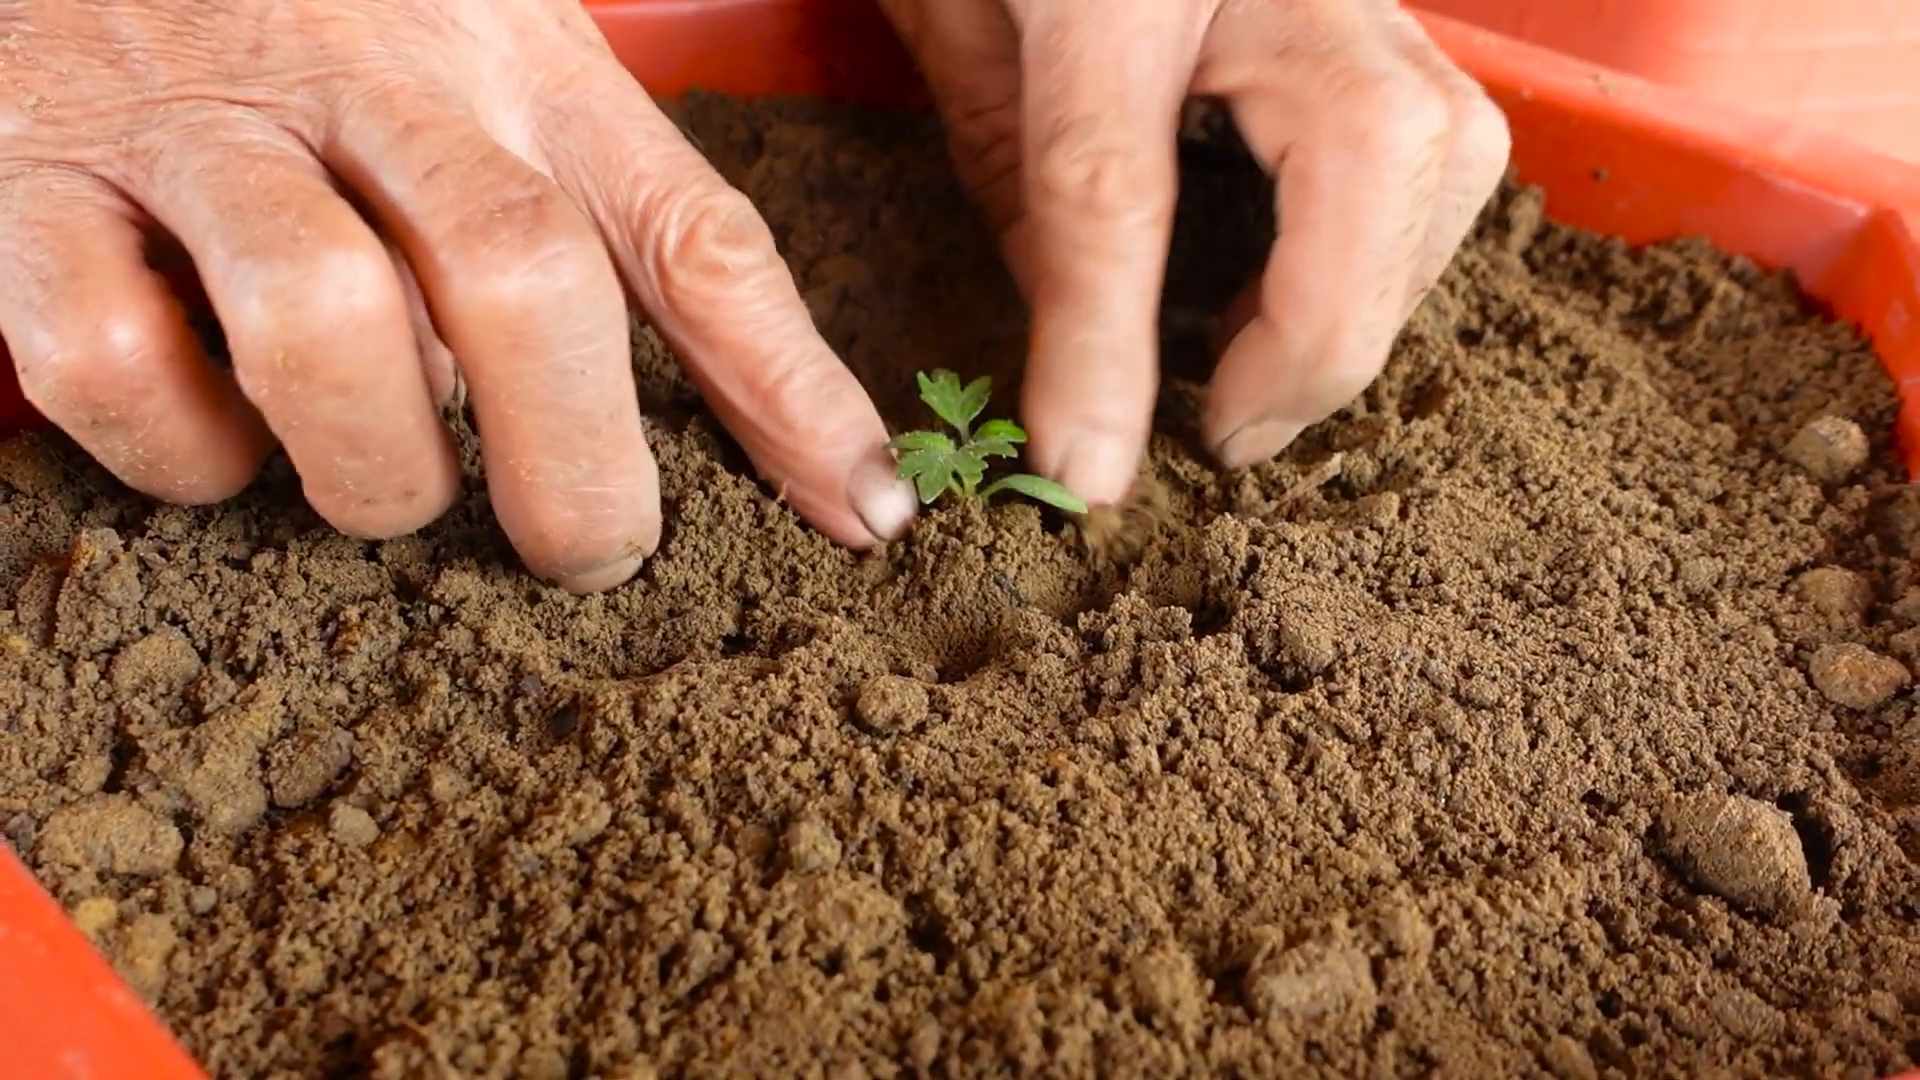
Planting Your Tomato Seedlings
Okay, let’s get those tomatoes in the ground (or rather, in the pot!).
1. Choose a Sunny Spot: Tomatoes need at least 6-8 hours of direct sunlight per day. Make sure your balcony gets enough sun before you start.
2. Fill Your Container: Fill your container with potting mix, leaving a few inches of space at the top.
3. Dig a Hole: Dig a hole in the center of the container that’s large enough to accommodate the root ball of your tomato seedling.
4. Plant Deep: This is a trick I learned that makes a HUGE difference. Remove the lower leaves from the tomato seedling and plant it deep, burying the stem up to the first set of leaves. The buried stem will grow roots, making your plant stronger and more productive.
5. Water Thoroughly: Water the newly planted seedling thoroughly until water drains out of the bottom of the container.
6. Add Support: Install your tomato cage or stake now, before the plant gets too big. This will prevent you from damaging the roots later on.
7. Mulch (Optional): Add a layer of mulch around the base of the plant to help retain moisture and suppress weeds.
Caring for Your Balcony Tomato Plants
Now comes the ongoing care. This is where the real magic happens!
1. Watering:
* Tomatoes need consistent watering, especially during hot weather.
* Water deeply and regularly, aiming to keep the soil consistently moist but not soggy.
* Check the soil moisture by sticking your finger into the soil. If the top inch or two is dry, it’s time to water.
* Avoid watering the leaves, as this can lead to fungal diseases. Water at the base of the plant.
2. Fertilizing:
* Start fertilizing your tomato plants about two weeks after planting.
* Use a balanced tomato fertilizer according to the package directions.
* I like to fertilize every two weeks during the growing season.
* You can also supplement with compost tea or other organic fertilizers.
3. Pruning:
* This is especially important for indeterminate varieties.
* Remove suckers: Suckers are the small shoots that grow in the “V” between the main stem and the branches. They steal energy from the plant and reduce fruit production. Pinch them off when they’re small.
* You can also prune some of the lower leaves to improve air circulation and prevent disease.
4. Pest and Disease Control:
* Keep an eye out for pests like aphids, whiteflies, and tomato hornworms.
* You can often control pests with insecticidal soap or neem oil.
* Prevent fungal diseases by providing good air circulation and avoiding overhead watering.
* If you see signs of disease, remove the affected leaves immediately.
5. Pollination:
* Tomatoes are self-pollinating, but sometimes they need a little help, especially in hot or humid weather.
* You can hand-pollinate your tomatoes by gently shaking the plant or using a small brush to transfer pollen from one flower to another.
6. Sunlight Management:
* If your balcony doesn’t get consistent sunlight throughout the day, you might need to rotate your tomato plants to ensure they get enough light on all sides.
Troubleshooting Common Tomato Problems
Even with the best care, you might encounter some problems along the way. Here are a few common issues and how to deal with them:
* Blossom End Rot: This is caused by a calcium deficiency. Make sure your soil has enough calcium and water consistently. You can also add calcium supplements to the soil.
* Leaf Curl: This can be caused by a variety of factors, including heat stress, overwatering, or pests. Make sure your plants are getting enough water and are protected from extreme heat.
* Yellowing Leaves: This can be a sign of nutrient deficiency, overwatering, or disease. Check the soil moisture and fertilize if necessary.
* Lack of Fruit: This can be caused by lack of pollination, insufficient sunlight, or nutrient deficiency. Hand-pollinate your tomatoes and make sure they’re getting enough sun and fertilizer.
Harvesting Your Tomatoes
This is the best part!
1. Wait for Ripeness: Tomatoes are ready to harvest when they’re fully colored and slightly soft to the touch.
2. Gently Twist: Gently twist the tomato off the vine.
3. Enjoy! Eat your tomatoes fresh, use them in your favorite recipes, or preserve them for later.
Extra Tips for Balcony Tomato Success
* Choose the Right Location: As mentioned before, sunlight is key. But also consider wind. A windy balcony can dry out your plants quickly.
* Use Self-Watering Containers: If you’re prone to forgetting to water, self-watering containers can be a lifesaver.
* Companion Planting: Plant basil, marigolds, or other herbs near your tomatoes to deter pests and improve
Conclusion
So, there you have it! Transforming your balcony into a thriving tomato garden is not only achievable but incredibly rewarding. We’ve explored the essential elements, from selecting the right varieties and containers to mastering watering and fertilization techniques. But the real magic lies in the DIY trick we’ve unveiled: the self-watering container system. This simple yet ingenious method addresses one of the biggest challenges of balcony gardening – consistent moisture – allowing you to cultivate plump, juicy tomatoes with minimal effort.
Why is this DIY trick a must-try? Because it dramatically reduces the risk of over or under-watering, two common pitfalls that can stunt growth and diminish your harvest. It also frees you from the daily grind of watering, especially crucial during hot summer months or when you’re away from home. Imagine returning from a weekend trip to find your tomato plants flourishing, not parched and drooping. That’s the peace of mind this self-watering system provides.
Beyond the basic design, there’s ample room for personalization. Consider adding a layer of mulch on top of the soil to further conserve moisture and suppress weeds. You could also experiment with different types of wicking materials, such as strips of old t-shirts or felt, to see which works best for your setup. For larger containers, you might even incorporate multiple wicks for more efficient water distribution.
And don’t limit yourself to just tomatoes! This self-watering system is equally effective for other thirsty plants like peppers, cucumbers, and even herbs. Think of the possibilities – a vibrant balcony bursting with fresh, homegrown produce, all thanks to a simple DIY solution.
This balcony tomato growing trick is a game-changer for urban gardeners. It empowers you to overcome the limitations of small spaces and enjoy the unparalleled flavor of homegrown tomatoes. The satisfaction of harvesting your own sun-ripened fruit, knowing you nurtured it from seed to table, is an experience that’s hard to beat.
We wholeheartedly encourage you to give this DIY trick a try. Gather your materials, follow the steps outlined, and prepare to be amazed by the results. Remember to document your progress, take photos of your flourishing tomato plants, and share your experiences with us and the wider gardening community. Your insights and tips could inspire others to embark on their own balcony tomato growing adventures.
Don’t be afraid to experiment, adapt, and personalize the system to suit your specific needs and preferences. Gardening is a journey of learning and discovery, and every season brings new opportunities to refine your techniques and achieve even greater success. So, get your hands dirty, embrace the challenge, and get ready to savor the taste of homegrown goodness! We can’t wait to hear about your balcony tomato growing triumphs!
Frequently Asked Questions (FAQ)
What type of container is best for this DIY self-watering system?
The ideal container is a large, opaque plastic bin or bucket. Opaque containers prevent algae growth in the water reservoir. The size depends on the tomato variety you choose. Determinate (bush) varieties need at least a 5-gallon container, while indeterminate (vining) varieties thrive in 10-gallon or larger containers. Ensure the container is food-grade plastic to avoid leaching harmful chemicals into your soil. Dark-colored containers can absorb more heat, which can be beneficial in cooler climates but detrimental in hotter ones. Consider a lighter color or painting the container white to reflect sunlight in warmer regions.
What kind of soil should I use for balcony tomatoes?
A well-draining potting mix is crucial. Avoid using garden soil, as it tends to compact in containers and doesn’t provide adequate aeration. Look for a potting mix specifically formulated for vegetables or create your own by combining equal parts peat moss (or coconut coir), perlite, and compost. The compost provides essential nutrients, while the perlite improves drainage and aeration. You can also add a slow-release fertilizer to the mix to provide a steady supply of nutrients throughout the growing season.
How often do I need to refill the water reservoir?
The frequency of refilling depends on several factors, including the size of the container, the weather conditions, and the size of your tomato plant. In hot, sunny weather, you may need to refill the reservoir every day or two. In cooler, cloudier weather, you may only need to refill it once a week. Check the water level regularly by lifting the inner container or using a water level indicator. The soil surface should remain consistently moist but not waterlogged.
What type of wicking material is best?
Several materials can be used for wicking, including cotton rope, strips of old t-shirts, felt, and even nylon stockings. The key is to choose a material that is absorbent and durable. Cotton rope is a popular choice because it’s readily available and relatively inexpensive. Strips of old t-shirts are a good option for recycling old clothing. Felt is another absorbent material that works well. Experiment with different materials to see which works best for your setup. Ensure the wicking material is long enough to reach the bottom of the water reservoir and extend well into the soil in the inner container.
How do I prevent algae growth in the water reservoir?
Algae growth can be a problem in self-watering containers, especially if the reservoir is exposed to sunlight. To prevent algae growth, use an opaque container and avoid overfilling the reservoir. You can also add a small amount of hydrogen peroxide to the water reservoir to kill algae. A few drops per gallon of water is usually sufficient. Alternatively, you can use a commercial algae control product specifically designed for hydroponic systems. Regularly clean the reservoir to remove any algae buildup.
What if my tomato plants are not growing well in the self-watering container?
If your tomato plants are not thriving, consider the following factors:
* **Nutrient Deficiency:** Ensure you’re providing adequate nutrients. Supplement with a liquid fertilizer specifically formulated for tomatoes.
* **Sunlight:** Tomatoes need at least 6-8 hours of direct sunlight per day. If your balcony doesn’t receive enough sunlight, consider using grow lights.
* **Waterlogging:** While the self-watering system helps prevent overwatering, it’s still possible. Ensure the soil is well-draining and the wicking material isn’t too saturated.
* **Pests and Diseases:** Inspect your plants regularly for pests and diseases. Treat any infestations or infections promptly.
* **Temperature:** Tomatoes prefer warm temperatures. Protect your plants from frost and extreme heat.
Can I use this system for other plants besides tomatoes?
Yes! This DIY self-watering system is suitable for a wide range of plants, especially those that require consistent moisture. Peppers, cucumbers, eggplants, squash, and many herbs thrive in self-watering containers. Adjust the size of the container and the type of potting mix to suit the specific needs of the plant. For example, herbs generally prefer a lighter, well-draining potting mix.
How do I overwinter my tomato plants in this system?
Overwintering tomato plants in a self-watering container is possible, but it requires some effort. First, prune the plant back significantly. Then, move the container to a cool, bright location indoors. Reduce watering and fertilization during the winter months. Provide supplemental light if necessary. In the spring, gradually acclimate the plant back to outdoor conditions. Keep in mind that overwintered tomato plants may not produce as abundantly as new plants.
Is this DIY self-watering system suitable for all tomato varieties?
While the system works well for most tomato varieties, some may be better suited than others. Determinate (bush) varieties are generally easier to manage in containers because they are more compact. Indeterminate (vining) varieties require more space and support, but they can also be grown successfully in self-watering containers with proper pruning and staking. Choose varieties that are known to perform well in containers, such as ‘Patio’, ‘Roma’, ‘Celebrity’, and ‘Early Girl’.
How does this system compare to other self-watering planters available commercially?
Commercial self-watering planters can be convenient, but they are often more expensive than building your own DIY system. The DIY system allows you to customize the size and design of the container to suit your specific needs and preferences. It’s also a more sustainable option, as you can repurpose existing materials. While commercial planters may offer some advanced features, the basic principle of self-watering is the same. The DIY system is a cost-effective and environmentally friendly way to achieve the same results.

Leave a Comment