
Bottle gardening kale: sounds a little crazy, right? But trust me, it’s a game-changer for anyone who dreams of fresh, homegrown greens but is short on space, time, or even a green thumb! I’m so excited to share this incredibly simple and rewarding DIY project with you.
For centuries, humans have cultivated kale, a nutritional powerhouse, in gardens big and small. From its humble beginnings as a wild cabbage relative to its current status as a superfood staple, kale has nourished communities across the globe. But let’s face it, traditional gardening can be intimidating. That’s where bottle gardening kale comes in!
Imagine harvesting crisp, vibrant kale leaves right from your windowsill, balcony, or even your kitchen counter. No sprawling garden beds, no back-breaking weeding, and minimal effort required. This DIY trick is perfect for apartment dwellers, busy professionals, and anyone who wants to enjoy the taste of fresh, organic kale without the hassle. Plus, it’s a fantastic way to recycle those plastic bottles and do your part for the environment. So, are you ready to transform your empty bottles into miniature kale gardens? Let’s get started!
DIY-Kohl-Garten in Flaschen: Ein Leitfaden für Anfänger
Hallo liebe Gartenfreunde! Habt ihr Lust, frischen Grünkohl anzubauen, aber wenig Platz? Kein Problem! Ich zeige euch, wie ihr mit recycelten Plastikflaschen einen kleinen, aber feinen Kohl-Garten zaubern könnt. Das ist nicht nur super nachhaltig, sondern auch kinderleicht und macht richtig Spaß!
Was du brauchst:
* Leere Plastikflaschen: Am besten eignen sich große Wasser- oder Saftflaschen (mindestens 1,5 Liter). Je mehr, desto mehr Kohl!
* Grünkohl-Samen: Gibt es in jedem Gartenmarkt oder online. Achtet auf Bio-Qualität, wenn ihr Pestizide vermeiden wollt.
* Anzuchterde: Spezielle Erde für die Anzucht von Pflanzen. Sie ist nährstoffarm und locker, ideal für Keimlinge.
* Blumenerde: Wenn die Pflänzchen größer sind, brauchen sie nährstoffreichere Erde.
* Schere oder Messer: Zum Zuschneiden der Flaschen.
* Bohrer oder Nagel: Für die Entwässerungslöcher.
* Gießkanne oder Sprühflasche: Zum Bewässern.
* Etiketten und Stift: Zum Beschriften der Flaschen (optional, aber hilfreich).
* Kleine Steine oder Kies: Für die Drainage am Boden der Flaschen.
* Geduld und Freude am Gärtnern!
Schritt-für-Schritt-Anleitung:
Phase 1: Vorbereitung der Flaschen
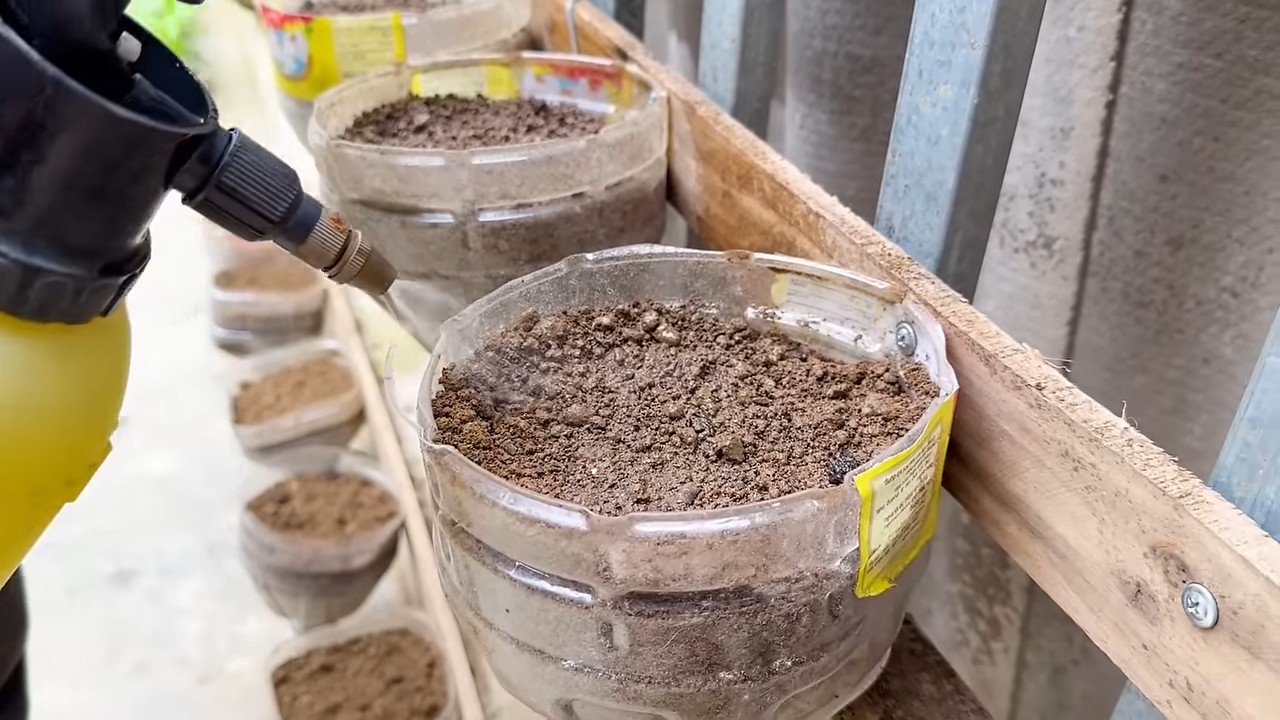
1. Reinigung der Flaschen: Zuerst müsst ihr die Plastikflaschen gründlich reinigen. Entfernt alle Etiketten und spült sie mit warmem Wasser und etwas Spülmittel aus. Achtet darauf, dass keine Spülmittelreste zurückbleiben.
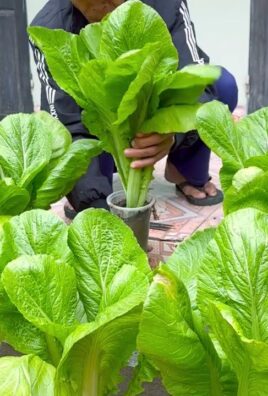
2. Zuschneiden der Flaschen: Jetzt kommt der kreative Teil! Es gibt verschiedene Möglichkeiten, die Flaschen zuzuschneiden. Ich bevorzuge es, die Flasche etwa 10-15 cm unterhalb des Flaschenhalses durchzuschneiden. So erhaltet ihr einen oberen Teil (mit dem Flaschenhals) und einen unteren Teil (den Flaschenkörper). Der obere Teil wird später umgedreht in den unteren Teil gesteckt.
3. Entwässerungslöcher bohren: Damit das Wasser gut ablaufen kann und keine Staunässe entsteht, bohrt ihr mit einem Bohrer oder Nagel mehrere kleine Löcher in den Boden des Flaschenkörpers. Achtet darauf, dass die Löcher nicht zu groß sind, damit die Erde nicht herausfällt.
4. Drainage anlegen: Füllt eine Schicht von etwa 2-3 cm kleinen Steinen oder Kies in den Boden des Flaschenkörpers. Das sorgt für eine gute Drainage und verhindert, dass die Wurzeln im Wasser stehen.
Phase 2: Aussaat der Grünkohl-Samen
1. Flaschen mit Anzuchterde füllen: Füllt den Flaschenkörper mit Anzuchterde bis etwa 2-3 cm unter den Rand. Drückt die Erde leicht an.
2. Samen aussäen: Verteilt die Grünkohl-Samen gleichmäßig auf der Erde. Achtet darauf, dass die Samen nicht zu dicht beieinander liegen. Eine Faustregel ist, etwa 2-3 Samen pro Flasche zu säen.
3. Samen bedecken: Bedeckt die Samen mit einer dünnen Schicht Anzuchterde (etwa 0,5 cm).
4. Bewässern: Befeuchtet die Erde vorsichtig mit einer Gießkanne oder Sprühflasche. Die Erde sollte feucht, aber nicht nass sein.
5. Flaschen beschriften: Wenn ihr mehrere Flaschen bepflanzt, ist es hilfreich, sie mit Etiketten zu beschriften. So wisst ihr immer, was in welcher Flasche wächst.
6. Standort wählen: Stellt die bepflanzten Flaschen an einen hellen und warmen Ort. Ideal ist ein Fensterbrett oder ein Gewächshaus. Grünkohl braucht viel Licht zum Keimen.
Phase 3: Pflege der Keimlinge
1. Feuchtigkeit halten: Achtet darauf, dass die Erde immer feucht bleibt. Besprüht sie regelmäßig mit Wasser, besonders wenn es warm ist.
2. Belüftung: Lüftet die Flaschen regelmäßig, um Schimmelbildung zu vermeiden.
3. Vereinzeln (Pikieren): Sobald die Keimlinge ein paar Blätter entwickelt haben (etwa nach 2-3 Wochen), müsst ihr sie vereinzeln. Das bedeutet, dass ihr die schwächsten Pflänzchen entfernt, so dass nur noch ein kräftiges Pflänzchen pro Flasche übrig bleibt.
4. Umtopfen: Wenn die Pflänzchen größer werden und die Wurzeln den Flaschenkörper durchdringen, ist es Zeit, sie umzutopfen. Nehmt den oberen Teil der Flasche ab und zieht das Pflänzchen vorsichtig heraus. Pflanzt es dann in einen größeren Topf mit Blumenerde.
Phase 4: Anbau und Ernte
1. Standort: Grünkohl braucht einen sonnigen Standort. Stellt die Töpfe an einen Ort, wo sie mindestens 6 Stunden Sonne pro Tag bekommen.
2. Bewässerung: Gießt die Pflanzen regelmäßig, besonders bei trockenem Wetter. Achtet darauf, dass die Erde nicht austrocknet.
3. Düngung: Grünkohl ist ein Starkzehrer und braucht regelmäßig Dünger. Verwendet einen organischen Dünger oder Kompost.
4. Schutz vor Schädlingen: Achtet auf Schädlinge wie Blattläuse oder Kohlweißlinge. Bei Bedarf könnt ihr die Pflanzen mit einem biologischen Schädlingsbekämpfungsmittel behandeln.
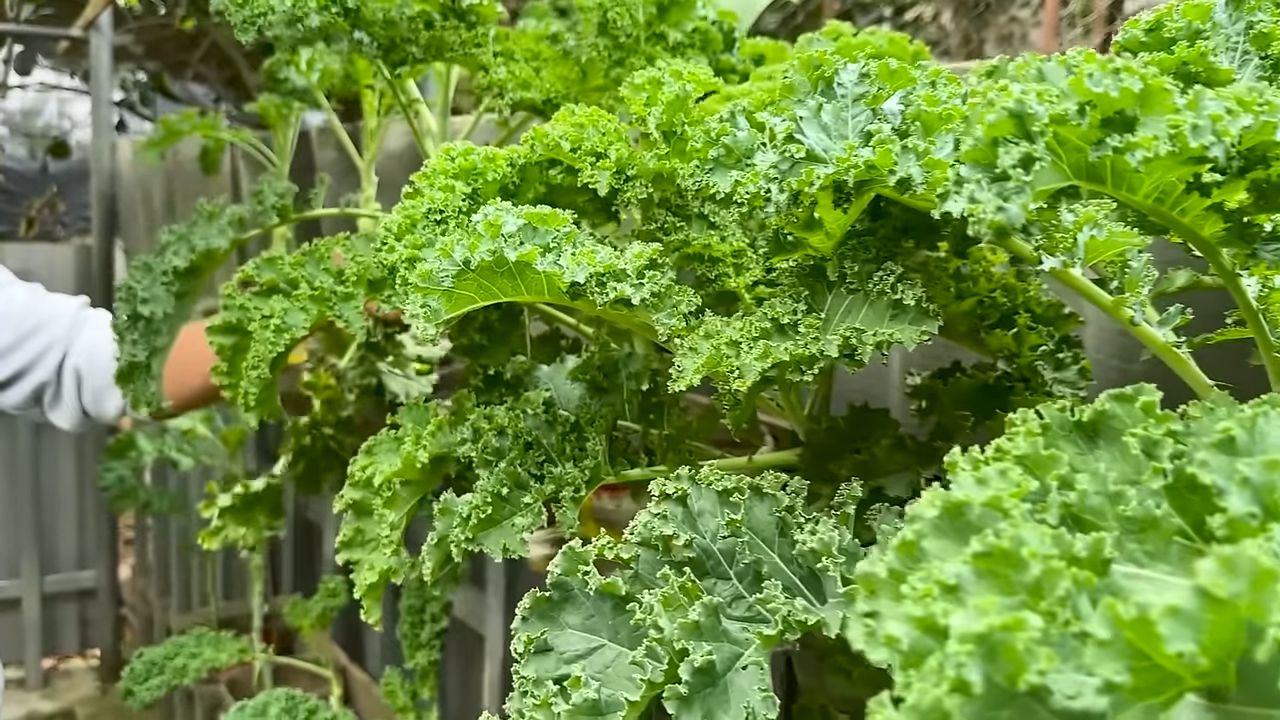
5. Ernte: Grünkohl kann geerntet werden, sobald die Blätter groß genug sind. Erntet die äußeren Blätter, so dass die Pflanze weiterwachsen kann. Die Erntezeit ist meist von Herbst bis Frühjahr.
Zusätzliche Tipps und Tricks:
* Verschiedene Grünkohlsorten: Es gibt verschiedene Grünkohlsorten, die sich in Geschmack und Aussehen unterscheiden. Probiert verschiedene Sorten aus, um euren Favoriten zu finden.
* Vertikaler Garten: Ihr könnt die Flaschen auch an einer Wand oder einem Zaun befestigen, um einen vertikalen Garten zu gestalten. Das spart Platz und sieht toll aus.
* Kombination mit anderen Pflanzen: Grünkohl lässt sich gut mit anderen Pflanzen wie Kräutern oder Salat kombinieren.
* Winterharte Pflanze: Grünkohl ist eine winterharte Pflanze und kann auch bei Frost im Freien bleiben.
* Recycling: Verwendet die alten Flaschen immer wieder, um euren Kohl-Garten zu erweitern.
* Kompostierung: Die alten Blätter und Stiele könnt ihr kompostieren und als Dünger für eure Pflanzen verwenden.
* Experimentieren: Seid kreativ und experimentiert mit verschiedenen Anbaumethoden und Sorten. Gärtnern soll Spaß machen!
Ich hoffe, diese Anleitung hilft euch dabei, euren eigenen kleinen Kohl-Garten in Flaschen anzulegen. Viel Spaß beim Gärtnern und guten Appetit!
Conclusion
So, there you have it! Transforming a simple plastic bottle into a thriving kale garden is not just a fun project; it’s a sustainable, space-saving, and incredibly rewarding way to enjoy fresh, homegrown greens. We’ve walked you through the steps, highlighting the ease and accessibility of this DIY trick. But why is this a must-try?
Firstly, it’s about reclaiming resources. Instead of discarding those plastic bottles, you’re giving them a new life, contributing to a more eco-conscious lifestyle. Secondly, it democratizes gardening. Whether you live in a sprawling suburban home or a tiny apartment, this method allows anyone to cultivate their own food. Imagine the satisfaction of snipping fresh kale leaves for your morning smoothie or adding them to a vibrant salad, all grown with your own hands and a recycled bottle.
Beyond the environmental and practical benefits, bottle gardening kale offers a unique learning experience. It’s a fantastic way to connect with nature, understand the life cycle of plants, and appreciate the effort that goes into producing the food we eat. It’s also a wonderful educational activity for children, teaching them about responsibility, sustainability, and the wonders of the natural world.
But the beauty of this DIY project lies in its adaptability. Feel free to experiment with different bottle sizes and shapes. Larger bottles can accommodate more kale plants, while smaller bottles are perfect for starting seedlings. Consider using different types of soil mixes to see which works best for your local climate and kale variety. You can even get creative with the design of your bottle garden, painting the bottles with vibrant colors or adding decorative elements to make it a visually appealing addition to your home.
Looking for variations? Try companion planting! Basil, garlic, and onions are known to deter pests and enhance the growth of kale. Plant them alongside your kale in the bottle garden for a mutually beneficial relationship. You can also explore different varieties of kale, from the classic curly kale to the more tender and mild Tuscan kale (also known as Lacinato or dinosaur kale). Each variety offers a unique flavor and texture, adding diversity to your homegrown harvest.
Don’t be afraid to experiment with hydroponics! While we focused on soil-based bottle gardening, you can adapt this method to a hydroponic system. This involves suspending the kale roots in a nutrient-rich water solution, eliminating the need for soil altogether. Hydroponics can lead to faster growth and higher yields, but it requires more attention to detail and careful monitoring of nutrient levels.
Ready to embark on your bottle gardening adventure? We encourage you to give this DIY trick a try. It’s a simple, affordable, and incredibly rewarding way to grow your own kale. And most importantly, we want to hear about your experience! Share your photos, tips, and challenges in the comments below. Let’s create a community of bottle gardeners, sharing our knowledge and inspiring others to embrace sustainable living. What are you waiting for? Grab a bottle, some soil, and some kale seeds, and let’s get growing!
Frequently Asked Questions (FAQ)
What kind of plastic bottle is best for bottle gardening kale?
Ideally, you should use food-grade plastic bottles, such as those that previously contained water, juice, or soda. Avoid bottles that held harsh chemicals or cleaning products, as these may contaminate the soil and affect the kale’s growth. PET (polyethylene terephthalate) bottles are a common and generally safe choice. Make sure to thoroughly wash and rinse the bottle before using it for gardening. The size of the bottle will depend on how many kale plants you want to grow. A 2-liter bottle is a good starting point for one or two plants.
How often should I water my bottle garden kale?
The watering frequency will depend on several factors, including the climate, the type of soil, and the size of the bottle. As a general rule, water your kale when the top inch of soil feels dry to the touch. Avoid overwatering, as this can lead to root rot. Ensure the bottle has adequate drainage holes to prevent water from accumulating at the bottom. During hot and dry weather, you may need to water more frequently. Check the soil moisture daily and adjust your watering schedule accordingly.
What kind of soil should I use for bottle gardening kale?
A well-draining potting mix is essential for successful bottle gardening. Avoid using garden soil, as it can be too heavy and compact, hindering root growth. A good potting mix will retain moisture while allowing excess water to drain away. You can also amend the potting mix with compost or other organic matter to provide additional nutrients. Consider using a mix specifically formulated for vegetables or herbs.
How much sunlight does bottle garden kale need?
Kale thrives in full sun, which means it needs at least 6 hours of direct sunlight per day. If you live in a particularly hot climate, some afternoon shade may be beneficial to prevent the leaves from scorching. Place your bottle garden in a sunny location, such as a windowsill, balcony, or patio. If you don’t have access to enough natural light, you can supplement with grow lights.
How do I fertilize my bottle garden kale?
Kale is a heavy feeder, so it’s important to provide it with adequate nutrients. You can fertilize your kale with a balanced liquid fertilizer, following the instructions on the label. Alternatively, you can use organic fertilizers, such as compost tea or worm castings. Fertilize every 2-3 weeks during the growing season. Avoid over-fertilizing, as this can lead to excessive leaf growth and reduced flavor.
How do I protect my bottle garden kale from pests?
Kale is susceptible to various pests, including aphids, cabbage worms, and flea beetles. Regularly inspect your plants for signs of infestation. If you spot any pests, you can try removing them by hand or spraying the plants with insecticidal soap or neem oil. Companion planting with herbs like basil or garlic can also help deter pests. Covering the bottle garden with netting can provide additional protection.
When is the best time to harvest my bottle garden kale?
You can start harvesting kale leaves when they are about 4-6 inches long. Harvest the outer leaves first, leaving the inner leaves to continue growing. Avoid harvesting more than one-third of the plant at a time. Kale leaves are most tender and flavorful when harvested in the morning. You can harvest kale throughout the growing season, and it will continue to produce new leaves as long as you provide it with adequate care.
Can I grow other vegetables in a bottle garden besides kale?
Absolutely! Bottle gardening is a versatile method that can be used to grow a variety of vegetables, herbs, and flowers. Some other good options for bottle gardening include lettuce, spinach, herbs like basil and mint, strawberries, and even small tomatoes. Just be sure to choose plants that are appropriate for the size of the bottle and the amount of sunlight available.
How do I overwinter my bottle garden kale?
Kale is a relatively cold-hardy vegetable, but it may need some protection during harsh winters. If you live in a region with freezing temperatures, you can move your bottle garden indoors or to a sheltered location, such as a garage or greenhouse. You can also cover the plants with a layer of mulch or straw to insulate the roots. Water sparingly during the winter months, and avoid fertilizing until the spring.
What if my kale leaves are turning yellow?
Yellowing leaves can indicate several problems, including overwatering, underwatering, nutrient deficiencies, or pest infestations. Check the soil moisture and adjust your watering schedule accordingly. Fertilize the plants with a balanced fertilizer to address any nutrient deficiencies. Inspect the leaves for signs of pests and treat them as needed. If the problem persists, consider repotting the kale in fresh soil.
Leave a Comment