
Cape Gooseberry Home Growing: Ever dreamt of plucking sweet, tangy golden berries straight from your own garden? Imagine the satisfaction of enjoying a unique and delicious fruit that you nurtured from a tiny seed! Well, you can stop dreaming and start doing! This article is your ultimate guide to successfully growing Cape Gooseberries right in your backyard, even if you’re a complete beginner.
The Cape Gooseberry, also known as the Golden Berry or Physalis peruviana, has a fascinating history. Originating in South America, these little gems have been cultivated for centuries, enjoyed for their distinctive flavor and nutritional benefits. They’ve even been used in traditional medicine! But you don’t need to travel to the Andes to enjoy them.
In today’s world, where fresh, locally sourced produce is highly valued, learning Cape Gooseberry Home Growing techniques is more relevant than ever. Store-bought Cape Gooseberries can be expensive and often lack the vibrant flavor of homegrown ones. Plus, growing your own allows you to control the entire process, ensuring they’re free from harmful pesticides and bursting with goodness. I’m going to show you simple, effective DIY tricks and hacks that will transform your garden into a Cape Gooseberry haven. Get ready to impress your friends and family with your homegrown bounty!
Growing Cape Gooseberries at Home: A DIY Guide
Hey there, fellow gardening enthusiasts! Ever wanted to grow something a little different, something that bursts with a sweet and tangy flavor? Then you’ve come to the right place! Today, I’m going to walk you through the process of growing Cape Gooseberries (also known as Golden Berries or Physalis peruviana) right in your own backyard or even in containers. Trust me, it’s easier than you think, and the reward of popping those little golden gems into your mouth is totally worth it.
What You’ll Need
Before we dive in, let’s gather our supplies. Here’s a list of everything you’ll need to successfully grow Cape Gooseberries:
* **Cape Gooseberry Seeds or Seedlings:** You can find these online or at your local garden center. Starting from seed is more economical, but seedlings will give you a head start.
* **Seed Starting Tray (if starting from seed):** A standard seed starting tray with individual cells works perfectly.
* **Seed Starting Mix (if starting from seed):** This is a light, well-draining mix specifically designed for starting seeds.
* **Potting Soil:** A good quality potting mix that drains well is essential for growing healthy plants.
* **Gardening Gloves:** To keep your hands clean and protected.
* **Watering Can or Hose:** For watering your plants.
* **Plant Pots or Garden Bed:** Choose pots that are at least 12 inches in diameter, or prepare a sunny spot in your garden.
* **Fertilizer:** A balanced fertilizer (like 10-10-10) or a tomato fertilizer will provide the necessary nutrients.
* **Stakes or Tomato Cages:** Cape Gooseberry plants can get quite bushy and may need support.
* **Pruning Shears:** For trimming and shaping your plants.
* **Sunny Location:** Cape Gooseberries need at least 6-8 hours of sunlight per day.
* **Patience:** Gardening requires a little patience, but the results are so rewarding!
Starting from Seed (Optional)
If you’re feeling adventurous and want to start from seed, here’s how:
1. **Sowing the Seeds:** Fill your seed starting tray with seed starting mix. Moisten the mix thoroughly. Sow 2-3 Cape Gooseberry seeds in each cell, about ¼ inch deep. Gently cover the seeds with more mix.
2. **Providing Warmth and Moisture:** Cover the seed starting tray with a clear plastic lid or plastic wrap to create a humid environment. Place the tray in a warm location (around 70-75°F or 21-24°C). Keep the soil consistently moist, but not soggy. You can use a spray bottle to mist the soil.
3. **Waiting for Germination:** Cape Gooseberry seeds typically germinate in 1-3 weeks. Once the seedlings emerge, remove the plastic lid or wrap.
4. **Providing Light:** Place the seedlings under grow lights or in a sunny window. If using a window, rotate the tray regularly to prevent the seedlings from leaning towards the light.
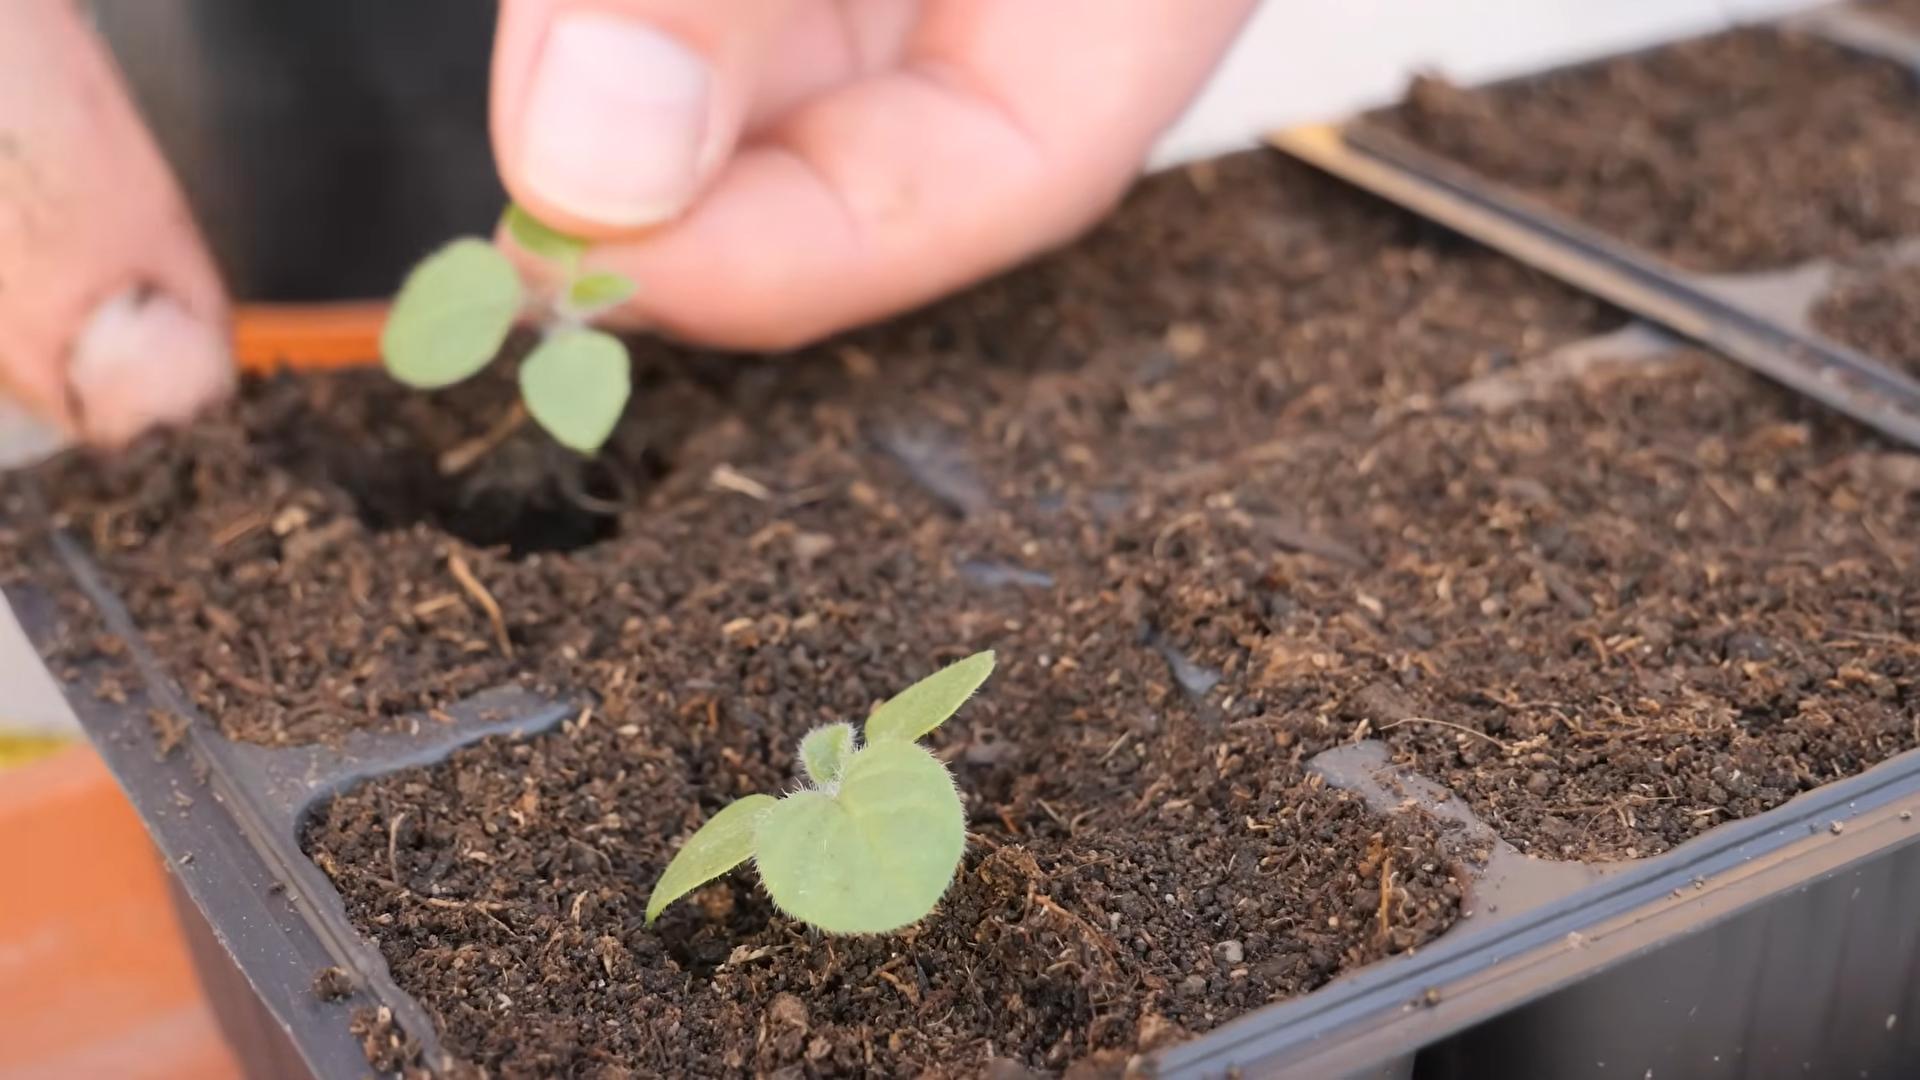
5. **Thinning the Seedlings:** Once the seedlings have a few sets of true leaves (the leaves that look like miniature versions of the adult plant’s leaves), thin them to one seedling per cell. Choose the strongest, healthiest seedling and gently snip off the others at the soil line.
6. **Hardening Off:** Before transplanting the seedlings outdoors, you’ll need to “harden them off.” This means gradually acclimating them to outdoor conditions. Start by placing the seedlings outdoors in a sheltered location for an hour or two each day, gradually increasing the amount of time they spend outside over the course of a week or two.
Transplanting Your Cape Gooseberry Plants
Whether you started from seed or purchased seedlings, the next step is transplanting them into their final growing location.
1. **Choosing the Right Location:** Cape Gooseberries thrive in full sun, so choose a spot in your garden that receives at least 6-8 hours of sunlight per day. The soil should be well-draining and slightly acidic (pH 6.0-6.8).
2. **Preparing the Soil:** If you’re planting in a garden bed, amend the soil with compost or other organic matter to improve drainage and fertility. If you’re planting in pots, use a good quality potting mix.
3. **Digging the Hole:** Dig a hole that is slightly larger than the root ball of your seedling.
4. **Removing the Seedling:** Gently remove the seedling from its container. If the roots are tightly bound, gently loosen them with your fingers.
5. **Planting the Seedling:** Place the seedling in the hole, making sure that the top of the root ball is level with the surrounding soil. Backfill the hole with soil and gently firm it around the base of the plant.
6. **Watering Thoroughly:** Water the seedling thoroughly after planting.
Caring for Your Cape Gooseberry Plants
Now that your Cape Gooseberry plants are in the ground, it’s time to provide them with the care they need to thrive.
1. **Watering:** Water your Cape Gooseberry plants regularly, especially during dry periods. Aim to keep the soil consistently moist, but not soggy. Water deeply, allowing the water to soak into the soil.
2. **Fertilizing:** Fertilize your Cape Gooseberry plants every 2-3 weeks with a balanced fertilizer or a tomato fertilizer. Follow the instructions on the fertilizer package.
3. **Providing Support:** As your Cape Gooseberry plants grow, they may need support to prevent them from sprawling. You can use stakes or tomato cages to provide support. Insert the stakes or cages into the ground around the plants, being careful not to damage the roots.
4. **Pruning:** Prune your Cape Gooseberry plants regularly to encourage bushier growth and better fruit production. Remove any dead, damaged, or diseased branches. You can also prune the plants to shape them and control their size.
5. **Pest and Disease Control:** Cape Gooseberries are generally resistant to pests and diseases, but they can be susceptible to aphids, whiteflies, and fungal diseases. Inspect your plants regularly for signs of pests or diseases. If you find any, treat them promptly with an appropriate insecticide or fungicide. Organic options are always a good first choice!
6. **Weeding:** Keep the area around your Cape Gooseberry plants free of weeds. Weeds can compete with the plants for nutrients and water.
Harvesting Your Cape Gooseberries
The best part of growing Cape Gooseberries is, of course, harvesting the delicious fruit!
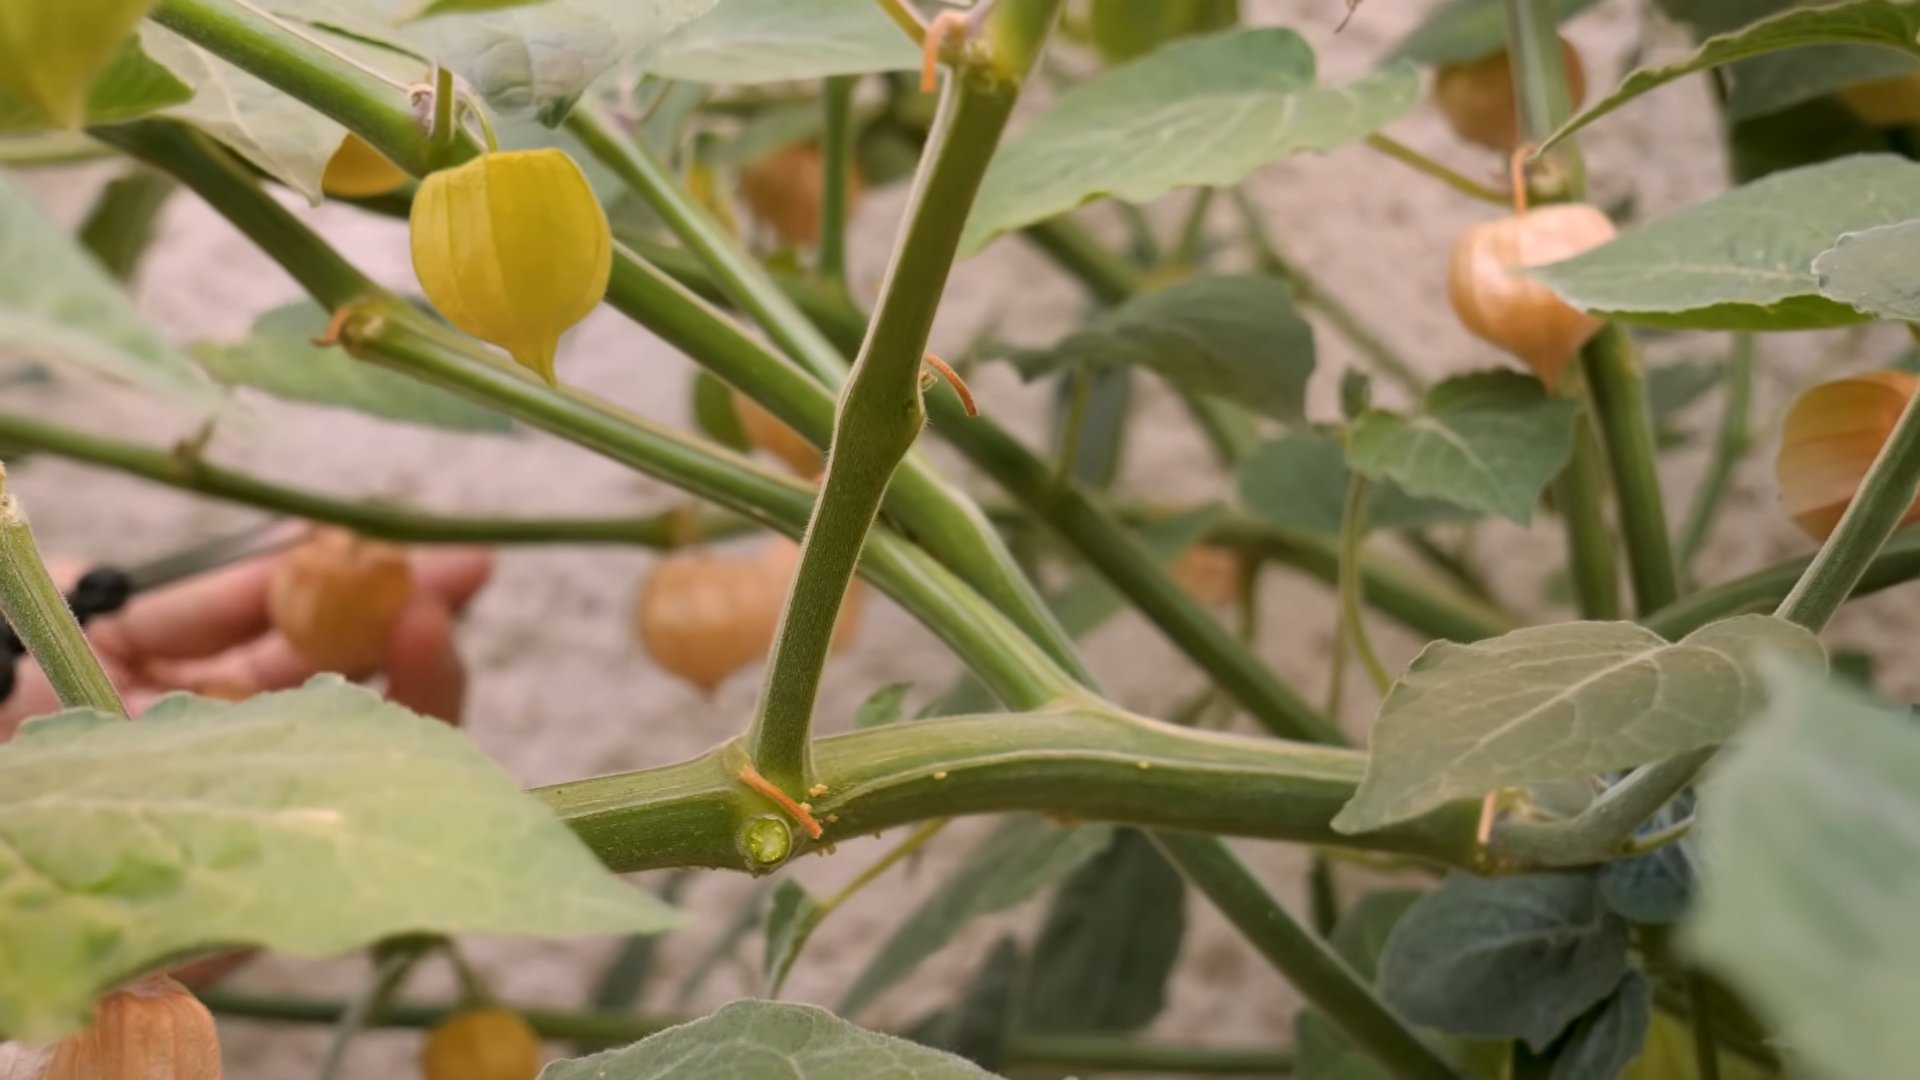
1. **Knowing When to Harvest:** Cape Gooseberries are ready to harvest when the papery husk surrounding the fruit turns brown and dry, and the fruit inside turns a golden yellow or orange color. The fruit will often drop to the ground when it’s ripe, so keep an eye out for fallen fruit.
2. **Harvesting the Fruit:** Gently pick the ripe Cape Gooseberries from the plant. You can also collect the fallen fruit from the ground.
3. **Storing the Fruit:** Cape Gooseberries can be stored in their husks at room temperature for several weeks. You can also store them in the refrigerator for longer storage.
Troubleshooting
Even with the best care, you might encounter a few challenges along the way. Here are some common problems and how to address them:
* **Yellowing Leaves:** This could be a sign of overwatering, underwatering, or nutrient deficiency. Check the soil moisture and adjust your watering accordingly. Fertilize the plants with a balanced fertilizer.
* **Lack of Fruit:** This could be due to insufficient sunlight, poor pollination, or nutrient deficiency. Make sure your plants are getting enough sunlight. You can also try hand-pollinating the flowers by gently shaking the plants. Fertilize the plants with a tomato fertilizer.
* **Pests and Diseases:** Inspect your plants regularly for signs of pests or diseases. Treat them promptly with an appropriate insecticide or fungicide.
Enjoying Your Harvest
Now that you’ve harvested your Cape Gooseberries, it’s time to enjoy them! These little fruits are incredibly versatile.
* **Eat them fresh:** Simply pop them out of their husks and enjoy their sweet and tangy flavor.
* **Make jam or preserves:** Cape Gooseberry jam is a delicious treat.
* **Add them to salads:** They add a unique flavor and texture to salads.
* **Bake them into pies or tarts:** They make a wonderful addition to baked goods.
* **Dry them for a healthy snack:** Dried Cape Gooseberries are a great source of vitamins and antioxidants.
Growing Cape Gooseberries at home is a rewarding experience. With a little care and attention, you can enjoy a bountiful harvest of these delicious and nutritious fruits. Happy gardening!
Conclusion
So, there you have it! Mastering the art of Cape Gooseberry home growing is not just a fun gardening project; it’s a gateway to enjoying a unique and delicious fruit right from your own backyard. We’ve walked you through the essential steps, from selecting the right seeds or seedlings to providing the optimal growing conditions and harvesting your golden bounty.
Why is this DIY trick a must-try? Because store-bought Cape Gooseberries, if you can even find them, often lack the vibrant flavor and freshness of homegrown ones. Plus, you have complete control over the growing process, ensuring that your fruits are free from harmful pesticides and chemicals. Imagine the satisfaction of plucking a perfectly ripe Cape Gooseberry straight from the vine and savoring its sweet and tangy taste – a taste that’s simply unmatched by anything you can buy in a store.
But the benefits extend beyond just the taste. Growing your own Cape Gooseberries is a sustainable and rewarding way to connect with nature, learn about the plant life cycle, and even reduce your carbon footprint. It’s a fantastic project for families, offering a hands-on learning experience for children and a chance to bond over a shared activity.
Don’t be afraid to experiment with variations! Try growing different varieties of Cape Gooseberries, such as the ‘Goldie’ or ‘Giant’ varieties, to discover your favorite flavor profile. You can also explore different growing methods, such as container gardening or vertical gardening, if you have limited space. Consider companion planting with herbs like basil or marigolds to deter pests and enhance the flavor of your fruits. And for those with a green thumb and a passion for propagation, try saving seeds from your best-tasting fruits to start new plants next season.
The possibilities are endless, and the rewards are plentiful. We wholeheartedly encourage you to give this DIY Cape Gooseberry home growing trick a try. It’s easier than you might think, and the results are well worth the effort.
Once you’ve harvested your first batch of golden berries, we’d love to hear about your experience! Share your photos, tips, and stories with us in the comments section below. Let’s build a community of Cape Gooseberry enthusiasts and inspire others to embark on this rewarding gardening journey. Happy growing!
Frequently Asked Questions (FAQs)
What are Cape Gooseberries, and what do they taste like?
Cape Gooseberries, also known as Golden Berries, Inca Berries, or Physalis peruviana, are small, round fruits encased in a papery husk. They have a sweet and tangy flavor, often described as a combination of pineapple, strawberry, and tomato. They are delicious eaten fresh, used in jams and preserves, or added to desserts and salads.
Are Cape Gooseberries easy to grow at home?
Yes, Cape Gooseberries are relatively easy to grow at home, even for beginner gardeners. They are adaptable to a variety of climates and soil conditions, and they are generally pest and disease resistant. With a little care and attention, you can enjoy a bountiful harvest of these delicious fruits.
What is the best time to plant Cape Gooseberries?
The best time to plant Cape Gooseberries depends on your climate. In warmer climates, you can plant them in early spring after the last frost. In cooler climates, it’s best to start them indoors 6-8 weeks before the last frost and transplant them outdoors once the weather has warmed up.
What kind of soil do Cape Gooseberries need?
Cape Gooseberries prefer well-drained soil that is rich in organic matter. They can tolerate a slightly acidic to neutral pH (6.0-7.0). Amend your soil with compost or other organic matter before planting to improve drainage and fertility.
How much sunlight do Cape Gooseberries need?
Cape Gooseberries need at least 6-8 hours of sunlight per day to thrive. Choose a sunny location in your garden where they will receive plenty of direct sunlight.
How often should I water Cape Gooseberries?
Water Cape Gooseberries regularly, especially during dry periods. Keep the soil consistently moist but not waterlogged. Water deeply at the base of the plant, avoiding wetting the foliage, which can increase the risk of fungal diseases.
Do Cape Gooseberries need fertilizer?
Cape Gooseberries benefit from regular fertilization. Use a balanced fertilizer or a fertilizer specifically formulated for fruiting plants. Apply fertilizer according to the package directions. Avoid over-fertilizing, as this can lead to excessive vegetative growth and reduced fruit production.
How do I know when Cape Gooseberries are ripe?
Cape Gooseberries are ripe when the papery husk turns brown and dry and the fruit inside turns a golden-yellow color. The fruit should also be slightly soft to the touch. You can gently squeeze the husk to check for ripeness.
How do I harvest Cape Gooseberries?
To harvest Cape Gooseberries, simply pluck the ripe fruits from the plant. The husk should easily detach from the stem. You can store the harvested fruits in their husks in the refrigerator for several weeks.
Are Cape Gooseberries susceptible to any pests or diseases?
Cape Gooseberries are generally pest and disease resistant, but they can occasionally be affected by aphids, whiteflies, or fungal diseases. Monitor your plants regularly for signs of pests or diseases and take appropriate action if necessary. Use organic pest control methods whenever possible.
Can I grow Cape Gooseberries in containers?
Yes, Cape Gooseberries can be grown in containers. Choose a large container with good drainage and fill it with a well-draining potting mix. Be sure to provide adequate sunlight and water. Container-grown Cape Gooseberries may need to be fertilized more frequently than those grown in the ground.
Are Cape Gooseberries perennial or annual?
Cape Gooseberries are technically perennial plants, but they are often grown as annuals in colder climates because they are not frost-hardy. In warmer climates, they can survive for several years if protected from frost.
Can I save seeds from my Cape Gooseberries to grow new plants?
Yes, you can save seeds from your Cape Gooseberries to grow new plants. Allow the fruits to fully ripen on the plant, then remove the seeds and dry them thoroughly. Store the dried seeds in an airtight container in a cool, dark place. Sow the seeds indoors in early spring or directly in the garden after the last frost.
Are Cape Gooseberries poisonous?
The ripe fruits of Cape Gooseberries are safe to eat. However, the unripe fruits, leaves, and stems contain solanine, a toxic alkaloid that can cause gastrointestinal upset. Do not eat any part of the plant except for the ripe fruits.
What are some ways to use Cape Gooseberries in cooking?
Cape Gooseberries can be used in a variety of culinary applications. They can be eaten fresh, added to salads, used in jams and preserves, baked into pies and tarts, or used as a topping for desserts. They also pair well with savory dishes, such as roasted meats and vegetables. Their unique flavor adds a touch of sweetness and tanginess to any dish.
Leave a Comment