
Chili pepper soil bag growing: Ever dreamed of harvesting fiery, flavorful chili peppers right from your own backyard, or even your balcony? Imagine the satisfaction of adding a dash of homegrown heat to your favorite dishes! Well, you don’t need acres of land or a green thumb of mythical proportions to make that dream a reality. This DIY guide unlocks the secrets to successfully growing chili peppers in soil bags, a method that’s surprisingly simple, space-saving, and incredibly rewarding.
The practice of container gardening, including using soil bags, has roots stretching back centuries. From the hanging gardens of Babylon to the humble window boxes of Victorian England, people have always found ways to cultivate plants in limited spaces. But the modern soil bag method offers a unique blend of convenience and efficiency, making it perfect for today’s busy lifestyles.
Why should you embrace chili pepper soil bag growing? Because it’s a game-changer! Many of us are limited by space, time, or even the quality of our native soil. Soil bag gardening bypasses these challenges, providing a controlled environment where your chili peppers can thrive. Plus, it’s an incredibly cost-effective way to enjoy fresh, organic produce. I’m excited to share these simple tricks and hacks that will have you harvesting a bounty of delicious chili peppers in no time. Let’s get started!
Chili-Pflanzen im Pflanzsack: Dein DIY-Guide für eine reiche Ernte
Hey Chili-Liebhaber! Hast du Lust, deine eigenen scharfen Schoten anzubauen, aber wenig Platz im Garten? Keine Sorge, ich zeige dir, wie du Chili-Pflanzen ganz einfach und erfolgreich in Pflanzsäcken ziehen kannst. Das ist nicht nur platzsparend, sondern auch super flexibel. Lass uns loslegen!
Was du für dein Chili-Pflanzsack-Projekt brauchst:
* Chili-Samen oder Jungpflanzen: Je nachdem, ob du von Grund auf neu starten oder etwas Zeit sparen möchtest. Ich empfehle, mit Jungpflanzen zu beginnen, wenn du schnell Ergebnisse sehen möchtest.
* Pflanzsäcke: Wähle atmungsaktive Pflanzsäcke aus Stoff (z.B. Filz) mit einem Volumen von mindestens 10 Litern pro Pflanze. Größere Säcke sind besser, da sie mehr Platz für die Wurzeln bieten und weniger schnell austrocknen.
* Hochwertige Chili-Erde: Spezielle Chili-Erde ist ideal, da sie auf die Bedürfnisse von Chili-Pflanzen abgestimmt ist. Du kannst aber auch eine gute Universal-Blumenerde mit etwas Kompost und Perlit mischen.
* Dünger: Ein Langzeitdünger oder Flüssigdünger für Chili-Pflanzen ist wichtig, um eine reiche Ernte zu gewährleisten.
* Gießkanne oder Schlauch: Zum Bewässern deiner Pflanzen.
* Pflanzschaufel: Zum Umtopfen der Pflanzen.
* Pflanzstäbe (optional): Für größere Chili-Sorten, die Unterstützung benötigen.
* Handschuhe: Um deine Hände sauber zu halten.
* Schere oder Messer: Zum Entfernen von beschädigten Blättern oder Trieben.
* Sprühflasche (optional): Zum Besprühen der Blätter mit Wasser, um die Luftfeuchtigkeit zu erhöhen.
Die Vorbereitung: Der Grundstein für deinen Chili-Erfolg
Bevor wir mit dem eigentlichen Pflanzen beginnen, ist eine gute Vorbereitung das A und O. Hier sind die Schritte, die du beachten solltest:
1. Wahl des Standorts: Chili-Pflanzen lieben die Sonne! Wähle einen Standort, der mindestens 6-8 Stunden direkte Sonneneinstrahlung pro Tag bietet. Ein windgeschützter Platz ist ideal, um die Pflanzen vor Beschädigungen zu schützen.
2. Pflanzsäcke vorbereiten: Fülle die Pflanzsäcke zu etwa zwei Dritteln mit Chili-Erde. Achte darauf, dass die Erde locker und gut durchlüftet ist.
3. Dünger hinzufügen: Mische den Langzeitdünger gemäß den Anweisungen auf der Verpackung unter die Erde. Wenn du Flüssigdünger verwendest, kannst du diesen später beim Gießen hinzufügen.
4. Erde anfeuchten: Gieße die Erde leicht an, bevor du die Pflanzen einsetzt. So haben die Wurzeln einen guten Start.
Chili-Pflanzen einsetzen: Schritt für Schritt zur eigenen Chili-Ernte
Jetzt kommt der spannende Teil: das Einsetzen der Chili-Pflanzen! Hier zeige ich dir, wie du es richtig machst:
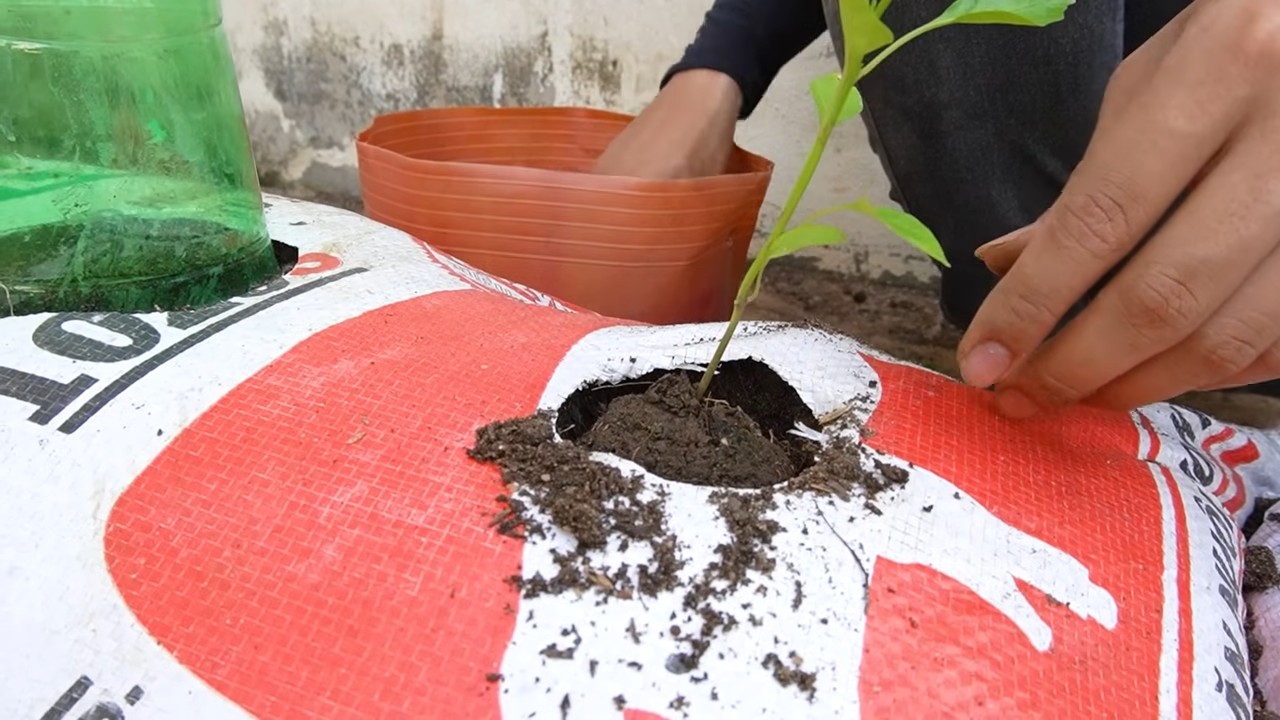
1. Pflanzen vorbereiten: Wenn du Jungpflanzen gekauft hast, nimm sie vorsichtig aus ihren Töpfen. Lockere die Wurzeln etwas auf, damit sie sich besser im Pflanzsack ausbreiten können.
2. Pflanzlöcher graben: Grabe in jedem Pflanzsack ein Loch, das groß genug ist, um die Wurzelballen der Pflanzen aufzunehmen.
3. Pflanzen einsetzen: Setze die Pflanzen in die Löcher und fülle die Lücken mit Erde auf. Achte darauf, dass die Pflanzen nicht tiefer sitzen als zuvor im Topf.
4. Andrücken und gießen: Drücke die Erde um die Pflanzen herum leicht an und gieße sie gründlich.
5. Pflanzstäbe anbringen (optional): Wenn du größere Chili-Sorten anbaust, kannst du jetzt Pflanzstäbe anbringen, um die Pflanzen zu stützen.
Die Pflege: So bleiben deine Chili-Pflanzen glücklich und gesund
Nach dem Einsetzen ist die richtige Pflege entscheidend für eine reiche Ernte. Hier sind meine Tipps:
1. Bewässerung: Chili-Pflanzen brauchen regelmäßige Bewässerung, besonders während der heißen Sommermonate. Gieße, wenn sich die oberste Erdschicht trocken anfühlt. Vermeide Staunässe, da dies zu Wurzelfäule führen kann.
2. Düngung: Dünge deine Chili-Pflanzen regelmäßig mit einem speziellen Chili-Dünger. Befolge die Anweisungen auf der Verpackung.
3. Schädlinge und Krankheiten: Kontrolliere deine Pflanzen regelmäßig auf Schädlinge wie Blattläuse oder Spinnmilben. Bei Befall kannst du natürliche Schädlingsbekämpfungsmittel verwenden. Achte auch auf Anzeichen von Krankheiten wie Pilzbefall.
4. Ausgeizen (optional): Bei einigen Chili-Sorten kann es sinnvoll sein, die Seitentriebe (Geiztriebe) auszugeizen, um die Energie der Pflanze auf die Fruchtbildung zu konzentrieren.
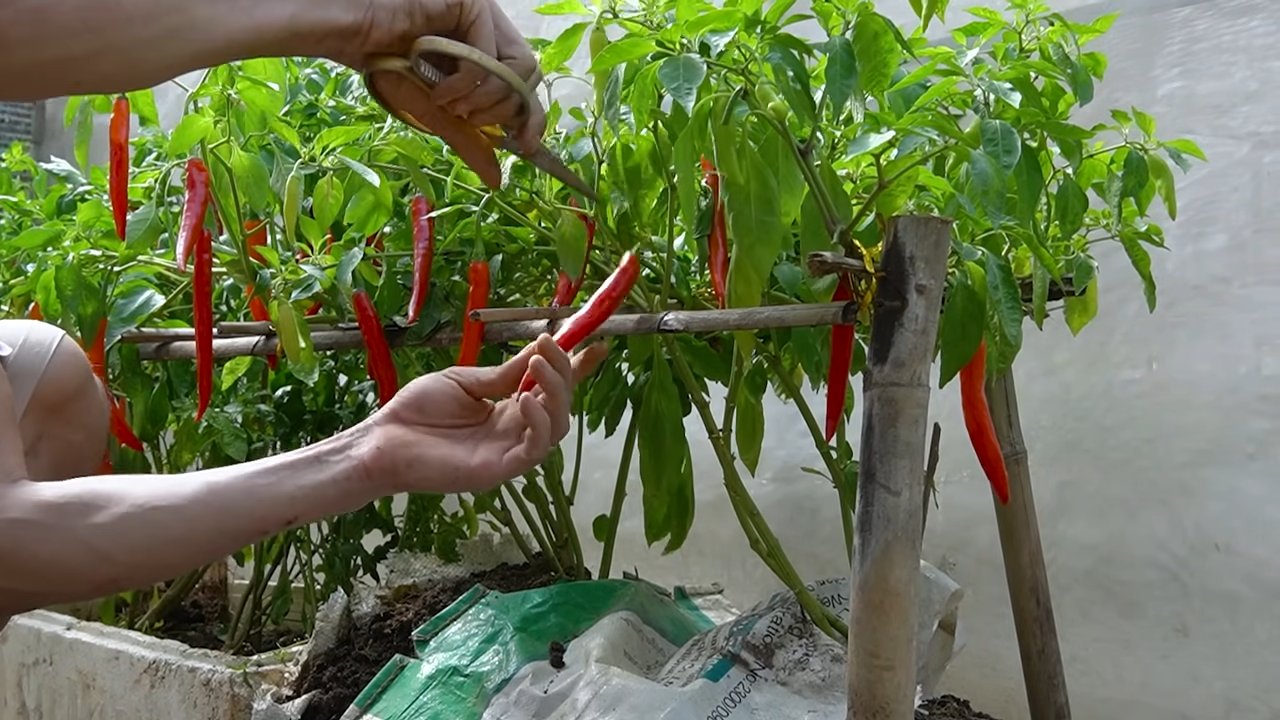
5. Ernte: Die Erntezeit hängt von der Chili-Sorte ab. In der Regel sind die Chilis reif, wenn sie ihre endgültige Farbe erreicht haben und sich leicht vom Stiel lösen lassen.
Zusätzliche Tipps für eine erfolgreiche Chili-Ernte im Pflanzsack
* Wärme: Chili-Pflanzen lieben Wärme. Wenn du in einer kühleren Region wohnst, kannst du die Pflanzsäcke auf eine dunkle Fläche stellen, die sich tagsüber aufheizt.
* Luftfeuchtigkeit: Chili-Pflanzen bevorzugen eine hohe Luftfeuchtigkeit. Du kannst die Blätter regelmäßig mit Wasser besprühen, um die Luftfeuchtigkeit zu erhöhen.
* Umpflanzen: Wenn deine Chili-Pflanzen zu groß für ihre Pflanzsäcke werden, kannst du sie in größere Säcke umpflanzen.
* Überwinterung: Chili-Pflanzen sind mehrjährig, aber nicht winterhart. Wenn du sie überwintern möchtest, musst du sie vor dem ersten Frost ins Haus holen und an einen hellen, kühlen Ort stellen.
Häufige Fehler vermeiden: So klappt es garantiert
Auch wenn das Anbauen von Chilis im Pflanzsack relativ einfach ist, gibt es ein paar Fehler, die du vermeiden solltest:
* Zu wenig Sonne: Chili-Pflanzen brauchen viel Sonne, um gut zu wachsen und Früchte zu tragen.
* Überwässerung: Staunässe kann zu Wurzelfäule führen. Achte darauf, dass das Wasser gut abfließen kann.
* Falsche Erde: Verwende keine normale Gartenerde, da diese oft zu schwer und verdichtet ist.
* Zu wenig Dünger: Chili-Pflanzen sind Starkzehrer und brauchen regelmäßige Düngung.
* Schädlinge ignorieren: Kontrolliere deine Pflanzen regelmäßig auf Schädlinge und bekämpfe sie frühzeitig.
Sortenempfehlungen: Welche Chilis eignen sich für den Pflanzsack?
Grundsätzlich kannst du fast jede Chili-Sorte im Pflanzsack anbauen. Hier sind ein paar Empfehlungen für Anfänger:
* Jalapeño: Eine milde bis mittelscharfe Chili, die sich gut für Anfänger eignet.
* Serrano: Eine etwas schärfere Chili, die sich gut für Salsas und andere mexikanische Gerichte eignet.
* Cayenne: Eine scharfe Chili, die sich gut zum Trocknen und Würzen eignet.
* Habanero: Eine sehr scharfe Chili, die nur für erfahrene Chili-Liebhaber geeignet ist.
* Pimientos de Padrón: Eine milde Chili aus Spanien, von der einige Schoten scharf sein können.
Fazit: Dein Weg zur eigenen Chili-Ernte
Mit diesem Guide bist du bestens gerüstet, um deine eigenen Chili-Pflanzen im Pflanzsack anzubauen. Es ist ein tolles Projekt, das nicht nur Spaß macht, sondern dir auch eine reiche Ernte an scharfen Schoten beschert. Also, worauf wartest du noch? Leg los und werde zum Chili-Gärtner! Ich wünsche dir viel Erfolg und eine scharfe Ernte!
Conclusion
So, there you have it! Creating your own chili pepper soil bag growing system is not just a cost-effective alternative to buying pre-made mixes; it’s a gateway to understanding and nurturing your plants from the ground up. By taking control of the ingredients, you can tailor the soil to the specific needs of your chili peppers, ensuring they receive the perfect balance of nutrients, drainage, and aeration for robust growth and fiery fruit production.
This DIY approach empowers you to become a more knowledgeable and engaged gardener. You’ll learn firsthand how different soil components affect your plants, allowing you to troubleshoot issues more effectively and adapt your methods as needed. Plus, there’s a unique satisfaction that comes from knowing you’ve created the ideal environment for your chili peppers to thrive.
But the benefits don’t stop there. Think about the environmental impact. By repurposing materials and reducing your reliance on commercially produced soil mixes, you’re contributing to a more sustainable gardening practice. You’re minimizing plastic waste and reducing the carbon footprint associated with transportation and manufacturing.
Ready to take your chili pepper growing to the next level? Don’t be intimidated by the idea of mixing your own soil. It’s a simple process that yields incredible results. Start with the basic recipe outlined earlier, and then experiment with variations to find what works best for your specific climate and chili pepper varieties.
Consider adding a handful of bone meal for an extra boost of phosphorus, which promotes strong root development and abundant flowering. Or, if you’re growing in a particularly hot and dry climate, incorporate some water-retaining polymers to help keep the soil moist. For those who prefer an organic approach, consider using compost tea as a regular soil drench to provide a steady stream of nutrients.
And remember, the key to successful chili pepper soil bag growing is observation. Pay close attention to your plants, monitor their growth, and adjust your watering and feeding schedule as needed. Don’t be afraid to experiment and learn from your mistakes. That’s all part of the fun!
We encourage you to give this DIY chili pepper soil bag growing method a try. It’s a rewarding experience that will not only save you money but also deepen your connection to the natural world. Once you’ve created your own perfect chili pepper soil mix, we’d love to hear about your results! Share your experiences, tips, and photos in the comments below. Let’s build a community of passionate chili pepper growers who are committed to creating the best possible growing environment for their plants. Happy growing!
Frequently Asked Questions (FAQ)
What are the benefits of making my own chili pepper soil bag compared to buying pre-made mixes?
Making your own chili pepper soil bag offers several advantages. Firstly, it’s often more cost-effective, especially if you’re growing a large number of plants. Secondly, you have complete control over the ingredients, allowing you to tailor the soil to the specific needs of your chili pepper varieties. Pre-made mixes may not always contain the ideal balance of nutrients, drainage, and aeration for optimal chili pepper growth. Thirdly, it’s a more sustainable option, as you can repurpose materials and reduce your reliance on commercially produced products. Finally, it’s a great way to learn more about soil science and plant nutrition, empowering you to become a more knowledgeable and engaged gardener.
What are the essential ingredients for a good chili pepper soil bag?
The essential ingredients typically include a base of good quality potting soil, a source of drainage such as perlite or vermiculite, and an organic amendment like compost or well-rotted manure. The potting soil provides a foundation for the plants to grow, while the perlite or vermiculite improves drainage and aeration, preventing the soil from becoming waterlogged. The compost or manure adds essential nutrients and beneficial microbes to the soil, promoting healthy root development and overall plant growth. Some recipes also include ingredients like coco coir for water retention and bone meal for phosphorus.
How do I adjust the soil mix for different chili pepper varieties?
While a general-purpose chili pepper soil mix will work for most varieties, you can fine-tune it to meet the specific needs of certain types. For example, hotter varieties like habaneros and scotch bonnets often benefit from a slightly richer soil with more organic matter. You can achieve this by adding a higher proportion of compost or manure to the mix. Conversely, milder varieties may prefer a slightly leaner soil with less organic matter. It’s also important to consider the drainage needs of different varieties. Some chili peppers are more susceptible to root rot than others, so ensuring good drainage is crucial.
How often should I water my chili pepper soil bag?
The watering frequency will depend on several factors, including the climate, the size of the bag, and the stage of growth of your chili peppers. As a general rule, you should water when the top inch of soil feels dry to the touch. Avoid overwatering, as this can lead to root rot. During hot and dry weather, you may need to water more frequently. Conversely, during cool and cloudy weather, you may need to water less frequently. It’s always best to err on the side of underwatering rather than overwatering.
What kind of fertilizer should I use for my chili pepper soil bag?
Chili peppers are heavy feeders, so they benefit from regular fertilization. You can use a balanced fertilizer with an NPK ratio of around 10-10-10 or 14-14-14. Alternatively, you can use a fertilizer specifically formulated for tomatoes or peppers, as these typically contain the nutrients that chili peppers need. Apply the fertilizer according to the instructions on the label. You can also supplement with organic fertilizers like compost tea or fish emulsion.
Can I reuse the soil from my chili pepper soil bag?
Yes, you can reuse the soil from your chili pepper soil bag, but it’s important to amend it before replanting. Over time, the soil will become depleted of nutrients and may also harbor pests or diseases. To rejuvenate the soil, remove any plant debris and mix in fresh compost or manure. You can also add some slow-release fertilizer to replenish the nutrients. If you suspect that the soil is contaminated with pests or diseases, you can sterilize it by baking it in the oven or steaming it.
What are some common problems that can occur with chili pepper soil bag growing, and how can I fix them?
Some common problems include nutrient deficiencies, pest infestations, and diseases. Nutrient deficiencies can be identified by yellowing leaves, stunted growth, or poor fruit production. To fix this, fertilize with a balanced fertilizer or amend the soil with compost or manure. Pest infestations can be controlled with insecticidal soap, neem oil, or other organic pesticides. Diseases can be prevented by ensuring good air circulation, avoiding overwatering, and using disease-resistant varieties. If you encounter a disease, remove the affected plants and treat the remaining plants with a fungicide.
How do I know if my chili peppers are ready to harvest?
The best way to determine if your chili peppers are ready to harvest is to check their color and firmness. Most chili peppers will change color as they ripen, from green to red, yellow, orange, or brown, depending on the variety. The peppers should also feel firm to the touch. You can also taste a small piece of the pepper to check its heat level. If the pepper is the desired color, firmness, and heat level, it’s ready to harvest. Use pruning shears or scissors to cut the peppers from the plant, leaving a small stem attached.
Leave a Comment