
Cleaning Hacks for a Spotless Home: Who doesn’t dream of a sparkling clean home without spending hours scrubbing and toiling? Let’s be honest, cleaning isn’t exactly anyone’s favorite pastime. But what if I told you there are clever, easy, and even fun ways to achieve that spotless haven you’ve always wanted?
Throughout history, cultures around the world have developed unique and ingenious methods for keeping their homes clean. From ancient Egyptians using natron (a natural salt mixture) to clean surfaces to the Victorian era’s obsession with elaborate cleaning rituals, the pursuit of a clean home is a timeless endeavor.
In today’s busy world, time is precious. We’re all juggling work, family, and social lives, leaving little room for extensive cleaning sessions. That’s where these cleaning hacks come in! I’m going to share some of my favorite DIY tricks and tips that will save you time, money, and energy, allowing you to enjoy a cleaner, healthier, and more relaxing living space. These aren’t just your average cleaning tips; they’re game-changers that will transform the way you approach household chores. Get ready to say goodbye to stubborn stains and hello to a sparkling, spotless home with minimal effort!

DIY Cleaning Hacks for a Spotless Home
Okay, let’s dive into some of my favorite DIY cleaning hacks that will leave your home sparkling without breaking the bank or relying on harsh chemicals. I’ve tried and tested these myself, and trust me, they work wonders!
Cleaning Your Microwave with Lemon Power
This is one of the easiest and most effective ways to clean your microwave. No more scrubbing furiously at dried-on food splatters!
What you’ll need:
* 1 lemon
* 1 cup of water
* Microwave-safe bowl
Step-by-step instructions:
1. Prepare the lemon solution: Cut the lemon in half. Squeeze the juice from both halves into the microwave-safe bowl. Then, drop the lemon halves into the bowl as well.
2. Add water: Pour one cup of water into the bowl with the lemon juice and lemon halves.
3. Microwave the solution: Place the bowl in the microwave and heat it on high for 3-5 minutes. You want the water to boil and create steam inside the microwave.
4. Let it steam: Once the timer goes off, don’t open the microwave door immediately! Let the steam work its magic for another 5-10 minutes. This will loosen all the grime and splatters.
5. Wipe it clean: Carefully remove the bowl (it will be hot!). Use a clean cloth or sponge to wipe down the inside of the microwave. You’ll be amazed at how easily the dirt comes off.
6. Final touch: For any stubborn spots, you can dip your cloth or sponge into the lemon water and scrub gently.
Unclogging Drains Naturally
Forget those harsh chemical drain cleaners! This natural method is safer, cheaper, and just as effective.
What you’ll need:
* 1 cup baking soda
* 2 cups white vinegar
* Boiling water
Step-by-step instructions:
1. Pour in the baking soda: Carefully pour one cup of baking soda down the clogged drain. Try to get as much of it down the drain as possible.
2. Add the vinegar: Immediately follow the baking soda with two cups of white vinegar. You’ll see a fizzing reaction – that’s a good thing!
3. Let it fizz: Let the baking soda and vinegar mixture fizz and work its magic for about 30 minutes. This reaction helps to break down the clog.
4. Flush with boiling water: After 30 minutes, carefully pour a pot of boiling water down the drain. The hot water will help to flush away the loosened debris.
5. Repeat if necessary: If the drain is still clogged, repeat the process. Sometimes, a particularly stubborn clog requires a second treatment.
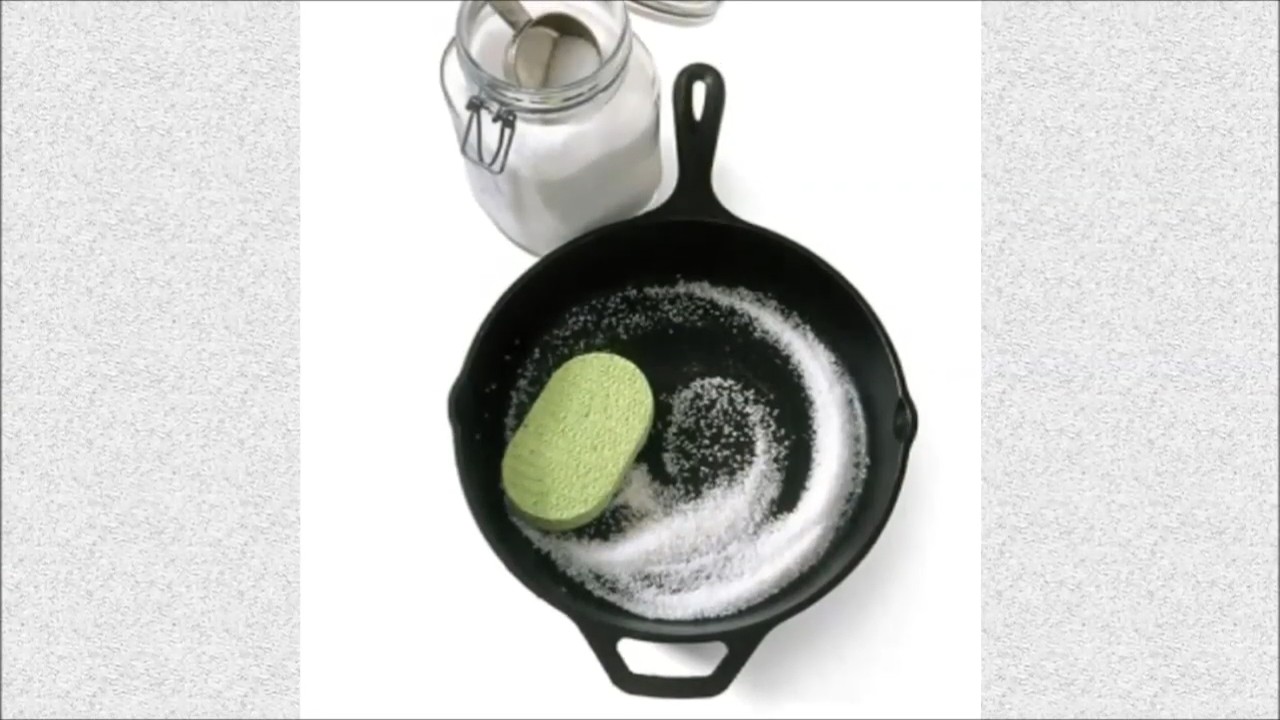
Cleaning Your Grout Like a Pro
Dirty grout can make your entire bathroom or kitchen look dingy. Here’s how to get it sparkling clean again.
What you’ll need:
* Baking soda
* White vinegar
* Old toothbrush or grout brush
* Spray bottle
* Water
Step-by-step instructions:
1. Make a baking soda paste: In a small bowl, mix baking soda with a little water to form a thick paste.
2. Apply the paste: Use your fingers or a small spatula to apply the baking soda paste to the grout lines. Make sure to cover all the dirty areas.
3. Spray with vinegar: Fill a spray bottle with white vinegar and spray it directly onto the baking soda paste. The vinegar will react with the baking soda, creating a fizzing action.
4. Scrub the grout: Use an old toothbrush or a grout brush to scrub the grout lines thoroughly. The fizzing action will help to loosen the dirt and grime.
5. Rinse with water: After scrubbing, rinse the grout lines with clean water. You can use a sponge or a damp cloth to wipe away any remaining baking soda residue.
6. Dry the grout: Use a clean towel to dry the grout lines. This will help to prevent mildew from forming.
Making Your Own All-Purpose Cleaner
Why buy expensive all-purpose cleaners when you can easily make your own with just a few simple ingredients? This recipe is safe, effective, and smells great!
What you’ll need:
* 1/2 cup white vinegar
* 1/4 cup baking soda
* 1 teaspoon dish soap (optional, for extra cleaning power)
* 2 cups water
* Essential oils (optional, for fragrance)
* Spray bottle
Step-by-step instructions:
1. Combine ingredients: In a large bowl or pitcher, combine the white vinegar, baking soda, and dish soap (if using). Be careful, as the baking soda and vinegar will react and fizz.
2. Add water: Slowly add the water to the mixture, stirring gently to combine.
3. Add essential oils (optional): If you want to add a fragrance to your cleaner, add a few drops of your favorite essential oils. Lemon, lavender, and tea tree oil are all great choices.
4. Pour into a spray bottle: Carefully pour the cleaner into a spray bottle.
5. Use as needed: Spray the cleaner onto surfaces and wipe clean with a cloth or sponge.
Cleaning Your Oven Without Harsh Chemicals
Oven cleaning is often dreaded, but it doesn’t have to be a chore. This natural method uses the power of baking soda and vinegar to loosen baked-on grime.
What you’ll need:
* 1 cup baking soda
* Water
* White vinegar
* Spray bottle
* Sponge or scrub brush
* Rubber gloves
Step-by-step instructions:
1. Remove oven racks: Take out the oven racks and set them aside. You can clean them separately in the sink with soapy water.
2. Make a baking soda paste: In a bowl, mix baking soda with enough water to form a spreadable paste.
3. Coat the oven: Using your hands (with rubber gloves on!), spread the baking soda paste all over the inside of the oven, avoiding the heating elements. Be generous with the paste, especially on areas with baked-on grime.
4. Let it sit overnight: This is the key! Let the baking soda paste sit in the oven overnight (or for at least 12 hours). This will give it time to loosen the grime.
5. Wipe away the paste: The next day, use a damp sponge or scrub brush to wipe away the baking soda paste. You may need to scrub a bit to remove stubborn areas.
6. Spray with vinegar: Fill a spray bottle with white vinegar and spray it all over the inside of the oven. The vinegar will react with any remaining baking soda, creating a fizzing action.
7. Wipe clean again: Use a clean sponge or cloth to wipe away the vinegar and any remaining residue.
8. Replace oven racks: Once the oven is clean and dry, replace the oven racks.
Freshening Your Mattress
Mattresses can harbor dust mites, dead skin cells, and odors. Here’s how to freshen yours up naturally.
What you’ll need:
* Baking soda
* Essential oils (optional, for fragrance)
* Vacuum cleaner with upholstery attachment
* Sifter or strainer
Step-by-step instructions:
1. Strip the bed: Remove all bedding, including sheets, blankets, and pillows. Wash the bedding in hot water to kill any dust mites.
2. Sprinkle with baking soda: In a bowl, mix baking soda with a few drops of your favorite essential oils (optional). Use a sifter or strainer to sprinkle the baking soda mixture evenly over the entire surface of the mattress.
3. Let it sit: Let the baking soda sit on the mattress for at least 30 minutes, or even better, for a few hours. This will allow the baking soda to absorb odors and moisture.
4. Vacuum thoroughly: Use a vacuum cleaner with an upholstery attachment to thoroughly vacuum the entire surface of the mattress. Make sure to get into all the nooks and crannies.
5. Flip the mattress: Flip the mattress over and repeat the process on the other side.
6. Put the bedding back on: Once both sides of the mattress have been cleaned, put the clean bedding back on.
Cleaning Blinds Like a Breeze
Cleaning blinds can be tedious, but this simple hack makes it much easier.
What you’ll need:
* Old sock
* White vinegar
* Water
* Spray bottle
* Bucket
Step-by-step instructions:
1. Prepare the cleaning solution: In a bucket, mix equal parts white vinegar and water.
2.
Conclusion
So, there you have it! These cleaning hacks aren’t just about making your home sparkle; they’re about reclaiming your time, saving money, and creating a healthier, happier living space. We’ve explored some truly game-changing techniques, from the power of vinegar and baking soda to the surprising effectiveness of everyday items you probably already have in your pantry.
But why are these DIY cleaning tricks a must-try? Because they offer a powerful alternative to harsh chemical cleaners that can be detrimental to both your health and the environment. They’re cost-effective, often using ingredients that are significantly cheaper than commercial products. And perhaps most importantly, they empower you to take control of your cleaning routine, tailoring it to your specific needs and preferences.
Think about it: no more battling overpowering fumes, no more worrying about harmful residues, and no more breaking the bank to keep your home clean. These hacks are a win-win-win!
Now, let’s talk about variations. While we’ve covered some core techniques, the beauty of DIY cleaning is its adaptability. For instance, if you’re not a fan of the vinegar smell, try infusing it with citrus peels for a more pleasant aroma. Lemon, orange, or grapefruit peels work wonders! You can also experiment with different essential oils to add a touch of aromatherapy to your cleaning routine. Lavender, tea tree, and eucalyptus are all excellent choices for their antibacterial and antiviral properties.
Another variation to consider is the concentration of your cleaning solutions. Start with the recommended ratios, but feel free to adjust them based on the severity of the cleaning task. For stubborn stains, you might need a stronger concentration of vinegar or baking soda paste. Remember to always test your cleaning solutions on a small, inconspicuous area first to ensure they don’t damage the surface.
Furthermore, don’t limit yourself to the specific applications we’ve discussed. These cleaning hacks can be adapted to a wide range of cleaning tasks around your home. Use the baking soda paste to clean your oven, the vinegar solution to disinfect your cutting boards, or the lemon juice to brighten your laundry. The possibilities are endless!
We truly believe that incorporating these **cleaning hacks** into your routine will transform the way you approach cleaning. It’s not just about getting the job done; it’s about creating a healthier, more sustainable, and more enjoyable cleaning experience.
So, what are you waiting for? Give these DIY cleaning tricks a try and see the difference for yourself. We’re confident that you’ll be amazed by the results. And most importantly, we want to hear about your experience! Share your tips, tricks, and variations in the comments below. Let’s create a community of DIY cleaning enthusiasts and help each other achieve a spotless home, naturally! We encourage you to share your before and after photos on social media using #DIYCleaningHacks and tag us so we can see your amazing results. Let’s revolutionize the way we clean, one DIY hack at a time!
Frequently Asked Questions (FAQs)
Q: Are these DIY cleaning hacks safe for all surfaces?
A: While most of these cleaning hacks are generally safe for a wide range of surfaces, it’s always crucial to test them on a small, inconspicuous area first. This is especially important for delicate surfaces like marble, granite, or wood. Vinegar, for example, can etch marble if left on for too long. Similarly, abrasive cleaners like baking soda can scratch certain surfaces. Always err on the side of caution and test before applying to a larger area. If you’re unsure about a particular surface, consult the manufacturer’s instructions or a professional cleaner.
Q: Can I mix different DIY cleaning ingredients together?
A: It’s generally not recommended to mix different DIY cleaning ingredients together, especially without proper knowledge of their chemical reactions. Some combinations can be dangerous and produce harmful fumes. For example, never mix vinegar and bleach, as this creates chlorine gas, which is highly toxic. Similarly, avoid mixing hydrogen peroxide and vinegar, as this can create peracetic acid, which can irritate the skin, eyes, and respiratory system. When in doubt, use each ingredient separately and rinse thoroughly between applications.
Q: How do I get rid of stubborn stains with DIY cleaning hacks?
A: Stubborn stains often require a bit more patience and persistence. For tough stains, try creating a paste of baking soda and water and applying it directly to the stain. Let it sit for several hours or even overnight before scrubbing gently with a soft cloth or brush. For grease stains, try using a mixture of dish soap and hot water. For mildew stains, try using a solution of vinegar and water. You can also try using a steam cleaner to loosen stubborn stains before cleaning them with your DIY solutions. Remember to always test your cleaning solutions on a small, inconspicuous area first.
Q: How often should I use these DIY cleaning hacks?
A: The frequency of using these cleaning hacks depends on your individual needs and preferences. For general cleaning, you can incorporate them into your routine as often as you like. For specific tasks, such as cleaning your oven or removing stubborn stains, you may only need to use them occasionally. Listen to your home and adjust your cleaning routine accordingly. Regular cleaning with these DIY hacks can help prevent the buildup of dirt and grime, making your home easier to maintain in the long run.
Q: Are these DIY cleaning hacks environmentally friendly?
A: Yes, one of the biggest advantages of these DIY cleaning hacks is that they are generally much more environmentally friendly than commercial cleaning products. They typically use natural, biodegradable ingredients that are less harmful to the environment. By reducing your reliance on harsh chemicals, you can minimize your impact on the planet and create a healthier living space for yourself and your family. However, it’s still important to dispose of your cleaning solutions responsibly. Avoid pouring large amounts of vinegar or baking soda down the drain, as this can disrupt the balance of your septic system.
Q: What are some essential oils that are good for cleaning?
A: Several essential oils possess antibacterial, antiviral, and antifungal properties that make them excellent additions to your DIY cleaning solutions. Some popular choices include:
* **Tea Tree Oil:** Known for its powerful antiseptic and antifungal properties.
* **Lavender Oil:** Offers a calming scent and has antibacterial properties.
* **Lemon Oil:** A natural degreaser and disinfectant with a refreshing citrus scent.
* **Eucalyptus Oil:** Has antibacterial and antiviral properties and a refreshing scent.
* **Peppermint Oil:** A natural insect repellent and has a refreshing scent.
When using essential oils, always dilute them properly with water or a carrier oil, such as olive oil or coconut oil. A few drops are usually sufficient for most cleaning solutions.
Q: Can I use these cleaning hacks to clean my appliances?
A: Yes, many of these cleaning hacks are safe and effective for cleaning appliances. For example, you can use a baking soda paste to clean your oven, a vinegar solution to clean your dishwasher, and lemon juice to clean your microwave. Always unplug the appliance before cleaning it and avoid getting water inside the electrical components. Refer to your appliance’s manual for specific cleaning instructions.
Q: How do I store my DIY cleaning solutions?
A: Store your DIY cleaning solutions in clean, airtight containers. Label each container clearly with the name of the solution and the date it was made. Store them in a cool, dark place away from direct sunlight and heat. Keep them out of reach of children and pets. Some solutions, such as those containing essential oils, may need to be stored in glass containers to prevent the oils from degrading the plastic.
Q: What if I have allergies or sensitivities to certain ingredients?
A: If you have allergies or sensitivities to certain ingredients, such as vinegar or essential oils, it’s important to avoid using them in your DIY cleaning solutions. Look for alternative ingredients that are safe for you to use. For example, if you’re allergic to vinegar, you can try using lemon juice or citric acid instead. Always read the labels of all ingredients carefully and consult with your doctor or allergist if you have any concerns.
Q: Where can I find the ingredients for these DIY cleaning hacks?
A: Most of the ingredients for these DIY cleaning hacks can be found at your local grocery store or supermarket. Common ingredients include vinegar, baking soda, lemon juice, dish soap, and essential oils. You can also find these ingredients online at various retailers. Look for high-quality ingredients that are free of additives and preservatives.

Leave a Comment