
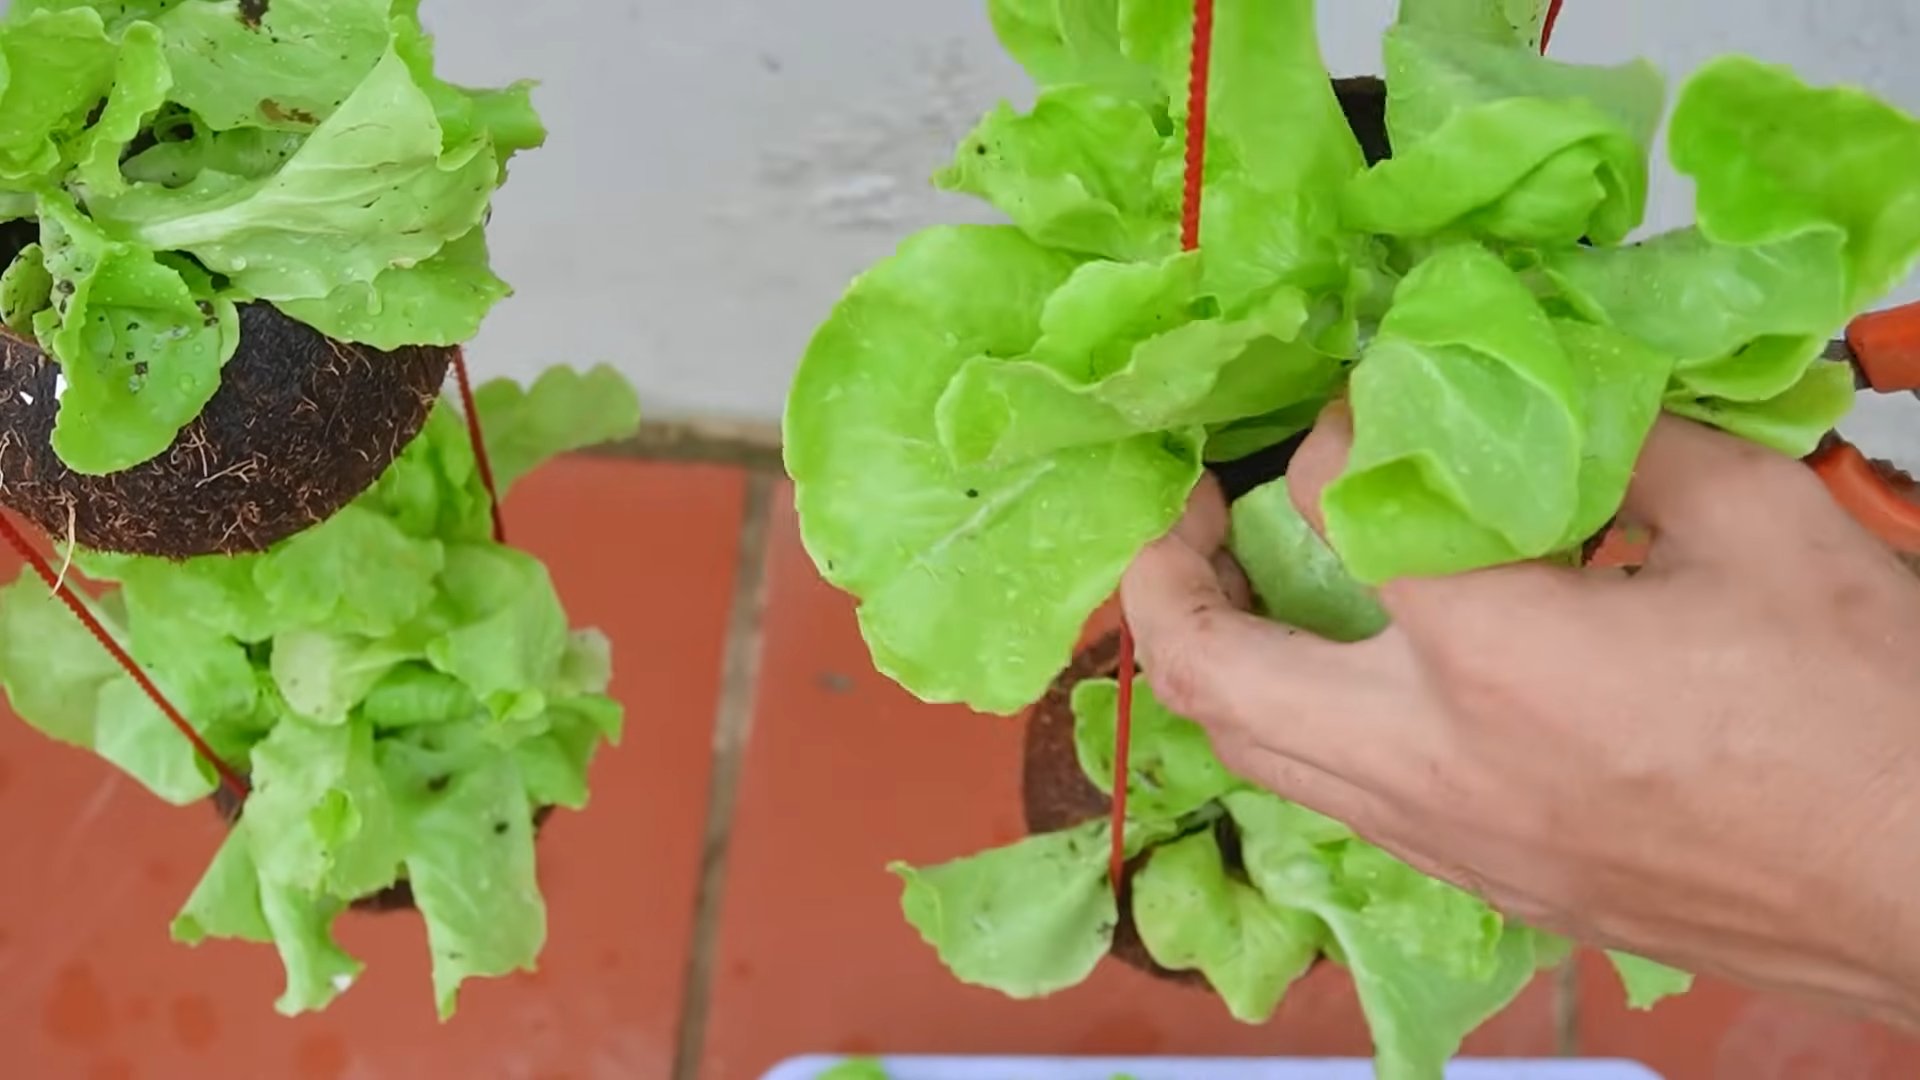
Coconut shell lettuce: sounds intriguing, right? Forget those boring plastic pots! I’m about to show you how to transform humble coconut shells into adorable and eco-friendly homes for your leafy greens. This isn’t just about gardening; it’s about adding a touch of tropical charm and sustainable living to your space.
For centuries, coconuts have been revered in many cultures, not just for their delicious water and flesh, but also for their versatile shells. From crafting utensils to building materials, these shells have been a staple of resourcefulness. Now, we’re bringing that tradition into the modern garden, giving these discarded treasures a new lease on life.
Why should you try this DIY trick? Well, for starters, it’s incredibly budget-friendly! Instead of buying expensive planters, you’re repurposing something that would otherwise end up in the trash. Plus, coconut shell lettuce planters are naturally biodegradable, adding nutrients back to the soil as they decompose. But the best part? They look absolutely fantastic! Imagine a cluster of these rustic planters adorning your balcony or windowsill, bursting with vibrant green lettuce. It’s a conversation starter, a sustainable choice, and a beautiful addition to any home. I’m excited to guide you through the simple steps to create your own coconut shell lettuce garden!
DIY Coconut Shell Lettuce Planter: A Tropical Touch for Your Garden
Hey there, fellow plant lovers! Are you looking for a unique and eco-friendly way to display your lettuce? I’ve got just the project for you: a DIY coconut shell lettuce planter! This project is not only fun and creative, but it also repurposes a natural material, giving your garden a tropical vibe. Plus, it’s surprisingly easy to make. Let’s dive in!
Materials You’ll Need:
* Coconut Shell: Obviously! You’ll need a mature coconut. You can either buy one from the store or, if you’re lucky enough to live in a coconut-growing region, harvest one yourself.
* Lettuce Seedlings or Seeds: Choose your favorite lettuce varieties! I personally love a mix of romaine, butterhead, and red leaf lettuce for a colorful display.
* Potting Soil: A good quality potting mix is essential for healthy lettuce growth.
* Drill with Drill Bits: You’ll need this to create drainage holes and potentially hanging holes.
* Sandpaper (Optional): For smoothing the edges of the coconut shell.
* Waterproof Sealer (Optional): To prolong the life of your planter.
* Rope or Twine (Optional): If you want to hang your planter.
* Gloves: To protect your hands.
* Hammer and Screwdriver or Chisel (Optional): To help open the coconut.
* Measuring Tape or Ruler: For accurate drilling.
Tools Summary:
* Drill with various drill bits
* Sandpaper
* Waterproof Sealer
* Rope or Twine
* Gloves
* Hammer and Screwdriver or Chisel
* Measuring Tape or Ruler
Section 1: Preparing the Coconut Shell
This is arguably the most challenging part, but don’t worry, I’ll guide you through it.
Step 1: Opening the Coconut
There are a few ways to open a coconut. Here’s my preferred method:
1. Drain the Coconut Water: First, locate the three “eyes” on one end of the coconut. These are softer spots. Use a screwdriver and hammer (or a drill with a small drill bit) to puncture two of the eyes.
2. Pour out the Coconut Water: Invert the coconut over a glass or bowl to drain the water. You can drink it or use it in smoothies!
3. Crack the Coconut: Now, the fun part! Place the coconut on a hard surface. Using a hammer and screwdriver (or chisel), carefully tap along the “equator” of the coconut (the widest part). Rotate the coconut as you tap, gradually creating a crack all the way around.
4. Separate the Halves: Once the crack is complete, you should be able to pry the coconut open into two halves. You might need to use a bit more force with the screwdriver or chisel.
Step 2: Removing the Coconut Meat
This can be a bit tricky, but patience is key.
1. Loosen the Meat: Use a sturdy spoon or a butter knife to carefully pry the coconut meat away from the shell. Work your way around the edge, gradually loosening the meat.
2. Remove the Meat: Once the meat is loosened, you should be able to remove it in larger pieces. If it’s stubborn, you can try gently tapping the outside of the shell with a hammer while prying.
3. Enjoy the Coconut Meat: Don’t throw it away! You can eat it fresh, use it in cooking, or even dry it to make coconut flakes.
Step 3: Cleaning and Sanding the Shell
This step is important for aesthetics and safety.
1. Clean the Shell: Wash the coconut shell thoroughly with soap and water to remove any remaining coconut meat or fibers.
2. Dry the Shell: Allow the shell to dry completely. This may take a day or two.
3. Sand the Edges (Optional): If you want a smoother finish, use sandpaper to smooth the edges of the coconut shell. This will also prevent any sharp edges from cutting you. Start with a coarser grit sandpaper and then move to a finer grit for a smoother finish.
Section 2: Preparing the Planter
Now that we have our clean and prepped coconut shell, let’s get it ready for planting!
Step 4: Drilling Drainage Holes
Drainage is crucial for healthy lettuce growth.
1. Mark the Holes: Use a marker to mark several spots on the bottom of the coconut shell where you want to drill drainage holes. I recommend at least three to four holes.
2. Drill the Holes: Using a drill with a drill bit appropriate for the thickness of the coconut shell (start with a smaller bit and increase the size if needed), carefully drill holes at the marked spots. Be careful not to apply too much pressure, as the shell can crack.
Step 5: Adding Hanging Holes (Optional)
If you want to hang your planter, follow these steps.
1. Determine Hanging Points: Decide where you want to hang your planter from. I recommend drilling three holes evenly spaced around the top edge of the coconut shell.
2. Mark the Holes: Use a marker to mark the spots where you want to drill the hanging holes.
3. Drill the Holes: Using a drill with a drill bit large enough to accommodate your rope or twine, carefully drill holes at the marked spots. Again, be careful not to crack the shell.
Step 6: Applying Waterproof Sealer (Optional)
This will help protect the coconut shell from moisture and prolong its life.
1. Apply the Sealer: Follow the manufacturer’s instructions to apply the waterproof sealer to the inside and outside of the coconut shell.
2. Let it Dry: Allow the sealer to dry completely before proceeding to the next step.
Section 3: Planting Your Lettuce
Finally, the fun part – planting your lettuce!
Step 7: Filling the Planter with Soil
1. Add Potting Soil: Fill the coconut shell with potting soil, leaving about an inch of space at the top.
Step 8: Planting the Lettuce Seedlings or Seeds
1. Plant Seedlings (If Using): Gently remove the lettuce seedlings from their containers and plant them in the potting soil, spacing them evenly around the coconut shell. Make sure the top of the root ball is level with the soil surface.
2. Plant Seeds (If Using): Sprinkle lettuce seeds evenly over the surface of the potting soil. Cover them with a thin layer of soil.
Step 9: Watering Your Lettuce
1. Water Thoroughly: Water the lettuce thoroughly after planting, making sure the soil is evenly moist.
2. Water Regularly: Keep the soil consistently moist, but not soggy. Water when the top inch of soil feels dry to the touch.
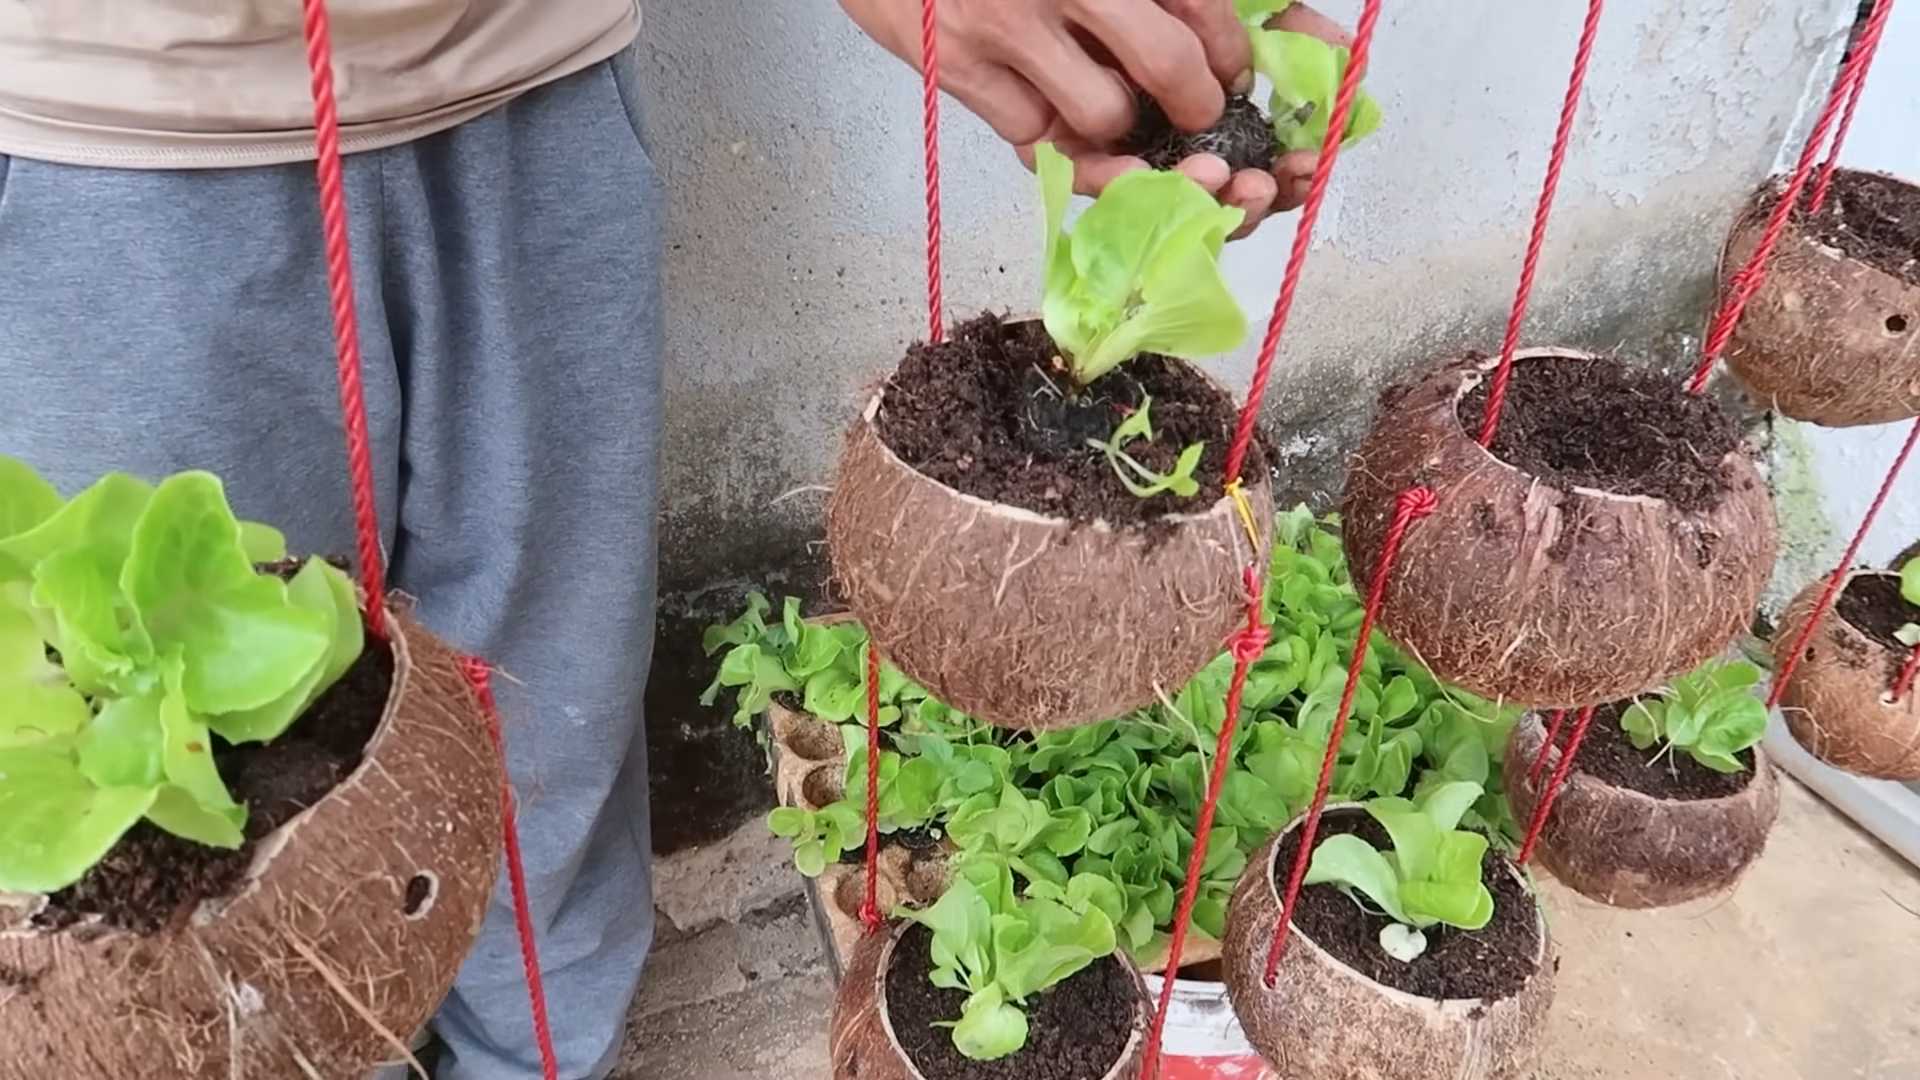
Step 10: Hanging Your Planter (If Applicable)
1. Thread the Rope or Twine: Thread the rope or twine through the hanging holes you drilled earlier.
2. Secure the Rope: Tie the rope or twine securely, making sure the planter is balanced.
3. Hang Your Planter: Hang your planter in a sunny location where it will receive at least six hours of sunlight per day.
Caring for Your Coconut Shell Lettuce Planter
* Sunlight: Lettuce needs at least six hours of sunlight per day.
* Watering: Keep the soil consistently moist, but not soggy.
* Fertilizing: Fertilize your lettuce every two weeks with a balanced liquid fertilizer.
* Pest Control: Check your lettuce regularly for pests, such as aphids or slugs. Treat any infestations promptly.
* Harvesting: Harvest your lettuce when the leaves are large enough to eat. You can harvest individual leaves or cut the entire head of lettuce.
Tips and Tricks for Success
* Choose the Right Coconut: Look for a mature coconut that is heavy and has plenty of coconut water inside.
* Be Careful When Opening the Coconut: Take your time and be careful when opening the coconut to avoid injury.
* Use Good Quality Potting Soil: This will ensure that your lettuce has the nutrients it needs to grow.
* Don’t Overwater: Overwatering can lead to root rot.
* Protect from Frost: Lettuce is sensitive to frost, so protect your planter if temperatures are expected to drop below freezing.
* Get Creative with Decoration: You can paint the coconut shell, add decorative stones, or even glue on seashells to personalize your planter.
And there you have it! Your very own DIY coconut shell lettuce planter. I hope you enjoyed this project as much as I did. Happy gardening!
Conclusion
So, there you have it! Transforming a humble coconut shell into a thriving lettuce planter is not just a fun project; it’s a sustainable, cost-effective, and surprisingly stylish way to grow your own fresh greens. We’ve walked you through the process, highlighting the simplicity and adaptability of this DIY trick.
Why is this a must-try? Because it’s more than just gardening; it’s about embracing resourcefulness and connecting with nature in a tangible way. Imagine the satisfaction of harvesting crisp, vibrant lettuce leaves from a planter you created yourself, knowing you’ve repurposed something that would otherwise have been discarded. It’s a small act with a big impact, both on your plate and on the planet.
Beyond the environmental benefits, this project offers a unique aesthetic appeal. The rustic charm of the coconut shell adds a touch of tropical flair to any space, whether it’s a sunny windowsill, a balcony garden, or even a kitchen countertop. It’s a conversation starter, a testament to your creativity, and a beautiful reminder of the simple joys of growing your own food.
But don’t stop there! The beauty of this DIY project lies in its versatility. Feel free to experiment with different types of lettuce, from the classic romaine to the peppery arugula or the delicate butter lettuce. You can also add companion plants like herbs (basil, chives, or parsley) to create a miniature edible garden. Consider painting or decorating the coconut shell to match your personal style or the décor of your home. You could even drill small drainage holes in the bottom and use it as a hanging planter for a truly unique display.
For those who want to take it a step further, consider creating a tiered system using multiple coconut shell planters of varying sizes. This not only maximizes space but also adds visual interest to your garden. You can also explore different potting mixes to find the one that works best for your specific type of lettuce and growing conditions. Remember to research the specific needs of your chosen lettuce variety to ensure optimal growth and yield.
The possibilities are endless! This coconut shell lettuce planter is a blank canvas for your creativity and a gateway to a more sustainable and fulfilling lifestyle.
We wholeheartedly encourage you to try this DIY trick and experience the joy of growing your own lettuce in a repurposed coconut shell. It’s a rewarding project that’s both fun and educational, and it’s a great way to introduce children to the wonders of gardening and the importance of environmental stewardship.
Once you’ve created your own coconut shell lettuce planter, we’d love to hear about your experience! Share your photos and stories with us on social media using [Your Hashtag Here]. Let’s inspire others to embrace sustainable gardening and discover the magic of growing their own food. We are confident that you will find that growing lettuce in a coconut shell is a rewarding and sustainable experience.
Frequently Asked Questions (FAQ)
1. What kind of coconut shell is best for this project?
Ideally, you want a mature coconut shell that is relatively intact and free from cracks or significant damage. The size of the shell will determine the amount of lettuce you can grow, so choose one that suits your needs. You can use a fresh coconut shell after enjoying the coconut water and meat, or you can purchase pre-cleaned coconut shells from craft stores or online retailers. Make sure the shell is thoroughly cleaned before use to remove any residual coconut meat or fibers.
2. Do I need to treat the coconut shell before planting?
While not strictly necessary, treating the coconut shell can help prolong its lifespan and prevent it from rotting prematurely. You can apply a sealant or varnish to the exterior of the shell to protect it from moisture. However, be sure to use a non-toxic sealant that is safe for food crops. Alternatively, you can simply line the inside of the shell with a layer of plastic or burlap to create a barrier between the soil and the shell. This will help prevent the shell from absorbing excess moisture and deteriorating over time.
3. What type of soil should I use for growing lettuce in a coconut shell?
Lettuce thrives in well-draining, nutrient-rich soil. A good option is a potting mix specifically formulated for vegetables or herbs. You can also create your own potting mix by combining equal parts of compost, peat moss (or coconut coir), and perlite or vermiculite. Compost provides essential nutrients, peat moss (or coconut coir) helps retain moisture, and perlite or vermiculite improves drainage. Avoid using garden soil, as it can be too heavy and compacted for container gardening.
4. How often should I water my coconut shell lettuce planter?
Lettuce needs consistent moisture to thrive, but it’s also important to avoid overwatering, which can lead to root rot. Water your lettuce planter whenever the top inch of soil feels dry to the touch. Water thoroughly until excess water drains out of the bottom of the shell (if you’ve added drainage holes). The frequency of watering will depend on factors such as the weather, the size of the shell, and the type of soil you’re using. In hot, dry weather, you may need to water daily, while in cooler, wetter weather, you may only need to water every few days.
5. How much sunlight does lettuce need?
Lettuce prefers partial shade, especially during the hottest part of the day. Aim for at least 4-6 hours of sunlight per day. If you’re growing your lettuce indoors, place it near a sunny window or under grow lights. If you’re growing it outdoors, choose a location that receives morning sun and afternoon shade. Too much direct sunlight can cause the lettuce leaves to wilt and burn.
6. How do I harvest lettuce from my coconut shell planter?
You can harvest lettuce leaves as soon as they are large enough to eat. Simply snip off the outer leaves with scissors or a knife, leaving the inner leaves to continue growing. This method, known as “cut-and-come-again,” allows you to harvest lettuce multiple times from the same plant. Avoid harvesting more than one-third of the leaves at a time, as this can stress the plant.
7. Can I grow other plants besides lettuce in a coconut shell?
Yes, you can grow a variety of other plants in a coconut shell, as long as they have similar growing requirements to lettuce. Some good options include herbs like basil, chives, parsley, and mint; leafy greens like spinach and kale; and small vegetables like radishes and strawberries. Be sure to choose plants that are appropriate for the size of the shell and the amount of sunlight available.
8. How long will my coconut shell lettuce planter last?
The lifespan of your coconut shell lettuce planter will depend on factors such as the quality of the shell, the climate, and how well you care for it. With proper care, a well-maintained coconut shell planter can last for several months or even a year. However, eventually, the shell will begin to decompose. When this happens, you can simply compost the shell and start a new planter.
9. Is growing lettuce in a coconut shell organic?
Yes, growing lettuce in a coconut shell can be organic, as long as you use organic potting mix, organic fertilizer, and avoid using pesticides or herbicides. Organic gardening practices promote healthy soil and plants, and they are better for the environment.
10. What are some common problems I might encounter when growing lettuce in a coconut shell?
Some common problems you might encounter include pests like aphids and slugs, diseases like powdery mildew and downy mildew, and nutrient deficiencies. To prevent these problems, choose disease-resistant lettuce varieties, provide good air circulation, avoid overwatering, and fertilize regularly with an organic fertilizer. If you do encounter pests or diseases, treat them promptly with organic pest control methods or fungicides.
Leave a Comment