
Cucumber Crop Failure can be a disheartening experience for any gardener, especially after investing time and effort into nurturing your plants. Imagine the anticipation of crisp, refreshing cucumbers, only to be met with yellowing vines, stunted growth, or, even worse, no cucumbers at all! It’s a common problem, and trust me, I’ve been there. But don’t despair! This DIY guide is packed with simple yet effective tricks to diagnose and combat the causes of cucumber crop failure, helping you salvage your harvest and ensure a bountiful cucumber season.
Cucumbers have a rich history, dating back over 3,000 years to their origins in India. They’ve been cultivated and enjoyed across cultures for centuries, prized for their refreshing taste and versatility. From ancient remedies to culinary delights, cucumbers have played a significant role in human history. But even with centuries of cultivation, achieving a successful cucumber crop can still present challenges.
Why do you need these DIY tricks? Because understanding the common pitfalls that lead to cucumber crop failure empowers you to take control of your garden’s health. Whether it’s identifying nutrient deficiencies, combating pests and diseases, or optimizing your watering and pollination strategies, this guide provides practical solutions that anyone can implement. Let’s turn those gardening woes into wins and get you back on track to enjoying a delicious cucumber harvest!
Gurken-Rettungsaktion: So beheben Sie Ernteausfälle und sichern Ihre Gurkenernte
Hallo liebe Gartenfreunde! Es gibt kaum etwas Frustrierenderes, als sich auf eine reiche Gurkenernte zu freuen und dann festzustellen, dass die Pflanzen kümmern, die Früchte faulen oder einfach keine Gurken wachsen wollen. Keine Sorge, ich kenne das Gefühl! Ich habe selbst schon einige Gurken-Krisen erlebt und möchte euch heute meine bewährten Methoden zeigen, wie ihr Ernteausfälle beheben und eure Gurkenernte doch noch retten könnt.
Ursachenforschung: Warum wachsen meine Gurken nicht?
Bevor wir mit der Reparatur beginnen, müssen wir erstmal den Übeltäter finden. Gurken sind zwar relativ pflegeleicht, aber sie haben auch ihre Ansprüche. Hier sind die häufigsten Gründe für Ernteausfälle:
* Schlechte Bestäubung: Gurken sind auf Insektenbestäubung angewiesen. Wenn es zu wenig Bienen und Hummeln gibt, oder das Wetter schlecht ist, kann es zu unbefruchteten Blüten kommen, die dann abfallen.
* Falsche Bewässerung: Gurken brauchen regelmäßige und ausreichende Bewässerung, besonders während der Fruchtbildung. Zu wenig Wasser führt zu Stress und geringem Ertrag. Aber auch Staunässe ist schädlich und kann zu Wurzelfäule führen.
* Nährstoffmangel: Gurken sind Starkzehrer und benötigen ausreichend Nährstoffe, insbesondere Stickstoff, Phosphor und Kalium. Ein Mangel kann zu gelben Blättern, schwachem Wachstum und wenigen Früchten führen.
* Krankheiten und Schädlinge: Gurken sind anfällig für verschiedene Krankheiten wie Mehltau, Gurkenmosaikvirus oder Wurzelfäule. Auch Schädlinge wie Blattläuse, Spinnmilben oder Schnecken können die Pflanzen schädigen und den Ertrag mindern.
* Falscher Standort: Gurken brauchen einen sonnigen Standort mit mindestens 6 Stunden Sonne pro Tag. Ein zu schattiger Standort führt zu schwachem Wachstum und geringem Ertrag.
* Bodenprobleme: Gurken bevorzugen einen lockeren, humusreichen und gut drainierten Boden. Ein zu schwerer oder verdichteter Boden kann die Wurzelentwicklung behindern und zu Problemen führen.
* Temperatur: Gurken sind wärmeliebend und vertragen keine Temperaturen unter 10°C. Kälte kann das Wachstum hemmen und zu Ernteausfällen führen.
Diagnose: Was ist das Problem mit meinen Gurken?
Um das Problem zu identifizieren, solltet ihr eure Gurkenpflanzen genau unter die Lupe nehmen. Achtet auf folgende Anzeichen:
* Blätter: Sind die Blätter gelb, braun, fleckig oder welk? Gibt es Löcher oder Fraßspuren?
* Stängel: Sind die Stängel weich, faulig oder verfärbt?
* Früchte: Sind die Früchte verformt, faulig, gelb oder wachsen sie nicht richtig? Fallen Blüten ab?
* Boden: Ist der Boden zu trocken oder zu feucht? Gibt es Anzeichen von Schädlingen oder Krankheiten?
Notiert euch alle Auffälligkeiten, um die Ursache des Problems besser eingrenzen zu können.
Erste Hilfe für Gurken: Sofortmaßnahmen bei Ernteausfällen
Sobald ihr eine Idee habt, was das Problem sein könnte, könnt ihr mit den Sofortmaßnahmen beginnen. Hier sind einige Tipps, die in vielen Fällen helfen:
1. Bewässerung anpassen: Überprüft die Bodenfeuchtigkeit und passt die Bewässerung entsprechend an. Gießt regelmäßig, aber vermeidet Staunässe. Am besten gießt ihr morgens, damit die Blätter über den Tag abtrocknen können.
2. Düngen: Wenn ihr einen Nährstoffmangel vermutet, könnt ihr eure Gurken mit einem organischen Dünger wie Kompost, Hornspäne oder Brennnesseljauche düngen. Achtet darauf, einen Dünger zu verwenden, der speziell für Gemüse geeignet ist.
3. Schädlinge bekämpfen: Wenn ihr Schädlinge entdeckt, solltet ihr diese so schnell wie möglich bekämpfen. Es gibt verschiedene biologische Mittel gegen Blattläuse, Spinnmilben und Co. Bei Schnecken helfen Schneckenkorn oder Schneckenzäune.
4. Krankheiten behandeln: Wenn eure Gurken von einer Krankheit befallen sind, solltet ihr die befallenen Blätter und Früchte entfernen und die Pflanzen mit einem geeigneten Fungizid behandeln. Achtet darauf, ein Mittel zu verwenden, das für den ökologischen Anbau zugelassen ist.
5. Bestäubung verbessern: Um die Bestäubung zu verbessern, könnt ihr die Blüten selbst bestäuben. Nehmt dazu einen kleinen Pinsel und übertragt den Pollen von den männlichen auf die weiblichen Blüten. Männliche Blüten haben einen dünnen Stiel, weibliche Blüten haben einen kleinen Fruchtansatz unterhalb der Blüte.
6. Standort optimieren: Wenn eure Gurken zu schattig stehen, könnt ihr sie eventuell umpflanzen oder den Schatten reduzieren, indem ihr Äste von Bäumen oder Sträuchern entfernt.
7. Boden verbessern: Wenn der Boden zu schwer oder verdichtet ist, könnt ihr ihn mit Kompost, Sand oder Humus auflockern.
Detaillierte Anleitungen für spezifische Probleme
Hier sind detaillierte Anleitungen für einige der häufigsten Probleme bei Gurken:
Mehltau bekämpfen
Mehltau ist eine Pilzkrankheit, die sich durch einen weißen, mehlartigen Belag auf den Blättern äußert. Er tritt besonders bei feuchtem Wetter auf.
1. Befallene Blätter entfernen: Entfernt alle befallenen Blätter und entsorgt sie im Hausmüll (nicht auf dem Kompost!).
2. Pflanzen stärken: Stärkt eure Pflanzen mit einem Ackerschachtelhalm-Sud. Ackerschachtelhalm enthält Kieselsäure, die die Pflanzen widerstandsfähiger gegen Pilzkrankheiten macht.
3. Fungizid verwenden: Bei starkem Befall könnt ihr ein Fungizid verwenden, das für den ökologischen Anbau zugelassen ist. Achtet darauf, die Anweisungen des Herstellers genau zu befolgen.
4. Vorbeugung: Um Mehltau vorzubeugen, solltet ihr für eine gute Belüftung der Pflanzen sorgen und sie nicht zu dicht pflanzen. Gießt die Pflanzen nur von unten, damit die Blätter nicht nass werden.
Blattläuse bekämpfen
Blattläuse sind kleine, saugende Insekten, die sich an den Blättern und Stängeln der Gurkenpflanzen ansiedeln. Sie können das Wachstum hemmen und Krankheiten übertragen.
1. Blattläuse abspritzen: Spritzt die Blattläuse mit einem kräftigen Wasserstrahl ab. Wiederholt dies mehrmals.
2. Nützlinge fördern: Fördert Nützlinge wie Marienkäfer, Florfliegen und Schwebfliegen, die Blattläuse fressen. Ihr könnt Nützlingshotels aufstellen oder Nützlinge im Fachhandel kaufen.
3. Schmierseifenlösung: Besprüht die Pflanzen mit einer Schmierseifenlösung. Löst dazu 1 Esslöffel Schmierseife in 1 Liter Wasser auf und sprüht die Pflanzen damit ein.
4. Neemöl: Bei starkem Befall könnt ihr Neemöl verwenden. Neemöl ist ein natürliches Insektizid, das aus den Samen des Neembaums gewonnen wird.
Gurkenmosaikvirus
Das Gurkenmosaikvirus ist eine Viruserkrankung, die sich durch gelbe Flecken und mosaikartige Muster auf den Blättern äußert. Die Früchte können verformt sein und einen bitteren Geschmack haben.
1. Befallene Pflanzen entfernen: Es gibt keine Heilung für das Gurkenmosaikvirus. Entfernt die befallenen Pflanzen so schnell wie möglich und entsorgt sie im Hausmüll.
2. Vorbeugung: Um das Gurkenmosaikvirus vorzubeugen, solltet ihr auf eine gute Hygiene achten. Reinigt eure Gartengeräte regelmäßig und vermeidet es, Tabak zu rauchen, während ihr mit den Pflanzen arbeitet, da Tabak das Virus übertragen kann. Verwendet virusresistente Sorten.
Wurzelfäule
Wurzelfäule ist eine Pilzkrankheit, die die Wurzeln der Gurkenpflanzen befällt. Sie tritt besonders bei Staunässe auf.
1.
Conclusion
So, there you have it! Transforming your cucumber crop failure into a thriving garden of delicious possibilities is not only achievable, but surprisingly simple. We’ve walked through the steps, highlighted the key considerations, and armed you with the knowledge to turn what might seem like a gardening disaster into a resounding success.
Why is this DIY trick a must-try? Because it empowers you to take control. Instead of surrendering to the initial setback, you’re actively problem-solving, learning valuable lessons about your garden’s ecosystem, and ultimately, becoming a more resilient and resourceful gardener. It’s about more than just salvaging cucumbers; it’s about fostering a deeper connection with your plants and understanding their needs. Plus, let’s be honest, there’s a certain satisfaction in defying expectations and proving that even a seemingly lost cause can be resurrected.
But the beauty of this approach lies in its adaptability. Don’t be afraid to experiment! Perhaps you want to try a different type of companion planting. Instead of marigolds, maybe basil or nasturtiums will work better in your specific environment. Or, if you suspect a nutrient deficiency is at play, consider amending your soil with different types of organic matter, like compost tea or worm castings. The key is to observe your plants closely and adjust your strategy accordingly.
Consider these variations to further enhance your efforts:
* Grafting: If you have a particularly hardy rootstock, consider grafting your cucumber scion onto it. This can provide increased disease resistance and vigor.
* Hydroponics: For a completely different approach, explore hydroponic cucumber cultivation. This method allows for precise control over nutrient delivery and can bypass many soil-borne issues.
* Vertical Gardening: Maximize your space and improve air circulation by training your cucumber vines to grow vertically on trellises or netting.
Ultimately, the success of this DIY trick hinges on your willingness to learn, adapt, and persevere. Don’t be discouraged if you don’t see immediate results. Gardening is a journey, not a destination. Each challenge is an opportunity to grow, both literally and figuratively.
We are confident that by implementing these strategies, you can overcome your cucumber crop failure and enjoy a bountiful harvest. But more importantly, we encourage you to share your experiences with us! Let us know what worked for you, what challenges you faced, and any variations you tried. Your insights can help other gardeners facing similar situations and contribute to a collective body of knowledge that benefits everyone. So, get out there, get your hands dirty, and transform that cucumber crop failure into a testament to your gardening prowess! We can’t wait to hear your success stories!
Frequently Asked Questions (FAQ)
Q: My cucumber plants are wilting despite regular watering. What could be the problem?
A: Wilting, even with adequate watering, can indicate several issues. First, check for signs of fungal diseases like Fusarium wilt or Verticillium wilt. These diseases block the plant’s vascular system, preventing water uptake. If you suspect a fungal disease, remove the affected plants immediately to prevent further spread and consider soil solarization or amending the soil with beneficial microbes before replanting. Another possibility is root rot, which is often caused by overwatering or poorly draining soil. Ensure your soil is well-draining and avoid overwatering. Finally, check for pests like cucumber beetles or squash vine borers, which can damage the plant’s roots or stems, leading to wilting.
Q: How can I improve soil drainage for my cucumber plants?
A: Improving soil drainage is crucial for healthy cucumber growth. Start by incorporating organic matter like compost, well-rotted manure, or peat moss into the soil. These materials improve soil structure and create air pockets, allowing water to drain more easily. If you have heavy clay soil, consider adding sand or perlite to further improve drainage. Raised beds are also an excellent option for improving drainage, as they elevate the plants above the surrounding soil. Avoid compacting the soil by walking on it excessively, and consider using a garden fork to aerate the soil periodically.
Q: What are the best companion plants for cucumbers to prevent future crop failures?
A: Companion planting can be a powerful tool for preventing cucumber crop failures. Marigolds are excellent companions as they repel nematodes and other soil pests. Dill attracts beneficial insects like ladybugs and lacewings, which prey on aphids and other cucumber pests. Nasturtiums act as a trap crop, attracting aphids away from your cucumber plants. Radishes can help deter cucumber beetles. Additionally, planting legumes like beans or peas near your cucumbers can help fix nitrogen in the soil, providing a natural source of fertilizer. Avoid planting cucumbers near aromatic herbs like sage, as they can inhibit cucumber growth.
Q: How often should I fertilize my cucumber plants, and what type of fertilizer should I use?
A: Cucumber plants are heavy feeders and require regular fertilization. Start by amending your soil with compost or well-rotted manure before planting. Once the plants begin to produce flowers, fertilize them every two to three weeks with a balanced fertilizer (e.g., 10-10-10) or a fertilizer specifically formulated for vegetables. You can also use organic fertilizers like fish emulsion or seaweed extract. Avoid over-fertilizing, as this can lead to excessive foliage growth at the expense of fruit production. Monitor your plants for signs of nutrient deficiencies, such as yellowing leaves or stunted growth, and adjust your fertilization schedule accordingly.
Q: My cucumbers are developing blossom end rot. What causes this, and how can I prevent it?
A: Blossom end rot is a common problem in cucumbers, characterized by a dark, sunken lesion at the blossom end of the fruit. It’s primarily caused by a calcium deficiency, which is often due to inconsistent watering or poor calcium uptake by the plant. To prevent blossom end rot, ensure your soil is well-draining and consistently moist. Avoid allowing the soil to dry out completely between waterings. Amend your soil with calcium-rich materials like bone meal or crushed eggshells before planting. You can also apply a foliar spray of calcium chloride to the plants, following the instructions on the product label. Avoid over-fertilizing with nitrogen, as this can interfere with calcium uptake.
Q: How can I protect my cucumber plants from pests like cucumber beetles and squash vine borers?
A: Protecting your cucumber plants from pests is essential for a successful harvest. Row covers can provide a physical barrier against cucumber beetles and squash vine borers, especially during the early stages of growth. Handpicking pests off the plants is also an effective method, particularly for cucumber beetles. Encourage beneficial insects like ladybugs and lacewings by planting dill, fennel, and other flowering herbs nearby. Use insecticidal soap or neem oil to control infestations of aphids, spider mites, and other soft-bodied pests. For squash vine borers, wrap the base of the cucumber stems with aluminum foil or netting to prevent the borers from laying their eggs.
Q: What are some signs of common cucumber diseases, and how can I treat them?
A: Cucumber plants are susceptible to several diseases, including powdery mildew, downy mildew, and anthracnose. Powdery mildew appears as a white, powdery coating on the leaves, while downy mildew causes yellow spots on the upper surface of the leaves and a grayish-purple mold on the underside. Anthracnose causes sunken, water-soaked lesions on the leaves, stems, and fruits. To prevent these diseases, ensure good air circulation around your plants, avoid overhead watering, and remove any infected leaves or plants immediately. Apply a fungicide specifically formulated for cucumbers, following the instructions on the product label. Consider using resistant cucumber varieties to minimize the risk of disease.
Q: How do I know when my cucumbers are ready to harvest?
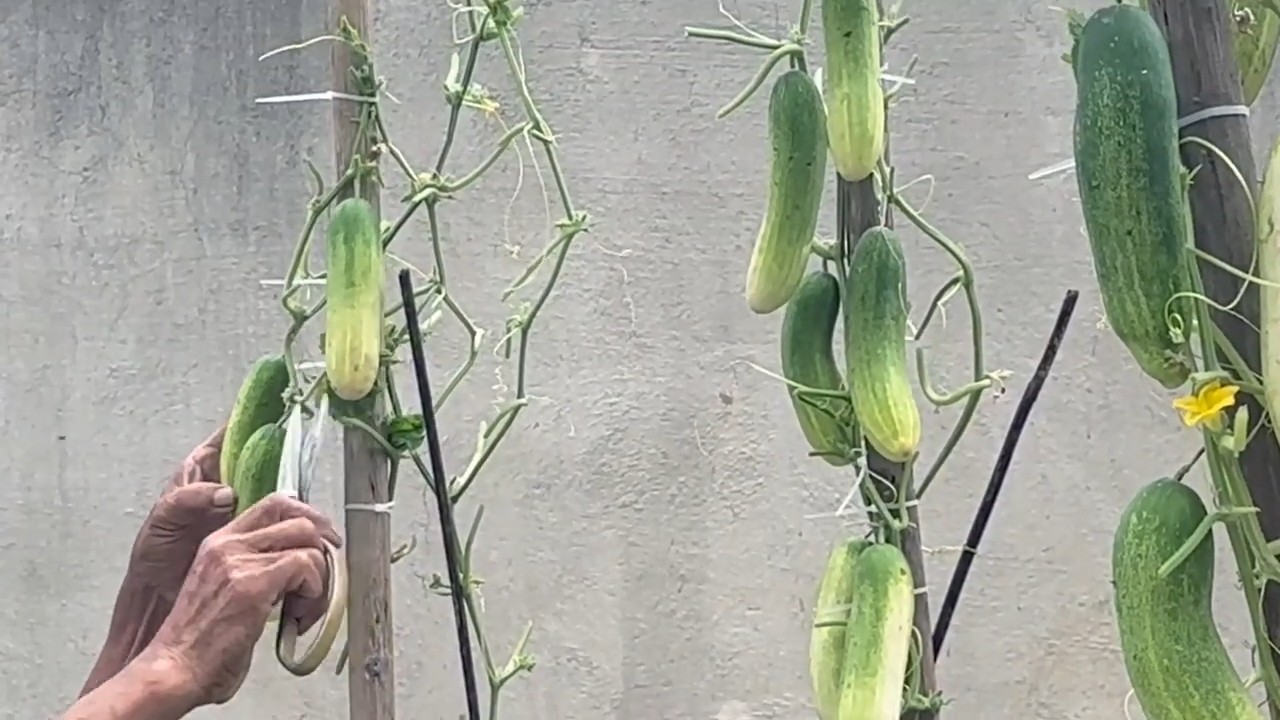
A: The ideal time to harvest cucumbers depends on the variety and your personal preference. Generally, cucumbers are ready to harvest when they are firm, green, and have reached the desired size for their variety. Overripe cucumbers will turn yellow or orange and become seedy and bitter. Harvest cucumbers regularly to encourage continued production. Use a sharp knife or pruning shears to cut the cucumbers from the vine, leaving a short stem attached. Handle the cucumbers gently to avoid bruising.
Leave a Comment